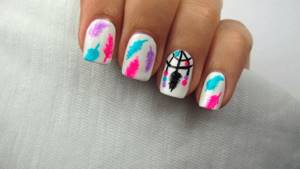
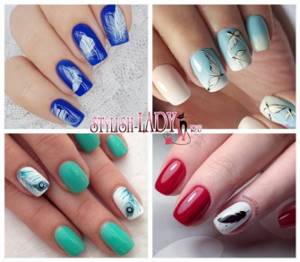
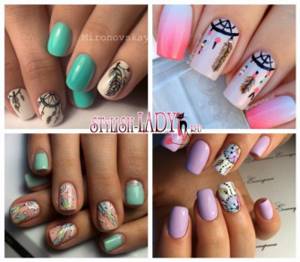
Let's talk about a very impressive and stylish design - a manicure with the image of a dream catcher. This attribute has become very popular over the past few years; they are used to decorate themed rooms, and the print is used to decorate clothes, accessories, and backpacks. This is a completely new and unusual design that will demonstrate to the world that you keep up with the times and are an extraordinary person. Let's consider the basic ideas of application and technique for performing this original drawing.
Peculiarities
Let's figure out what a dream catcher is? This is an Indian talisman that filters dreams and does not allow living spirits and other entities into the world. Bright, good thoughts and dreams pass through small holes, bad ones get entangled in the web. Everything bad and negative turns to dust in the morning, a person wakes up joyful and inspired. The image with a dream catcher belongs to the ethnic, boho style. The design turns out to be very original, unusual, beautiful. If the color scheme is harmoniously and correctly chosen, the manicure will be appropriate at parties, for everyday wear and at luxurious celebrations.
Images may be different, differ in appearance, manner and style of execution. New elements can be added, such as feathers or cobwebs, or something new can be introduced. The color scheme can be very diverse: monochrome or multi-colored, which gives a huge advantage in choosing an everyday and formal look. But every girl should remember that in this technique the dosage of accents and design is very important. To add expressiveness to your manicure, leave the emphasis on two or one ring finger. Do you really want to decorate a large number of nails? Consider lightening the pattern itself. If everything is harmonious, the manicure will emphasize your elegance even in everyday wear.
Form
Indian themes are always something unusual and extraordinary. The approach to applying such a manicure should be appropriate: the nails should be of medium length, the design should be thought out to the smallest detail, and the color scheme should be suitable for any look. On short nails it will not be possible to fully reveal the beauty of the pattern. Some girls draw only a small part of a fragment or a very small pattern. Another option is to do it on two nail plates at the same time, but this does not always look advantageous and beautiful.
Long nails give much more room for creativity, but only if they are neatly shaped. Too sharp ends are inappropriate; it is better to give them a more rounded appearance. Any technique is appropriate on a beautiful elongated nail plate: stamping, hand painting, sliders (transfers) or alternative modern designs.
You need to carefully approach the choice of material for applying manicure. For example, matte and glossy varnishes are considered the best base - on them the image looks very clear and does not blur. Types of varnishes that can be used for the base: mirror, with a craquelure effect, magnetic, cat's eye. They are not suitable for decorating and making the drawing itself. Neon types (which glow in the dark) would also be inappropriate.
Design options
Now let’s take a closer look at several specific stylish dreamcatcher manicure options for different nail lengths.
Feather
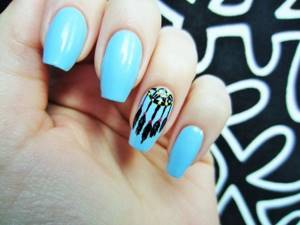
In this design option, you can depict a cobweb on one nail, and decorate several others with the contours of a feather.

A multi-colored feather can be drawn as follows: take a flat, wide brush, apply a range of different colors to it and draw it from the center of the nail to the side and slightly up. Do not forget to dry it in a lamp so that when applying the next layer the colors do not mix.
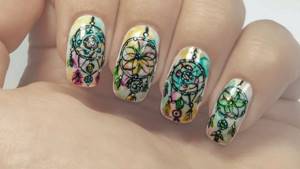
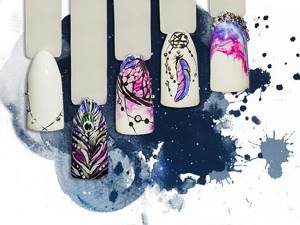
Manicure with stained glass gel polish
This unusual gel polish has a translucent texture. With its help you can create incredibly beautiful drawings.
- Apply the base and main background. In our case, these are white and light lilac shades.
- On nails with white color we will draw catchers. (You can use stamping.)
- Apply several colors of stained glass varnish to a palette or regular foil. We chose the following colors: yellow, green, orange, red, blue and purple.
- We paint the design elements and apply the finishing coat. Don't forget to dry it in a lamp at every stage.
Note: A similar analogue of stained glass gel polish in a number of respects can be prepared independently by mixing the top coat with regular gel polish.
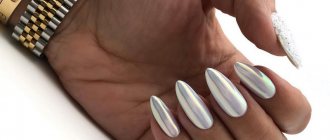
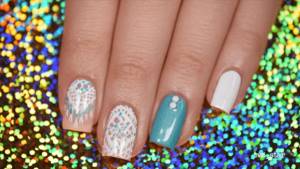
Option for long nails
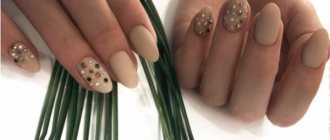
On long nails, a full-size dream catcher will look most impressive, especially with their almond shape. For large nail plates, skillful painting and detailed drawing with various elements are ideal. Elongated, smooth lines look great on oval-shaped nails. Let's consider an option using stamping, cat's eye gel polish and a magnet.
- Apply base and a layer of gel polish. For the next layer, use cat eye gel polish - it will give your nails a soft shine. Using ordinary magnets, you can additionally create an amazing glare effect of scattered glitter.
- Paint the fingers on which you want to depict the “catcher” with a light beige color. Sand with a buff or apply a matte finish.
- Apply black varnish to the stamping plate with the desired pattern. Use the stamp to transfer it onto your nail.
- Secure with top. (Remember to dry after each coat!)
Dream catcher for short nails
Many people believe that only those with long nails can wear a manicure with a catcher, but this is absolutely not true. This design can be adapted to any size and shape of nails.
It’s not always possible to make a manicure for short nails detailed, but the scope for creativity remains just as wide. You can use any technique to apply the design, but it would be better to abandon the French manicure and moon manicure. Also, do not use a large number of rhinestones. On small nails it is often preferable to draw only individual fragments of the amulet. Slightly careless, abstract options look very impressive on them.
Let's give an example of a simple design made using stamping.
- Apply base and light lilac polish. Lubricate the skin around your finger with liquid film so as not to stain the nail plate.
- Take a sponge and apply several shades of lilac and blue in spots.
- Using light tapping movements, transfer the polish from the sponge to the nail. For color density, apply 2-3 layers of gradient.
- Take stamping plates with dream catcher parts. Choose several suitable patterns. Apply black polish to the desired area of the disc and stamp the design onto your nails.
- Dry and seal with topcoat.
The soft lilac manicure is ready!

Note: For square-shaped nails, geometric options are best suited.
Color solutions
Manicure with the image of a dream catcher is performed in a wide variety of tones of colors. Let's consider the most profitable options for its design:
- blue and its shades;
- white and light shades of gray;
- chocolate and black;
- terracotta, coral;
- yellow, shades of sand.
The combination of pink and lilac, plum and wine, rich turquoise and delicate mint looks very gentle. If you want to add a little contrast, use brown and beige: against a well-chosen background, these two colors will perfectly convey the overall mood of the manicure. A great option for summer are peach, orange, green, pistachio shades. They will charge you with positivity and give their owner a great, bright mood.
To give the effect of lightness and ease, use a palette of pastel colors. The most popular among girls: powder, beige, light yellow, bronze tan, raspberry, marsala, milky. For lovers of cool colors, emerald, violet, and ink are ideal.
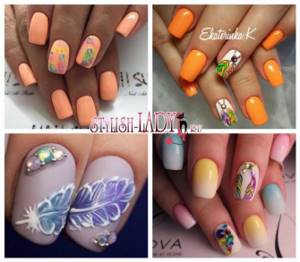
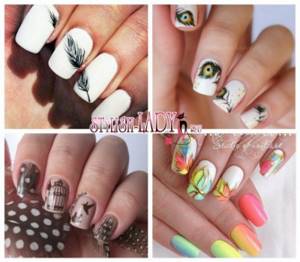
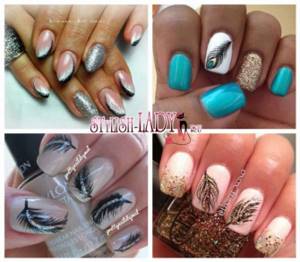
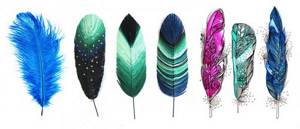
Manicure ideas with feathers on nails
Nowadays manicure with feathers is not widespread (like, for example, the well-known French manicure), but it is firmly in fashion. Looking at photographs of examples of such designs, one can understand that these are far from amateur drawings, but modern stylistic techniques. They continue to develop, improve and acquire unique features.

Down with prohibitions!
If you try, you can even depict the fabulous Firebird on your nails. And it doesn’t have to be plumage shining with all the colors of the rainbow. It is quite possible to create a calm manicure in nude shades, which will allow you to remain within the discreet style of a modern girl. But creative people will also find how to express themselves in a special way with the help of this type of nail art.
Fortunately, today you don’t even have to be able to draw beautifully. You can choose from a wide range of feather-themed sliders. And now a widespread technique is to place soft artificial feathers on the nails. In combination with rhinestones of different colors, they look simply luxurious! From a huge selection of options, a girl with any taste will be able to choose a manicure with a feather design that will perfectly fit into her lifestyle and style.
Manicure with feathers: pros and cons
Like any other nail art, this has its advantages and disadvantages. Let's look at them.
- originality;
- uniqueness of the image;
- incredible beauty.
All these advantages do not require explanation and speak for themselves, because... modern manicure and should not have any other properties. And these points are already enough to choose this design.
- Carrying out such a design yourself is not an easy task;
- manicure does not last very long;
- It takes artistic skills to achieve a truly realistic image.
From minimalism to chic
With the help of feather decor, using various techniques and a rich palette, you can create a design for literally any occasion: from an ordinary business day to a Brazilian carnival. Let's look at the most stylish and popular solutions.
- Fantasies with rhinestones
If you like to combine textures in one design, pay attention to the options with rhinestones. Decorate a couple of nails with artificial feathers, cover them with a finish, and then you can safely fantasize with shining stones. Don’t forget about the combination of different colors: if you use brown feathers and a beige background, you can make this design more elegant with the help of emerald rhinestones framed in gold.
Today, feather design is not yet so popular and widespread, so it is not always possible to purchase special artificial feathers. In this case, you can buy good old sliders or try to draw the feathers with a brush yourself, and only then decorate them with stones. This way you will be able to give your nails a truly oriental chic.
- Hint of continuation
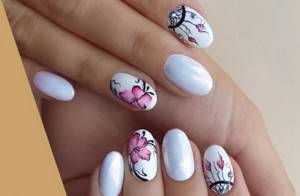
A manicure looks very modern and interesting, in which not individual feathers are painted on each nail, but which embodies a symbolic picture. For example, you can depict with black varnish on a white background a feather and birds, as if separating from it.
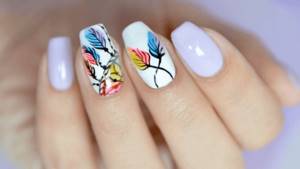
Another option is to draw elements of one long fluffy feather on several nails, which together are combined into a complete picture.
- Experiments with color
It is not always worth overloading the design with numerous details. Neat, thin feathers carefully drawn with a brush often look very elegant and advantageous. The whole secret is what background you choose for nail art.
A surprisingly elegant result can be achieved if you paint a black background with small golden feathers and fluffs. The main thing here is not to overdo it; two feathers on each nail are enough. The result will look both fabulous and stylishly grown-up.
If you make drawings on a white background, they will refer us to girlish innocence and nobility. The step-by-step technique using feathers can be slightly modified.
Cover each nail with white polish, and stick the feather only on the nail of the ring finger. The choice of shades is very rich, so you can choose any one and duplicate it on other nails, decorating them with rhinestones of the same color. For example, pink feathers and rhinestones can be suitable for both festive and everyday designs. You can draw translucent delicate feathers yourself or seek help from a professional. They will look very romantic and easy as a summer option for a young girl. You can also safely use stickers with images of feathers.
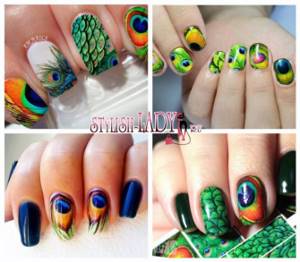
The bird with the most striking plumage is the peacock, and it is the chic peacock feather that most beauties choose for their nail art. It looks especially advantageous against a green background. Try painting all your nails with emerald-colored polish and your ring nail with light green. Wait until all the layers dry in the lamp, and you can start creating. Take a brush and emerald polish and apply sketchy fluffy grooves to the nail of the ring finger, and decorate the top of the feather with rings to achieve a characteristic peacock pattern. To add color, use blue, gold and light green. The drawing is ready!
- Chic and shine
What other ways are there to diversify your nail design? Of course, glitter! With the help of shimmer and glitter, you can make all the colors of your manicure sparkle in a new way. Glitter can be used to cover both the pattern itself, making it richer, and the background free from the pattern.
- Feather accent
The peacock pattern is currently the most popular among modern masters. Girls who are not afraid of an original manicure and bright colors can decorate their nails with feathers in various ways.
You can decorate only 1 or 2 nails with feathers, covering the rest with a varnish of a neutral shade, or vice versa - bright and rich, emphasizing the beauty of the feathers.
Another interesting option is the “macro photography” effect, in which an enlarged feather element is depicted on each nail.
A luxurious feather, playing with all the colors of the rainbow, can be depicted in negative space. The contrast with the unpainted nail plate looks very bright and modern.
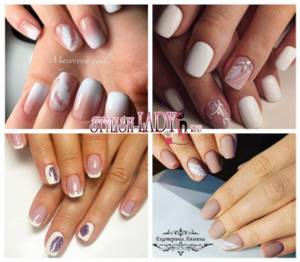
- Soft nude manicure
This design option has exactly the opposite goals. It is suitable for girls who associate feathers with something airy and delicate, and not at all with the carnival brightness of colors. Most often, this solution is made in beige-brown, the most natural tones.
With a feather fixed between layers of gel polish, you can decorate only the ring finger, and cover the rest of the nails with beige varnish without decorative elements. Or you can choose a more classic option, covering four nails with a biscuit color and one with a darker “café au lait.” Decorate them with pictures of little feathers on top and the result will look very sophisticated.
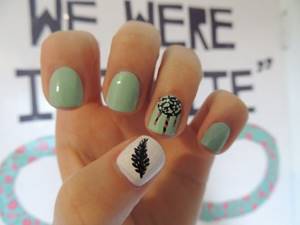
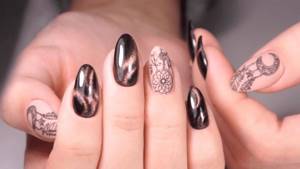
- dream Catcher
Using natural feathers, Indians have long made a talisman called a “dream catcher.” By hanging it above your bed, you can avoid the appearance of evil spirits that can cause harm in your sleep. As the years passed, this ancient amulet turned into an element of style that found its echo in nail design.
You can paint it on your nails using a thin brush or add sliders. Literally any colors of varnish can be used – from shades of white to black. The result will look very fresh and original, especially on the nails of young girls. It’s worth a try: perhaps the amulet will bring you good luck, and not only drive away bad dreams.
It’s safe to say that the feather design will eventually gain a huge number of fans, because thanks to the huge selection of options, it will suit anyone. It diversifies the business style, gives the luxury of oriental beauties, and makes the image discreet and romantic. This manicure is definitely worth trying, because you will definitely find an option that suits you and will be able to change it as easily as your own mood.
Technicians
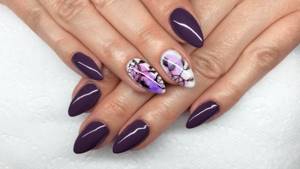
The technique can be very diverse - the “dream catcher” design can truly be called a universal manicure. The classic version is the most common - the nails are painted monochrome, an outline is drawn on one or several, and the details of the image are drawn. The coating can be contrasting; the design is used to decorate such nails.
It’s very interesting how a French manicure looks like a base for such a manicure. This can be either a familiar conservative design or an inverted lunar manicure. An ethnic-style manicure on nails with a gradient or ombre looks incredibly beautiful. It would be an unusual idea to use a rub for decoration - it is not necessary to rub the powder into the nails with the image applied. Focus on the rest, highlight them - one or more. But it’s better not to experiment with sparkles - they can look sloppy on the coating.
If you want to dilute the design with glitter, use it spotwise - for example, decorate beads or cobwebs. You can use rhinestones or small stones for these purposes.
What to remember
Let's summarize:
- A manicure with dream catchers is an ethnic design, but with the right combination of colors it will suit almost any dress code.
- You can depict the amulet in detail or a little casually - as you wish. This nail design option is surprisingly diverse: you can come up with a huge variety of your own unique variations.
- For the “catcher” it is preferable to use light, soft colors.
- When creating your own dream catcher design, you can show off your artistic talent, or you can simplify the process by using stamping, stencils or stickers.
- No matter how long your nails are, it is important to choose the right design.
We invite you to watch videos in which nail artists show in detail how to draw a dream catcher on your nails.
Have you painted an Indian amulet on your nails? Share your experience in the comments!
Design
Decide which nails you will decorate. It can be only one nameless or middle one, perhaps two at once. Use different techniques and colors that suit you best. Artistic painting is considered a traditional win-win option; the design can be either monochromatic or colored. Applying an image manually is very convenient, because you can adjust to the width and length of the nail plate. To make your dream catcher look interesting and unusual, draw it with feathers fluttering in the wind - the picture will turn out bright and dynamic.
Water-based transfer stickers or well-known stamping are an excellent alternative to hand-painting, which not every girl can do. But here you need to be careful - the pattern must clearly correspond to the nail and its parameters. A good solution would be to accent the decor with small rhinestones or stones or beads. You can place them as you please: on a spider’s web, on feathers, or on the dream catcher itself. If you have large rhinestones, replace them with small bouillons - miniature beads that successfully complement any pattern.
It looks very unusual to apply a pattern using stained glass technique, in which all elements are painted with very bright colors of the palette. All you need for this is a drawing made in one color (it doesn’t matter whether it’s stamping or a hand-drawn pattern), as well as acrylic paints. The stained glass effect looks very unusual and beautiful; you can fill the voids with a thin brush - the result will definitely please you!
General recommendations for implementation
Painting nails is a creative process. Therefore, there cannot be clear, consistent instructions on how to correctly implement a particular design option. We will list just a few basic technical features that are worth paying attention to when creating a “Dream Catcher” manicure.
Base layer
We will assume that we have already performed a standard hygienic manicure. Now we need to make a background on which our drawing will be placed. The main layer can be decorated with a solid color or its various shades, as well as diluted with some original elements. And it’s not at all necessary to do the same thing on all fingers!
A little about the intricacies of its design:
- Palette. Light, delicate shades are best suited for this manicure: blue, white, pinkish, lilac, peach. In this case, artists do not recommend using bright, saturated colors for the background.
- Gradient. You can choose two compatible colors and make smooth transitions on your nails using an airbrush or airpuffing.
- Different shades. Use different shades on different fingers - the main thing is that they combine harmoniously.
- Abstraction. An unusual magical background can be created using streaks of bright colors. To do this, you need to apply a small amount of gel polish to the wet base and blow on it, or blend it with a brush. Then wait a little and you will see how a beautiful weightless haze seems to spread over the nail plate. A combination of several colors will be even more impressive.
Background decoration
In combination with the “catcher”, you can use various, including classic, types of manicure, as well as various decorative elements on the nails:
- French. French manicure goes perfectly with light shades and will look very harmonious with the “Dreamcatcher” pattern. The design is delicate and light.
- Lunar manicure. This is like a reverse French - an inverted smile is applied to the bottom of the nail. This option is suitable for more saturated colors and will create a mystical, mysterious effect.
- Glitter. For a bright, contrasting manicure, any glitter is suitable. For the “dream catcher”, nail artists use a variety of options. For example, you can tightly decorate individual nails with them, or you can create an overall light glitter background. Both painting individual parts of the “catcher” with glitter and decorating the nail plate with various shiny elements, such as stripes, look impressive. For light shades it is better to use silver glitter or other delicate and soft colors.
- Rhinestones. Light specks of rhinestones are more suitable for manicure in pastel colors, and layers of broth are more suitable for brighter shades.
- Rubbing. If you don't want too much brightness, use pearl rub. Intuition will tell you whether to place it only on the nails with the catcher or, conversely, to touch everything except it.
- Volumetric drops will make your manicure even more airy and light. For example, a few tiny droplets on the bottom of the nail will look very nice.
Note: Gold glitter goes well with black and white colors. You will get a bright and at the same time harmonious manicure.
These are just some of the possible options for decorating your manicure. Anyone can create their own unique nail design with a dream catcher - you just need to give free rein to your imagination.
What to consider?
Be sure to take into account your style: girls who visit the office every day need to correctly combine the color scheme for applying the design. Of course, if you take into account the ethnicity of the image, it is ideal to apply such a manicure if you have the appropriate look: a hairstyle with braids, “multi-layered” clothes made from natural fabrics. But modern life is in full swing, so such strict rules have not applied to fashionistas for a long time. A manicure with a dream catcher fits harmoniously into an urban look with jeans and a T-shirt.
Make your nails not only original, but also stylish: choose the color palette of the design to match your favorite clothing tone, which is most often seen in your wardrobe. If you have chosen an unusual shade, try to complement it with some element: an accessory, a bag, a print on clothes to match. Showcase your taste, but unobtrusively - let the dream catcher attract attention, but not take it completely. Give preference to delicate nude or pastel colors, and make the silhouette of the dream catcher contrasting.
Nail design “Dreamcatcher”. From simple to complex
A dream catcher is a bright, attractive image that you want to embody on your nails. But when trying to draw it, many people never get an interesting design. Why? It is an incredibly difficult task to fit the entire design on one nail: there are too many elements in the dream catcher, and the thickness of the line, even in the hands of a master, has its limitations. The drawing often turns out to be disproportionate, the lines are excessively thick in relation to the drawing as a whole.
How to avoid this?
Don't treat your nail as a separate canvas, but rather a series of works. Fragmentation, in this case, will allow you to maintain a balance between your capabilities and the integrity of the entire design. So on one of the nails there may be a feather, on another there may be strings with beads (broths), on the third there will be a close-up part of the hoop, and somewhere the catcher will be a secondary, small element.
The article describes general principles, using which even a beginner can create a bright image.
You should always start with something simple, or better yet something interesting!
Let's play with watercolors and create abstract patterns. This will require gel polishes of rich, bright colors and a top coat; in our design we used the Top Coat for Gel Polish from UNO. You can apply a lot of topcoat, this is what will allow the gel polishes to flow freely.
Experiment with how to get divorces. What happens if you apply a little gel polish to a tip with an uncured topcoat and blow on it? What if you rotate it with a tip? You can simply blend with a brush and give the colors time to blend, spreading out like a haze.
When you realize that you have achieved the desired effect, send it to the lamp. If a lot of topcoat has accumulated on the nail in areas not filled with color, you can carefully remove it with a brush before polymerization. This way the surface will be as smooth as possible and will not become lumpy.
Now we move on to laying out the broths. To do this you will need adhesive gel for nail accessories. Place a drop of glue gel in a container or on a palette and mix with the broths. The gel will envelop the broths, making it easier to apply them to the nail - they will stick to it without unnecessary tricks. To consolidate the result, you should increase the polymerization time to a minute - this way you will be sure that the entire gel has dried. Don’t be afraid to place the broths one on top of the other, this will make the “wreath” (or crown) look even more rich.
Many people have difficulty creating a feather because when they try to stylize this object, they end up with a leaf instead of a feather. To avoid this, take a wide, flat brush, put several colors on it at once, and simply draw lines from the center to the side. But there is a nuance here: the hairs of the feather grow not just sideways, but slightly upward (toward the tip), and it is this movement of the brush that will allow you to quickly recreate the structure of the feather, it will turn out to be as believable as possible.
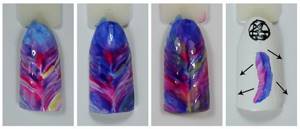
Apply gel polishes in layers, polymerizing each layer in an Led|UV lamp. Don't try to hit the same spot with your brush. This way the colors will not overlap each other, they will mix, each hair of the brush will leave its own unique mark. By the way, to draw the feather in the design, the same colors of gel polishes were used as for watercolors - both organically and economically!
With flowers you will create a base for the feather. And then decide for yourself exactly how you want to draw it. You can make a stylized “tribal” design, as in our version. To do this, you will need black gel paint, which gives contrasting clear lines, and white paint, so that you can then put dot patterns. Or you can take black gel polish and even dilute it with top coat. This method will allow you to make softer lines, convey light and shade, and draw the axis of the pen.
Lines. Can't get it straight? Be cunning