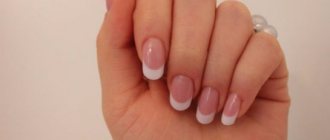
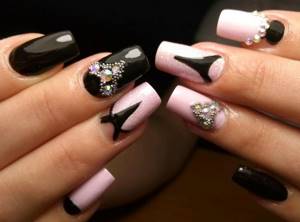
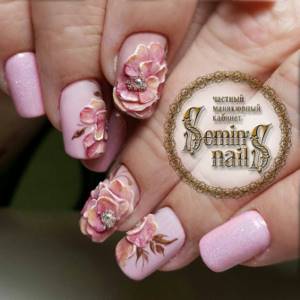
Along with a simple and laconic design, original 3D manicure options are still popular. The design with voluminous decor looks interesting and extraordinary. This is a great option for a special event: a wedding or prom.
In addition, voluminous nail design has become an object of experimentation for young girls who want to see something original and new on their hands. We invite you to plunge into the interesting world of 3D nail design, since the nail industry offers everything possible for this.
Fashionable 3D manicure: what you need for chic nail art
Volumetric manicure offers chic opportunities for decoration. Moreover, you can create an original design yourself, without resorting to the services of a master.
Depending on what kind of manicure you want to do, you will need:
- gel polishes of various shades
- acrylic Powder
- sparkles, glitter, sequins, tips
- voluminous metal figurines
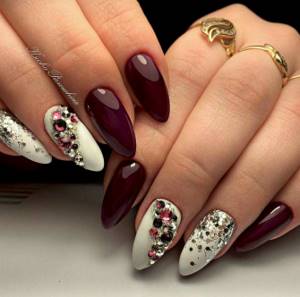
- large rhinestones and cone stones
When creating a wedding design, you cannot do without polymer clay and acrylic. It is difficult to create truly attractive nail art without experience, so on the eve of such an important event it is better to turn to a professional nail artist.
In addition, volumetric design can be done using:
- knitted and fur patterns
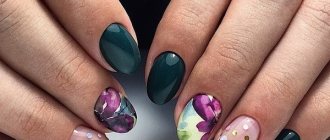
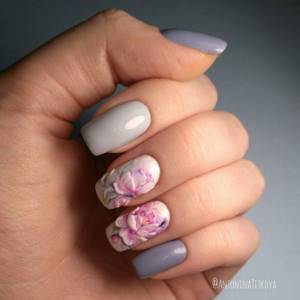
- voluminous floral motifs
- lace and openwork patterns
- beads, eggs, lint, etc.
Stylish 3D manicure using gel
Gel paste allows you to create any volumetric design. The manicure will look attractive, regardless of the shape and length of the nails. The main advantage of gel paste is that it does not spread and holds its given shape perfectly. Thanks to this, you can make a wide variety of patterns, inscriptions and pictures.
Nail art on a matte surface with voluminous gel paste decoration is very popular. After drying the 3D decor in the lamp, you will get an incredibly stylish and beautiful nail design.
It is worth considering that not every master can work with gel paste. The texture, which is pliable at first glance, may look completely unattractive on the nails. If we are talking about a wedding or other important event, it is better not to experiment on your own, but to turn to a professional.
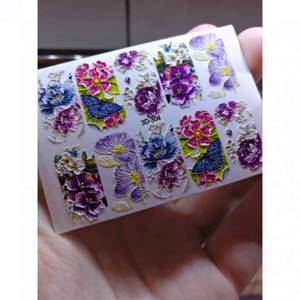
What types of 3D sliders are there?
It is worth noting that 3D sliders are nail stickers, but they are somewhat different from regular sliders in their image. There are several options for 3D sliders.
Types of 3D sliders:
- Ordinary flat stickers, which have a very clear, beautiful and voluminous design. Thanks to the variety of colors, they seem quite voluminous and naturalistic.
- Metallized. They are quite convex and are attached to the nails without the use of water, but because they have an adhesive backing.
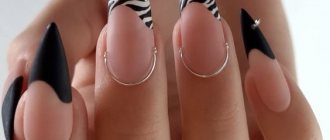
- Geometry on nails loved by clients of manicurists and pedicurists . These are raised stickers that are drawings consisting of certain straight lines.
Recently, the wolf face or the usual geometry on nails in the form of various triangles that combine with each other have become very popular. Using these 3D sliders you can achieve a very beautiful geometric design. They can be used as an independent option, or they can be used to paint over voids, creating more complex manicure options.
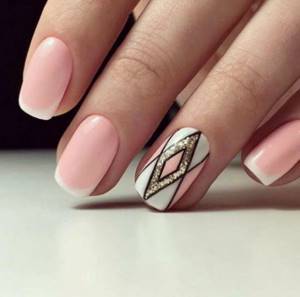
Volume sliders
3D manicure with sliders
Sliders serve as an excellent basis for creating a chic three-dimensional design. The required design has already been applied to the surface of the sticker; all that remains is to draw individual elements with acrylic powder, granulated sugar, gel paste and other 3D decor.
Sliders make it much easier to create three-dimensional decor. Even experienced artists can find it difficult to draw gorgeous flowers and leaves from scratch. To create a 3D manicure with sliders you need:
- stick sliders with a floral or other pattern on your nails. To do this, cut out a piece of the design from the plate, dip it in warm water for a couple of seconds and place it on the nail.
- After the slider has dried, you can begin to decorate with volume. Use thick gel polish, gel paste, acrylic, pile, glitter, etc. for this. It is important that the material does not spread over the surface of the nail. To achieve the desired volume, it is necessary to dry each element in a lamp one by one.
How to use nail stickers
As a rule, sticker sets are accompanied by detailed instructions. Before you start manicure, you should prepare all 10 sliders in advance, adjusting their shape individually to each finger.
The film with the pattern is glued to the base coat, which is applied in a thin layer. If you use shellac instead of regular varnish, the design is guaranteed to last for several weeks.
Using tweezers, carefully separate the sticker from the backing - the film will lie smoother if two or three tiny cuts are made on the sides of each sticker. The glued pattern is smoothed with an orange stick or a regular napkin. The remaining free tip is bent over the edge of the plate and removed with a nail file. The final stage is applying the top coat.
How to cut stickers to fit your nails
To make the manicure look neat, ready-made stickers are matched to each finger - the line at the base of the plate can be trimmed with scissors, and the excess length is removed after gluing the design. You need to adjust the size of each slide before the base is removed - by applying the film directly to the nail plate. Special stencils will help you trim stickers placed on a solid sheet beautifully.
How to apply water decals to nails
Depending on the type of stickers, the technology for their application also differs. So, apply water-based nail stickers as follows:
- in turn, the cuticle is pushed back on each finger, and the plate is given the desired shape;
- Use a wooden stick to remove pieces of skin from the nail and side ridges;
- the surface of the plates is thoroughly polished with a buff;
- then the nail is degreased;
- apply colored or transparent gel polish;
- then the slider of the required size should be separated from the palette with tweezers and immersed in warm water for 30 seconds - this will activate the glue applied to the film;
- stickers are applied to each nail in turn and leveled;
- The top of the design is covered with a top fixative.
Water stickers are very popular among fashionistas, because they are easy to apply, instantly stick, they do not tear or curl, and therefore the design is not deformed. The film fits tightly to the edges of the plate, which ensures not only an aesthetic appearance, but also the durability of the manicure.
Attention! Water stickers are an invaluable find for owners of thin, brittle nails, because their use does not injure the weakened plate.
How to apply 3D stickers on nails
3D nail stickers are distinguished by an unusual relief texture that skillfully imitates sculpting. Their surface is not flat, but voluminous, which makes the manicure original and very effective. What is noteworthy is that voluminous nail stickers most often have a painted background, so there is no need to apply additional varnish.
In general, the procedure for gluing a 3D slider repeats the technology described above, with the only difference being that the top coat is applied only to the free areas. If you cover the entire pattern with topcoat, the volume effect will simply disappear. Accordingly, the finishing layer is not applied to the sliders that cover the entire plate.
How to apply self-adhesive nail stickers
To glue self-adhesive sliders, they should be applied to treated nails, having first removed the protective layer. Next, the film is gently pressed with your finger - here it is important not to move the pattern on the plate. Air bubbles and irregularities are carefully smoothed out with a cotton or wooden swab or a regular paper napkin. The part of the slider protruding from the sides should be carefully trimmed with scissors, and the end of the nail should be filed with a nail file. The manicure is secured with colorless varnish, which is applied to the end of the plate - this way the film will not peel off and the design will last much longer.
A manicure using self-adhesive designs is easy to do at home - with some skill, the result obtained is in no way inferior to a salon design. A huge selection of textures and images allows you to fully express your creative abilities and create a real art masterpiece!
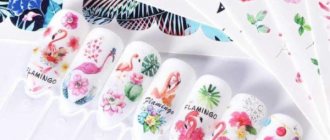
How to use transfer nail stickers
Transfer stickers are produced in the form of the thinnest film with a colored and white paper backing. Transfer sliders, depending on the chosen design, decorate part of the nail or the entire plate.
The technology for applying them to varnish and shellac is slightly different. In both cases, the plate must be treated with an antiseptic, degreased and covered with a base - regular varnish or gel. The ideal background for transfer sliders will be pure white, any nude and pastel shades - this will make the pasted image more contrasting and expressive.
When working with regular varnish, the sticker is glued to a coating that has not yet dried. If shellac is used as a base, the film is securely fixed to a sticky polymer.
Comment! The sticker should not reach the cuticle and skin at the edges of the nail by about a millimeter - this will make the manicure last longer.
As a finishing coat, the varnish is applied in 2 layers, while the shellac should cover the plate with a thin layer, which will harden after drying under a UV lamp.
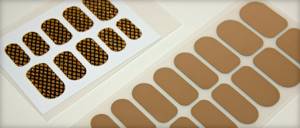
How to glue sliders
Using sliders - stickers on a thick paper base - is a budget-friendly way to create an original nail design at home. It’s not difficult to stick them on – even a beginner can handle simple stickers. An additional bonus is that the adhesive-based sliders thicken the plate, protecting it from fragility and delamination.
Often, masters create nail designs with stickers specifically for gel polish - a durable coating will allow you to enjoy chic nail art for much longer.
Before applying the slider, you should do a standard hygienic manicure: remove the cuticle, give the nails the desired shape and degrease the plate. If the surface is uneven, you can go over your nails several times with a sanding file - this will make the artificial coating perfectly smooth. Next, a layer of colored varnish is applied, the slider along with the paper base is placed in water for 20 seconds, removed with tweezers, the film is separated from the paper and transferred to the finger.
In order for the film with the pattern to lie evenly on the nail, you first need to press it with your finger against the cuticle, then carefully spread it over the entire plate, slightly pulling the slider towards the edge. As a result, the manicure will be smooth and its surface will not be covered with bubbles. You need to apply a transparent fixative on top - your unique bright design is ready!
Chic manicure with broths
Broths are small multi-colored granules that are attached to the surface of the nail using gel polish. This design can hardly be called everyday; the manicure looks completely extraordinary. In addition, the voluminous design with bouillons is impractical in everyday life; it often clings to hair and clothes.
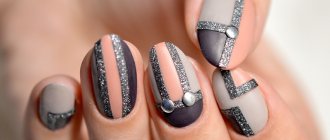
Geometry on nails with 3D sliders: photo
Drawing stickers with geometry

Sliders geometry
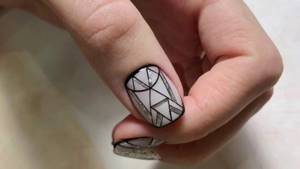
Stickers with drawing Sliders geometry Sliders with drawing Stickers with drawing
Sliders with drawing
Delicate volumetric manicure with acrylic powder
Acrylic powder is an easy way to create a 3D design yourself. All you need to do is coat your nails with gel polish and sprinkle them generously with acrylic powder.
A single-color design with acrylic undoubtedly looks original, but this season the trend is complex nail art with a gradient and various types of jackets. Experiment with shades of acrylic, use several tones at once. This way, a design with acrylic will look much more interesting.
Advice from the experts
Professional nail art artists recommend using a varnish in a contrasting or neutral beige tone as a base for applying stickers. If the design is applied over white varnish, it should be quite beautiful and bright so as not to look faded and blend in with the surface.
For gel polish, stylists recommend buying stickers with interesting photo prints - such stickers are quite dense and, with frequent contact with water, will not last long on a regular surface. But shellac will firmly fix the design, preventing the film from chipping and peeling off.
When gluing photo designs onto shellac, it is important to follow several rules: the base coat is applied in one layer, which only needs to be dried under a lamp for a minute - the gel polish should remain slightly sticky. The slider is placed extremely close to the cuticle, and it is better to level it in the direction from the center to the edges.
When removing the protruding tip at the end of the nail, the file should be held perpendicularly and not at an angle.
Wedding 3D manicure with stucco molding
Working with gel plasticine requires some experience in working with this material. To create the design, gel from popular brands Arnelle, Lady Victory and others is used. Some craftsmen use “liquid stones” to create three-dimensional decor.
Wedding manicure does not tolerate mistakes, so each design element must be carefully verified and correctly positioned on the nail. Even at a wedding, nothing should distract the bride from the celebration, so you should not create overly complex nail art.
When creating a wedding manicure, it is worth considering the image of the bride. Often gloves are used for celebrations, in which a 3D manicure would simply be inappropriate. For such celebrations, use a voluminous design made of thick gel polish in several layers, several rhinestones, and lace decor.
Gel paste and gel plasticine are an ideal solution for a wedding celebration. Choose your own nail design option in advance; improvisation is inappropriate in such an important matter.
How long do nail stickers last?
The lifespan of such a manicure directly depends on the strict implementation of all stages of preparation and application of adhesive stickers and transfer stickers, as well as on the quality of the materials used. An important role is also played by how carefully the housewife treats her nails - this means housework and the use of chemical detergents.
If the film quickly lags behind the plate, it may have been glued to poorly dried gel polish, or the sticker itself was too wet before application. The reason for the fragility of the design may be too thick a coating or poor quality of the slider.
If the design deteriorates due to chips in the finishing sealer, it means that the film did not have time to dry well before applying it, there was no free space left for the top to adhere to the gel polish, or the ends were poorly sealed. The fixer itself may also not be of the best quality, or it is simply not intended for fixing adhesive designs - this is worth finding out before the procedure.
Volume manicure with flock
A manicure with a pile looks very interesting and unusual. Delicate velvety fibers envelop the nails, making the design incredibly cozy and warming. For cold autumn and winter, this nail art is simply irreplaceable. It holds perfectly on nails and looks beautiful in everyday and business looks.
Manicure fibers have many shades that can be used in a single-color nail art or create a complex decor from fibers of different colors.
Volumetric manicure is often used in everyday looks. Most often these are simple nail art with acrylic, “sugar”, sequins and rhinestones. For special occasions, you simply cannot do without gel paste and gel plasticine, which make you feel like a real sculptor.
How to glue mirrors: gold and silver
Mirror stickers in technology do not have any special stages; everything is done according to a standard scenario with heating under a lamp. There are some subtleties when transferring it to the nail - here you need to make sure that the coating is as smooth as possible, and the first time, since any bend, speck under the film or unevenness will look very unsightly on a bright golden or silver surface.
Special attention should be paid to the very beginning of gluing - the plate must be placed at the cuticle, pressed with a finger, and glued to the end of the nail, as if pulling a little, in order to obtain a bubble-free surface.
Video: DIY metallic nail art
Mirror gold stickers on nails have their own nuances when transferring, and in order to avoid basic mistakes and get the best result, we recommend watching this video. Also in it you will find the answer to the question about the complexity of creating such a design and its durability.