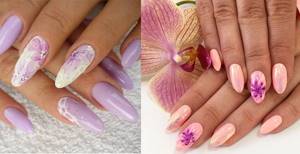
Watercolor design came to the nail industry recently, but the technique was so captivating with its uniqueness that in a short time it gained popularity among lovers of exquisite manicure. Watercolor on nails looks amazing, and you can make a variety of patterns. And the execution is easy.
What is watercolor painting on nails?
Watercolor painting on nails is one of the leading trends in the modern manicure industry. This technique involves the use of gel paint diluted with a top coat, or acrylic paints, or a special gel polish that creates a watery effect, which should be present in a similar technique on the nails.
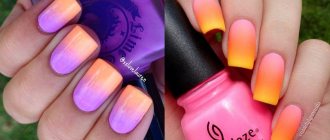
Also, the airiness effect is achieved thanks to soft gradient color transitions. This type of design is not limited by any boundaries. Any desired drawing can be made using the watercolor painting technique. This interesting technique has the ability to turn any nails into real works of art.
Nail repair
If for some reason you have broken 1 nail on which there was a design, you need to correct the entire manicure. There are two ways. If it’s not too short and the design hasn’t deteriorated too much, you can take a rough file, preferably an electric one, and file all the nails to the same length without removing the gel polish. If the design is damaged, you will have to remove and completely redo the manicure. We learned how to paint on gel polish, and now a few words about how to remove it all.
The gel is easily removed with acetone liquid for removing regular nail polish. Acetone, in general, dissolves everything. Just rubbing it with a cotton wool is useless, so you have to put it on the nail, seal it in foil, and hold it for a few minutes. And of course, it won’t come off just like that, you need to help with an orange stick when the gel polish becomes like rubber.
Pros and cons of coatings with a spreading effect
The main advantage of design using the watercolor painting technique is the unlimited number of designs.

This type of design also has many other positive qualities, such as:
- Creating unique and most suitable color solutions by mixing gel polishes.
- Easily create a design with one brush.
- There is no need to complement the design with additional accessories to create a design (but kamifubuki, foil, and rhinestones can be used if desired).
- A drawing using watercolor gel polish is created in a minimum amount of time.
In addition to the advantages, this technique also has disadvantages:
- the impossibility of making a full coating and design without a special base for watercolor gel polish;
- Most often, this painting technique is used on long nail plates, since the designs on them look more impressive and are easier to perform due to the sufficient amount of space;
- If watercolor gel polishes are stored incorrectly, they stop giving the desired effect, which is why the design stops looking so light.
But none of these shortcomings are problematic.
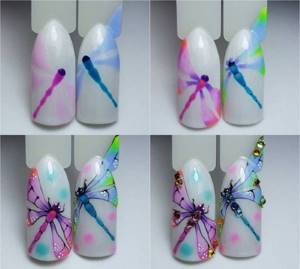
Step-by-step watercolor painting of nails for beginners
Watercolor painting is considered one of the most complex nail design techniques. It is such because the colors there are layered on top of each other and because of this it is not easy to obtain the desired watery effect. However, even a novice master who does not have any special artistic skills will be able to apply this technique in his work, using light sketches that do not require drawing contours.
Varnishes for coating
The range of varnishes for painting using the Watercolor technique is extremely diverse. Both special gel varnishes and regular colored coatings diluted with topcoat, or acrylic paints can be used.
Aqua gels can also be called stained glass due to the fact that they do not have a saturated color that lies in one layer, but a translucent pigment, which makes it possible to layer different shades on top of each other and get a new unique color and watercolor painting effect.
This design technique requires not only special color coatings, but also a certain base on which gel polishes can easily spread. An example is the Irisk Wet Gel Polish base.
These bases are available in 3 tones:
But in the absence of additional materials, those that nail technicians use every day in their work can be used to create such decorations in manicure. This is a colored gel polish and top coat. To create a stained glass varnish, you need to mix a drop of topcoat and color on the foil and mix until smooth.
A special base for spreading can be replaced with a thin layer of top coat; on it the color will spread less intensely, but in this case, to create the desired pattern, you should draw it with a brush without using color.
Current brands of varnishes for watercolor painting today are:
- Nika Nagel ("Lady" series);
- Lianail (World of Illusions series);
- BlueSky (shades from the “B” line);
- Irisk (series “Watercolor” with an “enamel” structure and “Watercolor shine” with a pearlescent sheen and micro-sparkles).
Tools
For watercolor painting you don't need too many tools: 2 brushes and a piece of foil for mixing colors. It is possible to make such a design using a thin round synthetic brush for drawing small details and a brush stroke to create the most watercolor drawing.
To obtain gradient transitions, a specialized flat brush is used. Experienced professionals use only one brush with medium bristles when decorating nail plates using this technique.
Steps for creating a watercolor design without a color base
The initial stages of creating a manicure with watercolor painting coincide with the creation of regular care for the hands and nail plate:
- Creation of the required shape and length.
- Preparing the nail plate for coating: to create better adhesion to the base, the nail is treated with a special buff and degreased.
- Applying primer or bonder before the base.
- Applying a base (it is better to use camouflage or leveling bases), creating a perfectly smooth nail.
- Drying the base (from 30 seconds in an LED lamp, from 2 minutes in a UV lamp).
- Applying a special Wet Gel Polish coating for a watercolor design (this coating is not dried before the design itself) or a thin layer of topcoat.
- Creating a watergel drawing on an undried coating for a watercolor design or topcoat. For a better spreading effect, the color coating should be applied in a thin layer, just as in watercolor painting, you should not brush the color over one place several times, as this can ruin the drawing. To create a smoother color transition, the varnish can be stretched with a special gradient brush. Spreading takes about 15 seconds.
- Dry the colored coating in a lamp (it takes the same amount of time to polymerize as the base).
- Covering the finished design with a top of your choice (if the selected design does not require further decoration with fittings, then it is better to choose without a sticky layer, otherwise use with a sticky layer on which rhinestones, kamifubuki and stickers will be attached).
- Drying the final coating.
If the design does not require a watery effect (if, according to the plan, only translucent shades should be obtained), then after drying the base you only need to remove the sticky layer and continue painting with a special gel , which after all stages should be dried and covered with a top coat.
Stages of watercolor design with color background
Watercolor painting on nails with a colored base is performed almost identically to the painting technique without a color base. The only difference is that after the base, a colored coating is applied in several layers, and only then a base is placed on which the gel polish will spread.
Materials and tools
Watercolor design is called because it looks similar to artistic watercolors. These are the same halftones, lightness and translucency of paints, the use of a thin consistency and a slight spreading effect. But contrary to popular belief, they do not use children’s watercolors, but artistic watercolors. They differ in composition and release form, and also lie softly on the work surface.
However, not all such pigments lie on the nail so that another can be applied on top of one layer. Therefore, you need to approach the choice of materials for watercolor design thoroughly.
Paint on nails with special manicure brushes. As a rule, they are very thin, differ in length and thickness. For example, the brush size can be not only zero, but also marked with two zeros.
Watercolor paints are diluted with ordinary cold water, and therefore problems with consistency in the work usually do not arise. In the same way as when working with a paper sheet, they use a palette to dilute paints, obtain the necessary tones, and apply color. In addition, you can use acrylic paints, which also require dilution with water. However, they are distinguished by the nuance that after drying they cannot be removed from the brush, and therefore during the work you will have to ensure that the brush does not dry out.
If one tool is replaced by another and it is necessary to choose a tool of a different thickness , you will have to immediately rinse the used brush. In addition to watercolors and acrylic paints, some artists can also use diluted gel polish for this technique. It has to be diluted because the gel polish itself has a consistency that is a bit thick for painting. You can use a top coat or a cleanser as a thinning agent.
Creating a design using varnishes
This technique of applying an ornament is a little more complicated than using a needle, but it is also easy to learn. To acquire the skill of working with a thin, long brush, first practice on artificial nails: you don’t mind constantly washing them with acetone for a poorly designed pattern. Paper is also suitable for training.
Instructions for applying varnish with a brush:
- Prepare nails for painting: bath, skin treatment, polishing the plate.
- The nail plate is covered with a base (colorless or medicinal varnish).
- The coating dries (in the future: each fresh painted layer must dry completely).
- A background coating is applied: a color is used that will act as a contrast to any other tone used in the painting. First, in one motion, move the brush in the center up to the edge, starting from the cuticle, then paint the left side of the plate and the right - just three strokes of the brush.
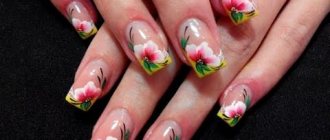
- A thin brush is dipped into the varnish, the excess is lightly removed (as in school, painting with gouache) and an element of the pattern is applied (usually from 2 to 6 colors are used). Beginners choose hearts, flowers, lines, only a little later moving on to more complex images.
The completion of the work is considered to be fixation of the ornament with a colorless coating.
When purchasing varnishes, pay attention - their manufacturers supply them with either regular brushes or thin ones intended for painting. If you don’t have this type of material on hand, you can use a thin silicone watercolor brush.
Features of background preparation
Perform a watercolor design on a prepared base, working with gel polish. Since coatings of this type have their own characteristics in application technology, initially a background is created for the design, following all the rules for its layer-by-layer implementation. It will be a kind of canvas for design. When working, you will have to use a drying lamp, without which the compositions used will not dry.
First, prepare the nail, remove the cuticle and pterygium around it, give it the desired shape, and clean out everything unnecessary. Afterwards, the gloss is removed from the nail plate itself. After this, a layer of base, pigment and top is applied, each of them is dried immediately after application in a special lamp. After the topcoat has dried, the surface under the pattern is buffed (treated with a soft sander) to obtain a slightly rough surface. After this, you can paint on it with water-based paints.
How to draw?
There is no need to wet anything additional; the watercolor effect is achieved due to the light texture of the paints themselves. They can immediately fill the base of the future drawing, using a very light pigment, well diluted with water. Due to its liquid consistency, the paint will lie on the background with a soft transition in intensity. You can highlight some areas, try to shade the necessary zones in some places.
In fact, the work resembles the work of an artist, except in a smaller format. Gradually, the necessary areas are shaded with colors, the penumbra is painted on, the necessary parts of the picture are highlighted, some are worked on more, others are left blurred. It should be taken into account that the paint will dry very quickly during the work, because it will be diluted with a tiny amount of water. Therefore, for the effect of a smooth flow from one color to another, you must work quickly.
To make the desired image more beautiful, it would be useful to use a ready-made picture. Looking at it, it will be easier to see where and what should be emphasized with the specific shades of paint used. The method of work is notable for the fact that paints can be mixed with each other, obtaining new shades and halftones. As a rule, such drawings are not overloaded with the number of layers; they are only made brighter by drawing a specific part of the image.
When it is necessary to highlight any elements of a drawing, paints are mixed with white pigment. At the same time, white color can dominate in some of the tones used, since this can create the effect of lightness. However, you should not whiten the texture too much: we must not forget about the translucency of the shades used.
You can add bright spots directly to the nail, using a brush to help them spread to the desired place in the design.
Brushes are changed during work as needed. The larger the area you need to paint with them, the thicker the brush can be. In the end, not everything is emphasized, but only some of the contours and elements of the design, thereby leaving it light and translucent. It is worth considering that the smaller the stroke and the thinner the outline of the line, the more similar the watercolor effect will be.
It is also important to take into account the need to shade the background, for which more water is added to the paint used. This technique will enhance the effect of watercolor on accent nails. When making contours in some places of the drawing, try to put less water on the brush. To do this, use special soft brushes designed for watercolors.
To make the lines smooth and confident, the brush should be positioned perpendicular to the nail.
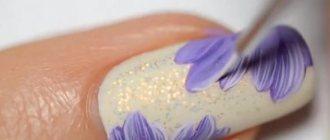
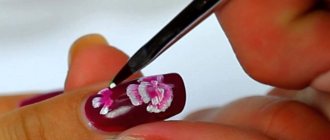
Watercolor painting can be done in different ways. Sometimes the master makes an ordinary blot on an accent nail, and after it dries, he draws on its contours, for example, in the form of petals, thereby creating a beautiful flower. In addition, you can make a preliminary sketch of the future drawing, drawing approximate contours. The base is filled with a gradual overlay of color and shades. Then, for outlining, sometimes broken lines are applied to the edges of the print, often emphasizing the outline in several tones in addition to black.
Gouache paintings on nails
HELLO! And again! Master Class. For fun and New Year's mood. Let's paint a nondescript ball. — We were in Auchan, Dasha picked up a bunch of these balls. I got it! Different colors, textures, medium balls, 7 cm in diameter. I'm still far from decoupage. I decided to take acrylic and paint the ball. Tips: - I would like to immediately remind you that the ball is quite small (beginners, it’s better to take 15 cm. Well, or 12 cm in diameter). 7 cm was not easy to paint, because of its smallness. Well, whatever was at hand. My brush number was “2”. Continue reading →
Girls whose children are just starting to sculpt, draw and do other creative things. Many babies stuff everything into their mouths at once. My daughter is no exception