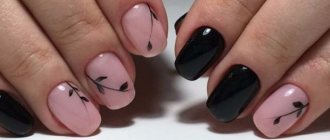
Nowadays, a beautiful manicure is no less important than spectacular makeup and hairstyle. With it you can create an elegant look and stylishly complement any outfit. Modern fashion trends do not set rigid boundaries; the trend is a variety of shades of varnish and nail design options.
Some prefer monochromatic classics, others do not limit their imagination and choose manicures with interesting patterns. Beautiful designs on nails emphasize a woman’s excellent taste and draw the attention of others to her original image.
You can turn to professionals to create manicure masterpieces, but you don’t always have the time and money for this. A more affordable and comfortable solution is to decorate your nails at home. How to do this correctly will be discussed further.
Decoration with decor
Using decorative elements, you can easily decorate your nails for the holiday; for this you will need glitter sprinkles, rhinestones, sparkles, etc. You will also need a clear varnish and a base varnish. The technique of applying patterns using decorative elements is very simple:
- Nails are covered with a colorless base.
- If desired, a coating of a different color of varnish is applied.
- After drying, decorative elements are laid out on the surface in the desired order.
- The base varnish is applied again on top.
Using decorative elements, you can easily decorate your nails for the holiday; for this you will need glitter sprinkles, rhinestones, and sparkles.

Glitter sprinkles applied on top of white polish
Each nail is individual
Advice! To prevent the decor from crumbling prematurely, you should try to choose elements that fit as closely as possible to the nail.
Preliminary preparation
Before you start painting patterns on your nails for beginners, it is important to know that your hands must be manicured. Immediately before the painting process, it is necessary to: disinfect your hands, process the cuticles, give your nails the desired shape, apply a base in the form of a transparent varnish to your nails.
Before you start painting patterns on your nails for beginners, it is important to know that your hands must be manicured

Immediately before the painting process, it is necessary to: disinfect your hands, process the cuticles, give your nails the desired shape, apply a base in the form of a transparent varnish to your nails
These lines are best done using a needle or toothpick.
Now you need to be patient, persevering and careful.
Advice! You can practice applying patterns on paper blanks made in the shape of a nail and having the same dimensions.
Other methods for creating simple nail designs
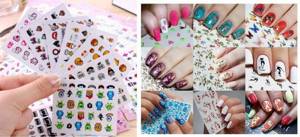
In addition to drawing with your own hands, you can use ready-made drawings - stickers, stencils, stockers, template plates.
Stickers
Choose a specific color for the base. Paint your nail plates with it.
Once completely dry, stick your chosen sticker on top. They come with an adhesive base.
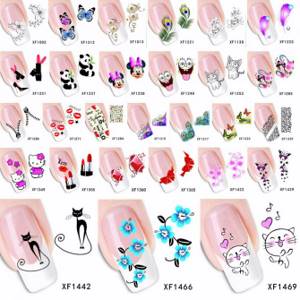
Stickers for nails
These need to be cut according to the shape of the nail.
There are also those that need to be placed in warm water before gluing. After 10 seconds, it is taken out, the figure is carefully grabbed with tweezers and transferred to the nail.
Another type of stickers
Decorative decorations
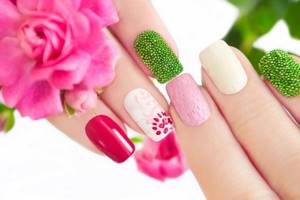
There are a lot of manicure decorations on sale. An ordinary background layer can be decorated not only with a pattern of your own making, but also with all sorts of decorative elements:
- glitter flowers;
- broths;
- beads;
- rhinestones.
Attach them to the still damp background layer and hold until the varnish is completely dry.
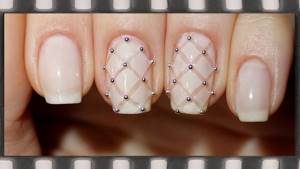
Manicure created using broths
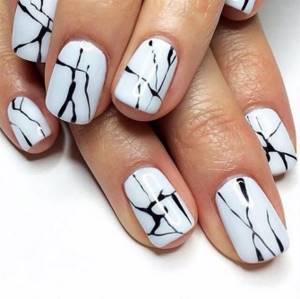
Blurred pattern
It is done very simply. On top of the still wet background layer of varnish, a pattern in the form of a wave, spiral, circle, or even random strokes is applied with a brush. Use a toothpick to remove errors.

Example of a blurry manicure
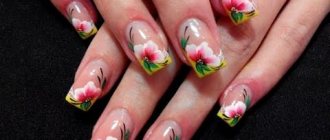
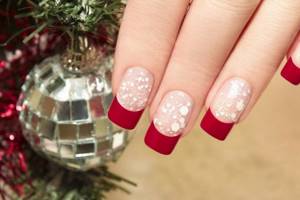
French manicure
A design that never goes out of fashion is acceptable in any life situation and suits every look.
Execution technology:
- Apply the base and wait until it dries.
- Apply your chosen background layer. Dry properly.
- Select the edge shape of the nail from ready-made patterns, of which there are many in stores, glue it and cover the end of the nail plate, as shown in the photo.
- Cover the part that remains open with white varnish.
- Let it dry, remove the pattern.
- Cover the top of the nail with a fixative - transparent varnish.
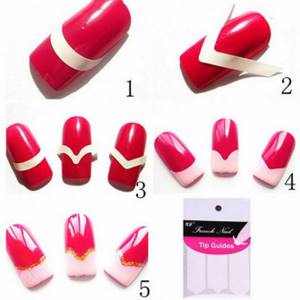
Original French options
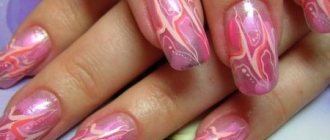
Water manicure
The drawings that are obtained by mixing varnishes of different colors in water amaze with their originality, uniqueness and inimitability. How to make it?
Prepare a shallow but wide vessel, pour a little water into it, so that it is not too cold. Its temperature should be slightly above room temperature.
Prepare several colors of varnish. Preferably from the same manufacturer, so they will interact better with each other.
Add the varnish drop by drop into the water: first, one, it should spread over the water in the form of a large circle. Add a different color in the center, it should do the same, but not overlap the first layer. Then the third, fourth, and so on as long as you want. In principle, you can use 3 colors, alternating them with each other.
The result will be a film on the water in the form of a rainbow of different stripes.
Very quickly, before it has time to dry, use a toothpick or needle, starting from the center, draw a line in any direction. Don’t finish it all the way, otherwise the drawing will reach for the toothpick and get ruined. So, be sure to lead all other lanes from the center. You can also move them in the opposite direction, so you get something like sharp petals from a flower.
Then wait 20 seconds for the film to dry, dip your nail in the water in the area of the design that you prefer to print on the nail.
Before the procedure, in order not to stain your finger, wrap it with tape around the entire perimeter.
When the design sticks to the nail, remove the tape.
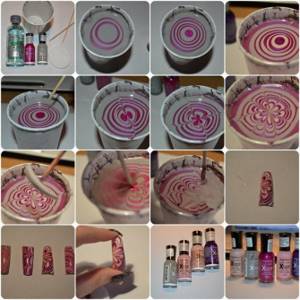
Drawing using water and different colors of varnish
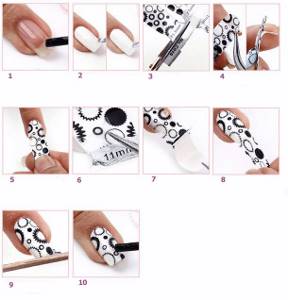
Drawings using template plates
If you don’t have time to paint your nails, but you really want to surprise others with an unusual design, you can use a simpler solution. There is a special kit for creating drawings on sale. It consists of one or several plates on which small details are applied in the form of individual flowers, figures, animals, and so on. There are also more advanced designs in the form of lace, French manicure patterns, and fabric textures.
A special stamp with a silicone insert and a scraper for removing excess varnish is sold for the plate.
It's very easy to work with:
- The nail is covered with a base.
- Then the basis - the background.
- A pattern template is selected and painted over with varnish, directly on the plate.
- The excess is removed with a scraper, the plate remains figuratively clean, the varnish remains only in the groove of the pattern.
- The stamp is adjusted to the design and pressed so that its imprint remains on the silicone.
- Transfer this print to the nail plate where you think it should be located.
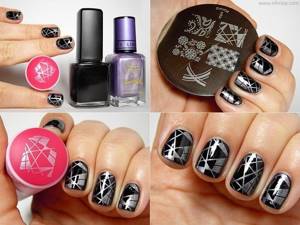
Stamping on nails
Feng Shui manicure
For those who are interested in the teachings of Fei Shui, it will be interesting and useful to know what laws and rules must be followed in manicure. Feng Shui experts advise starting to do manicure in a calm, peaceful state .
Quiet, relaxing music or sounds of nature should be playing in the background (for example, the sound of the sea, like the element of water), a candle should be burning (help of the element of fire), the window should be open (element of air).
First, you need to decide which area of life needs to be activated; the color scheme, and even the fingers, which will need to be given special attention, will depend on this.
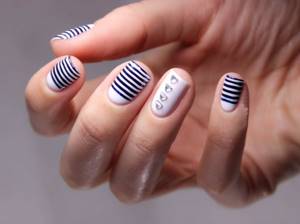
It’s easier to start nail art with the simplest geometric shapes and patterns (stripes, triangles, squares).
Those who dream of attracting love into their lives need to focus on the middle (new discoveries, flirting, falling in love) and ring (meeting, acquaintance, new connections) finger of the right hand.
itself in pink tones (activates femininity, youth, tenderness), and on the indicated fingers to make soft, smooth designs in red (happiness) and gold (spiritual and physical strength) tones.
Nail art using tape: “Geometry”
Before starting this type of manicure, you need to carefully think through the details and carry out preparatory work.
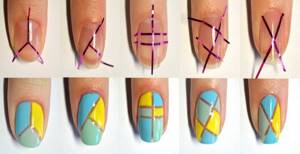
In addition to the standard set (base and topcoat, varnishes of different colors) you will need:
- masking tape.
- nail scissors (to cut out the desired shapes).
- tweezers.
- thin brush for drawing.
It’s easier to start with the simplest geometric shapes and patterns (stripes, triangles, squares).
Technique:
- After the base is applied, the nail plate is covered with one light color.
- Shapes of the required shape are cut out of scotch tape with scissors and carefully glued onto the nail using tweezers. They press tightly. To make it easier to remove the tape later, it should protrude beyond the nail plate.
- The top of the nail is again covered with a darker varnish.
- If desired, the entire procedure can be repeated, but with a different ornament and varnish of a different color.
- After the varnish has dried, the tape must be removed.
- Cover with fixative.
Using tulle
A wonderful option for beginners would be an openwork design on the nails. A very beautiful, delicate, romantic and elegant manicure is obtained if you use a piece of ordinary tulle or lace.
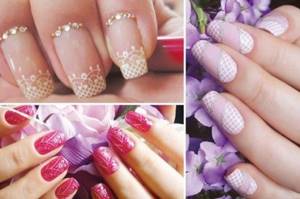
In addition to the standard things (base and topcoat), for such a pattern you will need:
- Varnishes in two colors.
- A piece of tulle or lace with a small finished pattern.
It is better to cut several strips with the same or similar patterns. This way, the remaining polish after the first application will not spoil the design on the next nail.
Technique:
- After the base has been applied and dried, the base varnish is applied.
- You need to wait for it to dry completely and only then start applying the drawing.
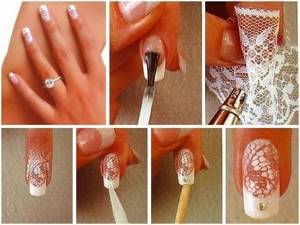
- To make the pattern neat, it is better to take a piece of fabric that is thin and long so that it can be comfortably held with your side fingers. If it is possible to involve a second person, it will be easier.
- A piece of lace is pressed against the nail plate and polish is applied on top of it. It is quickly removed so that the varnish does not have time to set, otherwise the design will be smeared.
- After drying, a fixative is applied.
Advice! It is not necessary to cover all your nails with the same pattern. On one nail it may be larger, on the second it may be smaller. Some nails don’t need to be decorated with a design, but simply left colored in a single color.
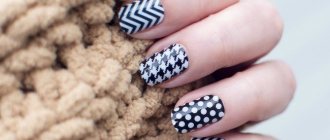
Nail trends 2016
Neat and well-groomed nails never go out of style. Short nails are trending this year. The almond shape of nails does not lose popularity, giving harmony to the image.
The color scheme is distinguished by non-standard colors, for example, turquoise shades will suit red-haired beauties, and denim style will be interesting for young girls. Shades of coral are already classics for the feminine and elegant.

Short nails are trending this year. The almond shape of nails does not lose popularity, giving harmony to the image
The color scheme is distinguished by non-standard colors, for example, turquoise shades will suit red-haired beauties, and denim style will be interesting for young girls
Shades of coral color are already classics for the feminine and elegant.
This season's fashionable mint color will not disappear in the fall. Flesh-colored nail polish is also popular, and the bravest girls are already using yellow vinyl, dark lavender and hot coral. The pink color, which has also become a classic, does not leave the scene. The confetti varnish is interesting. It contains an unusual combination of coral and violet particles, and there are also calm pink particles of various sizes.
No need to be afraid of experiments
Women always dream of having beautiful and well-groomed nails. There is no point in chasing fashion trends; instead, you can become the creator of your own design, only starting from fashion trends as a starting point.
It is quite possible to independently create a pattern and decorate your nails, especially since, as it turned out, it is not so difficult - the main thing is to follow the rules and know the secrets of performing the techniques. There is no need to be afraid to use your imagination and design capabilities, there is no need to be afraid to experiment.
Who knows, maybe next season the design that you came up with yourself will be used as a basis?
Tips and tricks for a novice master
Absolutely every girl can create her own nail design, even if she doesn’t know how to draw very complex patterns, but really wants to look attractive. You just need to choose for yourself a technique that she can thoroughly master and use in practice. Over time, experience, dexterity, precision in performing work, and even your own personal innovations will come. To ensure that the drawing you create turns out well and lasts for a long time, rely on these tips:
- Buy high-quality material that lasts a long time and is characterized by high durability. Pay more attention not to cheap varnishes, but to those that have been tested by time and experience.
- When creating a design, take into account its size and the proportions of the design in relation to the nail. Don’t try to cram a bunch of different elements onto short plates - it will look pretentious and tasteless.
- If the drawing doesn’t work out the first time, you don’t need to despair and quit. This time try changing the position with simple geometry. Next time everything may turn out differently.
Don't be afraid to experiment, even very bold ones. There are no restrictions in nail design. Any design in the form of a drawing, simple lines, circles, and so on is also art and also has the right to exist. At the same time, any decorative element on the nail changes the image.
Drawing Rules
A true professional is able to create any composition on the nails. But what should girls do who don’t have so much time to visit beauty salons or drawing courses? How to create an unusual nail design yourself? How can beginner girls learn to paint on their nails at home? Let's figure it out.
Drawing is not only calming, but also very exciting. But to achieve an ideal result, you need to train and experiment a lot, mastering more and more new techniques. Knowing the simplest basics, you can relax and let your imagination go ahead, depicting what your subconscious mind advises. For your convenience, we have collected the simplest rules and step-by-step diagrams that will help you create the perfect coating.
Required Tools
What tools are useful for a novice craftsman or home user? After all, only with their help can you create the perfect nail design. To begin with, you don’t need to spend a lot of money on professional materials and tool kits. If necessary, they can always be purchased in addition.
During your first few days at home, you can use the following tools:
- toothpick;
- needle;
- hairpin;
- scotch;
- sponge/sponge;
- tweezers;
- orange stick with cut;
- art brushes.
Using a needle or toothpick, you can draw graceful monograms, elegant patterns or small flowers. Brushes allow you to outline, draw small elements or paint over objects.
Secrets of specialists
Our simple tips will help you create an unusual coating:
- It is best to equip a special place for painting on nails: let it be a comfortable desk on which bright daylight falls;
- varnishes can be mixed on paper, plastic surface or foil;
- It is better to store all tools in special boxes;
- To avoid damaging the surface of the nail with a sharp needle, it is necessary to apply a base coat or clear varnish.
French colored strokes
An incredibly beautiful variation of the French manicure, where the tips of the nails are decorated with white strokes in combination with sparkles and rhinestones. This festive design looks spectacular in a bride’s manicure for the New Year. And it’s hard to ignore the French style with strokes in pastel shades - ideal for the spring-summer season. When choosing an original French manicure for the fall-winter season, do not forget about fashionable gray shades with a snow-white “sugar strokes” design interspersed with sparkles or foil.