Reads: 5,335
Reading time: 7 min.
no comments
Paints, varnishes and gels used in nail art as one of the areas of body art should be as durable as possible and as bright as possible.
After all, when painting on the body, you cannot ignore the nails - their design should complement the overall composition or sharply contrast with it, depending on the concept conceived by the artist.
Paints
Nail art currently uses not only standard palettes of paints and varnishes, but also other materials - velvet, glass, leather, suede, paper, precious metals, stones, acrylics, light-curing gels, etc.
To master planar design or artistic painting in nail art, use non-toxic, quick-drying water-based or varnish-based paints.
Typically, such paints are sold complete with thin brushes.
Lacquer-based paints are diluted with special varnish thinners, water-based paints (acrylic, glitter, pearlescent, pastel, honey watercolor, gouache) are diluted with water and it is possible to mix them to obtain different tones.
Designs using water-soluble paints require mandatory and careful fixation.
When applying varnish fixative, it is important not to smudge the design. Once dry, the paints become matte, so a top coat must be applied to the finished design.
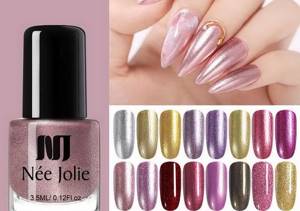
There are also fluorescent and opalescent nail paints.
These pearly whites are applied sparingly over dark nail polish to give it a shimmery effect.
In aquarium nail design, colored acrylics, sparkles, rhinestones, foil, dried flowers, modeling and protective materials are used.
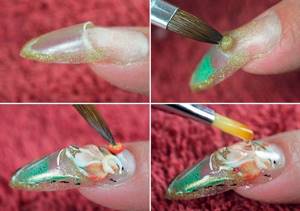
The drawing turns out three-dimensional and is visible as if under the glass of an aquarium.
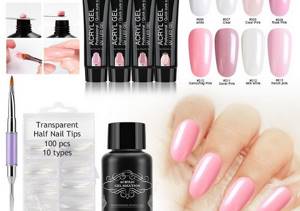
Three-dimensional (three-dimensional) nail design uses nail modeling and extension technologies using various materials.
These are colored acrylic paints for nail art, special gels for manicure and cyanoacrylic glue for creating certain shapes.
In photo nail design, the choice of paint palette is determined by the color capabilities of photo printer cartridges, with the help of which designs are applied to artificial nails.
Decorative patterns
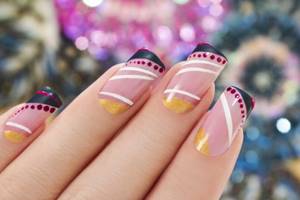
How to learn to draw various decorative but simple patterns on your nails? After all, in addition to straight lines, waves and peas, you want to somehow diversify your coverage. Let's see how to implement the best ideas on your nails.
As easy as pie
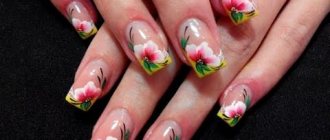
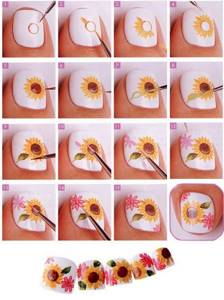
Flowers can be painted using brushes of different thicknesses. They help to draw the various curved lines and texture of the petals. The core of such a flower can be decorated with rhinestones, sequins or a drop of shiny varnish. And if you outline the petals with acrylic paints, they will stand out in the overall composition. Flowers are usually located in the lower corner of the nail near the cuticle. The shape of the petals can be round or curved.
Elongated drops, wavy curves, stars, lettering nail designs, abstract patterns can be made using a needle. But you need to draw with a needle very quickly, before the varnish dries. Of course, if it's regular varnish. To begin with, you can practice on the palette.
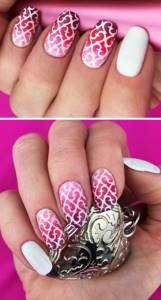
Monograms
Monograms are royal, elegant designs that look quite aristocratic. It is simple monograms that can add status to your image. They can be painted with either a dots or a thin brush. It is better to use thick varnish, colored gel or acrylic paints as a material. The main thing in monograms is symmetry. Both sides should mirror each other.
How to learn to draw monograms on your nails:
- Cover your nails with a base coat and colored nail polish in several layers.
- Place polish/gel/paint on a brush and place a drop on the tip of the nail near the cuticle.
- Carefully stretch the monogram, drawing a smooth arc to the tip of the nail.
- Repeat a few more “branches” of the monogram.
- To add volume, you can apply a second layer of paint or gel.
The best place to place the monogram is the lower corner of the nail plate near the cuticle.
Symbolism
You can see how to draw simple drawings in the video below.
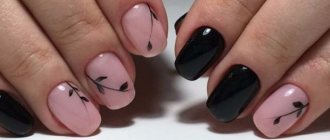
Flowers
The girls' favorite elements are floristry. It is she who sets a special mood not only for the entire manicure, but also for the image as a whole.
How to learn to draw flowers on your nails:
- Apply base and colored polish to your nails in 1-2 layers.
- While the varnish is not dry, you need to draw semi-twisted short strokes on the nail plate with a thin brush, which you need to scoop up the second shade of varnish.
- Since the wet varnish has not yet dried, the second varnish will slowly spread over the surface and create unusual patterns.
- After drying or polymerization, cover the nail design with a finishing topcoat.
Now you know how to learn how to paint on your nails. All techniques and methods are quite simple and do not require much investment of your time or money. Feel free to experiment and move from simple drawings to complex ones, constantly improving.
Lucky
Nail art uses many different varnishes, bases, fixatives and other related liquids.
Base varnishes (base varnish), or primer varnishes, are colorless and increase adhesion to the nail, protect against the action of coloring pigments and aggressive components of the varnish:
They are applied to the natural nail before applying colored varnish.
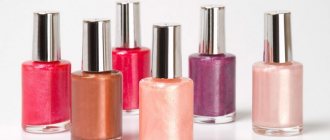
Colored varnish (liquid enamel) is used to add color and shine to nails. It is usually applied in two layers:

The color varnish contains a solution of nitrocellulose in a bulk solvent such as ethyl acetate, which evaporates easily.
Manufacturers add castor oil to the varnish to prevent it from drying out too quickly.
Thanks to the acetone-free base, the varnishes are perfect for both natural and artificial nails.
Each bottle of varnish is equipped with a brush, the length and thickness of which meets professional standards.
The brush is fixed in a lid, the shape of which is designed taking into account all the rules of ergonomics, and is therefore convenient to use.
Varnishes differ not only in price and volume, but also in properties.
The first and most common varnish is simple, usually applied in two layers; for dark shades, one is enough.
There are also single-layer varnishes, where application is carried out in one layer.
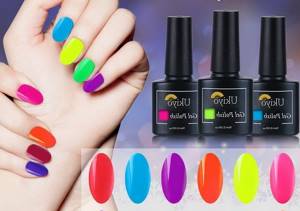
Pearlescent varnish has a golden or silver tint:
There are also express varnishes that dry in 2-3 minutes.
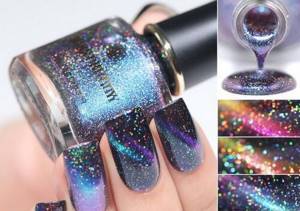
Chameleon varnishes change color under ultraviolet light or depending on the angle of the nail, thermal varnishes - depending on the temperature in the room or outside:
Hypoallergenic varnishes are sold in pharmacies and do not cause allergies due to the absence of toluene, formaldehyde, and dibutyl phthalate.
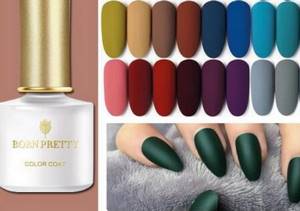
Matte varnishes do not shine, even if the nails are even and smooth, and they also dry out faster:
Watercolor varnishes create a visual impression as if they have not dried completely and are actively used in nail art and French manicure.
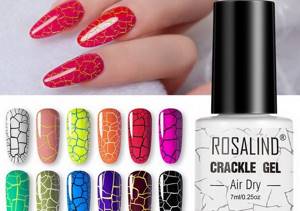
Cracked varnishes (“the effect of old porcelain”) create on the surface of the nail the effect of cracks spreading in different directions:
Film varnishes are water-based and are removed by pulling off the entire coating with film.
Bitter varnishes were invented specifically for those who cannot wean themselves from the habit of biting their nails.
Varnishes for nail art are dense in texture and pure in shades. They are usually sold in a set of 6-10 bottles with brushes for nail design.
At the same time, drawings made with varnishes can be corrected using a manicure corrector:
Only in this case you need to act carefully: the corrector can erase not only the drawing, but also the varnish applied for the background.
Therefore, you do not need to rub or drag the corrector along the incorrectly applied line; you need to lightly touch the place that needs to be removed, it will dissolve and absorb the varnish.
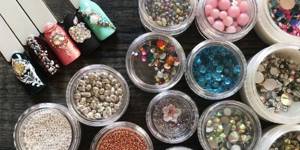
Accessories for design
The choice of materials and tools for nail design - creating patterns and decorations - is huge. Conventionally, all these funds are divided into 2 categories:
- To create a flat manicure. This group includes foil, stickers, ribbons and other materials for nail extensions that do not rise above the main coating.
- Tools for 3D design. These are voluminous beads, rhinestones, bouillons, intertwined threads. They may protrude above the surface of the nail.
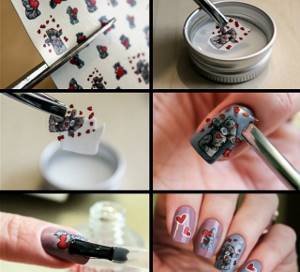
Stickers, ribbons and foil
The most popular design accessories:
- Stickers are drawings on a durable adhesive base. They are applied to dry varnish and covered with a quick-drying transparent layer.
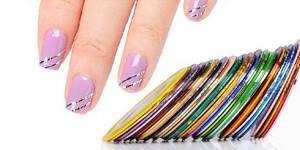
- Ribbons. There are different textures (from fabric to metal) and colors (plain, patterned, fabric design). They also have a sticky base and are applied to a dry coating.
- Foil. This is a special film with amalgam coating. The master applies it to the painted nail and presses lightly. The foil print is secured on top with transparent varnish.
- Thirty-fourth week of pregnancy
- Buckwheat diet with kefir - menu for 7 days. Reviews of those who have lost weight and the results of the buckwheat diet with photos
- What are the benefits of hazelnuts - the properties of the nut. Harm and benefits of hazelnuts, video
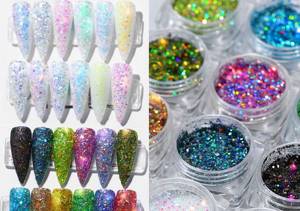
Glitter powder
It is not necessary to have a shiny polish in your arsenal - you can always add a little brightness to your nails with the help of a special powder. Small glitter comes in small plastic packages and can have different shapes: round, square, triangular, diamond. Glitter is applied to the top coat of varnish using a brush.
You can also add shine to your nails using special rubs. This is a fine powder with different shades. It is applied to a painted and dried nail and rubbed in using a sponge. Remaining powder can be easily removed with a brush.
The most popular rubbing effects are metallic, holography, chameleon.
Beads and rhinestones
Colored glitters and films can be used alone or mixed with other design components. The most popular accessory for decorating nails is rhinestones. They are attached to a small drop of varnish, acrylic or embedded in gel. Rhinestones give a manicure design a special charm.
The beads are slightly larger than rhinestones and will rise noticeably above the surface of the nail plate. Professional masters use them only for decorating manicures that will be worn for no longer than 7 days. Beads are attached to acrylic or topcoat. There is also a smaller version of beads on sale - broths. They are used in the “Caviar manicure” design.
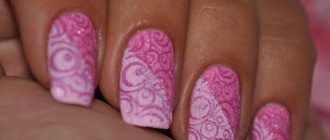
Stamping
If you don’t have the skills of an artist, you can always use ready-made drawings.
Stamping is a method of applying patterns to nails that does not require additional painting.
This is a nail art tool kit equipped with a stamp, stencil and scraper. Before applying the design, coat your nails with polish of the desired color.
Apply some paint to the stencil. Holding the scraper at a 45° angle, remove excess varnish. Press the stamp firmly onto the stencil with paint and roll it back and forth and on the sides a little. Use the stamp to create decorations on your nails by pressing it onto the desired area. Remove any remaining polish from the skin with a lint-free cloth.
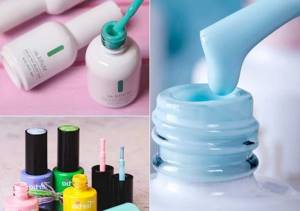
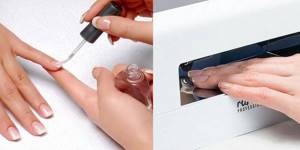
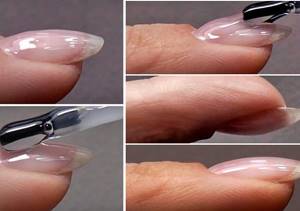
Base and top coat
To ensure that the gel polish sticks well, a base coat is used. This is the first transparent layer that evens out the nail plate, hides minor imperfections and bonds the polish to the surface.
It is better to apply the base coat with a flat brush and dry it in an LED lamp for about a minute.
The top transparent coating is called topcoat. Its purpose is to fix the entire manicure and protect the varnish from external damage. The top can be matte (creates a coating without shine), with a sticky layer (this must be removed with a lint-free cloth) and without stickiness. It is recommended to apply the topcoat after creating the design. It is advisable to purchase the top and base from the same company.
Nail restoration products
With frequent use of gel polish, nails can peel off, become brittle and dull. The following tools will help fix the problem:
- Keratin masks. They contain liquid keratin, medicinal oils and vitamins. The base should be applied to clean nails and left for 5-7 minutes. Rub in the remaining mask with light movements.
- Strengthening varnishes. They contain calcium, wheat proteins and other beneficial substances. The varnish is applied once every 2-3 days to clean nails. The treatment course is 10–15 days.
- Restorative oils . They additionally contain vitamins and minerals. Such products not only strengthen the nail plate, but also make the cuticle softer and more pliable. The oil should be rubbed into the surface of the nail every day. The treatment course is 7–14 days.
Bleach and liquids
Nail bleach is applied to the nail plate and under the free edge to remove yellow stains. It contains hydrogen peroxide.
White nail pigment is applied under the free edge of the nail to make the nail appear white. It contains zinc oxide or titanium dioxide.
Nail whiteners are sold on sale in the form of paste, cream, stick or pencil.
Nail polish remover is an organic solvent used to dissolve and remove nail polish.
In order to compensate for the drying properties of the solvent, it often contains cosmetic oil.
For clients with artificial nails, it is recommended to use acetone-free nail polish removers as acetone can soften or dissolve the tips of synthetic nails, as well as adhesives and acrylic nail creation compounds.
Liquid for thinning varnish. An acetone-free product that does not affect the properties and color of the varnish and returns the varnish to its original consistency.
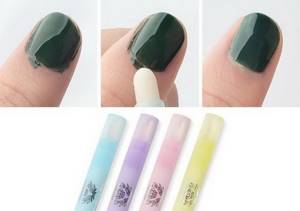
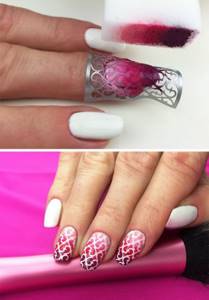
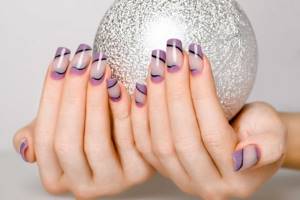
Decorating nails with a gradient
Another pattern for beginners is presented step by step. It looks very impressive, and is created easily and simply with the help of eye shadow and a sponge. To do this, varnish of the main color is applied to the nail, after drying, eye shadow is applied to it using a sponge, and now the resulting colored enamel is covered with colorless varnish.
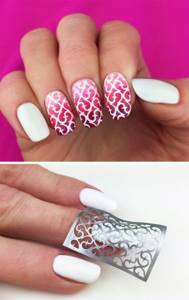
Gradient coloring with a stencil - step by step
Gradient coloring with a stencil - step by step
Gradient coloring with a stencil - step by step
Advice! It is better to first check the interaction of the transparent varnish and the shadows planned for application in order to eliminate their unsightly spreading or unnecessary reaction.
Fixer and drying
A sealer is a clear varnish that is applied over colored varnish to prevent flaking and add extra shine to the finished nail.
It can produce an acrylic or cellulose type film, protects any coating, including varnish, from fading, because it contains ultraviolet protection, and saves time when designing.
An ultra-hard, high-gloss, wet-polish topcoat is also used, creating a non-fading ceramic-type glaze that provides high-quality nail protection while maintaining exceptional shine.
Liquid drying in the form of a spray or in bottles with a brush is designed to prevent varnish from smearing. It speeds up drying, the varnish does not stick and does not fade. The base of this drug is alcohol.
There is a nail polish dryer in the form of a 2 in 1 preparation. It allows you to dry all its layers in 3 minutes, and the presence of oil in the composition simultaneously conditions the cuticle and nails.
Special ingredients give the coating flexibility, which allows even such a defect as smudged varnish to be completely eliminated.
Aerosol packaging ensures minimal consumption.
Drawing with tulle
Using this method, the nail acquires an interesting openwork pattern. To do this you need a piece of tulle with a beautiful small openwork. Nails are prepared as with other techniques (base varnish, main color), without allowing the second layer of varnish of the main color to dry completely, a piece of tulle is applied to the nail plate, pressed for a while and removed. You get an imprint of openwork tulle on the enamel, and now you just need to cover it with transparent varnish to fix it.
Having mastered several nail art techniques, you will be able to change the design of your nails several times a month.
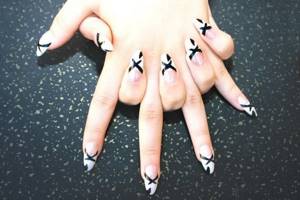
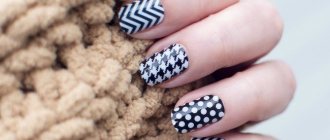
Drawings can be done on both long and short nails
A combination of dots, stripes and moon manicure
Advice! The pattern can be selected individually for each finger. Instead of tulle, take knitted fabric or velvet.
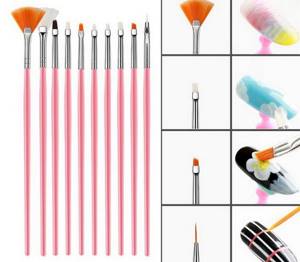
Brushes
Nail art brushes also come in different shapes and qualities, but are smaller in size than other types of body art.
Brushes are made from a variety of materials, due to which there is a range of elasticity: from very soft to very hard, but synthetic brushes are used for working with water-based paints.
For painting on nails, it is usually better to choose smaller brushes.
For manicure design, it is fundamentally important to do nail painting.
There are specially selected brush sets for this, but it is recommended to start with a limited palette of paints and a small set of brushes to learn the basics without getting overwhelmed by additional tools.
As your artistic abilities develop, you need to expand your set of brushes.
What brushes are used for painting nails:
- Fan brush - professional fan brush for nail design is designed for painting medium-length nails.
- The Stiper brush is used to paint stripes on your nails.
- An angular painting brush allows you to create designs on your nails with high precision.
- kolinsky hair brush
- “Dagger-shaped ” - a synthetic brush for design, the working part of which is a beveled corner, allows you to create both thin drawings and more voluminous design options.
- “Petal” is a type of flat brush with a cut corner that allows you to create a fancy design on the nail.
- “Flat” is a wide brush used for making patterns such as Gzhel painting; it can be used to apply glitter and colored powder.
Drawings on nails with nail polish for beginners at home
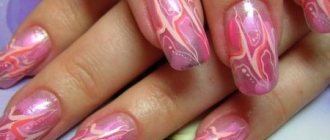
A fairly simple and unusual design can be done by any girl who wants to create pleasant soft “waves” on her nails. You will need a clear varnish for the base and 3 shades of varnish for applying the design directly.
Step 1. Apply clear polish to your nails. Here you can show your imagination and choose a varnish of a different color.
Step 2. Apply a stroke of varnish of the same color and make 2 more strokes nearby so that each subsequent one is slightly shorter than the previous one.
Step 3. Step back closer to the edge of the nail and make strokes with a different color of varnish, repeating the contour of the previous shade.
Step 4. Apply shade 3 in the same way, moving even closer to the edge of the nail.
Other tools
Another useful tool for freehand drawing is the stylus, which comes in different sizes and has a wooden handle with both ends extended by metal with a ball at the end:
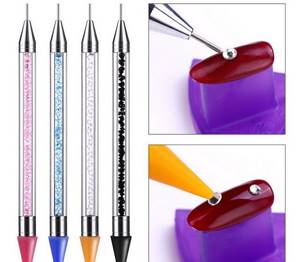
These balls are also of different sizes and are very convenient for imprinting small colorful circles in the form of polka dots, eyes, bubbles, etc. on the nail.
They can also be used to create a swirl of colorful drops of paint or polish on the surface of the nail to create a marble-like pattern.
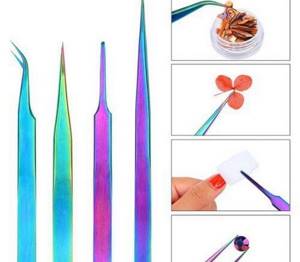
In nail art, silk scissors are convenient for working with fabric coverings that strengthen nails, and they are also actively used in body painting when developing stencils, etc.
Stainless steel tweezers in nail art are intended for repeated use, therefore, before accepting the next client, it is necessary to strictly follow all sanitization and disinfection procedures:
In nail art, self-adhesive stencils are also used to create a clear pattern:
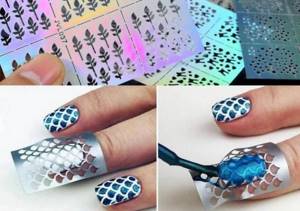
To use a nail stencil, you first need to apply 2 coats of base coat and let it dry completely, then press the stencil firmly onto your nail and apply a small amount of paint.
Only after complete drying can the stencil be removed.
After using the stencil, you can decorate your nails with other available decorations: rhinestones, colored dust, sparkles, etc.
There are a large number of different applications in nail art: several types of foil, rhinestones, sparkles, feathers, mica and seashells, metal applications, decoupage, threads, natural materials, colored sand, lace, colored ribbons, confetti, etc.
Cotton napkins. 100% cotton tape used for cosmetic purposes, namely for removing excess nail polish or correcting errors in work, etc.
Cotton wool, cotton balls, sticks or tampons . Cotton wool is needed to remove nail polish. It can also be used to apply hand and nail care products.
Cotton-tipped swabs or simply cotton swabs are used for minor corrections.
0 Comments
Toothpick designs on nails for beginners
Drawing "Heart"
The simplest option. We cover the nails with white varnish. After it has completely dried, dip a toothpick into pink varnish and place 2 dots on the surface, which we then connect to form a heart.
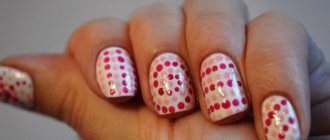
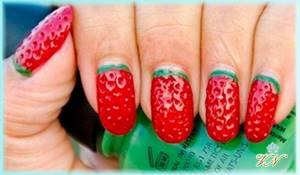
Drawing "Strawberry"
Step 1. Cover the surface of the nail with red varnish in several layers.
Step 2. Without waiting for the coating to dry, take a toothpick and, with gentle movements, press the dots at the same distance from each other, as shown in the picture.
Step 3. Apply a thin strip of green polish to the area near the cuticle.
Studs
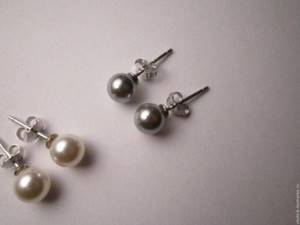
Try using a regular earring at least once to create perfectly even little polka dots on your nails. Surely this unusual instrument will become one of your favorites. The prints are small and very neat. You can create the effect of using glitter varnish by adding shining dots on a plain surface using an earring.