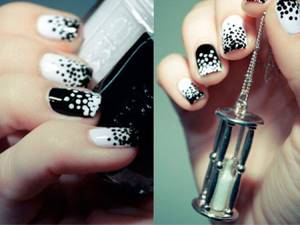
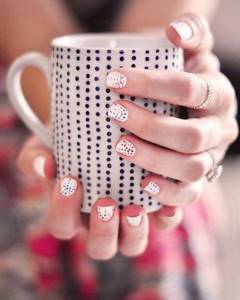
A fairly popular element in nail designs are various dots and small circles. They look equally organic both in a romantic ornament and in a strict graphic design. You can create this design on your nails using dots quickly and accurately. With its help, you will avoid drips, drops of varnish will not drag on, spoiling the design.
[yandex1] [google1]
What is dots?
For several years now, manicures performed with such a simple tool as “dots” have been extremely popular. There are several reasons for this:
- ease of use (no need to have artistic talent);
- minimum time spent (several minutes);
- You can create drawings of any complexity using just dots.
Thus, dots are a manicure tool for creating patterns on nails.
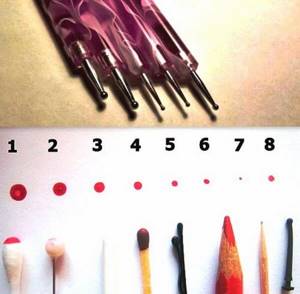
Outwardly, it looks like a crochet hook only with a steel ball at the end, which is how the dots got its name.
Basic properties
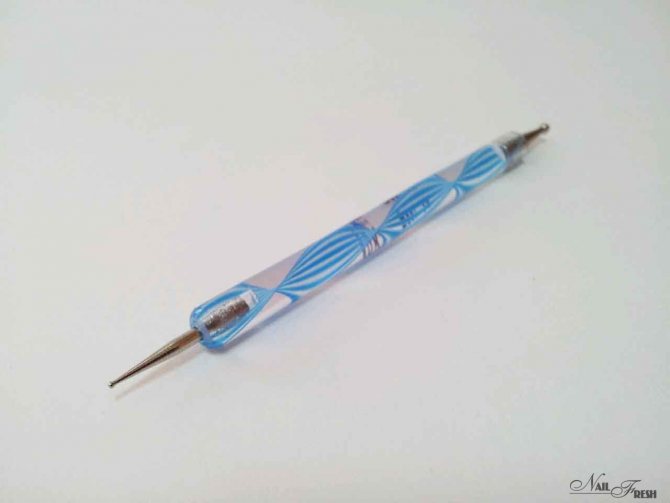
There are no special secrets on how to use this device. With its help, even those who picked it up for the first time can create a complex pattern. The main element of the device is a small ball at the end, which is used for drawing. The remaining elements are just a matter of ease of use.
The ball can be of one size or another. Most types of this tool have a working tip at both ends of the handle. The balls on them are of different sizes, which allows you to create circles and dots of different diameters. However, you can create a fairly large point with a small ball by carefully moving it in a circle, gradually moving it away from the center.
Drawings and patterns on nails for dotsom beginners, such as in the photo above, are not all that can be created with this tool. If you moisten it in water, it will become indispensable for applying sand, velvet powder, and placing balls on the nail. A dry dot with a small ball is also convenient for applying rhinestones to your nails.
If you don’t have a tool at hand, then you should think about how to make dots for nails with your own hands. It is not difficult and does not require much time. The tool can be a hairpin with a ball at the end, or one of the “bristles” of plastic massage combs. The smallest diameter dot can be created using the refill of a ballpoint pen that has run out of ink. Some craftsmen put a bead on the tip of a toothpick; this method helps to select the required diameter of the circle.
If you want to purchase a dots for manicure and nail design, such as in the photo, then it will be useful for you to know how much this tool costs. One dots made of steel can be sold at a price from 50 to 200 rubles. Sets of two dots are also available for sale; their prices can vary greatly depending on the material and tool. The most profitable purchase seems to be a set that includes one pen and many attachments for dots with balls of different diameters. The cost of such a set can vary from 200 to 1500 rubles.
[yandex2] [google2]
How to use Dots?
Even a child can master the technique of drawing with dots.
But, first, it is advisable to practice on one of the volunteers or on plastic tips in order to “fill up” your hand .
Decide how it is more convenient for you to hold the handle of the tool; the brush should not be tense. Then dip the tip of the dot into the varnish and simply place dots.
When you learn to control their size and they turn out clear and neat, then you can begin to implement your manicure ideas. At the same time, do not forget about the sequence that should be followed:
- First of all, prepare your nails: adjust the shape, polish, remove or push back the cuticle.
- Apply a base that will protect the nail plate from pigmentation and extend the life of the manicure.
- Cover your nails with colored or clear polish and wait until it dries completely.
- Take a palette (you can use anything for this purpose - even a tea saucer), drop a little varnish on it or dilute acrylic paint to the desired consistency.
- Dip the tip of the dot into varnish/paint. Try to coat the “ball” with varnish evenly.
- Place the main points that will serve as the “framework” for your drawing. Hold the tool at a right angle to the nail plate, then the dots will be smooth and beautiful.
- Make sure that the paint on the palette does not dry out and renew it on time.
- Add the remaining "secondary" dots to complete the design. As a rule, these points are smaller in diameter.
- When the drawing is ready, wait until it dries and cover your nails with colorless varnish.
- Get the tool in order - remove any remaining paint from its surface using a cotton pad and nail polish remover.
- Enjoy your new manicure!
Using dots
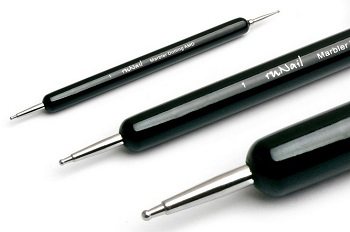
Set of dots for nail design
Dots are used by professional nail artists and girls themselves at home. The tool is easy to use and allows you to create drawings consisting of dots, lines, commas or strokes in no time. The size of the finished element depends on the diameter of the ball.
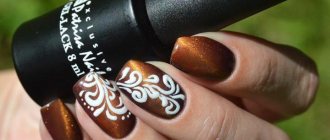
Recently, dots have become actively used for coloring complex designs applied using such a fashionable technology as stamping.
If you don't know what diameter of ball to choose, buy a kit that includes a rod and removable tips.
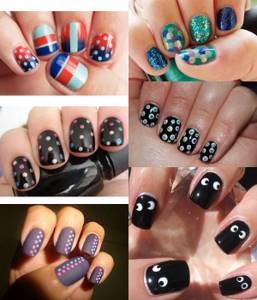
Simple designs on nails
Fans of minimalism (and just lazy people) can opt for simpler designs. They do not require much effort, but at the same time they look very impressive.
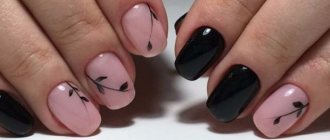
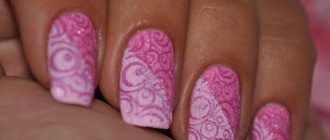
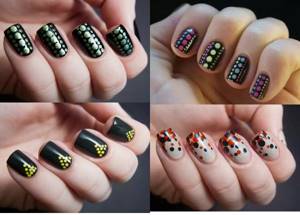
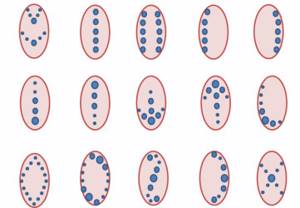
With the help of dots, you can decorate your manicure with dots and circles of different sizes, commas, curls created from dots decreasing in descending order.
You can also create geometric patterns from dots of the same diameter.
Here are some simple options for nail art using dots:
Option one:
- Cover the nail plate with black varnish.
- We wait until it dries.
- We spread white paint on the palette.
- Dip the dots into it.
- On the free edge of the nail we place many white dots of various sizes.
- After the drawing has dried, apply the finish.
Option two:
- Cover the nail plate with beige or light pink polish.
- We wait for it to dry.
- We spread white paint on the palette.
- Drawing French.
- We wait until it dries.
- Using dots, we make two rows of white dots immediately behind the “smile”.
- After drying, apply the finish.
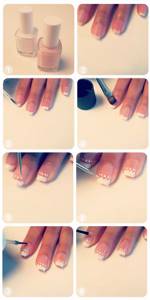
Of course, you can experiment with colors - choose them to suit your mood and style.
Dots manicure: tips
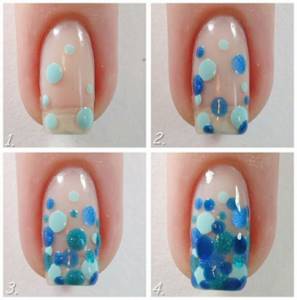
If you are not a professional manicurist, but a beginner, and you also do your own manicure, it is better to start with the simplest possible schemes - this way you will avoid mistakes and not lose interest in an unusual manicure. At the initial stage, step-by-step photo instructions - and some tips - will help you.
© catalinanailexpert
- To ensure that the dots are the same size, apply the polish onto the dots each time before working on an individual nail.
- To draw dots of different sizes, put varnish on a dots and place three or four “peas” in a row without lowering the tool into the varnish. Or, which is much easier, use a tool of a different size.
- If you are going to paint flowers on your nails, start from the center and then paint the petals in a circle. Make sure that there is a distance between the points and that they do not merge into one (the result may be an ugly blot). To make the petals longer (like those of a lily or daisy), make a dot using a dotter, and then stretch it to the side with a toothpick.
- Among other things, it's easy to draw hearts. Place two points at a short distance from each other, and then use a thin brush to draw connecting lines so that you get a heart.
Return to contents
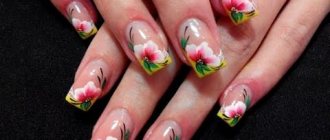
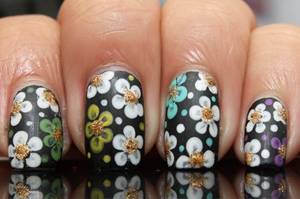
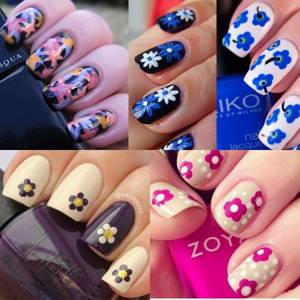
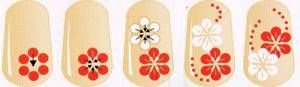
Drawings of flowers
With the help of dots you can easily create a “floral” manicure .
The easiest way:
- First, coat your nails with a base color and let dry.
- Then we place five dots-petals of a contrasting color.
- Place another point (color of your choice) in the middle of the resulting flower.
- Using this scheme, we draw the number of colors we need (of different sizes).
- After drying, cover the nails with a transparent top coat.
More complicated way:
- Cover the nails with the base color and wait for it to dry.
- Using dots, place petal dots on the free edge of the nail (use several colors). It should turn out so that the “petals” seem to overlap each other.
- We arrange the core points.
- After drying, apply the finish.
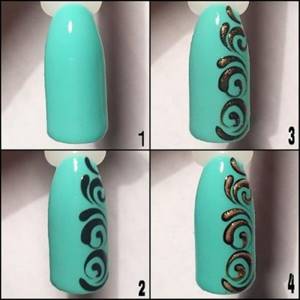
To create a more “atmospheric” manicure, flowers can be “diluted” with all kinds of curls.
Dots drawings
At first glance, a simple tool for nail design, in fact, has quite good abilities.
Dots is not as simple as it might seem at first glance, and dots are not the only pattern it is capable of.
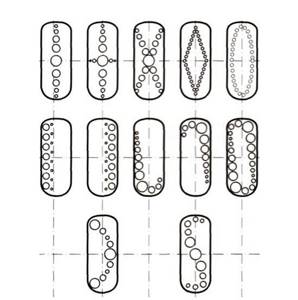
You can create several variations of drawings with Dots:
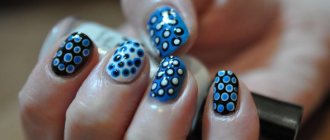
- Dots. A strip of dots decreasing in size is not the only option available to dotsu. Small dots can create an ombre effect on your nails when using two shades. An oriental pattern with dots in several bright shades or an imitation of Turkish cucumbers in one color look very colorful on the nails. Using dots on your nails, you can paint a dotted canvas or create a confetti effect.
- Flower theme. Chamomile petals are the “horse” of dots. They can be of any size and color, and can be drawn individually or cover the entire surface of the nail. Also, the depiction of flowers in the style of ceramic painting with a smooth transition of line thickness is quite accessible to dotsu.
- Animals. The convex image of the eyes, ears and paws of animals is subject only to dotsu, so this nail tool is used even when almost the entire drawing is ready.
- "Ladybug". The circles on the wings of this insect are just begging to be painted on the nails with dots.
Design for short nails
It is worth remembering that on short nails it is better to place the design not horizontally, but along the nail plate . This will visually elongate the nail.
Diagonal patterns are also acceptable.
You should not put too “fat” dots - they will not add length to short nails and will make the composition heavier.
About bright manicure ideas using dots
Each person is individual, and that is why all girls try to choose a manicure that will distinguish them from other girls. Unfortunately, many blindly follow fashion trends without knowing at all whether it will suit them. There are many ideas for bright and expressive manicure. You need to choose the right range of colors that will suit you.
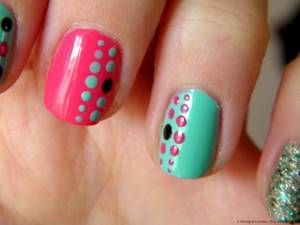
Using dots you can create bright manicures
A bright manicure starts with a bright base, and only then a design is added. You can create different compositions using dots. They can be complex and create a picture. You can also simply put a few dots for decoration and variety. One of the brightest designs is a pattern. In this case, the main thing is not to overdo it with the print, and it should not look stupid and tasteless.
Schemes of drawings
The final result will depend on how you arrange the dots and what colors you choose.
To be convinced of this, just look at the photographs.
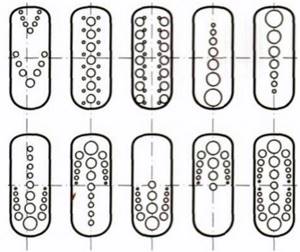
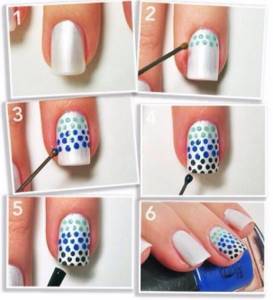
* By choosing three shades, you can perform a manicure with a transition of color and shape . At the tip of the nail we place darker and larger dots (2 rows), then - lighter and smaller dots (2 rows) and, directly at the hole, we use the lightest shade to place the smallest dots (2-3 rows).
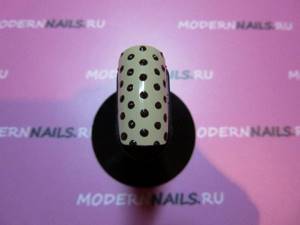
* A discreet manicure can be achieved by painting black polka dots on a white background.
* Bright circles on a black background will not leave anyone indifferent!
* If you apply smaller ones to larger circles (in the background color), you will get rings.
* An interesting pattern can be created by simply connecting the dots with straight lines.
Thus, we see that there are a great many ideas for nail art using dots. It all depends on your imagination and perseverance . Don't be afraid to experiment and always be original!
Drawings with gel polish
The application of drawings will differ slightly from regular varnish. After applying the base layer, it should be dried in a lamp for about a minute.
Next, the main color is applied. It should be dried for at least three minutes. If necessary, apply another layer. Before applying the pattern, be sure to remove the sticky layer with a special product.
Otherwise, the lines will not be clear. Further, the technique is the same as when working with regular varnish. The desired drawing or pattern is created.
The finished drawing must be dried in a lamp for at least 5 minutes. Then a fixing layer is applied and also dried in a lamp. After complete drying, you should sting the sticky layer of varnish.
How can you replace dots at home?
If you really want to create a dotted design, but you don’t have the right tools at hand, you can use other improvised items that are found in any home. You can replace dots:
- with a match. It has a round top and a square bottom. Alternating even dots and squares will help you get an interesting pattern;
- hairpin. Both ends end in smooth balls; the item can be used to apply small peas;
- stick with a cotton tip. Can be used to draw large dots, stripes, and fill in voids;
- a knitting needle, a hook with a rounded or pointed tip are suitable for applying a pattern as an alternative;
- a toothpick can be used to apply dotted, thin lines, to draw small details;
- a simple pencil has the shape of a hexagon. Great for applying multi-faceted shapes.
Simple and easy for beginners
Of course, it is better to see various techniques “live” or at least on video. Even photos of successful projects, as well as tips from experienced craftsmen, will help a lot with this. Or you can use Impress hard nail polish. The best way to master the art of nail aesthetics is through special courses, and the simplest techniques can be presented as follows.
Step-by-step instructions for creating simple drawings:
Applying flower petals
It’s very easy to apply flower petals with dots, then decorate them with additional decor, rhinestones and make the core a different color. The oblong petals are lengthened using brushes or a regular toothpick, which allows you to get attractive “commas”.
Spotted manicure
The now popular spotted manicure is also done using dots. You can use different colors, but don’t forget that each layer must be dried in a lamp.
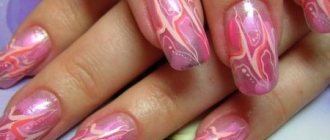
Abstraction and pattern
A beautiful abstraction is obtained by combining several techniques. For example, you can apply several colored lines on the nail, and then use a toothpick or brush to “mix” the colors in a certain order. Additionally, you can use dots to create circles, which can also be mixed with the general background. You can find out about hand cream with urea in this article.
Drawing monograms on nails
Nail stencils will help you create even complex monograms with minimal artistic skills. Patterns and ornaments decorated on top with shiny varnish of a similar tone look very unusual.
Rainbow manicure
A rainbow manicure is obtained by using several tones of bright varnishes. To do this, several strips of colored varnish are applied to the base, placing them as close to each other as possible, but without mixing. Using a toothpick, draw one or more lines to help create the sunburst effect. The location of the “rays” can be varied, as well as the direction of the stripes.
How to draw the snake skin effect correctly - step by step
The snakeskin effect is also distinguished by its original design. To create the desired look you will need green varnishes. A special mesh is applied to the base coat, and then varnish is applied. After drying, the mesh is removed, leaving stains resembling snake skin on the nails. After removing the mesh, the design can be corrected with a thin brush. The second layer can be applied to the location of the mesh and be contrasting in tone. An easier way is to use a ready-made gel polish with a snakeskin effect. After application to the plate, it independently forms the required pattern.
Drawing on a manicure is always stylish and fresh. There can be a lot of options for implementation, especially since the modern beauty industry is constantly coming up with new techniques and materials for this. Our article will tell you how to master simple designs on nails. You can find out about cream for dry skin at the pharmacy in this material.
To make the drawing beautiful
The simplest manipulations can be practiced at home, especially if you have minimal artistic skills.
For those who are not familiar with this process, you can use regular varnish, adjusting as necessary as you go. It’s also a very good idea to buy ready-made stickers.
By placing them on the nail plate in random order, the top coat will give the design the necessary durability and strength. A photo of Oriflame lip balm can be found here.
Video: dots and brush, nail design with patterns and dots
The main points of the correct execution of the drawing:
- It is best to take as a basis a colored varnish of a darker tone, on which the design will appear brighter.
- Each layer must be dried well in a special lamp.
- A good help would be to use a palette to mix colors.
- It is better not to take more than three primary colors, otherwise the manicure will look sloppy.
- An excellent idea is to design each finger in a special technique, as well as make arbitrary variations.
- If a stencil is used, it must be removed only after the applied layer has dried. A video on how to paint your lips with a pencil can be found here.
It is very convenient to mix colors on a piece of foil.
In order not to spend too much on expensive materials, it will be enough to buy the basic colors of the solar segment, and then, according to the laws of color combination, mix the necessary tones.
Video: drawing flowers on nails