The role of dots in needlework
Today we want to talk to you about what you use to create your products.
In addition to high-quality material and golden hands, the master needs various tools to bring his products to the state of Ideal. Let's talk about Dots. What is "dots"? From English Dot - translated as “dot”, the letter S is added only to indicate the plural. So, initially, it is a tool that makes points on a surface. It is mainly used by manicurists and pedicurists to create beautiful nail designs. However, in our opinion, this is a universal tool and should not be attributed to a specific area.
All dot tips must be metal - only in this case will the tool be justified when working, for example, with polymer clay.
Dots are micro-rolls with micro balls for a wide range of applications, used: - for sculpting miniature flowers from polymer clay; - for sculpting miniature flowers from foamiran; - for sculpting jewelry; - for sculpting doll miniatures; - for dot painting; - for leather embossing; — for paper embossing; - for scrapbooking.
Dots are indispensable for applying dots when coloring petals and leaves (for orchids, lilies, etc.), for decorating the centers of flowers), and are convenient for decorating wedding glasses.
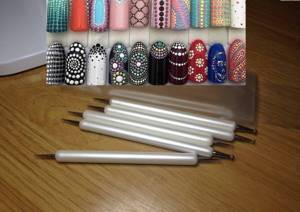
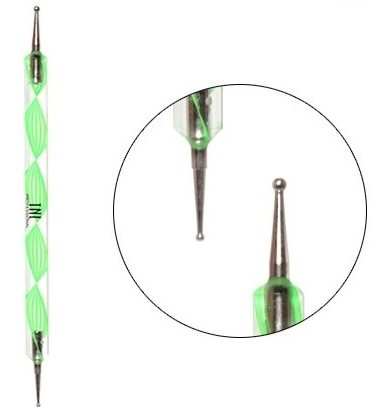
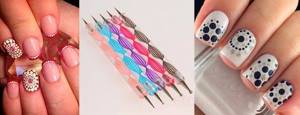
A dots is a tool that is used for drawing. This tool came to us from the art of painting nails, but it is also very convenient in decoupage, painting and working with Foamiran. It is a plastic or wooden stick, the size of a writing pen, with a metal tip, at the end of which you will see a ball. With this tool you can draw dots of different sizes. This is achieved by using sets of dots with tips of different sizes. Over time, their popularity in the Western world began to gain momentum, and manufacturers improved the instrument, making it double-sided. Now each dots has two metal balls of different sizes. For those who want to engage in such amazing creativity as nail design with artistic painting or use dots in creativity, it is enough to have in their arsenal one dot with a small and medium ball.
A complete set for professionals consists of tools ranging in size from 1 to 10.
Using dots, you can paint with acrylic, or lay out patterns with gel. You can also work on uncured acrylic or gel. Moreover, dots are not the only element with which you can build an image, although the common method of applying dotted lines with dots decreasing in size has great potential. You can draw zigzag lines and get petals, stems, flowers, curls and more complex patterns.
Someone will ask: “Why use dots, because we are used to doing such things with contours?” But personally, I don’t always like the volume effect that contours give. With the help of dots you can get beautiful dots and drawings that will look like you painted them with a brush, and therefore will not overwhelm your work.
You can diversify the final result by mastering the technique of drawing lines. The shape of the line depends on the speed of paint application. If you dots slowly, the line will be uniform and long. At high application speeds, the lines are short and thin at the ends.
Having mastered the application of simple shapes, you can build quite complex images without having any artistic skills.
You can also diversify the pattern using small decor, such as rhinestones. It’s also convenient to post every little thing using dots. When working with paint, it is very important to remember that after each stroke you need to wipe the dots on a damp cloth so that paint residues do not accumulate on the sides of the tool and stain the work. At first, it seems that this is very inconvenient, but after a while your hand gets used to it and you will fully appreciate the convenience of the tool.
The work must be done slowly, because the paint flows slowly over the spherical surface and lasts a long time. If you get used to it, then in your creativity you can draw lace, flowers and many more beautiful and unique designs with dots.
Well, that's probably all. It all depends on your imagination and ability to use the tool! You can use it, as you have seen, in any creative activity, or in most types of needlework.
We will be very glad if this article was interesting to you and if it gives you a creative impulse!
Source
How to create a dots manicure design for nails, step-by-step instructions and tips
Artistically designed nails are attractive, harmoniously complement the image, and emphasize the style and character of the lady. The nail industry has an impressive collection of tools necessary to perform manicures of any complexity. Dots are one of the essential tools for creating a picturesque composition on your nails. What is dots? How to use the tool, step-by-step actions for beginners, techniques for applying patterns, what can be replaced, photos and videos here.
What is dots
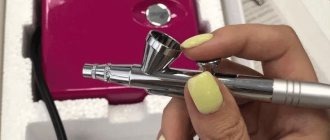
In appearance, the dots are similar to a gel pen. The dye is drawn onto the tip in the form of balls of different sizes, which are located at both ends. Designed for creating openwork patterns using solid, multi-colored dots. The tool is convenient for drawing lines of different thicknesses, filling empty spaces with multi-colored paints, connecting dots, and drawing contours. Metal dot tips allow you to use the item in various fields of applied art:
- sculpting miniature flowers and leaves from plastic polymer clay;
- production and decoration of costume jewelry;
- decoupage, scrapbooking;
- embossing paper, pieces of leather;
- dot painting;
- decoration of glass, porcelain, wood, metal products.
Acrylic or gel is used to apply the design. Using dots, you can create patterns in the form of dotted lines, zigzags, waves, monograms, and curls.
Why do you need a dots stick in manicure?
A dot stick is a small thin object made of wood, plastic or metal. Has one or two metal tips with a rotating ball at the end. The mobility of the ball allows you to collect paint on its surface, apply a dotted pattern, and lay dotted, straight, geometric lines. Dots for nail design are needed to create original, original, exotic ornaments and patterns.
- simple, convenient;
- allows you to quickly decorate your nails and create a special design;
- varnish, gel, acrylic are suitable as paints for painting;
- suitable for independent use at home;
- Suitable for beginners in art design;
- withstands repeated use.
Types of tools
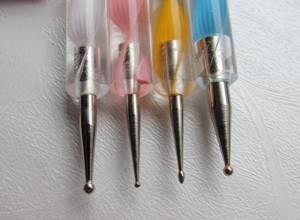
Dots can be single-sided or double-sided and differ from each other in the diameter of the rotating ball. One tool can have different diametrical sizes of the ball to make it possible to apply points of different sizes in the same color. A tool with a micro pea on the end is designed for drawing fine, slightly noticeable details. The shape of the ball is a round pea, cylindrical, elongated, pointed.
There are dots with a silicone brush on one side and a metal ball on the other, which is very convenient when making designs. Dots can be used to attach tiny rhinestones, beads, beads to the surface of the nail. Tools are sold as a set and individually. The set allows you to draw a pattern in several colors and shades. The product differs in design and material from which it is made - wood, metal or plastic. A simple, unassuming look or a glamorous one with sequins and embossed patterns throughout.

Rating of the best
The best dots produce:
- Zinger. The German company produces nail care products and other cosmetics. Metal dots, double-sided, with different ball sizes. The product is high quality, certified.
- Planet Nails. A well-known brand that produces high-quality products for the nail industry. Recognized double-sided dots for drawing, for applying rhinestones and beads.
- Ice Nova. It produces dots for applying small decor, for creating openwork patterns, ornaments of various shapes, three-dimensionality.
Where to buy dots
You can buy the tool in specialized stores selling manicure products, or via the Internet. Sold individually and in packages in several colors, with nozzles of various sizes.
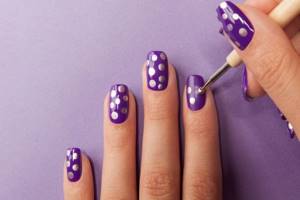
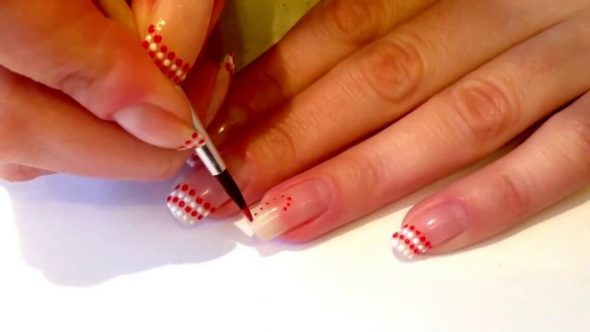
How to use Dots: step-by-step instructions
How to use Dots? The tool is so easy to use that a beginner who loves a beautiful manicure can master the drawing technique. To be on the safe side, it is better to practice on a piece of paper and only then apply the pattern to the prepared nail. Start by applying beautiful even dots, use a thin tip to lay dotted lines, connect, try to depict a flower, monograms, curls. Before creating a pattern or ornament, sequentially perform the following steps:
- prepare your nails for decoration. Do a hygienic manicure (remove the cuticle, shape it with an abrasive file, polish the nail surface);
- cover your nails with a protective base;
- carefully apply colored varnish or gel to the base in accordance with the intended design;
- drop some paint for painting (gel polish, acrylic) onto a piece of paper, foil, or any flat, clean surface;
- put a little paint on the ball tip of the tool, transfer it to the nail at a right angle to prevent spreading and get a beautiful, even pattern;
- use balls of different sizes, then you can arrange flowers from peas into dots;
- after drawing, cover the surface of the nails with transparent varnish to secure the result;
- Clean the tool from paint and place it in a closed container for storage.
How can you replace dots at home?
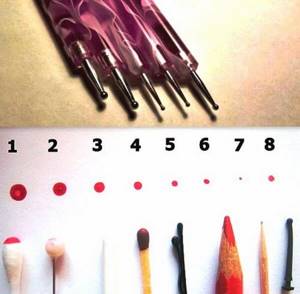
If you really want to create a dotted design, but you don’t have the right tools at hand, you can use other improvised items that are found in any home. You can replace dots:
- with a match. It has a round top and a square bottom. Alternating even dots and squares will help you get an interesting pattern;
- hairpin. Both ends end in smooth balls; the item can be used to apply small peas;
- stick with a cotton tip. Can be used to draw large dots, stripes, and fill in voids;
- a knitting needle, a hook with a rounded or pointed tip are suitable for applying a pattern as an alternative;
- a toothpick can be used to apply dotted, thin lines, to draw small details;
- a simple pencil has the shape of a hexagon. Great for applying multi-faceted shapes.
Useful tips and secrets of using Dots
To make the ornament or design smooth and flawless, follow certain rules:
- Apply paint (gel polish, acrylic) evenly onto the ball so that the drop is round and without lumps.
- When working with acrylic, each time before dipping the dots into paint, wet the tip with water.
- To collect paint onto the tip of the tool, use a palette in the form of a flat plastic form, foil, cardboard, or thick sheet of paper. The palette is convenient for mixing paints to obtain the desired shade.
- Wipe the tip of the dot with a dry cloth every time you collect coloring material. It will help to avoid blurry, uneven shapes in the pattern.
Attention! If you are using colored varnish as paint, before dipping the tip of the tool into the colored drop, wipe the tip with a cotton pad soaked in nail polish remover.
- To make a beautiful pattern, mark the main points on the surface of the nail in advance, draw small details, lay dotted lines, they will help maintain the shape, image and style of the future work.
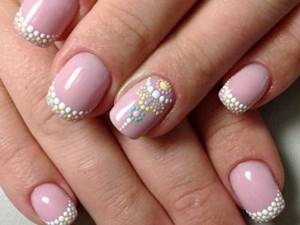
- Use an object to apply rhinestones, beads, beads, or glass pebbles to your nails.
Tips and recommendations from experienced professionals:
- Apply larger shapes first, then smaller ones. With one dip of the tip you can draw several elements at once;
- interesting original drawings are obtained on uncured varnish or acrylic;
- Draw longer elements (monograms, curls, commas) slowly, the pattern will be more accurate;
How to draw simple dot patterns with dots
Dots nail design is easy to learn and easy to put into practice. The simplest design is to cover the surface of the nail with multi-colored dots completely or partially. With a harmonious combination of colors, a bright, original ornament is obtained. More complex patterns consist of dots, curls, smooth lines, images of flowers, plants, animals, and insects. Before decorating your nails with dots, think through the design and color combinations.
Confetti
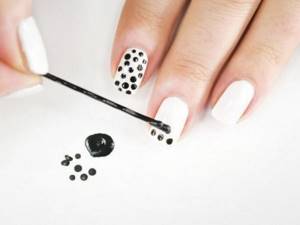
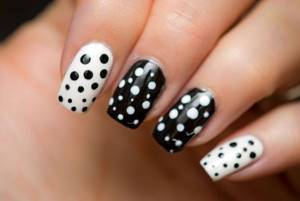
Lightest design. Apply colorful dots on your nails in random order to create a confetti effect. Peas can be placed vertically or horizontally in a row. Make them multi-colored or plain. Use a contrast effect (black on white, white on black). If the colors are in harmony with each other, you will get a catchy, cheerful manicure.
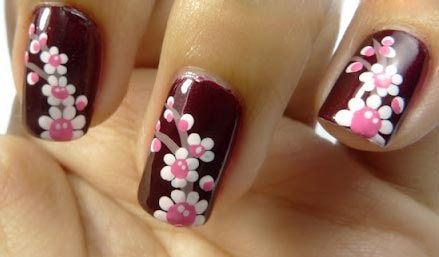
spot flowers
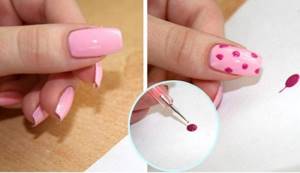
Drawing flowers using dots is not difficult. Dip the tip of the tool into the paint, transfer it to the surface of the nail, you will get the center of the flower. Surround the middle with petal dots using a contrasting color. You will get dotted flowers.
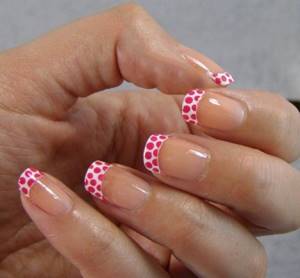
French
A classic French jacket is appropriate for ladies of any age. The technique of performing a French manicure is complex; to create a flawless “smile” you need to try. Dots makes this task easier. Apply a varnish base to the prepared nail, dip the tip of the tool in white varnish and draw a “smile”. Make the tips of your nails plain or sprinkle them with contrasting confetti and dotted colors. Secure the resulting result with colorless varnish.
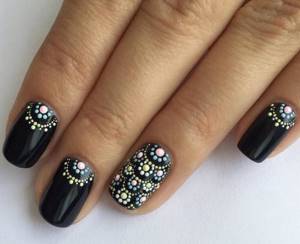
Lunar manicure
An original lunar manicure can be done using dots. To get an elegant, sophisticated manicure, place the pattern on one or two fingers. Cover your nails with varnish and dry. Apply a drawing, draw out thin lines using a sharp toothpick, make large elements more voluminous and convex. Using a thin brush, highlight the cuticle area with a contrasting tone and highlight it with an ornament. The holes should be even and identical.
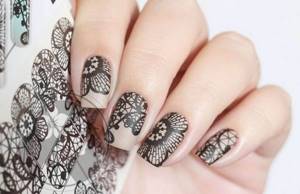
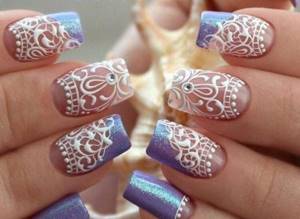
Lace
Lace motifs on well-groomed nails look gentle and elegant. Attach an openwork stencil to the surface of the nail (you can make it yourself or use a ready-made one), coat the nail plate free of lace with varnish. Remove the stencil, draw the lace with dots, and cover with a thin layer of varnish to secure the design.
Other patterns
Points and lines can be placed vertically, horizontally, and diagonally. You can turn one of the marigolds into a beautiful mandala, depict a dragonfly, a butterfly, a funny face of a kitten, or a panda bear. Place initials and numbers in dots. Zigzags and waves look impeccable, dividing the plane into two or three contrasting zones.
Video on the topic: how to use dots for nail design
To visually consolidate the information received, we offer a video about using the dots tool and how to make dots designs on nails.
What is dots?
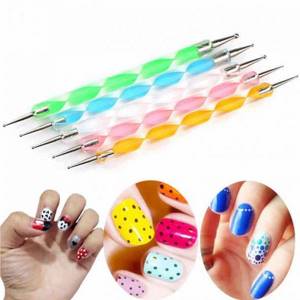
Dots of different sizes
This simple tool is used for making a variety of patterns, as well as for applying rhinestones and coloring stamping. Dots are used to draw ideal dots of various sizes, commas, lines, waves, and various curls. Nail design turns out neat and beautiful even at home.
A dots is a wooden or plastic handle with a ball-shaped tip. Nowadays you can quite often find double-sided dots. Its tips have different diameters. You don't have to be an artist to create wonderful dots drawings.
Anyone can learn to use this simple tool. By combining different colors and elements, you can create a new fashionable manicure for each occasion.
What is a pusher?
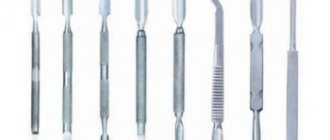
A pusher (another name is “scraper”) is a manicure tool, on the one hand having the shape of a spatula, on the other - various modifications (hatchet, spatula, etc.).
The main function of the device is to remove the cuticle and pterygium. Double-sided nail pusher
Types of pushers
Pushers (scrapers) can be made of different materials: metal, plastic, wood, silicone. Basically, pushers differ in the types of tips and are:
- one-sided - with one working surface;
- double-sided - the classic version with a spatula on one side and a hatchet on the other;
- with a rubber tip (such options are the safest);
- especially for pedicure: with a wider blade.
The instruments also differ in tip shapes: oval, almond-shaped, square, round, flat, convex.
There is another division: by scope. Pushers can be medical (for example, to remove an ingrown toenail), manicure or pedicure (with a wide blade). Since our area is manicure, we become a manicure pusher and learn all about them. Double-sided nail pusher
How to use Dots?
Using the dots is simple and convenient. Its popularity is growing day by day. To create wonderful designs on your nails, you just need to have certain skills and remember a few rules for using dots. To make the pattern you will need: a base varnish, acrylic paint or varnish for applying the pattern, a palette, a cotton pad or napkin, nail polish remover and, of course, dots.
Sequence of performing a dots manicure:
It is important to remember that the amount of varnish on the ball gradually decreases as you paint. Therefore, to ensure that all points are the same size, you should dip the tool in varnish each time.
With a decreasing row of dots you can highlight one nail, and using commas you can draw cute flowers; they are very relevant in the spring and summer. Geometry is in fashion. When drawing a line, keep in mind that the slower you move the dots, the longer it will be.
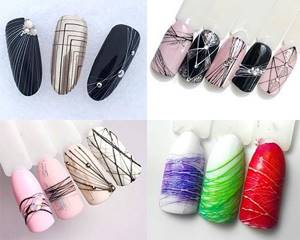
How to use gel web - application and design options
The fastest possible design, perfect fine lines, geometry or abstraction - at its best and all with one super product. Spider gel or spider gel quickly burst into the nail industry and won its niche in gel polish design.
If you are good at drawing on nails, forget about your skills, spider gel has completely different properties than paint and any design with it is impromptu and an active action.
In this article we will look at the intricacies of applying webs and what design possibilities this product opens up.
Methods of applying spider web gel paint to nails
- What tools to use with spider web gel paint.
Using gel web is easy; to make a design you will need to choose from: dots (preferably with a mini ball), a thin brush, an orange stick or gloves (vinyl, nitrile, latex).
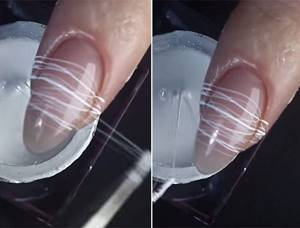
- How to apply spider gel and make fine lines.
The thickness of the lines directly depends on the depth of immersion of the dots in the jar; the more composition you capture, the thicker the thread will be. In this case, if you dip the dots very lightly into the gel, the web will grip very weakly and may tear when stretched.
By stretching the gel (pull the dots with paint on the tip away from the can), thinner lines are obtained. Gradually, during the process of creating the design, the thread becomes almost transparent.
- How to use spider web gel paint.
You can apply spider web gel to a finished manicure with gel polish directly on the top without a sticky layer or after removing the stickiness from the finish or color coating.
Spider gel can be left as a convex design, diluted with additional decor, or covered with a top.
Since the web has a modest color palette, you can make it colored yourself. Microglitter, velvet sand, acrylic powder can be sprinkled onto the undried web or with the remainder of the dispersion layer; rub in the mirror rub.
- How long to dry the spider web gel.
The thinner the gel lines, the better they dry - 20-30 seconds of drying is enough, the time increases in relation to the thickness of the threads.
Do not create lines more than 1 mm thick, since the composition is not completely baked in the lamp and a liquid gel remains inside the web.
In general, the drying time of the composition in the lamp is ambiguous; read the instructions on the manufacturer’s jars and practice with tips.
VIDEO INSTRUCTIONS » alt=»»>
- What thickness of spider web gel is best?
Many manufacturers rushed to release the popular design gel, but the density of the compositions varies.
It works better on fairly dense, thick textures; their threads do not break and allow you to draw out the finest lines.
More liquid compositions can cause threads to sag quickly and break.
- How to remove gel cobwebs from skin.
There are several removal methods:
- Before making the design, apply Skin Defender protective tape to the skin of the rollers (you can read about the product in our article). After performing a manicure, simply remove the dried film from the gel paint and everything will be clean.
- Gently wipe away any cobwebs from the skin before drying with a lint-free cloth and cleanser. You can also apply cream to your skin before creating the design to make it easier to remove the gel.
How to create a gel design with spider webs
You can make an interesting design with cobwebs using any of the above tools; for some work a brush is more suitable, for others dots, it’s all a matter of practice.
The described methods of applying web gel are performed on a finished varnish coating or after applying a colored layer with the stickiness removed.
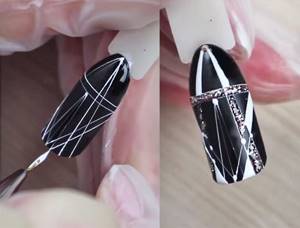
- For making chaotic or sketched rounded lines.
- Grab a little gel directly from the jar (or put a separate drop of paint on the palette).
- Using a brush or dots, draw out the required thickness of the thread, pull it to the level of the nail and, without touching the surface of the gel polish with the tool, place the web in the invented pattern. The thread is in the air all the time, and after pulling it is quickly placed on the nail.
- The dots/brush moves in relation to the nail at an angle of 90 degrees or, if more convenient, completely parallel in the air. The movements should be fast enough, but not too sharp, so that the threads do not break.
- To create rounded lines, the web is draped over the nail, but not tightly wound along the axis (remember that you will need to remove the excess).
- When the lines are completed, send them to the lamp. Once dry, complete the design or cover the lines with topcoat.
Graphic design gel spider web
To create graphic patterns, you can act in two ways: pull a thread from a jar and place fastening points on your glove, or wrap a small drop of gel on your brush and move from point to point.
Web graphics features:
- We draw the lines quickly and clearly; delay causes the thread to sag.
- When working from point to point - do not place clear gel drops, lightly touch the nail - barely noticeable and begin to draw a pattern. They pulled out the desired section in the air and placed it on the nail.
- After drying the lines in the lamp, fill the geometry windows with gel polish or other decor.
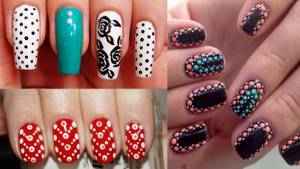
Manicure ideas
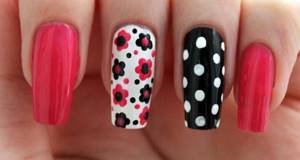
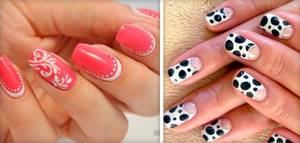
Manicures with dots have been trending for several seasons now and are not losing ground. And it is recommended to start getting acquainted with dots with a dot pattern. A manicure “a la fly agaric” looks original and is easy to perform. Red color is relevant at any time of the year. Contrasting white dots make nails even more vibrant and attractive.
The main thing is that this cheerful manicure looks harmonious with your clothing style and matches your inner state.
For lovers of delicate shades and discreet design, delicate daisies are suitable. The base can be a clear varnish. Black polka dots on white nails look elegant. It will look organic with a black and white outfit and accessories. A design in pastel colors, decorated with a series of decreasing dots, is suitable for a business woman, and thickly layered multi-colored polka dots are suitable for a young, cheerful girl.
Don't limit yourself to a manicure with a variety of dots. Dots are convenient for drawing a straight smile line, vertical lines, and creating many other nail art options. Everyone will find a composition for themselves.
At first, you should not combine many shades; limit yourself to 2-3 contrasting colors. Creating intricate nail designs using a wide range of colors requires experience and some skill. Over time, you will get a new nail design quickly, beautifully and neatly.
Combine different manicure techniques to make your nails bright and unique.
Source
Why do you need a dot stick in manicure?
This term refers to a small thin stick that can be made of wood. It is also often made of plastic. The tip of this tool looks like a metal ball, and it can have different sizes.

Today, double-sided dots are increasingly being sold - at their ends there are balls of different diameters. Professional craftsmen will need a whole set. If you need a dots for home design, a small to medium size will suffice. Large instruments are used extremely rarely.
Dots is very easy and convenient to use. It allows you to quickly decorate your nails with dots, lace and other designs. It makes it easy to draw snowflakes or flowers. Dots are often used to create a small additional pattern. It can also be used for gluing rhinestones onto paintings.
What patterns can you draw with a brush?
With this tool you can easily create a huge number of beautiful and interesting patterns. For example, a butterfly or a flower applied with dots looks great.
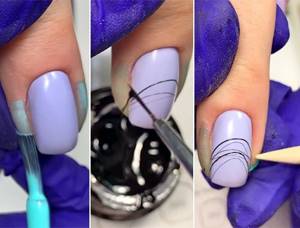
Lunar manicure
To perform a lunar manicure decorated with a floral pattern, you can use a dots. In order not to make it too pretentious, it is better to perform the pattern on only two nails - most often the middle and ring fingers are chosen for this.
Then you can paint your nails with varnish of the main shade and dry well again. After this, you can cover them with a second layer of varnish and use a dot to create a design. To do this, you need to drop a little varnish onto the foil and use a tool to draw a flower consisting of 4-5 dots. Then use a wooden stick to draw out thin lines to make the composition more voluminous.
Using a thin brush, create a semicircle at the base of the nail plate. First you need to make an arc, and then fill it with color. It is important that the holes are the same.
French
This classic manicure suits all girls. The French technique is considered quite complex, since it is not easy to create a neat white line. However, dots makes this task much easier.
First, you need to prepare the nail, and then cover it with base varnish. The main stage of such nail art is considered to be making a smile. To do this, the dots need to be dipped in white varnish and used like a pen. After applying the main design, the nails can be treated with a fixative.
spot flowers
The image of dots on nails is considered one of the most popular designs. With the help of dots you can create such a design quite easily. To do this, you need to dip the device in varnish and cover the dried base with dots. This way you can create designs of different sizes.

It is also quite possible to show your imagination and make various patterns from dots - for example, flowers. Thanks to the use of dots, you can get designs of different sizes and colors, which will make your nail art truly unique. To make a beautiful flower, you need to put a large dot in the center, and use smaller dots to make the petals.
Lace
Lace designs on nails always look very gentle and feminine. To perform them you need to choose a varnish. Then cut out a wavy pattern from the tape, which will then become lace. It should be glued to the nail, and the free area should be covered with a delicate shade of varnish. After this, remove the tape.
Now you should use dots to make the lace, get rid of excess varnish and complete the neat design. To fix the pattern, the nails need to be covered with another layer of varnish.
Tools and materials for stamping
To perform the above steps you will need certain tools and materials.
Stamping plates
Stamping plate PN-05 (9.5*14.5 cm) ParisNail
Stamping plate PN-03 (9.5*14.5 cm) ParisNail
Stamping plate PN-02 (9.5*14.5 cm) ParisNail
Stamping plate PN-01 (9.5*14.5 cm) ParisNail
Stamping plate PN-11 (9.5*14.5 cm) ParisNail
Stamping plate PN-12 (9.5*14.5 cm) ParisNail
These are metal plates on which various patterns and designs are engraved. When purchasing a plate, you must make sure that the engraving is deep enough - in this case, you will not have problems transferring even the smallest design. Stamping plates from ParisNail have this quality. In addition, they are sold in very convenient packaging:
- You can store the plate in them to protect it from scratches;
- to show the client a drawing, there is no need to take the plate out of the pack - all the drawings from the plate are included on the packaging.
You can also use a convenient and stylish album for stamping plates or a stamping plate organizer case from ParisNail for storage.
Album for stamping plates 9*15 ParisNail
Case organizer for stamping plates 6*12 and 6*6 cm ParisNail
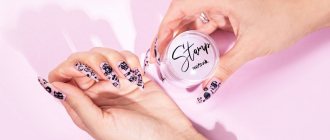
Stamps for stamping
Stamping stamp with two ParisNail pillows
Stamp and scraper for stamping Echo Go Artsy ONIQ
Stamp and scraper for stamping Echo Gold Stamper ONIQ
A stamping stamp is a special, most often silicone product, with which an image is transferred. The quality of the stamp also affects the result.
What to look for when buying a stamp?
Material
Stamps are made of rubber and silicone. Rubber stamps are denser, silicone stamps are soft and pliable.
Number of working areas
There are single-sided stamps - they have one pad for transferring the image. There are also double-sided stamps. They already have two pads, which differ in size and density. The stamping stamp from ParisNail has two cushions. The top one is silicone and the bottom one is rubber. The rubber pad allows you to transfer the design more accurately, reduce its size and prevent distortion.
Transparency and color
The colorful stamps have multiple interchangeable pads that come in a variety of colors. This helps if the varnish on one of the pads is hard to see. But a more convenient alternative is a transparent stamp. Both the pad and the holder can be transparent. This allows you to immediately see the future result while applying the image to the nail plate.
Scraper
Necessary to stretch the varnish over the plate with images. The scraper can be metal or plastic. We recommend choosing a plastic scraper, since a metal scraper can scratch the plate. By the way, when you purchase a ParisNail stamp, you receive a plastic scraper in the set.
Varnishes for stamping
Stamping polish 08 silver ParisNail 10 ml
Stamping polish 07 gold ParisNail 10 ml
Stamping polish 03 red ParisNail 10 ml
Stamping polish 02 nude ParisNail 10 ml
Stamping varnishes do not need to be dried in a lamp - they dry in air. Therefore, when working with varnish, you need to act quickly. For this reason, they are more suitable for experienced craftsmen than for beginners.
Note! ParisNail stamping varnishes have a moderate drying speed, so even a beginner will be comfortable working with them.
Stamping varnishes can be mixed with each other. But since they air dry, mixing colors is more suitable for the reverse stamping technique.
Gel paints for stamping
Stamping gel paint 11 red ParisNail 8 g
Stamping gel paint 05 yellow ParisNail 8 g
Stamping gel paint 03 silver ParisNail 8 g
Gel-paint for stamping Echo Orange ONIQ 5 ml
Gel stamping paints are easy to use for both beginners and professionals. They dry not in air, but in a lamp, so you don’t have to rush when working with them. In addition, gel paints allow you to print a drawing several times; this will not work with varnishes.⠀
Liquid for caring for stamps and plates
When working with stamping varnishes, wipe the plate and scraper with nail polish remover before and after work. It is enough to clean the stamp with adhesive tape, tape or a special roller for cleaning the stamp.
When working with gel paints, wipe the scraper and plate with a degreaser. First wipe the stamp with a lint-free cloth moistened with a degreaser, then with adhesive tape.
Base and/or top for securing stamping
Consolidation is one of the most important stages of the technique. If the design occupies more than 70% of the nail plate, then you first need to cover it with a base and then with a top. If the design occupies less than 70% of the nail, then it is enough to cover it with a top coat.
How to replace a tool at home
Don't be upset if you don't have dots. Instead of this device, you can use any similar objects. A hairpin with a ball at the end is perfect. An equally effective pattern can be obtained using an ordinary ballpoint pen, a toothpick or an orange stick for manicure. The main thing is to apply the drawing as carefully and patiently as possible.
Possible options for replacing dots also include the following:
It is important to consider that small objects are not very convenient to hold when drawing. To solve the problem, you should use a regular pencil with an eraser at the end. To do this, just stick a pin into it.
Photo ideas for nail design using dots
Dots helps to realize the most daring ideas in nail design, which is confirmed by numerous photographs. With the help of this simple tool, you can create a variety of designs on your nails - lace, floral patterns, geometric patterns. In any case, they will look neat and attractive.
Dots are a very convenient device that helps you create various patterns on your nails. With this tool you can get many interesting nail art options. The main thing is to be patient and do everything as carefully as possible. As you complete such drawings, you will acquire the necessary skills and be able to independently perform a beautiful salon manicure.
Source
How to use a pusher?
If you are using a spatula to push back the cuticle, you will first need to treat the skin with remover, wait about a minute and then use the flat side of the tool to gently push it down towards the nail bed.
Make sure that the angle of the scraper does not exceed 45 degrees. Don't press hard, work delicately. Do not work under weight: place your fingers on a flat surface to minimize the possibility of accidental injury. Is there dirt on or under the nail? Then carefully and thoroughly clean them with a hatchet. Pushing back cuticles with a pusher
What is dots
Dots for nail design (how to use is described below), or dotter, is a tool for creating designs on nails. It looks like a pen with a small metal ball at the end.
Most often, dots are made double-sided, with two balls of different diameters at different ends.
What is it needed for
Initially, dots were created to make polka dot manicures. This is evident from the name. After all, “dot” translated from English means “point”. In addition to points, they are comfortable drawing straight and curved lines, making contours and painting the space inside them.
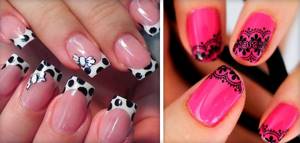
Dots are easy to use to create military or leopard print nail designs. With proper skill, they can be used to paint openwork lace and other complex patterns on nails.
Types of instruments
The only significant characteristic of the dots is the diameter of the ball-tip. The size of the picture depends on it.
All dotters are divided into three groups:
It is better for a beginner to start with two dotters: large and medium. Most often, dots are made double-sided. Therefore, it will be enough to purchase only one tool, choosing the most suitable tip diameters.
Rating of the best
Dotter is a very simple tool. Therefore, the brand does not play any role. A tool ordered through a well-known Chinese resource will work the same as one purchased from a specialized nail art store.
Below is a rating of seven reliable dots sellers on a well-known purchasing resource:
For those who are just starting to paint on their nails, one double-sided dot with balls of different sizes will be enough. Those who want to achieve perfection in nail art will need a set of several tools.
As a rule, the set includes 5 dotters with different tips: from smallest to largest. A variety of sizes will allow you to bring to life the most intricate patterns.
Dots drawings on nails
Are you unable to draw even dots, commas or circles on your nails using a paint brush and polishes? No problem. Now the manicure industry offers a very simple and affordable solution to this problem, namely a special tool for nail design, which is called DOTS, which translated from English means nothing more than dots. It is with the help of this tool that you can achieve perfectly even dots of various sizes, and, of course, other small details on your nails that are quite difficult to draw evenly with a simple nail design brush. Let's find out more about this tool and how to use it correctly.
What is dots?
A dot is a small thin stick, made of wood or plastic for convenience, the tip of which is a metal ball. It can be of various sizes. Recently, double-sided dots have become increasingly sold, both ends of which look like balls, but of different diameters. For professional design, it is better to purchase the entire set, but for personal use, medium and small sizes will be enough; large dots are used extremely rarely.
The dost is very convenient and easy to use, so no artistic skills are needed here. With it, you can easily decorate your nail with descending dots, garland, lace, straight lines or a sprig of commas. This is achieved due to the fact that the paint at the tip of the paint gradually decreases, and the slower you paint, the longer it lasts. Very often dots are used to create a small additional pattern or decor. Dots are good for applying rhinestones to a design.
Creating a nail design using dots
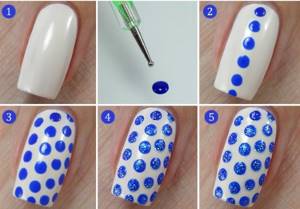
- First, paint your nail with your chosen nail polish color and wait for it to dry. Only after this you can start decorating with dots.
- Apply paint to the palette, preferably one that contrasts with your background color. It is best to use acrylic paint. Place it on a metal ball, drowning the dots a little in the paint.
- Use the dots as if you were using a pencil or pen, draw dot lines or commas. These are the main elements of dots painting. Remember, the slower you draw, the longer the lines will be. Don’t forget to also periodically wipe off the paint from the dots on a napkin. You can try to draw several petals, resulting in an even flower. The convenience of using dots is that at the end the line always becomes thinner and you do not need to adjust the pressure, as with a brush. This happens because there is gradually less paint on the ball.
You can come up with some interesting compositions of your own from the basic elements of dots; as a rule, such designs are very simple and elegant. For example, you can complement a French man’s smile with a garland of dots - and this is no longer just a French man! Experiment, and your work will be unique.
Dots nail design video
Tatyana, author of the blog “Manicure at home from Tanyusha!” was with you. Subscribe to my blog newsletter so as not to miss the most interesting and exciting articles from the world of manicure. That's all for today, good luck and see you again!
If you found this page useful, please recommend it to your friends:
How to use Dots: step-by-step instructions
Dots for nail design (step-by-step instructions explain how to use to make a spectacular design) can be used at home:
Drawing with dots is similar to drawing with a regular pen. You just need to monitor the amount of varnish on the ball. If there is not enough of it left, the pattern will not be visible. Excess can lead to unsightly blots.
The thickness of the lines and the size of the dots depend on the diameter of the ball. For a beautiful manicure you will need dots of at least two sizes.
It is convenient for small ones to draw lines and small dots, and for large ones it is convenient to make large peas and fill large areas inside the contour.
Dipping dots into a bottle of nail polish is inconvenient. It's so difficult to regulate the amount of polish applied. In addition, there is a high risk of staining the handle, and then all the objects lying nearby. It is more convenient to use a palette. You can make it yourself from a sheet of paper or a piece of foil, or buy it at an office supply store.
When drawing with dots, you must not forget about the following rules:
Using dots, you can make a dotted pattern - an analogue of ombre.

You just need to put peas in a row, gradually changing the tone of the varnish from light to dark or vice versa. The easiest way to do this is by diluting the selected shade with white varnish.
How to draw simple dot patterns with dots
The simplest pattern that can be made using dots is dots or polka dots. To do this, you will need at least two shades of varnish: for the main coating and for the design. The dots can also be made in different colors, but it is not advisable for beginners to use more than 3-4 colors. It will be very difficult to draw peas beautifully and neatly.
Simple nail design, which is most convenient to use with dots
Colors can be:
Dots for nail design (how to use to create a dotted manicure is described in detail below) is suitable for creating any image:
The dots can be the same or different sizes. For identical peas, you need to add varnish each time. If you draw several elements in a row, each subsequent point will be slightly smaller than the previous one. This makes it convenient to draw a “fading” series. And the easiest way to vary the size of the peas is to take dots of different sizes.
How to properly care for a pusher?
The scraper must be disinfected after each use. This can be done with an antiseptic solution, by boiling or sterilization under UV rays.
Store the pusher in a separate case, or a compartment of the case along with other tools at room temperature in a dry place.
Attention!
If your pusher is made of plastic or wood, then you cannot boil it; such tools can only be treated with disinfectants. The pusher must be stored in a case.
At least once a year, a steel scraper must be sharpened - this way you will significantly extend its life and improve the quality of subsequent work.
We hope our article was useful and you will choose the best pusher that will serve you faithfully for a long time!
Other dot patterns
Pattern options:
Success will depend entirely on the correct choice of pattern. Start with simple patterns. For example, with one longitudinal line of dots, a star or a “speckled” manicure. Having gained experience, it will be possible to do more complex painting.
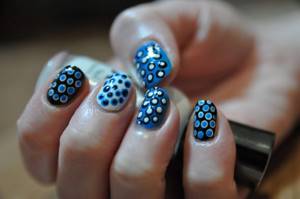
Confetti
With dots you can draw an original pattern reminiscent of multi-colored confetti. It will require a polish for the base and several polishes in harmonizing colors for the bright spots.
Sequencing:
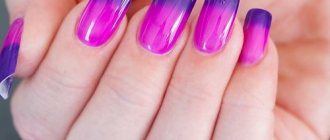
Flowers
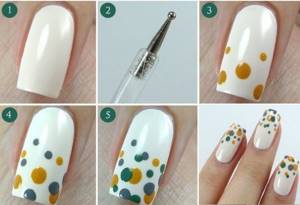
Dots for nail design (how to use to draw a flower is described below) can be used in drawing summer patterns.
The technique for performing the simplest option:
The petals can be the same size as the center, or slightly larger. If desired, you can stretch them out, stretching the varnish from the center to the edge. This is done with a small dot or toothpick. Using this technique, you can draw lilies, daisies, or leaves to decorate the composition.
The second option is a little more complicated.
Suitable for those who have already mastered the basic drawing technique: The third method is for those who have been drawing dots on their nails for a long time and have mastered simple patterns to perfection:
French manicure
It's very easy to make a French dots. It's even easier than using the classic method with manicure strips. The two options will be described step by step below.
Option one – a smile made of dots:
Option two – smile and dots:
A French manicure can be combined with a moon manicure, circling not the smile, but the hole at the root of the nail plate.
How to make French dots:
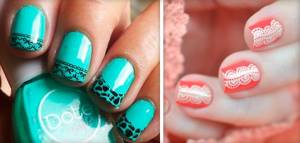
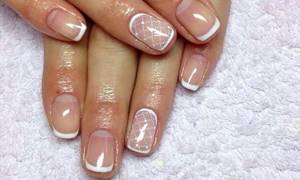
Lace
The most complex, but also the most beautiful painting is imitation lace on nails. She is good both solo and as an element of the overall composition. So, a smile or a hole is often highlighted with a lace pattern, or applied to 1-2 nails, making a French pattern on the remaining fingers.
There are 5 ways to depict the finest pattern:
Step-by-step instructions on how to use dots for lace nail designs:
Lace made with acrylic paints looks most elegant. They hardly spread and allow you to perform the most delicate painting. Ordinary varnish produces good patterns of dots, a grid of diamonds, various curls, lines and circles.
Other patterns
Below are a few more elements that are easy to draw using dots. By combining them, you can get original patterns.
Patterns:
All of the above drawings can be depicted alone or in combination with each other. The possibilities of dots are limited only by the imagination of the fashionista.
Stamping for nails: step by step
Step 1. Get your nails in order
- First, use a file to give the free edge the desired shape, and apply cuticle remover to the cuticle and side ridges.
- Next, place your hand in a bath of warm water for 3-4 minutes. We wipe our fingers and start manicure.
- Use a pusher to push back the cuticle and remove it with scissors (tweezers, nippers).
- Then, using an orange stick soaked in water, we go along the contour of the nail and clean the pterygium.
Step 2. Prepare nails for coating
- We treat the surface of the nail plate with a buff to lift the scales of the nail plate and improve adhesion.
- Remove dust with a special brush.
- Then apply degreaser to a lint-free cloth and wipe your nails. For those with oily skin, to improve adhesion, apply a dehydrator to the entire surface of the nail and air dry for a minute.
- Then you need to apply primer to the free edge of the nail and air dry for one minute.
Step 3. Cover your nails
Apply a base coat to the surface of the nail and dry it in a lamp. Apply gel polish, if necessary in 2 layers. We dry each layer in a lamp.
How to replace a tool at home
You can choose an alternative to dotter from household items. This can be any object with a small rounded tip: a toothpick, a cotton swab, a needle, a pin eye, a match, a knitting needle or crochet hook, a hairpin, a ballpoint pen that has run out of ink.
An effective and inexpensive tool is the dots, which is convenient to use at home to create an original nail design. Although it can be replaced with improvised means, with dotter the patterns are more accurate.
It is better to start painting on your nails with a simple dotted manicure, gradually moving on to more complex compositions - geometric patterns, flowers or lace.
Article design: Svetlana Ovsyanikova