The use of gel polish for manicure has gained great popularity. Girls not only turn to masters, but also gain skills at home. I am pleasantly pleased that there are no chips, the nail does not break, and even with wet cleaning, the appearance of the nails remains unchanged. If all the nuances of application have already been mastered, then it’s time to move to the level of creativity and choose a creative “outfit” for your nails.
What you need to paint gel polish on nails
It is a very common opinion that gel polish looks ideal only when applied in a single color. In fact, this is far from true. This varnish can not only last on your nails for quite a long period of time, but also decorate your manicure with a beautiful design in the form of various patterns.
A boring drawing can be easily removed or replaced by another. For these purposes, the base varnish coating is repainted, and artistic compositions are made on its surface.
To perform a high-quality manicure using gel polish, you will need the following tools and materials:
- Professional nail polishing;
- Basic coating;
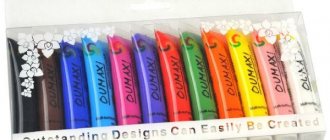
- Gel polish of different colors;
- Finish coating;
- Sticky layer remover;
- Lint-free wipes;
- UV lamp;
- Special liquid for removing gel coating;
- To create an aquarium composition, you will need a transparent gel polish;
- If you want a French manicure, then you need to purchase a pink tone of varnish and a white camouflage one;
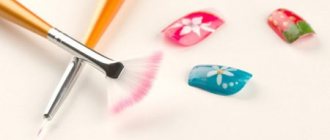
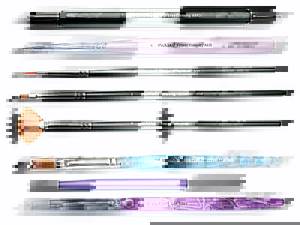
- Fan brush and paint brushes of different sizes;
- Decorating materials such as foil, glitter or mica;
- Palette and dots.
Required tools and materials
Before performing any pattern or design on the nails, you need to do a basic rough manicure, which consists of treating the nail bed and cleansing it of the keratinized epidermis that grows on the surface.
For a classic manicure, you will need several tools that you can always find at home: a file, an orange stick or metal pusher, nippers, and a polishing pad. To soften the cuticle, it is recommended to prepare a remover (you can use hydrogen peroxide instead).
Consumables used for decorative coating:
- Base, colored gel polishes, top;
- Dehydrator for degreasing the surface;
- Ultraviolet or LED lamp;
- Primer for removing the sticky layer.
If you want to create an unusual design on your nails by drawing unique patterns on them, prepare several brushes of different sizes, as well as dots (metal styluses with balls at the end) that will help you create even circles or dots.
To make drawing more convenient for you, you can take care of higher quality compositions in advance. Since the design is applied in one layer, the pigment should be saturated and not leave gaps after the first application.
Additionally, you can take a backing board so that you can rehearse your planned design. This way you can first hone your skill and only then apply it to your nails.
In addition to painting brushes, you may need the following materials:
- Needle;
- Sticky decorative tape;
- Foil;
- Rhinestones;
- Stickers;
- Stamping devices.
Take care in advance of the cleanliness of the workplace in which you will work. There should be no nail dust or traces of sawdust on it, which was done earlier, because if it gets on wet gel polish, it will instantly spoil the entire design.
The simplest options for beginners ─ step-by-step instructions
If the technique of applying such varnish is fully studied, it’s time to learn how to create masterpieces on your nails. Let's look at a few simple options:
Option one
This method of application will not take much time and will not cause any particular difficulties in the process, but it will look impressive. You will need a dots with a small ball and gel polish in colorful and expressive shades; you can choose based on your own preferences or according to your clothing style:
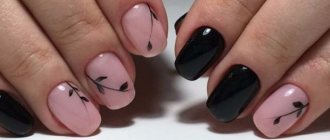
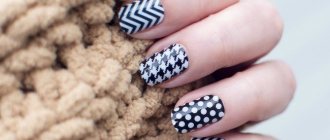
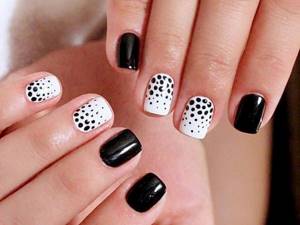
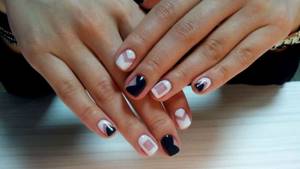
- Variegated nail design is offered on two fingers of your choice. The middle and ring fingers look impressive. Cover them with a layer of black varnish, and the rest in red. Dry with a lamp, and then use a special product to get rid of the sticky layer. This is done so that the varnish for the design does not smudge.
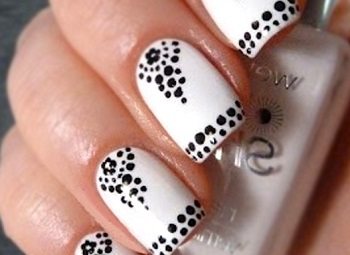
- On the main black color, make dotted patterns with white varnish. You can dilute the white spots with pink dots. The size of the circles is selected based on tastes. The main component of effectiveness will be the frequency of placing the dots; the denser they are placed, the prettier the manicure will be.
- Finally, you need to dry the resulting pattern and fix it with a top coat.
Simple, but tasteful!
Option two
The idea of the nail design below can be easily implemented without any special skills:
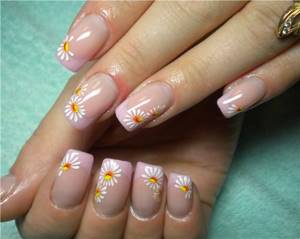
- Cover your nails with a base coat.
- Next, apply a black coating and dry it.
- Then cover your nails again with black, but with a thinner layer and paint on it in the form of daisies, using white and yellow coating colors. Dry the finished design under a lamp for 45 seconds.
Spectacular artwork is ready!
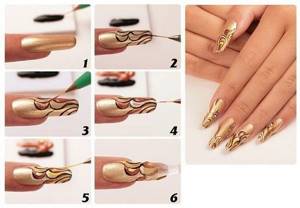
Option three
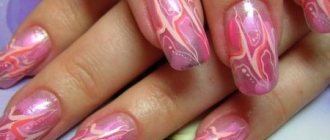
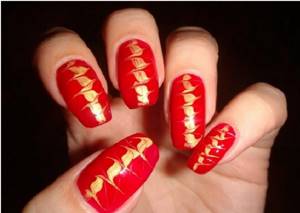
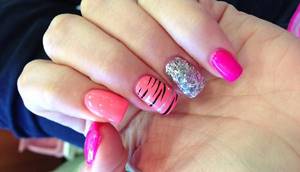
This manicure is an artistic painting on the wet surface of gel polish. Dots is again an indispensable assistant here:
- After applying the base coat, cover all nails with a layer of red gel polish. Let it dry and you can start painting.
- Using the gold color coating, apply three stripes on each edge of the nail.
- the middle of the nail plate with varnish of any color.
- On a wet surface , make zigzag movements with the dots so that the tones blend.
- Dry the resulting manicure thoroughly and secure with a topcoat.
As soon as you manage to complete your first drawing, you will want to create more! Enjoy!
Creating monograms
This design method is quite popular because it does not require special preparation. Most experts advise painting a pattern on one or two nails and covering the rest with a single-color gel polish. This will create a brighter accent.
Important! In order not to smear the monograms, you should be patient. If your hand shakes, it is better not to use this technique.
Thin patterns are easier to paint with acrylic paints.

Monogram pattern
There are several ways to apply manicure:
- When stamping, we use a stencil on which we paint with gel polish. For beginners, this technique is quite convenient because it does not require special skills. However, nothing can be added to the design;
- monograms can be painted using a thin brush. In this case, you will need perseverance, since if there is the slightest deviation from the pattern, the pattern will have to be applied again. But in this case, your imagination is not limited;
- The easiest way is to use stickers. They just need to be pressed onto the nail and then secured with a finishing layer.
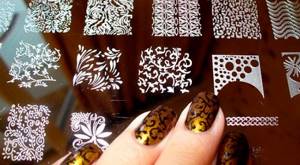
Stencil for applying monograms
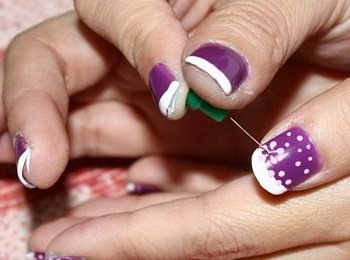
To draw a monogram, place dots on your nails and use the sharp end of a needle or brush to stretch them in the desired directions.
The photo shows patterns that you can easily reproduce at home.
Drawing a pattern
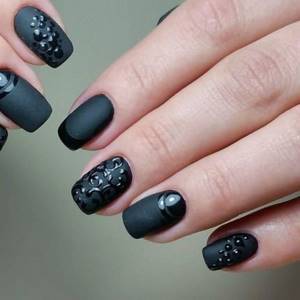
Matte manicure with gel polish
This year, matte manicure is on the list of the most fashionable trends. The secret of popularity lies in the ease of application and the achievement of an incredibly effective combination with other textures. Matte manicure looks very unusual and impressive.
A manicure with a matte finish will suit every girl and will go with any image. The coating can be done in a single color or try to complement it with glossy varnishes. Make various patterns, geometric shapes, decorate with sparkles and rhinestones ─ just use a little imagination. In any case, the tone of the coating should depend on the event for which it is being performed.
Whatever pattern or application method is chosen, it is important to remember that the matte finish is very easily soiled. Due to the rough surface, dirt gets on it, which looks like worn suede leather. Therefore, you need to take into account that on a light manicure, the stained areas will be very noticeable. To avoid this effect, choose dark shades of coating.
If you really want to do a matte French manicure using a pale pink shade, then buy more liquid to remove the matte gel coating; you should always have it on hand. If your nail is dirty, you just need to wipe it a little with the product and everything will be perfect again.
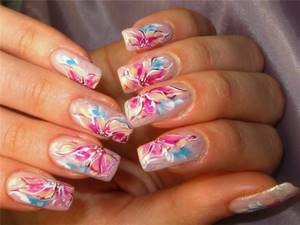
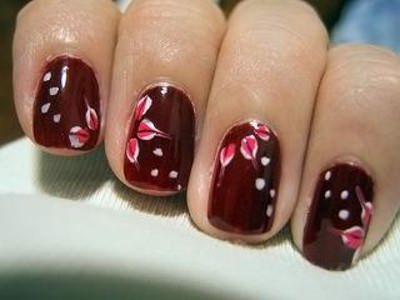
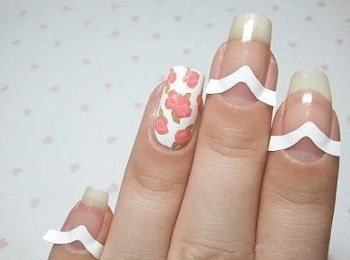
Draw flowers step by step
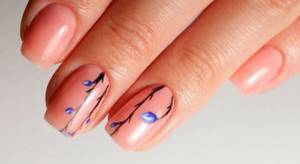
A popular element of manicure is flowers, especially roses. To apply the pattern you need to use a dots and a needle. Place a dot on the finished coating and carefully draw a line with a needle, twisting a kind of spiral. If you perform the technique on wet gel polish, the outlines of the colors will be more blurred, which will give a natural look.
Choose dark shades as the base color and paint on them with light varnish. You can also use the reverse technique - dark flowers on a light background. Try painting the leaves using a green tint. It is best to do this with a thin brush. Dry each layer separately so as not to smear the design when applying the next element.
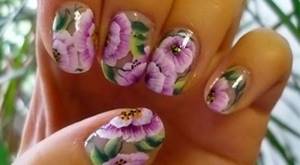
Flowers pattern
Flowers are not considered the most complex pattern, but we recommend practicing on tips on which we paint with gel polish. The video of applying manicure is presented step by step below.
Painting with gel polish
Gel painting on nails is an art that will not leave any woman unnoticed. In any nail design, there is a touch of charm that attracts the eye. The choice of gels on the cosmetics market is simply huge. Variegated, transparent, thick varnishes ─ each of them has its own mission. Gels of bright colors are rich and perfectly complement each other on nail painting.
Base and top coats are often used to create a background surface, as well as to perform additional paintings:
- If you are new to this creativity, then first you need to master the technique of circular color mixing. Having only a few bright colors, such as blue, red and yellow, can create a mass of shades. And if, in addition, you have white and black gels in your arsenal, then the base for creativity is endlessly large.
- When using gels, translucency is achieved by applying strong pressure to the brush. It is important to remember that when working with different varnishes, it is necessary that they all be from the same manufacturer, this will help to avoid shortcomings in creating a beautiful design.
- As long as the coating has not been under the lamp, you can apply corrections to the drawing without limit. Thanks to the thickness of the gels, the execution of drawings is greatly simplified; they do not smudge or flow.
Select a pattern
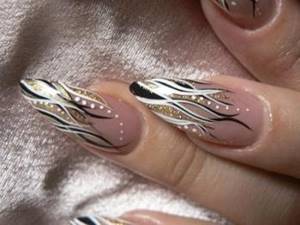
When choosing a design, think about whether it will fit all your looks. If you adhere to a strict clothing style at work, you should not do a bright manicure. Give preference to original patterns made in elegant shades.
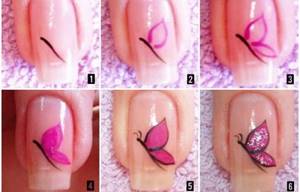
Drawing a butterfly pattern
The classic option would be black and white drawings. It is better to use one or two elements in the design and not overload your nails with a variety of patterns. If you cannot choose a manicure, we suggest that you familiarize yourself with the fashion trends that are presented in the photo.
Instructions for creating beautiful designs with gel polish
Constant experimentation with applying designs to nails will be excellent practice for novice nail artists. Before the girl has time to look back, ideas will be born in her head instantly, and the result will exceed all expectations. Let's try to analyze step by step the options for beautiful drawings for beginners in this creativity.
Option one
With this method of application, all the work will be done using an ordinary needle (you can use a toothpick).
You can also apply drawings to a helium surface using acrylic paints:
- Cover your nails with a base coat.
- After drying , decide on the choice of background and cover all nails.
- a needle, mark the dots of the future drawing or other patterns on the wet varnish
- Using a needle, carefully begin painting , mixing colors; if the drawing provides clear lines, then do them with great care.
- Dry the finished manicure under the lamp and secure with top coat.
Option two
This application system is ideal for beginners, and the tool used is the same needle and several shades of coating:
- Apply a colorless base to the nail plate and dry.
- Complete the background by applying a matte shade.
- While the varnish is still wet , make spot applications of a different color.
- Using a thin needle, begin to make circular connections of drops , based on the idea of the future drawing.
- Dry the drawing and secure with topcoat.
Option three
This method is performed using ordinary tape. No matter how surprising the method may seem, the drawing turns out to be very original:
- Cover the nail plate with base and dry well.
- From tape, cut out small geometric shapes and glue tightly onto the nail plate.
- Cover your nails with any color.
- After drying , carefully remove the tape with smooth movements.
- For added effect, cover the entire manicure with a clear coat.
Option four
With such an easy creative process, an example of applying patterns with various varnishes will be given.
Painting called nail is distinguished by its simplicity and justified result:
- It’s worth starting again with a basic application.
- Apply a background in any color scheme.
- Make any drawing using painting varnish, which has a special thin brush.
- Use the finishing coat to secure it.
Option five
The means at hand often come to the rescue. For example, an ordinary helium pen is capable of miracles. With its help you can create a masterpiece on your nails. An important feature is the fact that you do not need to learn to be confident in using such a tool.
In this application method, the drawing will be done with helium-based acrylic paints:
- Tweak your nails and correct any imperfections with several coats of clear gel.
- Squeeze several colors of acrylic paints onto a piece of foil, it will act as a palette.
- Use your imagination and start making the same designs on each nail plate, and finally secure the composition with a finishing agent.
Making a geometric pattern
Geometric designs with gel polish are very popular because they look unusual, but even a beginner can draw them. In the process of work, you need to use two types of brushes: thin and wider. It’s better to figure out in advance what the drawing will be like. To do this, you can draw a nail on a sheet of paper and draw a conventional pattern on it. It will be much easier to repeat such a print.
With a brush you can easily draw squares, triangles, and various zigzags. But to depict circles, it is better to use dots. Moreover, this pattern will go perfectly with a classic French manicure. It is not even necessary that the design on all nails be identical. The more important thing in this case is to combine colors correctly. The combination of black, pink and yellow in a graphic design looks impressive.
What designs are suitable for short and long nails
A well-groomed long manicure undoubtedly looks beautiful. This also applies to drawings. Absolutely all variations of compositions suit long nails, which cannot be said about short manicures. Let's talk about this in more detail.
Everyday household chores force you to have short nails for convenience. But I want them to have an attractive appearance.
Therefore, following the basic rules of effective design on short nails will come in handy:
- Avoid large patterns ; small patterns look decent on a short nail plate.
- Very small details will simply be invisible, it is better not to do them.
- The ideal combination would be a composition of three shades.
- Nail modeling and decorative decorations will look rough and should be abandoned.
- The shape of your nails will always prompt you to choose a design.
- with medium flowers, as well as a French manicure, will look good
Go for it, everything will work out for you, and let your unrivaled manicure stun not only you, but everyone around you.
Specifics of applying different patterns
Remember that to create different designs on your nails with gel polish, you need to know what to apply and with what. Some designs are created with special tools, and for some it is enough to mix shades correctly or apply a stencil, sparkles, or stones in a timely manner.
Using dots , you can apply dots of different diameters, which depend on the amount of varnish. Smooth lines can also be applied with this tool by drawing along a damp surface.
Many manicurists use a thin needle , which allows you to make thin lines and create more complex outlines, such as snowflakes or flowers.
Artistic brushes of different thicknesses help you create original designs on your nails. Monograms are formed with a brush or needle along the side of the plate or over the entire area. The monogram can be classic, reminiscent of a pattern on clothing. The usual intersection of stripes that form letters or symbols is possible.
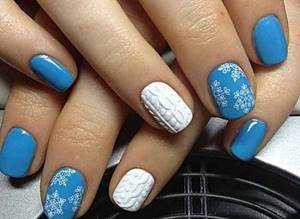
Experienced manicurists create original three-dimensional designs with gel polish on nails, for example, a popular winter manicure - a sweater. This method requires perseverance and a lot of training. Volume is created using special powder of different shades.
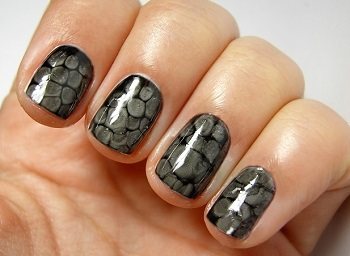
Applying snakeskin is another way to draw the attention of others to your hands. You can create such a design using green, brown and marsh colored gel polish, dripping them gradually onto a colorless base. then you need to draw diagonal intersecting stripes along the nail. Place small dots or blots at their intersections. After drying, the effect of snake scales will appear.
The use of stencils expands the capabilities of beginners who have not yet gotten their hands on applying original designs on nails with gel polish. Just dry your nails together with the stencil and when applying the composition, do not get it on the stencil.
There are a lot of methods for nail design using a hybrid base. Fashion is constantly changing and offering new options. By learning the simplest drawings and understanding the specifics of designer manicure, any woman can become original.
How and how to properly remove gel coating
To remove gel polish from nails, you need to use cotton pads, which must first be soaked in a special solution. They should be applied to the nail plates, wrapped in foil and fixed in this position for several minutes. Under the influence of the product, shellac softens, after which it will not be difficult to remove.
Do not try to peel off gel polish without first softening it. Of course, it comes off quite easily. However, as a result, unsightly irregularities may remain on the nails, which simply ruin their appearance.
Tips and tricks
Often girls are interested in how to make drawings with gel polish. To make your nail design successful, you need to follow some tips and recommendations while working. The main rule when working with gel coating is to degrease your nails before applying it. Due to this, there is a more reliable adhesion of the varnish to the nail plate. Otherwise, after a few days the gel coating will swell and air bubbles will form.
The gel layer should be thin and uniform. Otherwise your nails will look too rough. You should not allow the coating at the tip of the nails to be thicker than at the base. Be sure to dry your nails under a lamp after each layer. Do not allow the gel to get on the skin of your fingers or flow onto the cuticle. This will make the manicure seem sloppy.
Thus, you can make a beautiful manicure using gel polish at home. But during the design process, you must follow the recommendations of professionals, otherwise the coating will turn out to be of poor quality. As for the drawing, it can be anything. The main thing is to choose the right colors.