Today, the nail industry offers us such a huge number of products and tools for creating designs that during a visit to the store, our eyes wander around the shelves, and we simply get lost in this variety. In our desire to create the perfect manicure, we are ready to regularly visit a specialist, spending a lot of time and money on it. But any drawing can be made independently, using numerous varnishes from our arsenal. The right product, a little attention to our advice - and you are already a master of nail art!
What can you use to paint on your nails?
It’s quite easy to create a simple design on your nails with gel polish.
You can apply patterns using:
- gel polish;
- acrylic paint;
- watercolor paint;
- acrylic powder;
- shellac.
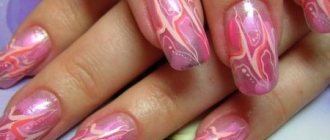
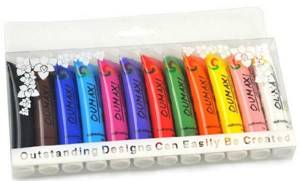
The most popular product for nail art is regular varnish . 2 contrasting colors are selected, one as a base, the second for drawing. The disadvantage of this option is that the varnishes have a thick texture, and it is difficult for a beginner to create thin lines. This method is more suitable for large and voluminous figures.
Acrylic paints are easy to use and come in a wide range of colors. They do not have to be mixed with water; after drying, they do not crack, so applying one color to another is acceptable. To add romance and tenderness to the image, crystals, rhinestones or sparkles are added. The resulting drawing must be covered with a fixative, since acrylic paints are easily washed off.
Acrylic paints are an excellent choice for creating simple designs on nails.
Watercolor paints are diluted with water, they are inferior to acrylic in drying speed. A large selection of colors allows you to paint entire pictures on your nails, but the technique is not easy to master.
Shellac is characterized by a safe composition, as it does not contain formaldehyde. It is easy to apply, looks beautiful, and lasts a long time without cracking or chipping. Painting with a hybrid of varnish and gel is not difficult. Shellac is thick, so it is difficult to apply elegant small patterns. You won't be able to draw small details with it, but it's great for creating gradients and contrasting patterns.
Acrylic powder comes in different consistencies and colors; it gives your nails a well-groomed and stylish look. The effect lasts for a long time, and nails grow and become stronger. White powder is used for wedding events, and neon powder is used for disco events.
Acrylic powder will correct defects in the nail plate and even out its surface.
Gel polish is suitable for nail art. The patterns are applied to the dried base. These could be butterflies, geometric patterns or flowers. The gel polish design lasts a long time.
Main types of varnishes for design
Surely, you know about the variety of textured varnishes, their huge range of colors and other “interesting things”.
All women who are interested in nail design are constantly watching the emergence of new textures and shades. So this time we will not focus on this, taking a more general look at the types of coatings. So, speaking in general terms, today two main types of varnishes are used to create nail art:
- well-known traditional coating - manicure varnish
- new product – gel polish
In both the first and second categories, there is a separate line of products - painting varnishes. Their difference from traditional forms is the presence of a thin brush, which allows you to draw thin and neat lines without the use of improvised means (needles, toothpicks, etc.).
Next we’ll talk in more detail about what and how you can draw using this or that means.
Necessary supplies for painting nails
A simple design on nails with varnish, acrylic powder or shellac is applied using additional tools.
List of tools:
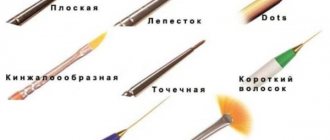
- a brush is a necessary element in the work . It is worth choosing brushes with natural bristles and purchasing several pieces for different methods of applying patterns. Flat brushes are needed for applying glitter and oriental painting, beveled brushes draw small details, fan brushes smooth out transitions and create veil effects, there are special brushes for writing letters and hieroglyphs;
- sponge or sponge - to create unusual patterns, the result depends on its texture;
- dots – resembles a standard pen with a ball at the tip. Designed for drawing swirls and dots;
- a toothpick or a wooden stick - does not damage the nail plate, it is easy to apply patterns with it, but it will not be possible to obtain clear patterns;
- sewing needle - craftsmen often use it, but it can scratch the nail when pressed.
New manicures with brush strokes for the 2022 season
Sources
- https://nailbum.ru/dizayn/mazki-kistyu/
- https://krasotka.cc/krasota/manikyur/dizajn-mazki-kistyu-na-nogtyah
- https://nailsworld.ru/modnyj-manikyur-mazki-kistyu/
[collapse]
Master class: drawing a heart with a toothpick
A simple heart-shaped nail design can be created using any polish. The nail is covered with a base layer. Select a color, for example red. Dip a toothpick and place 2 dots side by side at the same level. Descends from each point along a line to form an angle. The varnish spreads and a beautiful heart comes out.
Don't miss the most popular article in the section: How to draw monograms on nails step by step for beginners. Instructions with photos.
Fixer and drying
A sealer is a clear varnish that is applied over colored varnish to prevent flaking and add extra shine to the finished nail.
It can produce an acrylic or cellulose type film, protects any coating, including varnish, from fading, because it contains ultraviolet protection, and saves time when designing.
An ultra-hard, high-gloss, wet-polish topcoat is also used, creating a non-fading ceramic-type glaze that provides high-quality nail protection while maintaining exceptional shine.
Liquid drying in the form of a spray or in bottles with a brush is designed to prevent varnish from smearing. It speeds up drying, the varnish does not stick and does not fade. The base of this drug is alcohol.
There is a nail polish dryer in the form of a 2 in 1 preparation. It allows you to dry all its layers in 3 minutes, and the presence of oil in the composition simultaneously conditions the cuticle and nails.
Special ingredients give the coating flexibility, which allows even such a defect as smudged varnish to be completely eliminated.
Aerosol packaging ensures minimal consumption.
How to draw strawberries with a needle?
To make the berry realistic you need varnishes:
- red;
- green;
- and black;
- yellow.
The nails are prepared and covered with a red base. To create leaves, take adhesive tape and cut out teeth on it. The entire surface of the nail except the base is covered with adhesive tape. Green varnish is applied to the free space of the nail plate, and leaves are obtained.

Remove the tape and apply small dots with a needle to imitate strawberry seeds. Acrylic paints are suitable for this design. Strawberry leaves can be simply drawn with a needle using emerald paint. For originality, the design is sprinkled with glitter.
An interesting option is voluminous nail art. Nails go through the preparation stage and are coated with the main base color. Without waiting for it to dry, apply a thick layer of transparent varnish. After a few seconds, indentations are made with a needle in place of the grains. When the coating dries, fringe is drawn in the form of thin leaves.
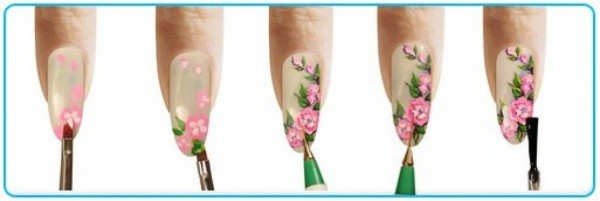
Fashionable floral manicure “Lily of the Valley”
- We paint a long sheet (6) with green paint.
- We slightly emphasize the leaf with light paint and... Having mixed green and brown paints, we draw out a branch on which we will “plant future flowers (7).
- Add a little green to white acrylic paint, you get a very diluted pastel light green color. We draw lilies of the valley. We arrange the flowers on the branches from largest to smallest (8).
- We use white paint to place light accents (9). Cover the design with top gel. We polymerize in a UV lamp.
Drawings using dots
Dots are a special tool for applying patterns that look like a crochet hook with a steel ball at the tip. Using dots, it's easy to draw flowers. They will look beautiful on both short and long square-shaped nails.
The nails are prepared and the base is applied. Select the background color. Now 5 dots are placed on the nail, placing them in a circle. These will be the petals. A dot of a different color is fixed in the center. The tip of the dots must be constantly cleaned with a napkin so that the dyes do not mix. The final stage is the application of a transparent top product.
One of the well-known decor options using dots is two-color polka dots. Usually the combinations are: red and white, black and white, but you can combine other colors.
There are plenty of other decor ideas:
- bows;
- ladybugs;
- geometric figures;
- curls;
- French
Fashionable floral manicure “Hydrangea”
- We draw small hydrangea flowers with blue and lilac paints (photo 1).
- Fill in the gaps between the colors with dark blue and dark purple paints. Laying shadows (2).
- Using dark blue paint we place dots in the center of the blue flower, and dark lilac paint in the center of the lilac one.
- Use white paint to highlight the petals (3).
- We outline the branches (4) with brown paint.
- We paint leaves around the flowers with green paint and highlight them with light green paint (5).
- Cover the design with top gel. We polymerize in a UV lamp.
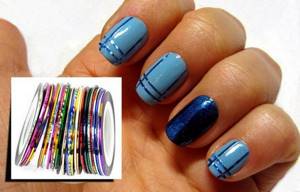
Drawings using tape and foil
A simple design on nails is created not only using regular varnish, but also using decorative tape or foil. To imitate beautiful ornaments, narrow adhesive tape is suitable. Experts advise not to use double-sided tape, and if the tape leaves a mark, then the manicure may not be neat.

Nail art with adhesive tape is performed according to the same type of pattern, only the pattern or the number of straight lines differs.
To get a manicure you need to purchase:
- several colored varnishes;
- base;
- top coating.
The nails are processed, a transparent base is applied, then any colored varnish. After drying, the tapes are attached to half of the nail plate diagonally. The part not covered with tape is painted in a different tone. All you have to do is wait until it dries and carefully remove the tapes.
Foil is an unusual material that can attract attention. To work with it you need not only standard accessories, but also:
- sharpened scissors;
- tweezers;
- orange sticks.
Foil comes in different types:
- holographic;
- embossed;
- engraved;
- covered with a protective film.
After standard nail preparation, a base coat, base varnish is applied, and foil is applied on top using glue or clear varnish. It can be glued either completely or partially.
If you need to cover the entire nail, only special glue will do. The foil is quite fragile, so working with it should be done using tweezers or tweezers. An adhesive composition is applied to the surface of the nail or varnish. The foil is applied and carefully leveled with an orange stick. The film is removed and the manicure is sealed with a top product.
Partial decoration of the nail plate with foil involves free arrangement of pieces of material or decoration of the hole.
We bring to your attention step-by-step instructions for a simple but very beautiful manicure.
1. When starting to create floral nail art, give your nails a well-groomed look. This can be done using European or classic manicure. At the end of the preparatory procedure, cover your nails with a transparent base that protects the plates from decorative varnish.
Fashionable haircuts and hairstyles in 2016
Fashionable coloring 2016: photo for medium hair
Fashionable men's haircuts 2016 for short hair
Hairstyle for prom 2016 photo
2. For a more saturated nail color, apply two layers of decorative varnish, waiting for them to dry completely. You can choose the shade of the main color coating to suit your taste.
3. It's time to start decorating your manicure: in our instructions we will draw flowers using a regular ballpoint pen. Drop a bright or contrasting varnish onto a piece of foil or thick paper. Dipping the pen rod into it, we point-draw neat and beautiful flowers on the nails. An important rule that you need to remember: any subsequent layer of floral decor is applied only after the previous one has completely dried! This means that you should draw the core of the flowers only after all the petals have dried.
4. Small flowers look great on short nails, and large designs will suit those with long nails. Another option is to decorate only the nails on your ring fingers with a large design.
5. Decide on the design in advance. For everyday life, it is better to choose a modest flower design - delicate cornflowers, simple pansies, snow-white daisies or elegant irises. When doing an evening manicure, you can get creative. Rhinestones, sequins (broths), and glitter will be used, which will give your nails a mysterious shimmer and make them even more beautiful.
6. A familiar French jacket will also serve as a good background for a floral design on your nails. Light transitions from transparent to rich look amazing. You will definitely need a fixative varnish, a thin brush or a regular ballpoint pen (needle, toothpick). Photos of flower designs on nails will help you choose the ideal option for yourself.
7. You can complete the floral manicure on your nails with a transparent top coat, which will add shine and preserve your nail art for a long time.
Painting on nails with a brush
A simple design on the nails (with varnish, acrylic powder or shellac) is done with nail art brushes.
They come in different types:
- fan-shaped brush - for applying glitter, aluminum film and creating a smooth transition;
- a hair-like brush for drawing the smallest details. With its help it is easy to get a straight line or a beautiful curl;
- a thin brush is a universal tool for miniature and light design elements;
- flat brush – for creating large, wide patterns;
- petal brush – has a beveled edge, often used in Chinese nail art. Petals with this device turn out beautiful, deep and neat.
Don't miss the most popular article in the section: How to extend nails with gel polish. Nail extension instructions for beginners. Photo.
Step-by-step guide to creating monograms
- The preparatory stage involves removing the cuticle, leveling the surface and shape of the nails, and dehydration.
- Apply a base or single-color coat of varnish.
- Tools are selected.
- Before applying the decor, you should practice on paper, since monograms require perseverance, accuracy and smooth, clear strokes.
- The design is created carefully on the side of the nail.
- When depicting monograms, symmetry is important; it is better to make patterns voluminous, doubling the lines. A large drop is collected at the tip of the brush, which is then directed in the desired direction.
- Decorative elements are dried under ultraviolet light if the patterns are applied with gel polish or acrylic paint. The latter is ideal for monograms.
- Sparkles and rhinestones are added.
- The result obtained is confirmed by the top product.
Fashionable floral manicure “Hibiscus”
Stylized hibiscus is always and everywhere appropriate; it can be done in different shades and different techniques. A simple option: select a sketch of a hibiscus, draw the outlines of the flower with a thin brush, use dots and yellow to make the stamens, place accents in the form of stylized petals-curls, the flower is ready. The most ideal “one stroke” technique. With one wide brush and a few colorful shades you can create a masterpiece. Seal the finished floral design with clear or glitter polish.
How and with what to draw a smile on your nails
To get the perfect French jacket, you need to know the rules and nuances. The smile line divides the nail into 2 zones – the main part and the grown part.
There are several ways to create a French manicure, depending on the tools used and the length of the nails:
- Method 1 – for short or medium-length nails . You will need a thin brush with long bristles. The smile is drawn in a standard way - from right to center and from left to center, drawing a common line. When creating a French gel polish, it is easy to correct unevenness until the coating has been dried under ultraviolet light;
- Method 2 – for those with long nails . A flat brush is used; after dipping into the gel paint, the bristles are pressed on both sides to create a clear line. A smile is drawn from one side of the nail to the other, applying the flat side to the grown part. It is important to change the angle in time during the transition to obtain a beautiful French manicure;
- Method 3 – use an angled brush. It is universal as it is suitable for short and long nails. The brush is applied perpendicular to the nail, then 2 lines are drawn to the center.
Nail design at home: photo
So, if you are interested in the question of how to make a simple nail design with gel polish at home, then you can look at a photo with ideas for a beautiful manicure for beginners (photo with a nail design made by a private manicurist Polina). Thanks to this, you can easily create interesting nail designs for beginners.
Acrylic watermelon drawing
This nail art reminds you of summer. To make a manicure with an imitation watermelon, you will need:
- brush;
- several colors of varnish;
- stencils (if necessary);
- fixative;
- basic basis.
A preparatory coating is applied to the nails, then a red varnish, which will create the pulp of the berry. There are 2 parallel lines along the top of the nail, 1 is light green, 2 is dark green. When everything is dry, all that remains is to make the seeds with black varnish and secure the result with a top coat, which will increase the durability of the manicure.
How to depict sakura?
The simplest flower design on nails is sakura. Based on the video, we will tell you step by step how to draw branches and small flowers of Japanese cherry trees.
- Select two fingers that you want to focus on and apply white polish, paint the rest of your nails with black polish. You can use either glossy or matte finish.
- Sakura is depicted on white nails. The drawings begin with black branches resembling a slingshot. It is most convenient to apply them with a thin brush.
- Next, between the branches you need to draw a cluster of three red dots, in the center of which apply a white pea. To make the sakura on your nails last longer, fix the flowers with a top coat. We invite you to repeat the step-by-step instructions by watching the following video lesson.
How to paint a bow with gel polish?
To create such nail art, a dots or brush is suitable.
Steps for drawing a bow:
- It is better to decorate along the edge of the smile or diagonally on the nail.
- The required dye is taken with a dot, transferred to paper, and a drop of varnish is taken.
- A period is put.
- Triangles are drawn from it in 2 directions.
- The corners of the resulting figures are rounded.
- From the triangles, 2 stripes are drawn down.
- The bow is secured with a top product.
What tools may be needed during the work process?
It’s not enough to know how to draw flowers on your nails step by step; you also need to prepare the appropriate tools. It is advisable to choose a table that is not cluttered and is well lit by natural or artificial light. The rays should fall from the left side. The list of “equipment” consists of several items:
- Several brushes of different widths.
- Base and top coat.
- Dots, which can be easily replaced with a regular ballpoint pen.
- Acrylic paints of a suitable color.
- Varnish that will determine the color of the flower itself.
Additionally, you may need cotton swabs, which can be used to correct the design and remove excess drops of varnish. In addition to a set of paints and varnishes, you may need glitter, rhinestones or stones - it all depends on the design features of the flower and the overall composition.
Drawings for beginners with decoration
It is better to buy glass rhinestones for manicure; they look more impressive and shine beautifully. To apply them, use an orange stick, previously soaked in a top product. They beautifully and simply decorate the smile of the nail by placing rhinestones on it. They are applied, gently pressed to the surface of the nail. The result is confirmed.
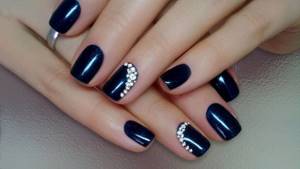
If you want to get a 3D effect, you should pay attention to the broths. A manicure using them is often called “caviar”. The registration process is similar to the previous ones. The broths are distributed over the nail plate, the excess is removed with a fan brush. A fixing layer is applied, the emphasis is on the edges of the nail, where the broths fall off most quickly.
Acrylic powder is a loose powder, has a porous texture and allows nails to breathe. It dries quickly, so careful and quick work is needed. Thanks to acrylic powder, three-dimensional designs are obtained that resemble a knitted sweater.
Apply 2 layers of gel polish and dry under ultraviolet light. After degreasing, patterns are created that fall under the lamp. In order not to spoil the velvet effect, you will have to choose a matte finishing agent.
Features of short nails
With the right manicure, it is very easy to highlight the advantages of your hands and hide any imperfections. Don't assume that floral patterns are not for short lengths. They can also look interesting and fresh in this case. You just need to listen to some recommendations:

place the flowers closer to the free edges to visually lengthen your fingers;- use a few dark accents in the pattern to narrow the nail plate;
- leave one millimeter on the sides of the nail unpainted;
- clear lines are suitable for the “square” shape, and blurred and smooth lines are combined with any shape.
And, of course, the created manicure should not be dissonant with the image. Otherwise, you are limited only by your imagination.
Ideas for simple and beautiful patterns for short and long nails
Metallic stripes look great on short nails. They are purchased at a specialized store. Apply to the finished coating, excess edges are cut off.
Moon manicure looks beautiful. It requires French stencils. Only they are applied not to the tip of the nail, but to its base. The surface is painted in one color, stencils are glued on, and painted in a different tone. All that remains is to remove the stickers and secure the resulting effect.
To cover long nails, acrylic is suitable. Among the common options for nail art are diagonal stripes, applying rhinestones in the shape of a semicircle at the height of the nail, creating patterns and monograms.
Bleach and liquids
Nail bleach is applied to the nail plate and under the free edge to remove yellow stains. It contains hydrogen peroxide.
White nail pigment is applied under the free edge of the nail to make the nail appear white. It contains zinc oxide or titanium dioxide.
Nail whiteners are sold on sale in the form of paste, cream, stick or pencil.
Nail polish remover is an organic solvent used to dissolve and remove nail polish.
In order to compensate for the drying properties of the solvent, it often contains cosmetic oil.
For clients with artificial nails, it is recommended to use acetone-free nail polish removers as acetone can soften or dissolve the tips of synthetic nails, as well as adhesives and acrylic nail creation compounds.
Liquid for thinning varnish. An acetone-free product that does not affect the properties and color of the varnish and returns the varnish to its original consistency.
Tips from the experts: what not to do when creating a manicure
Common mistakes that should not be made:
- the cuticle is not cut, it is pushed back with an orange stick and then removed with a remover;
- the nail plate is filed in one direction to avoid cracks and brittleness;
- Before using the varnish, do not shake it, otherwise bubbles will appear, which will become an obstacle to creating an even coating;
- You can’t apply varnish in a thick layer, 2 thin layers are better;
- the edges of the nail are caught when painting, otherwise chipping cannot be avoided;
- Do not underestimate the benefits of the fixative; it increases the service life of the manicure;
- coatings are dried in the open air or under a lamp, do not try to do this in ice water;
- to remove excess polish on the skin, use a nail art brush;
- You cannot remove gel polish with a file; there are professional tools for this.
There are many techniques and decorative options, so every woman will choose an option to suit her taste. Salon procedures are expensive, but you can learn the basics of nail art on your own.
It is easy for a novice manicurist to learn how to make simple designs on nails. They are created using varnishes, bouillons, rhinestones, foil, acrylic powder or watercolor paints.
Article design: Olga Pankevich
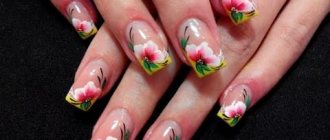
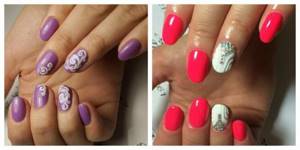
Flower Nail Art Ideas
We have provided several examples of floral designs for you. There are much more of them in the world of nail art. You can paint on your nails not only poppies, roses, sakura branches, but also, for example, a lily or any other flower. They all look gentle, light and beautiful, provided that they are made with high quality and accuracy . If you are not confident in your own abilities, try to depict the same lily or rose on your nails using special stickers. Flowers can be arranged in various compositions and combined with other elements. There are a huge number of variations, some of them are presented in our photo gallery.
An elegant floral manicure can be done for a special event or just for everyday wear to lift your spirits. The photos presented above will help you determine the direction in which you should move when choosing a suitable design. And in conclusion, we invite you to watch a wonderful master class on painting beautiful petunia on your nails. The author of the video will show you what Chinese nail painting is. This technique can be applied to other flowers, drawing, for example, a luxurious lily. Give free rein to your imagination, and everything will definitely work out!
Manicure trends
As in any other field, manicure also has its own trends. If you want to please yourself with a floral manicure, you should consider a few recommendations:
- It is better to use flowers in design in spring or summer, keeping in mind their relevance.
- Currently, the theme of the East has become very popular, so lotus and sakura are the most popular sketches.
- Orchids and poppies are extremely popular. It is desirable that the drawing be made in a minimalist style.
- The trend is roses, which are made using white varnish. A rose can be painted by forming tiers of white varnish.
The use of stones and rhinestones should be minimal.
Spot technique for creating flowers using varnish for beginners
The easiest way to start is with regular varnish. This method will be much cheaper and easier to correct than gel polish. To create the simplest masterpiece on your nails, you will need three colors of polish and an old ballpoint pen.
Instructions on how to create a flower on nails step by step for beginners:
- Apply base polish to prepared nails. Can be any color.
- Dip the grain of a ballpoint pen into another varnish and dot the middle and five petals around the center.
- You can make the petals oblong by stretching with a handle from the center to the edges.
- Cover the top of the drawing with a fixative.
Using this technique, you can create a sakura branch that will look identical to the natural one. The dot technique is suitable for creating wider compositions.