- file and buff;
- dehydrator;
- degreaser;
- primer;
- base for gel polish;
- polygel (acrigel, combigel);
- liquid for working with polygel;
- putty knife;
- brush;
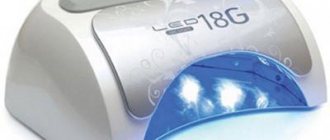
- polymerization lamp;
- dust removal brush;
- top for gel polish.
Before repairing a nail, you need to stock up on the necessary tools
. Let's get started:
- We completely remove the coating using any method (using a machine or soaking). Attention: work carefully with the problem area!
- We go over the nail with a buff - we level the surface, smooth out the transition to the problem area.
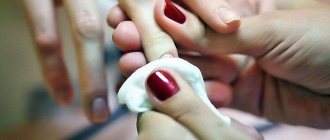
- Carefully brush off the dust with a brush and degrease the nail plate.
- Apply dehydrator and primer.
- We cover the nail with a thin layer of base and polymerize it in a lamp.
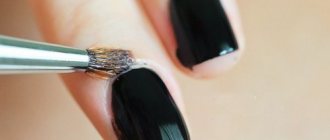
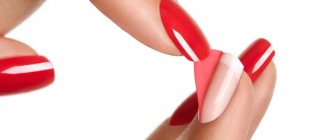
- Take acrygel, squeeze out a small amount, pick it up with a spatula and transfer it to the nail.
- Dip the brush into the fluid for working with ParisNail polygel and distribute the material over the nail plate. Work “by air”, building the desired architecture and smoothing the surface. The thick structure of acrygel holds its shape and height well, so it is ideal for adding missing lengths or corners even without forms. Cure in a lamp.
- If necessary, apply a second layer of polygel: we also transfer it using a spatula, dip the brush in acrygel liquid, distribute the material evenly, stretching it along the entire length of the nail and completing the missing length and volume. Don't go under the cuticle! If you feel that the brush is starting to stick to the material, immediately dip it in the ParisNail polygel liquid. Make sure that the brush is not too wet - this may disrupt the density of the polygel. Cure in a lamp.
- Remove the sticky layer. File the desired nail shape. Sand the surface and brush away any remaining sawdust.
- Cover with top coat to secure the result.
Apply polygel according to instructions
What is construction fluid used for?
Beginners often wonder why a construction fluid is needed at all; is plastic polygel really not enough?
No, acrylic alone is not enough for quality work. Without a special liquid, it is impossible to achieve an easy and uniform distribution of the material over the nail plate - the brush will pull it, it will lie in lumps. Many people are afraid to work with polygel liquid because of the pungent odor. The nail industry does not stand still, and we at ParisNail have developed a special composition that not only does not smell of chemicals - it has the aroma of ripe berries!
In addition, the product has a number of other advantages! Thus, it does not have adhesion properties and allows you to interact comfortably with acrygel without clogging the brush. It has a neutral composition, does not contain activators (monomers), therefore does not affect the condition of the artificial surface, does not change its structure and does not leave greasy marks. It does not pull the material behind the brush - it does not frizz or clog. Does not dry out or irritate the skin even after prolonged use.
Now the process of repair or extension will not give you a single unpleasant moment!
You can’t do without a construction fluid when working with polygel.
Method No. 2
2
You will need: nail glue and acrylic powder
This method of “fixing” a broken nail is good because it allows you to fix the crack on the free edge on both sides at once, and not just on top.
- Apply glue to the crack, including the underside of the free edge
- Dip your finger into clear acrylic powder for a few seconds
- Let the layer dry for a minute
- Brush off excess powder and sand the “repair” area.
How to choose a polygel?
The choice of polygel depends on the final color you want to achieve (darker, lighter or transparent), as well as on the consistency you prefer to work with. But still, there are 2 general recommendations:
- It is better to purchase materials from leading brands that have already proven themselves and received many positive reviews. These are ruNail, BHM, EMI, Imen, Monami Professional and others.
- Acrigel must be purchased from a trusted store so as not to accidentally become the owner of a fake. Fake information can lead to severe allergies and nail diseases.
Attention: only certified products that have passed multi-stage testing are presented in ParisNail online and retail stores!
Method No. 1
1
You will need: tea bag and glue
The easiest and most affordable way to solve the problem of a broken nail at home. And even if a nail breaks not at home, but at work, a tea bag and superglue are always at hand.
Long or short nails? Bright red polish or neutral nude? Find out what secrets a manicure will reveal.

Take the test
A one-time use of glue will not have a strong negative impact, and the nail will be saved. But still, this method should be used only as a last resort, so if you often break your nails, it is better to buy several bottles of specialized nail glue at once - for home and for work. We tell you how to proceed:
© essie
- Cut a square piece from the tea bag of a size that will completely cover the crack
- Sand the damaged area and degrease the nail (we have already talked about what you can use to replace the degreaser)
- Apply glue to the crack and the area around it
- Press the tea bag onto your nail
- Apply another layer of glue until the piece of the bag is completely saturated
- Let dry and then sand the edges to smooth out the transitions.
How to care for extended nails?
You have successfully extended your nail. What to do (or what not to do) to make the material last us as long as possible?
On the first day after extension and repair, limit contact with water and high temperatures as much as possible: do not swim, do not take a steam bath, do not take a bath. Handle your nails with care and try not to touch anything with them. And it’s better to do without greasy hand creams or oils.
Next, be sure to use gloves when doing any wet cleaning, avoid acetone, and try not to bang your nails (for example, on a table).
Then the manicure will delight you for a very long time. Choose only high-quality polygels!
Method No. 3
3
You will need: acrylic powder and gel polish base
If you use gel polish, then you can repair a crack on your nail at the stage of applying the base without using any third-party products. In addition, this method allows you to further strengthen your nails and create a reliable frame that will keep the gel polish in good condition for much longer. Therefore, feel free to use this method, working with all nails at once, and not just the damaged one.
© essie
- Prepare the nail plate for applying gel polish
- Apply the first layer of base, carefully filling the crack area with it, and dry in a lamp
- Apply a second coat of base and dust it with clear acrylic powder before drying in the lamp.
- Dry in a lamp and remove excess
- Apply another layer of base and dry in a lamp
- Next, you can follow the usual sequence of applying gel polish.
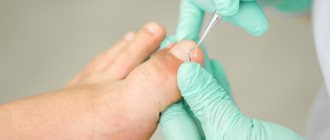
First aid
The course of action for a broken nail will differ depending on the nature of the breakage. If it is bleeding, cracked to the meat, at the root, halfway, then the first thing you should do is disinfect the wound and stop the bleeding. It is important to do it right:
- Stop the bleeding. Press a bandage or clean cloth onto the bleeding area and hold for 10 minutes. In this case, it is recommended to lie on your back and raise your arm up. If the bleeding has not stopped after 15 minutes, you should seek medical help.
- Clean the wound if it is dirty. Place your hand under running cold water. If necessary, use a soft washcloth and soap. Do not rub the damaged area, otherwise the bleeding will resume.
- Treat the wound with an antiseptic. You can use chlorhexidine (does not sting), hydrogen peroxide or another.
- In case of serious damage, it is correct to cut off the broken part of the plate and file the edges. Then you should apply an antibiotic ointment to the wound (Neosporin, Levomekol, Polysporin).
- Gently bandage your finger. Wrap the bandage several times to create a cap, then criss-cross the bandage and tie. Make sure that the bandage is not too tight, but does not fall off.
- Apply ice poured into a plastic bag to the sore spot 3-4 times a day. Keep it on for 15–20 minutes. This will help relieve pain and swelling.
- Change the bandage daily and treat the injury site with an antiseptic or antibacterial ointment.
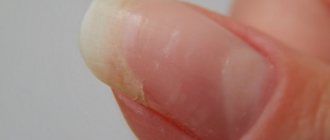
Is it necessary to remove gel polish if the original nail underneath is cracked?
The formation of cracks and breakage under gel polish can be dangerous for a girl, as this implies the formation of an air gap between the decorative coating and the natural nail, into which water can enter. High humidity in a confined space quickly leads to the formation of a favorable environment for the development of bacteria, which is why fungus appears.
And the presence of fungus negatively affects the condition of the entire plate, including the health of the matrix (base), so future manicure corrections will not be possible until the nail is restored.
In addition, damage to the plate leads to its severe weakening, due to which a large load on it in the form of gel polish leads to a decrease in the strength of the plate, and detachments and breakages begin to form.
However, if the surface is slightly damaged in the free edge area, you do not need to remove the coating yourself. Typically, the formation of cracks in the regrown part does not lead to pain and does not bring the risk of infection in the body.
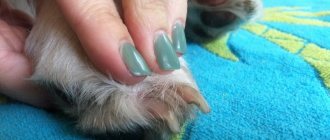
Broken corners
When a chip occurs at a corner, you can make a sawdust by rounding the ends. But if you want to maintain the square shape, you can use a thick gel to restore the broken corner. In this case, not a polygel, but a thick gel is more suitable, since the first one will fall under the nail and will have to be cut out.
Spread a pea of thick gel with a brush over the area of the chip and pull out the corner. Dry and remove the sticky layer. Next, make a filing to shape the free edge and level the nail with the base.
What to do to prevent nails from breaking: 20 recommendations
- Timely correction.
- Before applying new material, completely remove the old one.
- Periodic strengthening.
- Be sure to apply a base coat before painting.
- Use of quality materials.
- Compliance with the rules for performing a manicure and subsequent cleansing of nails.
- Using a ceramic nail file. In no case is it made of iron.
- Polish the upper border exclusively at right angles.
- Consultation with a doctor.
- A complete lunch ration including phosphorus, calcium, zinc, sulfur, magnesium and vitamins E, D, A.
- Daily consumption of clean water is at least 1-2 liters per day.
- Sleep at least 8 hours a day.
- Use rubber gloves when your hands come into contact with household chemicals and other chemicals.
- Avoiding mechanical stress on nails.
- Do not chew or bite your nails. You cannot remove gel polish “on the spot” (with teeth, scissors, a knife, etc.).
- Carefully process the cuticle with special forceps. Hangnails should not be bitten off with teeth or torn off.
- If possible, do an unedged manicure using modern cuticle removers.
- The use of caring and strengthening products (creams, wax, iodine, sea salt, baths, essential oils, masks).
- Periodic rest of nails.
- Protection of hands from exposure to high and low temperatures.