Moon manicure - a fashion trend or an echo of the past? Read the article on how to make a stylish moon manicure.
The fashion world does not stand still, but is rapidly moving forward in big and small steps. Fashion for clothes, hairstyles, and hair coloring is changing rapidly. Even manicure fashion changes almost every day.
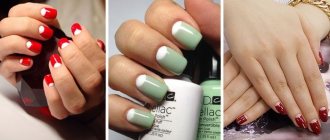
Unusual fashionable manicure
Today an elegant French manicure is in fashion, tomorrow a contrasting gradient on nails is in fashion, the day after tomorrow something else will be in fashion. And these trends need to be taken into account not only by manicurists, but also by their clients. Firstly, in order not to look old-fashioned, and secondly, it’s always nice to be one of the first to try something new.
A very unusual manicure is a fashion trend
What is a manicure with a hole called?
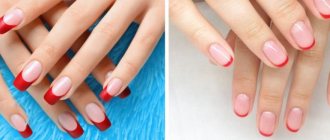
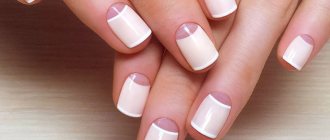
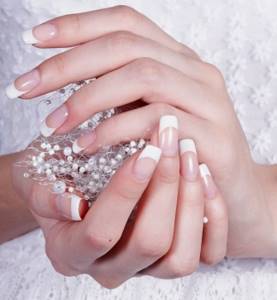
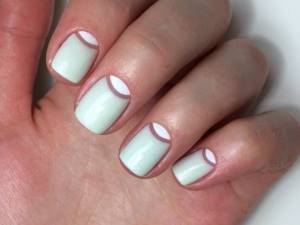
In fact, a lunar manicure or a manicure with holes is some kind of alternative version of the familiar French manicure (French). French is when the top of the nail is highlighted with a different color of polish from the main color of the nail.
The traditional version uses flesh-colored varnish, white and transparent.
Traditional French manicure
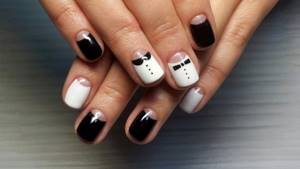
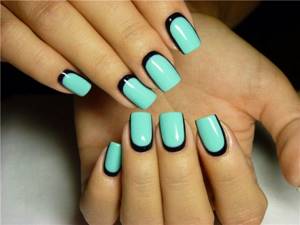
A more modern option involves the presence of more contrasting colors, additional patterns, gradients, rhinestones, and sparkles.

French manicure with rhinestones French with sparkles and patterns, asymmetrical
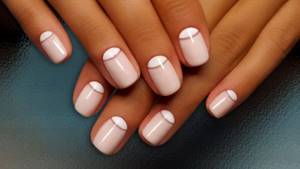
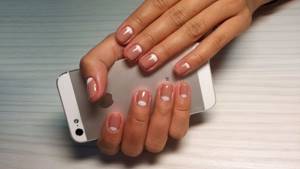
Manicure with holes - highlighting the hole of the nail from below with a different color, rhinestones, sparkles, whatever.
So, the main difference between a real French manicure and a lunar manicure is that a French manicure involves highlighting the nail from above, and a lunar manicure from below.
traditional moon manicure
Moon manicure with additional elements
Sometimes masters use not semicircular holes, but triangular ones. The manicure turns out stylish and unusual.
Manicure with triangular holes
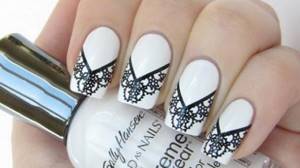
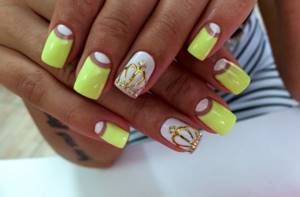
Some masters, at the request of clients, can combine moon manicure and French manicure. Then a very beautiful, fashionable, combined manicure is born. You can add rhinestones, patterns and sparkles to this manicure. But you need to know when to stop, since the abundance of small details greatly distracts attention.
Combined moon manicure and French manicure
What types of holes are there?
This manicure involves different techniques. It differs in shape, choice of colors, and application technique. In this case, the hole itself can be in the form of a wide or narrow arc, in the form of a semicircle, an even strip, or even a corner. If you like to be creative, you should abandon the traditional shape of the hole.
Give preference to other options with a triangular, square shape or depict it in the form of the letter W. It is quite possible to combine this art with a floral print, a classic French jacket, as well as the use of rhinestones and sparkles.
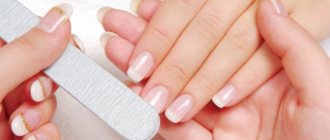
How to do a moon manicure at home: step-by-step instructions
Making a lunar manicure “like on the cover of a magazine” is not at all difficult. But such a manicure will require some accuracy and understanding of the basic principles of creating a spectacular manicure.
Even if you are a complete beginner, creating such a manicure will not be difficult if you follow all the tips below.
So, what is needed to create a manicure with holes?
- nail file
- several cotton sponges
- orange nail stick
- nail polish remover
- a product to treat your finger before a manicure or something greasy so that the polish can be easily wiped off your finger
- two colored varnishes and a clear varnish to fix the work
- special stencil (circle with a hole inside)
- patience
If you do everything correctly, you will end up with a manicure like this.
Blue manicure with holes
Now the technology for creating a blue moon manicure:
- Treat the nail. Using a nail file, make the perfect shape of your nail, and using an orange stick, push back the cuticle, degrease the nail plate and apply a base coat. Treat the finger itself near the nail with a special mixture so that any varnish that accidentally gets on the skin can be easily removed
- Apply an even layer of base varnish to the prepared nail. In our case it is white varnish
- Now you need to apply a stencil, slightly extending beyond the base of the nail, to create a crescent
- Apply a varnish of a different color (in our case, blue) to the remaining part of the nail without a stencil.
- Secure the resulting manicure with a layer of colorless varnish.
Advice! Apply a new coat of varnish only after the previous layer of varnish has completely dried. Otherwise, the varnish will become covered with bubbles or simply will not dry, and your efforts will be in vain.
This is the simplest version of the moon manicure. If desired, you can use other colors of varnish.
Lunar manicure in pastel colors Red lunar manicure Lunar manicure with blue varnish
Several features when performing art
You can make this drawing yourself and in the salon. However, before performing it, it is necessary to take into account some nuances. For example, this manicure is suitable for those with nails of any length and shape. The only exception is, perhaps, nails with a characteristic square shape. And even then because of the pronounced rough transitions. Remember, a moon manicure with shellac needs smooth lines and transitions. He does not tolerate angularity.
It is important to remember that the shorter the length of your nails, the narrower your hole needs to be made.
How to evenly draw holes on nails with gel polish or shellac?
Drawing an even pattern on nails is an entire art that requires maximum concentration from the artist. The exception is if a stencil is used. There's enough precision there.
But the hole on the nails must have an ideal shape, otherwise the manicure will look cheap and sloppy. If you don't need this effect, arm yourself with a brush, gel polish and a lamp and go!
To ensure that a manicure with holes using gel polish and shellac comes out “as it should”, prepare:
- two gel polishes, contrasting in color
- base for gel polish
- thin brush
- UV lamp
- stencils for French manicure
Lunar manicure on nails with gel polish
Now the most interesting thing is - what are the ways to draw the perfect hole on the nail?
Method 1:
- Apply the outline of the future hole with a very thin brush.
- Paint the hole in 2 layers, drying each layer for 2-3 minutes.
- Then apply a colored coating above the hole, reaching the border with it, and do the same with it
- Finish the manicure with gel polish and seal the coating.
Method 2:
- Apply colored gel polish to the entire nail and dry well.
- Draw a hole on the dried layer of gel polish with a brush, fill the boundaries of the hole at the base with a varnish of a different color, dry
- Finish the manicure with gel polish and seal the coating.
Method 3:
- Mark the location for the future hole
- Apply colored gel polish to the entire nail and let it dry. It is advisable to do two layers
- Apply varnish of a different color into the hole and dry. Make two layers
- Finish the manicure with gel polish and seal the coating.
Bright manicure with gel polish with holes
These were the main ways to create a perfectly smooth hole using gel polish and shellac. Above was a method for creating a lunar manicure using a stencil. This method is also suitable for any type of varnish, not just regular one.
How to choose shades for a Hollywood French jacket
To create an original moon manicure, you need to choose two contrasting shades of polish. You can focus not on color, but on the texture of the coating. Often, matte and glossy varnish of similar or identical shades are used for this purpose.
The most successful color combinations for lunar manicure are:
- pink – white;
- blue - white;
- red – transparent;
- blue – transparent;
- lilac – silver;
- red – gold;
- gray – white;
- raspberry - brown.
For everyday lunar nail decor, bed shades such as light pink or coffee in combination with white are best suited. When creating a manicure for holidays and celebrations, you can experiment with brightly colored nail polish with glitter.
View this post on Instagram
Publication from Manicure gel polish Dolgoprudny (@nail_piiich)
How to evenly draw a hole on your nails with acrylic paint?
The technique of applying a hole with acrylic paints is no different from the technique of applying a pattern with gel polish or regular varnish.
To bring the idea of creating a lunar acrylic manicure to life, prepare:
- brush
- base varnish, varnish base, clear varnish
- dots (or a regular needle), perhaps a toothpick
- cotton pads
- nail polish remover
- acrylic paints
Moon manicure with additional elements using acrylic paints
To make a moon manicure with acrylic paints, follow the instructions:
- Prepare your nails: shape them, push back the cuticles, degrease the nail plate.
- Apply a coat of base coat and base color and let it dry.
- Now, using a thin brush, pick up acrylic paint of the desired color, mark the boundaries of the future hole, and fill the hole with paint.
- Now an optional step: using a dot or a needle, you can make absolutely any design on your nails, in addition to the holes - monograms, flowers, butterflies.
- After the paint has dried, apply a coat of clear varnish to seal the work. This step is required.
Fashionable moon manicure using acrylic paints
That's all. Manicure with holes using acrylic paints is ready! This manicure won't last as long as gel polish, but it's still worth a try.
Preparing the tools
A stylish Hollywood French can be done using regular varnish in contrasting colors and a set of stencils. However, I want to note that nail decor created in this way will please the eye for a very short time. To ensure that the results of your work are preserved for a long time, it is better to use a more durable coating, such as gel polish. But in this case, the list of necessary tools will increase significantly, since polymerization of the gel will require a special fluorescent or LED lamp.
If you like a long-lasting and high-quality manicure, then before you start working on lunar nail decor you need to prepare:
- standard manicure set;
- degreaser for the nail plate;
- base for gel polish;
- two contrasting shades of gel polish;
- means for fixing the coating;
- a brush or a set of stencils for moon or French manicure;
- elements for decoration (glitter, rhinestones, transfer foil);
- a special lamp for drying nails.
How to evenly paint a moon manicure with regular varnish?
The easiest way to draw holes using regular varnish is a stencil. This method was described in detail above, so there is no point in writing about it again.
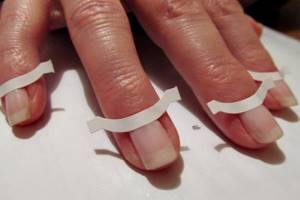
Advice! If you don't have a special French manicure stencil, you can make your own from cardboard and tape, or use regular duct tape, masking tape, or plastic-coated adhesive tape.
Creating a lunar manicure using a special stencil for a French manicure.
Lunar manicure using homemade stickers with regular varnish.
Lunar manicure with regular red varnish
Moon manicure step by step
Lunar nail design - on the other side of the French manicure
Oddly enough, the appearance of lunar manicure was preceded by the technological boom of the 1920-30s. It is then that a woman receives the right to work and earn on an equal basis with men. Naturally, active work with gloves was simply impossible, but I didn’t want to expose my fingers and expose them to the risk of contamination. Then specialists from the famous companies Revlon and Cutex created a coating that ennobles ladies’ hands and protects manicure from the negative influence of external factors.
What is a moon manicure? This is a type of nail art that appeared as an antipode to French. French manicure, on the contrary, is more practical and does not require correction over a long period of time. We will talk about the advantages and disadvantages of this design below.
| Advantages | Flaws |
| An overgrown moon manicure looks presentable and neat | If you have a violation of the pigmentation of the plate or problems with its relief, then a manicure with a smile will only emphasize the defects |
| The design with a hole is easy to repeat even for a beginner | You need to be extremely careful and diligent in drawing the holes, any blot will be noticeable |
| Nails with holes do not oblige their owner to a certain style of clothing or type of makeup. They are universal and appropriate in any situation | It is important to choose the right shades of the main coating and the hole, taking into account the combination of colors |
| You can use any shellac from the collection without fear of it spreading | The lunar coating will be durable only if it is well secured with topcoat. |
Lunar manicure with shellac using a stencil
Shellac is a type of gel polish that combines the properties of gel and regular polish. Shellac is as easy to apply and remove as regular polish.
Shellac moon manicure idea
Unfortunately, there are no special secrets or mysteries for creating a lunar manicure with shellac. There is a proven scheme for applying shellac, which you need to take as a basis and stick to it throughout the entire creation of a manicure with holes.
- Give the nail the required shape, prepare it for applying shellac, having previously degreased it
- Apply shellac to the nail plate
- Apply a layer of shellac
- Manicure is ready
In just 5 steps you can create a moon manicure with shellac. This is much faster than using gel polish, because the latter needs to be dried after each applied layer. Shellac does not require such an attitude.
A stencil method for creating a manicure with holes using shellac
Advantages of gel polish over regular coating
Gel polish has a great many advantages, which is why most girls love it. The first thing worth noting is its durability, which allows you to forget about refreshing your manicure for two weeks. The second is strength, which prevents the coating from cracking or chipping due to mechanical damage. Third, it is absolutely harmless; shellac compacts and strengthens the nail plate.
It is thanks to these qualities that many masters use gel polish when performing lunar manicures. However, it is not suitable for every nail painting technique. At home, it’s still easier to use regular varnish, and there’s no need to buy a UV lamp separately.
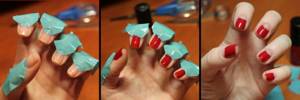
How to do a manicure with triangular holes?
A manicure with triangular holes is done slightly differently than a manicure with crescent-shaped holes. Nevertheless, even in this design, lunar manicure is quite simple and almost anyone can do it.
Stylish moon triangular manicure
So, to create a lunar triangular manicure you will need:
- Two varnishes of different colors and one clear varnish
- Nail polish remover, cotton swab
- Two strips of adhesive tape, adhesive tape, adhesive tape, electrical tape (optional)
- File and orange stick to shape the nail
- Time and patience
Step-by-step description of the process itself:
- Prepare the nail for applying polish: treat the nail plate with a nail file, remove or push back the cuticle using an orange or cotton swab for this procedure, degrease the nail using a primer or regular nail polish remover.
- Apply a base coat of the color you would like to see in the socket area.
- Now cut out thin strips of adhesive tape and glue them in a triangle, as shown in the diagram below
- Paint over the part of the nail that is not covered with stripes with a different color of varnish. Let the varnish dry. After this, remove the adhesive tape.
- Secure the manicure with a small layer of clear varnish.
Creating a manicure with triangular holes step by step
Hole design
The nail industry uses a huge number of hole design options. The classic type of lunar manicure is a free or transparent hole against the background of a red coating.
Most often, nail technicians create nail decor with a concave hole or a familiar hole in a natural shape. Its filling is carried out in various variations, for example, the hole can be made double or triple. The size of the hole is selected taking into account the structure and shape of the nail.
A peculiar trend in recent years has become a lunar nail design with a triangular hole, which is not only outlined with varnish or remains transparent, but also laid out or duplicated with rhinestones. To obtain an acute angle, two strips are used, which are applied in the desired direction.
Creative craftsmen skillfully combine lunar nail designs with French nails. This combination always looks advantageous and elegant. If you have almond-shaped or square-shaped nails, then this option is the most advantageous for you.
View this post on Instagram
Posted by Viktoria (@viktoria_kootko)
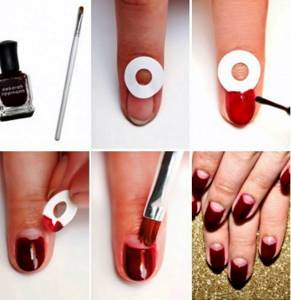
How to evenly draw a moon manicure with a transparent hole on short nails?
The very first version of the lunar manicure was with a transparent hole. Later, women began to come up with ways to make holes of different colors, because it looked new.
Let's return to the very first option - a lunar manicure with a colorless (transparent) hole. To create such a perfectly even manicure, you will need:
- stencil
- nail polish remover, cotton wool or cotton pads
- clear varnish and colored varnish (one bottle each)
- nail file and orange stick
Process:
- Prepare your nails: shape them, degrease and remove cuticles.
- Apply a coat of clear varnish and let it dry completely.
- Now attach a stencil to the base of the nail; this is the future hole. Paint over everything above the stencil with colored varnish. Let the varnish dry completely.
- Now apply another layer of clear varnish.
- Ready! A classic moon manicure with a transparent hole will delight you for a long time!
Moon manicure with a transparent hole
Another interesting idea for a lunar manicure with a transparent hole
Lunar manicure according to the length and shape of nails:
For short nails
We have already talked about the features of manicures for short nails, so we simply invite those who have them to be inspired by especially “tasty” photos from the World Wide Web.
On long nails
Moon manicure on new nails is a spectacular sight, but requires respect for proportions. Remember the main rule of harmony: the longer the free edge, the wider the smile line.
On square nails
A manicure with a corner is the best solution for those with square-shaped nails.
For oval nails
On almond-shaped nails
Moon manicure, like the moon walk of old man Michael, looks extraordinary even after decades. The French invert is an original way to stand out from the crowd, demonstrating to the world your impeccable taste.
How to draw double holes in a moon manicure with a transparent stripe?
A lunar manicure with a transparent strip is a closer option to the classic of all existing types of lunar manicure.
This manicure will require significantly more time than a standard one, because the hole will have to be drawn as many as two times.
Lunar manicure with a transparent strip and double holes
The set of materials you will need to create a moon manicure with a transparent stripe includes:
- orange stick, cotton pad, nail file
- nail polish remover, sponge
- two colored varnishes and one clear varnish
- stencils for French manicure with thin internal borders, the more stencils the better
Now about how to create a manicure with transparent holes:
- Give the nail plate the desired shape using a nail file and remove the cuticle.
- Now degrease the nail using a special product or nail polish remover.
- Apply clear polish to the entire nail and let it dry.
- Now place the stencil so that it ends where the hole will begin.
- Paint the top area (where the edge of the nail) with the first colored polish.
- Paint the hole area with the second varnish (you can use just one varnish if desired).
- Now let each varnish dry and seal the finish with a thin layer of clear varnish.
Moon manicure with a transparent stripe
Take note! Very often there are manicure options in which a transparent strip is filled with rhinestones or sparkles. In such a case, it is not necessary to use the method just described above. You can do a regular manicure with holes, and apply rhinestones or sparkles to the border of the hole.
Useful tips
- Before applying the coating, take care of a perfect hygienic manicure. Highlighting the hole or free edge implies the ideal condition of the cuticle.
- The stencils must be removed before drying in a UV lamp, otherwise the coating may end up with torn edges of the hole.
- When painting a hole with a brush, pay special attention to carefully making the corners.
- It is important to choose the right combination of companion colors for a lunar manicure so that the nail art does not look provocative and overly theatrical. It is not recommended to combine matte and pearlescent varnishes. Remember to match the colors to your clothing style and makeup.
- Rhinestones or stones are glued along the outer contour of the hole. Placing rhinestones in the center of the nail plate will look cumbersome.
Lunar manicure ideas: photos
The article does not describe all options for lunar manicure, but only the simplest ones. More complex manicure options with holes are shown below.
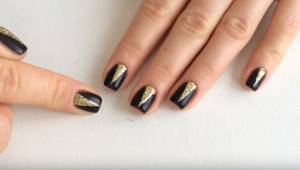
Black and gold are a great holiday or weekend combination. The black color is strict, it is perfectly complemented by the golden tints of sparkles.
Reverse moon manicure with glitter
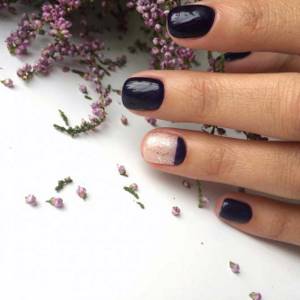
A few years ago, a trend emerged - a combination of matte varnish with metallic elements, which were used as foil or a special varnish with a metallic effect.
Matte varnish with metallic holes
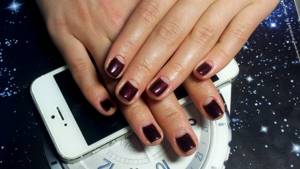
Black nails with colored holes are still in fashion.
Black nails with blue holes Black nails with gold holes
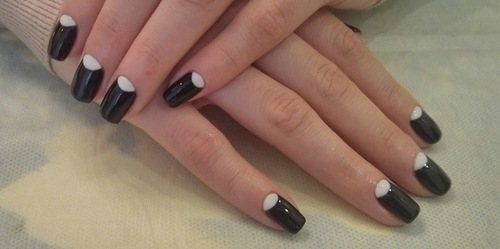
Black nails with white holes Original black French nails
A gentle moon manicure with sparkles or a reverse French manicure is a solution for a manicure for every day.
Reverse French with gold glitter Delicate moonlit manicure
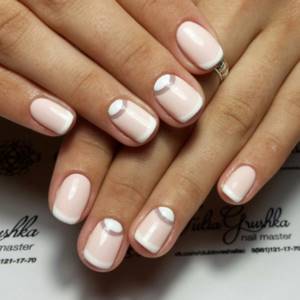
If you definitely want variety, pay attention to the moon manicure with polka dots.
Stylish lunar manicure with polka dots Lunar manicure with polka dots and bows
A bright solution - a manicure with holes in blue, pink, green and yellow colors will definitely attract attention to you.
Bright blue moon manicure
Reverse moon manicure with turquoise polish
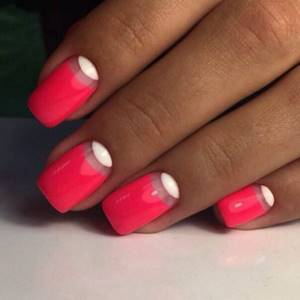
Bright pink moon manicure Green moon manicure
Yellow moon manicure Very unusual and stylish moon manicure
Materials and tools for creating lunar nail art with shellac
To perform reverse French at home you will need:
- UV lamp
- Shellac in two contrasting colors
- Degreaser
- Base coat
- Top coating
- Stencils or a thin brush for drawing a smile
Stencils can be cut from medical tape.
Stencils
If the design is made using foil, then instead of a brush and stencils you will need:
- Glue for foil
- Transfer foil
- Pusher or orange stick
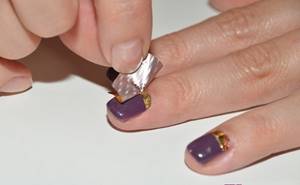
Foil
Doing a manicure at home: what you need
In order to perform such art at home, you need to prepare the appropriate tools and tidy up your nails. For home nail design you will also need the following tools:
- UV lamp with an approximate power of 36 watts.
- A bottle of base and finish, two colored varnishes.
- Small nail wipes (lint-free).
- Degreasing liquid.
- Acetone.
- Special round stencils.
- Additional decorative elements (if desired).
You will need all these things for a home manicure.
Stages of work
The secret to performing a high-quality manicure with gel polish is following the technology exactly. You don’t have to do anything special, but the sequence of steps must be followed. To make sure the job is done correctly, you can watch a training video.
Before applying gel polish, you need to prepare your nails by performing a regular manicure. To remove the cuticle, you can use nippers after soaking the skin in the bath. Another option is to dissolve the cuticle with a special product and remove it with an orange stick.
The nails need to be shaped and sized, and then treated with a polishing block. After preliminary preparation, you can begin to perform a lunar manicure.
- Degrease the nail plate with a special product.
- Apply primer for better adhesion of the gel to the nail surface.
- Apply the base in a very thin layer and dry in a lamp according to the instructions.
- Fill the area near the cuticle with gel of an auxiliary color. Dry.
- If the color saturation is insufficient, repeat the procedure.
- Wipe off the sticky layer with a napkin. Paste the stencils, completely covering the “lunar” fragment.
- Apply the base color, remove the stencil and dry the nail.
- To obtain a more saturated base color, the procedure can be done twice, after first erasing the sticky layer and gluing a new stencil.
- Wipe off the sticky layer.
- Apply gel base to the entire area of the nail, including the end part. A “sealed” nail will retain the coating longer.
- Dry the fixative in a lamp. The final coat will make your nails shine.
The manicure turns out to be very neat, no different from a salon one, and it’s easy to do. The main thing is to learn how to work with a lamp and stencils.
Features of manicure on short nails
Owners of short nails can become even more tender and cuter with this type of nail design, but when designing such nails it is better:
- Choose natural colors;
- Eliminate clearly defined boundaries;
- Don't get carried away with additional decor.
What are the benefits of moon art?
If you pay attention to the photo, a moon manicure with shellac is a great way to highlight the graceful shape of your nails. It is perfect to complete any style, including retro and vintage. This manicure lasts a long time and goes with any outfit. He doesn't get bored or irritate.
After a little practice it will be quite easy to do it yourself. Moreover, if your nails grow long, you can always file them and remove the excess length. In this case, it will not harm the original drawing. In a word, this is an original design that never goes out of fashion.