The development of the nail industry, as well as a large number of video tutorials, allows anyone to do their own manicure at home. For a modern woman, well-groomed nails are as important a detail of appearance as neat makeup or hair styling.
In recent years, nail fashion has moved further and further away from long, extended nails, handing over the palm to short-cut nails. The manicure accessories market offers owners of short nails a wide range of design solutions for every taste and occasion.
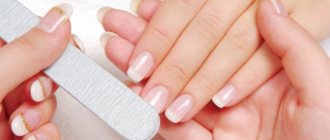
Necessary tools for manicure at home
To carry out the treatment efficiently without damaging your nails, you need to purchase professional tools. Firstly, their service life is much longer, and secondly, they operate efficiently and as safely as possible, allowing you to speed up the process significantly.
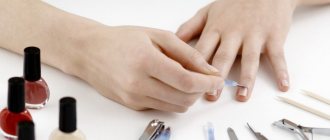
For manicure you will need the following tools:
- Cuticle nippers. Some of the best time-tested companies are Solingen and Zinger. The tools are made in Germany, the material of manufacture is stainless steel. The pliers come in different sizes depending on the length of the blade. For home processing, a parameter of 0.5 cm is suitable.
- Pusher is
a special double-sided device for pushing back the cuticle and modeling the nail hole. On the one hand, it has a “spatula”, on the other, a small knife. The tool must be made of metal. - Knipser. Used for shortening long plates. Outwardly it resembles a guillotine and operates on the same principle. There are powerful toenail clippers and standard ones for hand care.
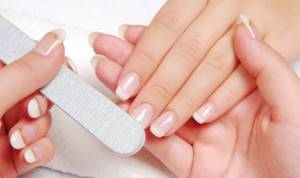
- File. It is necessary to trim the plate and give it the required shape. It differs in material of manufacture and rigidity. For a home procedure, a file with a grain size of 180 grit is suitable.
- A polisher is
an accessory that gives your nails a beautiful glossy shine and perfect smoothness. It can also have different abrasiveness, ideally 2000 grit.
In addition to the main set, you will need auxiliary items and tools:
- terry towel or paper napkins;
- cotton pads;
- steaming container – large cup, bowl, etc.;
- wooden sticks made from citrus fruits for cleaning nails, pushing back cuticles, etc.;
- nail polish remover - if you need to remove the previous coating;
- disinfectant - you can purchase sanitizers at a pharmacy or specialty store, or use regular chlorhexidine (Miramistin) or a 70% alcohol solution.
Depending on the type of manicure and the desired coating, you will need additional accessories. For example, you can take a special oil to soften the cuticle or a pencil for rhinestones if you plan to decorate with stones.
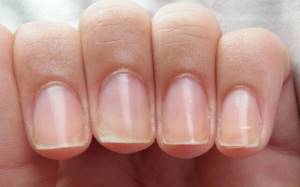
How to avoid hangnails
Hangnails are particles of skin that have peeled off on the surface of the nail fold.
They can appear for several reasons:
- Dry cuticles caused by overuse of harsh chemicals found in detergents.
- Incorrect technique for performing trim manicure. Cuticle removal should be done smoothly and continuously to avoid ragged edges.
- Filing nails from side to side, as well as using metal files.
- Poor circulation caused by aging processes.
Hangnails bring discomfort, and often inflammation and abscess appear in their place.
Following several important rules will help prevent their occurrence:
- It is mandatory to use rubber gloves when working with any types of household chemicals.
- Technically correct execution of trimmed manicure with a well-sharpened tool.
- Using oils and creams to moisturize the skin around the nail.
- Massage cuticles and nail folds to improve blood flow. You can do it yourself.
To achieve a positive effect, self-massage should be done 2-3 times a day. It will take no more than 3 minutes. The massage should begin with light stroking of the hand, and gradually move on to kneading the fingers. It is enough to repeat this action 4-6 times.
Rubbing the phalanges of the fingers is the main element of self-massage. To do this, you need to clench your hands into fists and alternately rub the phalanges against each other. The massage ends with the application of nourishing cream.
Regularly performing this procedure has a beneficial effect on the appearance and health of the nails, and also prevents the appearance of hangnails.
Which manicure tools should you use and which should you not?
For beginning craftsmen, the listed set of items will be sufficient. Don't ignore the orange stick - it will help push the skin away from the cuticles without damaging it. If you don't have clippers, you can use regular nail scissors. However, tweezers have beveled blades, which allows you to remove the dead layer of skin more deeply. As a result, the nail bed looks well-groomed longer than when trimmed with scissors.
On sale you can find various kinds of tools, for example, cuticle forks. At first glance, they seem convenient, since they cut the skin at the “right” angle.” However, they are considered a non-professional device and are not used by craftsmen. It is very easy to damage the capillaries with forks, after which your hands will bleed for a long time. They are also not recommended because the blades create unnecessary pressure that deforms the nail bed. Sometimes the damage is so severe that the nail begins to grow crooked and never straightens out again.
Step-by-step instruction
Next, we have prepared for you several DIY manicure ideas in the form of step-by-step instructions. With just a few bottles of colored polish in your arsenal, you can already create a simple design on your nails. It is recommended to complement the images with manicure accessories and gradually complicate the design. All tools are available for sale at any nail store.
French
Classic manicure is so universal in everyday life that it not only goes with any feminine look, but is also easy to perform. The French finish consists of a camouflage pattern that matches the shade of the natural base and white smile. As a base, you can choose any beige and light pink shades. To draw a thin white smile line, you can use arc-shaped stencils.
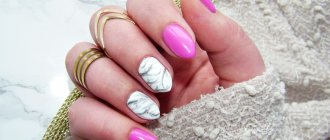
The good thing about the design is that you can always add modern touches to the classics. For example, snow-white holes, patterns and the intersection of straight lines will look luxurious on a nude base. A laconic and simple design can always be diluted with sparkling rhinestones and ribbons. And also change the colors of the holes and the substrate to contrasting ones. A beautiful DIY French manicure can be seen in the photo.
Sterilizing instruments at home
Trimming manicure is considered one of the most traumatic, so sterilization of instruments is a prerequisite for its implementation. In nail salons, this procedure is performed in special dry-heat ovens; at home, you can use an oven. Simply load metal tools into the cabinet on a separate baking sheet, set the temperature to 250˚ and heat for 15 minutes.
If during the previous treatment the skin was damaged and blood came out, the items must first be soaked in a solution of one of the following products:
- chlorhexidine;
- 70% alcohol;
- special pharmaceutical composition.
If you use reusable orange sticks, they also need to be sanitized. It is enough to wipe them with antiseptics; the nail files are treated in the same way.
How to choose a manicure set?
If you are not a fan of hardware manicure and prefer to do a classic manicure at home yourself, you will have to provide yourself with convenient tools.
After reading our material, you could be convinced that for a trim manicure you do not need as many devices as some expensive manicure sets contain.
And perhaps the first thing to start with is writing a list of what separates you personally from a great manicure. This list will probably include not only the components of the kits, but also a special bath, as well as care products. All this will also need to be purchased.
Next, you can purchase tools that you think are right for you, in their inexpensive version. And that's why. As already mentioned, each master chooses his own tools - some prefer scissors, others tweezers. In addition, everyone has their own skin and nail characteristics. For some people, trimmed manicure is not at all suitable for physiological reasons (for example, this can happen if you have diabetes, when any wounds heal very poorly). Try doing your nails a few times first. If you are uncomfortable, change some of the tools.
By trying inexpensive tools first, you can choose the ones that work best for you. And if you want to buy what you personally need in a more expensive version. After all, as a rule, all necessary devices are sold individually.
By buying a large, expensive set at once, you can end up with a huge number of unnecessary items that will lie idle for years. It is also worth choosing a separate case for storing all items, where everything will be laid out separately. After all, if metal tools come into contact, this can contribute to their dullness.
Choosing a nail file
Manufacturers offer a wide range of files that differ in hardness, shape and material. Choose a tool based on the result you want to achieve and your financial capabilities.
Classification by material
The following types are produced:
- Glass. Their advantages are long service life, versatility, safety, prevention of plate delamination. If the coating has worn off (usually a file lasts for a year), this indicates the need for replacement. The main disadvantage is fragility. Glass breaks easily, so it should be stored in a special case.
- Ceramic. The choice of professionals and people who have to treat weak, damaged nails. Ceramic is also suitable for removing old gel coating.
- Diamond. The main advantage is the ease of processing the plate in all directions. The diamond file also does not damage the nails and seals the tip, reducing the risk of splitting. Used on both natural and artificial nails. Its cost is several times higher; it is classified as a professional device.
- Metal. Masters do not use this type, as there is a high probability of injuring the nails. The price of such a file is low, it lasts quite a long time, but that’s where the positive qualities end.
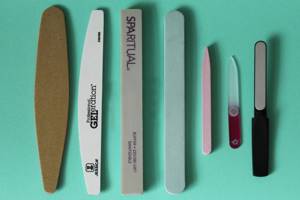
You can also find paper and plastic tools; you should not purchase them for home use. The best option is a ceramic or diamond file.
Classification by shape
The shapes of the files are also varied:
- oval – for correcting the shape of natural and extended plates;
- rectangular - to form the length;
- boomerang - to give nails a rounded shape;
- diamond-shaped - the most convenient option for correcting artificial plates;
- dome - to give the extended nails the desired shape along the entire length.
The best choice for working at home is an oval file. With its help you can perform almost any manipulation.
Classification by hardness
The grain size of the file is determined by grits, that is, the amount of abrasive applied per 1 cm². A low indicator indicates maximum roughness of the instrument, a high indicator indicates softness. The following types are used in manicure:
- 80-150 grit – for processing artificial plates;
- 150-180 grit – for final polishing of extended nails;
- 180-240 grit – for working with natural plates that do not delaminate;
- 400 grit – for weak and thin nails;
- 400 – 2000 grit – polishers.
The hardness is indicated on the file itself. If you do not see this indicator, do not purchase the tool. Most likely, it will be of poor quality and will only “fragment” your nails.
Choosing a nail shape
The nail plates on each finger are different, and with the help of proper filing you can visually align and lengthen them, giving them elegance and subtlety. The most difficult to treat are the thumb and index fingers - usually the nails on them grow crookedly, and the nail bed itself is different from the rest. The little finger and ring fingers are considered the easiest to work with - the nail on them is narrow and beautiful.
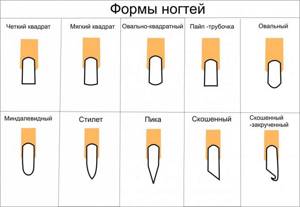
Be sure to align short nails in length so that the free edge does not show through and does not reveal uneven plates. When choosing a specific shape, be guided by the bend of the bed, the length and thickness of the fingers. There are several form options:
- Square. This type is considered the initial type for any other form, but it is not suitable for everyone. If you have plump, short fingers, it is better to avoid the square. It is sawed quite simply - the length is removed, after which several manipulations with a nail file are made on both sides to emphasize sharp corners.
- Soft square. The corners of the square are beveled and rounded, the edge is made a little “smiling”, but not much, otherwise the transition to an oval shape occurs.
- Oval. A file is placed at the corners of the finished square at 45˚, then the corner is filed. The resulting edge needs to be smoothed, giving the plate an oval shape. To make the nail symmetrical, the oval should be drawn from a square. If you immediately try to file the plate on both sides, the proportion will be disrupted.
- Almond. A shape that should only be done by those with long, thin fingers with an elongated nail bed. Otherwise your hands will seem awkward. To give your nails an almond shape, you need to file off the corners of the finished square at 60˚, and then smooth the edge.
The shaping is completed by removing the sawdust from under the plates. To do this, place the file perpendicular to the free edge of the nail and perform several manipulations in an upward direction.
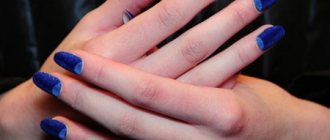
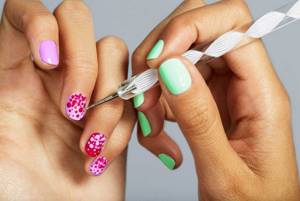
Manicure yourself using sparkles and glitter
Glitter is an excellent decoration for manicure. If it is very difficult for a girl to create a design or pattern on her nails, but still wants to get a special and unsurpassed nail art, then glitter will come to the rescue. With their help, the manicure will shine and amaze others with its sophistication. You can cover your little finger, index finger and half of your ring finger with glitter, and paint the rest with varnish of the desired tone. Ombre made with gold or silver sparkles looks very original. Another good option is holes or smiles with sparkles of any color.
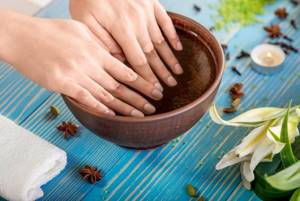
Useful baths as a preparatory stage
Before a classic trim manicure, it is necessary to soften the cuticle and prepare the skin for further procedures. Baths are used for this. Fill a container prepared in advance with warm water (not hot), then lower your hands there for 3-5 minutes. This time will be enough to give the skin sufficient softness.
If desired, you can add sea salt or aromatic oils to the water. Then the procedure will be more pleasant and useful, strengthening the nail plates. After the bath, it is advisable to use a hand scrub and moisturizer.
Lesson No. 3 - “How to properly do manicures for clients (edged, euro, combined)”
A professional manicure requires the attention of your eyes.
We start by determining the type of cuticle, so you will understand what type of manicure your client needs. Types of cuticles and corresponding manicure:
Normal type of cuticle - very easy to remove, the skin is not dry, a combined manicure is ideal for this type (in the future the client can be switched to a European manicure).
Thin cuticle - it resembles a film. has a translucent appearance, very soft, you need to be careful with it, since this type is often accompanied by close capillaries. If a client comes to you with exactly this type of cuticle, you should do the first manicure with a trimmed one, and then only a combined one, you don’t need to injure it, so it will stop growing so much over time (perhaps the first manicure with this level of neglect will be accompanied by bleeding, not You need to be scared, the longer the cuticle is neglected, the closer the capillaries grow to it).

Simple type of cuticle - this type of cuticle hardly grows, but it needs to be maintained in order; with this type, the area of the side ridges often grows the most. European manicure is ideal in this case, but if suddenly there is still a little cuticle on one of the fingers, you wash it off.
The next stage of your work is to proceed to the technology of performing a hygienic procedure - manicure, follow the instructions, each type of manicure is described step by step.
Nail structure:
Technique for performing classic edged manicure
At home, manicure is carried out according to the following instructions:
- Wash your hands with detergent.
- Completely remove the previous coating.
- Give the nail plates the required shape.
- Make a softening bath. To do this, lay out a towel, place a container of warm water on it and place your left hand there if you are right-handed, and your right hand if you are left-handed.
- Wait a few minutes, then take out your little finger and pat it dry with a towel.
- Gently work the cuticle with the side of the pusher that resembles a “spatula”.
- Remove the pterygium from the plate with the side of the pusher where the blade is located.
- Using clippers, cut off the dead skin from the skin folds and nail bed.
- Consistently repeat the described procedure with the remaining fingers and the other hand.
- Polish your nails.
- Cover the plates with your chosen varnish, transparent base or medicinal composition.
- Massage your fingers and hands with special oil.
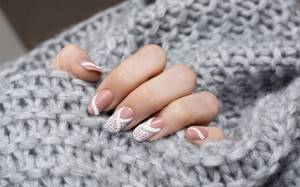
French manicure for yourself
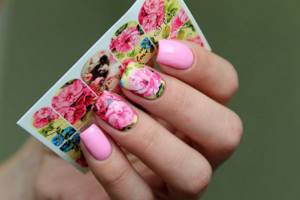
French manicure attracts the love of many fashionistas. This nail art looks very neat, gentle and attractive. Doing a French stitch yourself is not difficult. If you can’t draw even smiles on the edge of your nails, then you can use special strips that will make this task much easier. For a classic French manicure, the nails are covered in a soft pink tone or remain transparent. For a moderate and calm manicure, use white for the holes. If you want something unusual and extravagant, you can make holes in bright and catchy colors. It’s also worth experimenting with the base color of your nails. The red coating with black or white holes looks original. To diversify the design of French nail art, you can focus on one or two nails. To do this, just cover it with a different tone, glitter, rhinestones or decorate it with patterns.
Unedged manicure at home
In the salon, for unedged manicure, a machine with many rotating attachments and caps is used. The cutters remove the keratinized layer of epithelium on dry skin. To perform a similar procedure at home, you can use a cuticle softening cream, a special file for European manicure and a ceramic hoof. They will help to gently push back the skin without injuring it. There is no need for baths for the procedure, since the treatment is completely “dry”.
Unedged care is performed according to the following algorithm:
- Wash your hands with soap.
- Apply a softening composition to the cuticles. Let it soak in.
- Start with your little finger. Open the nail bed with the round end of a file or a wooden stick, pushing away the skin folds.
- Remove the softened part of the cuticle remaining on the surface of the plate.
- If the skin ridges are rough, go over them with a stick with an abrasiveness of up to 240 grit.
- Wash your hands again.
- Use a degreaser or alcohol to prepare the plates for further decorative coating.
- Apply polish or gel.
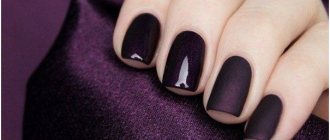
Matte manicure for yourself
The matte finish looks very elegant, feminine and extravagant on nails of any length. This coating can easily be combined with glossy. To perform a beautiful manicure yourself, you need to first prepare your nails. The technology for performing matte manicure is no different from standard nail art. Only at the end we cover the nails with a special matte top. This manicure can be decorated with stickers, rhinestones or patterns if desired.
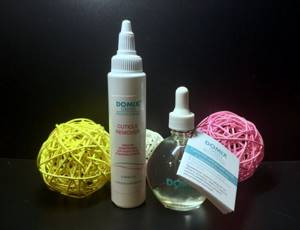
Cuticle removers
A wide range of softening compositions for hardened areas of skin on the fingers and hands are on sale. All of them are divided into three types:
- alkaline;
- acidic;
- based on fruit oils.
The first two require mandatory rinsing after a certain period of time, the third option can be left as is. Alkaline and acidic solutions are suitable for European-style home unedged procedures. They will soften the skin equally well. However, you should carefully study the instructions for the products so as not to overexpose them and not get inflammation, burns or dryness.
Features of applying nail polish
Applying nail polish is not as difficult as it might seem at first glance. There are some useful tips about this:
- The varnish must be the correct consistency. If you just bought it and it hasn’t been sitting on the counter, then its thickness is optimal. If you notice that the density is too high, then add a special liquid to dissolve the varnish into the bottle.
- Do not use acetone or nail polish remover to thin the base. These compounds will simply curdle her.
- If you are going to apply a colored coating, first prepare the plate and treat it with a transparent base. Otherwise, the gel or shellac will quickly be absorbed, leaving uneven streaks.
- Practice on some similar objects before painting your nails. An incandescent light bulb is ideal.
- After dipping your brush into a container of varnish, be sure to squeeze out the excess.
Knitted manicure
This type of manicure has been very popular lately. Volumetric patterns reminiscent of sweater knitting are most in demand during the cold season. In order to make your nail art design unusual and interesting, you need to decorate your ring and middle finger with knitting. In this case, the fingers can be highlighted not only with the help of an openwork pattern, but also painted with a different shade. Before applying polish, give your nails the desired shape and get rid of cuticles. Now you can safely apply the base and dry it in an ultraviolet lamp. Next, coat the nails with varnish of the desired color. After the varnish has completely dried, you can begin to paint. Carefully draw a pattern in the form of a braid or a knitted sweater (for a more voluminous effect, it is better to apply the pattern several times). If desired, you can cover the pattern with acrylic powder to achieve a rough effect.
Applying Shellac: A Step-by-Step Guide
Shellac is a kind of hybrid of regular varnish and gel for nail extension. It lasts longer than its analogues, gives the nails additional rigidity and allows those with brittle plates to grow longer. Apply gel polish according to the following algorithm:
- Clean your fingers from dust after a manicure using a special brush. Degrease the plate so that the shellac adheres better.
- Cover your nails with base coat. To ensure an even layer, first apply the base to the edges of the plate, then paint the middle and finally seal the free edge. After each application, you need to dry the gel in an LED or UV lamp. The time depends on the type of device.
- Now coat your nails with your chosen polish. For beginners, it is better to paint with one color, and only after a positive result obtained several times, move on to complex designs. So, apply the base coat in the same way as the base coat, but do not seal the edge.
- Dry the layer in a lamp. If you notice that the gel is swollen, you will have to remove it and start the process again from the first point.
- Apply the base composition a second time and dry it. This is necessary to create a rich, vibrant color. If you are going for a translucent effect, you can skip this step.
- Apply topcoat or finishing coat to your nails. This layer should be the densest and thickest. It takes longer to dry than others, and the tip is sealed during application.
- Wipe the finished, dried nails with a special compound or a lint-free cloth to remove the resulting sticky layer. If you don’t have professional products at hand, you can use regular alcohol. However, keep in mind that it takes away some of the gloss from shellac.
If you want to do a more complex finish, such as a cat eye, practice on single color designs first.
Nail designs at home You don't have to go to a salon to give your nails an original look. The procedure can be completed at home, but some designs may require additional materials and experience.
Among the popular types of nail plate decoration are the following:
Classic French.
Shape your nails into a soft square, then cover them with a base coat in a natural shade. Usually choose pale pink, beige or milky. After this, the free edge should be highlighted with a white “smile”. It is difficult to apply it evenly, so beginners often use stencils.
Lunar manicure.
Similar to the previous option, only here you need to select not the tip, but the hole at the base of the plate. You can use a stencil for a clearer drawing. In the lunar design, the holes look interesting, drawn in a bright color contrasting with the base.
Sliders.
These are small stickers with ready-made designs on one side and an adhesive layer on the other. Before manicure, cut out the necessary stickers, apply the base and, while it is still wet, secure the slider. Smooth the film with an orange stick and remove any bubbles. Secure with top.
Stencils.
They allow you to apply the design as accurately as possible, without allowing the varnish to spread. Simply separate the template from the leaf and glue it to the desired location on the plate. After this, cover the nail with the desired color of shellac, dry for 5 seconds under UV rays and remove the stencil.
Stamping.
For this manicure you will need special stamping kits. It is understood that you will use these silicone impressions to apply the selected patterns to the nail plates using the stamping method. It can be stripes, flowers, ornaments, etc. It all depends on your taste. Choose the colors of the base and stamps at your discretion.
Glitter.
The universal shade of glitter is silver. It fits any design and accents just the right amount of attention. To apply glitter, wait until the varnish is completely dry, arrange the decorative elements as desired and secure them with a top coat.
Rhinestones.
They decorate only two nails, otherwise the design will look redundant. Buy a set of Swarovski crystals of different sizes and a special pencil for gripping them. Decorate with rhinestones a plate on which the shellac has not yet dried. To do this, moisten a wooden stick or pencil with water and bring it to the crystal. It will attach itself. Place the largest stone in the center closer to the nail bed, leaving smaller rhinestones at the edges. Simply release the stick after alignment to adhere the crystal.
Matte manicure.
It is also called "Velvet". To complete this you will need a special “Satin” varnish. After complete drying, it becomes matte, while hiding all imperfections of the nail. If you apply a top coat over it, the coating will become glossy. You can make two nails shiny, for example, and leave the rest matte. It is better to use “Satin” on bright colors; on nude colors the dullness is not visible.
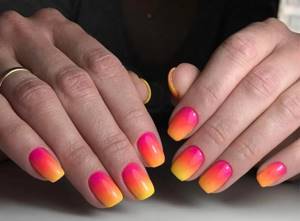
Gradient.
A smooth transition from one color to another is assumed. The direction of the stripes can be vertical, horizontal or diagonal. To begin, apply one of your chosen shades to the plate, and while it is still wet, apply a stripe of the next one. Blend the border with a brush.
Water manicure.
Pour water into a container and place a drop of the first color you choose, place a drop of another on top, etc. Using an orange stick, move the drops to create the pattern you want. Since you will need to submerge half your finger in the water, try to tape off as much skin on it as possible. Dip your nails into the water right in the center of the design. Wait for the pattern to transfer to the plate. Pull your fingers out and clean off any excess polish. Apply topcoat.
Newspaper manicure.
Cut pieces of newspaper slightly larger than your nail beds. It is better to take publications in a foreign language, they look more interesting. Apply base to your nails and wait until it dries. Take a piece of newspaper with tweezers and dip it in alcohol for 10 seconds. Take it out and press it onto your nail, hold for half a minute or longer. Remove the newspaper and let the print dry. Coat the plates with finishing agent.

Manicure with velvet sand for yourself
To give your manicure a spectacular texture, use acrylic powder. This manicure is very easy to do yourself, and it won’t take much time. First, do a manicure and apply a base. After it dries, you can safely cover your nails with the chosen shade. Then apply acrylic powder to the varnish layer and dry. Shake off any remaining residue using a special brush. You can sprinkle velvet sand on all your marigolds, so your marigolds will look unusual and elegant. To make a more traditional nail art, cover several fingers with acrylic, and on the rest, draw patterns with a thin brush and also cover with velvet sand.
What pharmaceutical products may be useful?
You can buy several antiseptics at once at the pharmacy:
- chlorhexidine;
- 70% hawthorn tincture;
- 70% alcohol.
All of them are good as a disinfectant for treating tools and hands before starting a manicure. You can also consult a pharmacist to purchase professional formulations for sterilizing devices. During the work, BF-6 glue may also come in handy: if you accidentally cut your skin, immediately apply it to disinfect and seal the cut instead of an adhesive plaster.
Baths and oils to strengthen and grow nails after a manicure.
Baths can be done not only to steam your hands, but also to strengthen the nail plate. To prevent waves and white spots from appearing on your nails, to keep them strong and not peeling, you can prepare baths with sea salt for them several times a week. It is not necessary to use expensive salt from specialized stores; regular salt from the grocery store will do. Just dilute a couple of spoons in a container of warm water and put your hands there for 15 minutes.
After the bath, it is useful to apply a nourishing oil-based cream to the skin of your hands. Choose products that contain avocado, apricot and aloe. If you see essential or mineral oils, do not purchase such cream. It contains products of chemical petroleum processing, so it does not bring a positive result.
How to learn to do a manicure: the most common mistakes
Unfortunately, when performing a manicure yourself, you may do some manipulations incorrectly. After 1-2 procedures, nothing bad will happen, however, if you regularly repeat mistakes, the condition of your nails will begin to noticeably deteriorate.
- Excessive polishing of nails. Yes, after diligent polishing, the nail plate looks great. However, it is worth remembering that this procedure can be performed no more than 1-2 times a month. Otherwise, you will gradually thin your nails: it will not be noticeable on the outside, but after 10-12 months you will experience brittleness, delamination and fragility of the nail plate.
- Constant length cutting using scissors. It is believed that it is enough to stop cutting your nails to get rid of their splitting. The fact is that with scissors you damage the edge of the nail and unnaturally bend the plate itself. That is why it is recommended to cut down the growing length rather than trim it.
- Cutting off rough skin on the periungual fold. Ideally, these areas of the fingers should be sanded with a file and then nourished with cream or oil. Otherwise, after such an independent manicure, the roller may begin to dry out, become rough and crack.