One of the most popular and beautiful designs in nail design can be called monograms. But not all novice masters know how to draw them. This review is just for those who want to learn how to draw these beautiful decorative elements. It contains step-by-step photo and video lessons, training cards and photos with design ideas. Monograms on nails are rarely seen in their pure form; this design is combined with different manicure techniques, as well as nail accessories. The result is a very beautiful combined manicure.
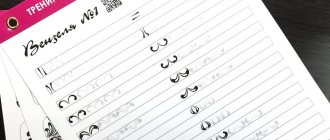
Large selection of training cards for painting nails
Creative ideas and good taste are closely related to basic knowledge. Beautiful ornaments, floral patterns, interesting combinations of bright colors come with experience.
Important! Beginners need to master simple drawings, then move on to more complex lines. Working out fine lines will improve the results of your work.
Training cards for painting nails with monograms
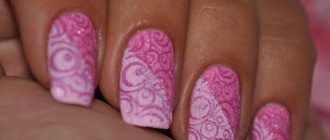
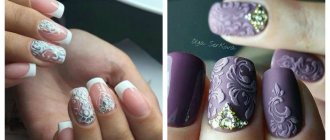
Well-groomed hands will be emphasized by a beautiful nail design with artistic details. There are many sketches for original drawings; they are used for painting. Patterns called “monograms” have gained popularity in this direction. This includes curls, squiggles, flowers and ornaments. For your first experience, it is better to use sketches for beginners.
Beginners are offered simple drawings, which can be used to practice basic elements and working with a brush. You can print out practice cards for painting nails with simple monograms.
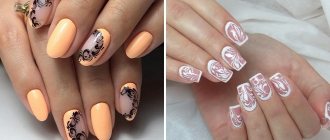
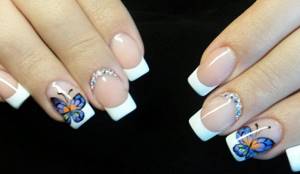
A sketch of monograms in the form of delicate patterns will complement a French manicure in pastel colors. You can draw one pattern on all nails or apply it to one. The composition is well suited for celebrations.
For a more sophisticated and lace manicure, use training cards for a more complex art design. There are a lot of fine lines and small details, so it is better not to combine a large number of colors, but to stick to a few shades.
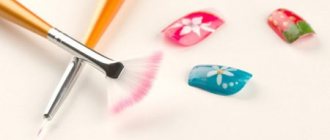
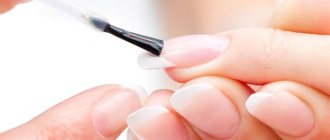
In the photo you can see how the process of painting with a thin brush on printed material takes place. Masters recommend purchasing several brushes of different thicknesses, which need to be changed for individual elements.
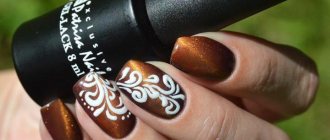
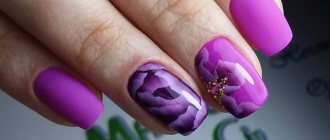
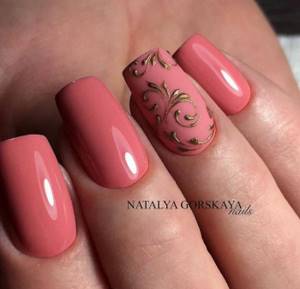
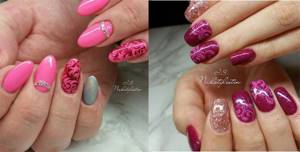
Beautiful ornaments in the form of flowers are one of the options for monograms. Drawing floral patterns is considered to be of medium difficulty. This is a feminine manicure that will truly decorate your hands.
After painting training sheets or cards, you can move on to tips. Below is a clear example of how to draw a pattern.
Artistic skills developed using manicure sketches will allow you to draw luxurious monograms with the finest lines. This art design will create different looks for fashionistas.
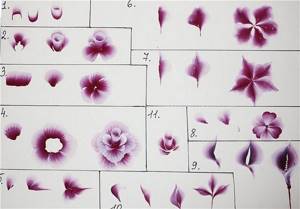
Training cards for Chinese painting
Manicurists create bright floral designs using Chinese painting. As you know, floral elements are the basis of Chinese painting. A special feature of the drawing is the double stroke technique with a smooth transition of colors.
Advice! To master oriental craftsmanship, you need a lot of practice and a flat brush. First, they practice basic strokes in one direction, then in the other.
The basic sketch consists of leaves and petals. First of all, use a stroke of a light shade, then a darker one. Masters advise beginners to take their time and practice individual elements more.
In the next option, you can try to draw flowers with veins on such practice sheets for painting nails. This is a more complex floral manicure design in a purple shade.
Here is a detailed diagram of the main elements of oriental design. Here you need to pick up the paint correctly and carefully shade it. For this, an acrylic composition or gel polish is used.
After going through many difficulties, a masterpiece of manicure design emerges. The full palette of shades is expressed in the color composition. In this technique, the design is made simultaneously on several nails, which gives a modular design.
The result largely depends on which brushes are used for each detail. Here is a selection of six brush options for proper use. Chinese color manicure is multifaceted, so more professional skills are required.
In addition to white sketch sheets, special black paper is used. It is convenient to work out the finest lines and strokes here. Black color also looks original in manicure.
Professional masters claim that the result will be visible only after a month of practice. Chinese painting is a labor-intensive process due to the technique and many complex elements.
Monograms on nails: design features
To learn how to draw beautiful monograms on your nails, first of all you need to stock up on the necessary tools and materials: manicure brushes, gel paint or gel polish, training tips, stencils and training cards.
- Brush for monograms on nails
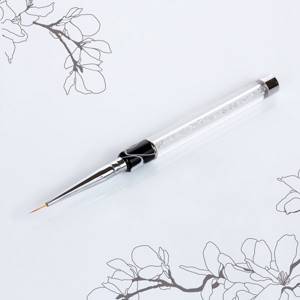
To draw small designs on nails, including monograms, use brushes with thin short bristles. Good reviews on the Internet can be found about the brush InGarden, Global Nail, as well as some brushes from Aliexpress, for example, MAKARTT, BQAN, Monja, KASAKO, etc. But no matter how good the brush is, many masters cut “brushes to suit themselves” ” to make the thinnest hair possible. The brush is cut at the base in a circle, one hair at a time. For long curls, it is better to use brushes with longer hair.
- Gel paint
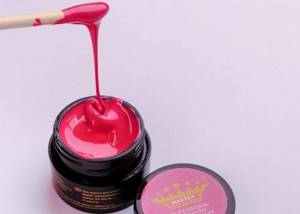
Some masters manage to draw monograms on their nails with regular gel polish of a thick consistency, but it is much more convenient to use products specially designed for this, namely gel paint or gel paste. Among the gel paints, E.mi, NeoNail, InGarden, UNO, Nail Passion, Maranda, Patrisa nail, etc. are praised.
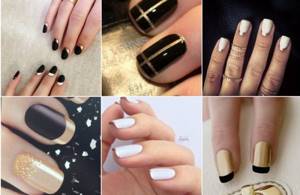
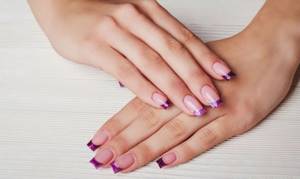
French manicure options and their differences
But modern manicurists have gone further, deciding not to limit themselves to just one thing and have created many variations of it.
- At first, French began to appear on long nails.
- Today you can see not only clear rims on the tips of the nails, but also varnish applied using the popular ombre technique.
- A revolutionary decision was a radical change of color - the white rims were replaced by black ones, and then completely became multi-colored. For this type of French coat, matte and glossy varnishes of the same color were used. Recently, “metallic” jackets have come into fashion, using foil, glitter and rhinestones on the tips of the nails.
- Then the crescents gave way to diamonds. Then the idea came to paint diamonds in two layers alternating white and black. This is how the zebra style jacket appeared.
- Later, a variety of “lunar” or “reverse” French appeared: the crescent moved from the top to the base.
- Among the recent new products: “lace” French manicure, with designs reminiscent of mehendi patterns.
- Now we can preserve this manicure for a long time thanks to shellac.
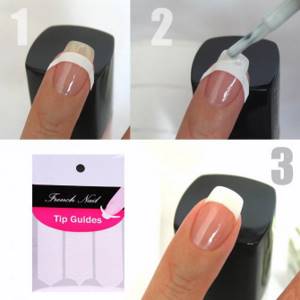
DIY nail stencils
Nail tape stencils
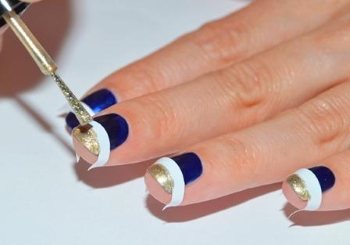
Stencil for French
Beautiful and convenient stencils can be obtained from nail tape.
You can use even strips, and you can also cut out various geometric shapes, waves, arcs, etc. from them.
Original pictures can be obtained by combining several strips located on the nail at different angles.
Stencils made of paper, window tape or cash register tape
Plain paper, window tape or cash register tape will help you create large motifs and simple designs. Sketch a sketch on paper, then apply film and cut out the resulting design. When applying the design, make sure that the varnish does not flow under the film. Paper will also make wonderful strips for a French manicure or moon manicure .
Make a stencil design in just a few minutes under the guidance of an expert:
Stencils made from adhesive tape, tape
Geometric fantasies using tape
To make a stencil from tape or adhesive tape, you will need scissors, a utility knife and a glass surface .
- First come up with a suitable design.
- Cut off the required amount of tape or adhesive tape.
- Next, carefully stick it on the glass surface.
- Using a utility knife, shape the tape into the desired shape.
Please note that there are no folds or irregularities anywhere, otherwise the stencil may turn out to be of poor quality.
To get a truly original and unique drawing, it is better to draw it yourself. You can draw directly on paper or in a graphics editor, such as Photoshop. If you can’t draw it yourself, you can download ready-made pictures from the Internet and print them.
Another simple way to make a stencil:
How to make a template for a French manicure
Original French
A stencil for a French manicure can easily be made from tape, adhesive tape or window tape . At the same time, you can not be limited to the standard form, but show your imagination and create your own unique pattern for a jacket, for example in the form of a wave.
How to make a stencil for a moon manicure
Original lunar
Moon manicure is very similar to French manicure, only the hole at the base of the nail is highlighted with varnish, and not its very tip.
A template for such a manicure can also be made from tape or adhesive tape by simply cutting out the desired shape: round, triangular, wavy, or even with a pattern.
Step-by-step technique for performing manicure with a stencil
Whatever one may say, French is not just about applying varnish. The process is long and quite labor-intensive, but you don’t mind the energy and time for such beauty, right? I'll tell you step by step.
Preparing your nails
We erase the old varnish. We bring the shape of the nails to the same desired shape and size using a nail file. By the way, based on personal experience, I advise you to use glass - my nails stopped breaking from the summer breeze only after I started using this tool.
Now fill the bowl with hot water, add just a little liquid soap, a couple of drops of your favorite aroma oil and a teaspoon of sea salt. Dissolve it all, if necessary, dilute it a little with cold water, lower your hands and keep it in the bath for 5-7 minutes.
Having taken out your hands, wash them thoroughly with soap; if necessary, use a brush to remove dirt. Using a pusher or an orange stick, push back the cuticle. We get rid of it by applying a special remover liquid, using nail scissors or triangular cutters. We do the same with the skin around the nail. We make sure that the cuticle has completely capitulated and move on to the main part!
Process description
Use a sanding file to lightly polish the surface of the nail.
- If you want a contrasting result and a clear border, then apply a colored base (pink, milky, beige). Dry well. If you want to make your manicure more noticeable, apply a second layer. After drying, stick the stencils tightly and make white “smiles” at the ends. Carefully remove the stencils, dry them, and apply the finishing coat (transparent varnish).
- If you are more attracted to a slightly blurry manicure, then apply a transparent base first, then paint the tips, without stripes, and then cover with a translucent colored varnish.
Types of stencils
Disposable
Disposable blanks consist of an adhesive paper or vinyl backing and backing. How to use them? The adhesive strip is applied to the nail, the desired color is applied on top, then the stencil is removed.

The base is low cost and easy to use. Keep in mind that vinyl adheres more tightly to the nail, resulting in a clear design.
Reusable
Typically, reusable stencils are made of metal and are sold in a set of 8 sizes. Silicone and plastic are also available.
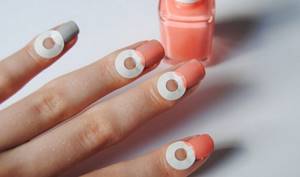
Round
Have you seen paper stickers in the form of circles? These are used for lunar, that is, reverse manicure. They are attached to the bottom of the nail.
Triangular
Triangles glued to nails allow you to create an original pattern that will look beautiful on long nails. As an original addition, you can leave the hole colorless or paint it a lighter shade.
In the form of an arc or a tick
Arcs and swooshes are easy to use and create something more classic. The only thing you need to pay special attention to is precise centering in order to get the same result on all nails.

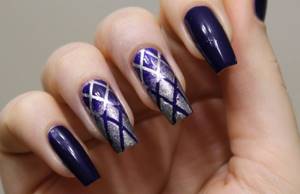
“Airy” manicure: top 5 ways to create a “monogram” design
Each master has his own favorite techniques and tools for this design. Conventionally, in order of increasing complexity of execution, the following methods of creating “curls” are distinguished:
- Monogram sliders.
For a beginner, perhaps the easiest and fastest option. The main thing is to have on hand a thick varnish (shellac) of the classic range (white, black, red) and a good top coat for varnish or gel polish (ultra-glossy or matte for both types). You will not need the skills of an artist, only taste in the selection of a design and a color coating to set it off. - Transfer foil design.
The secret to performing this variation well is to choose good glue and let it dry slowly. When choosing the design itself, it is better to give preference to a monochrome design, as it is better tolerated and looks more expressive in the finished manicure. - Stamping and stencils.
These two techniques require more tools (boards, dies, tweezers, skin protection), as well as the necessary accessories and auxiliary liquids (ZhDSL, sponge, special varnishes), but the final result will pleasantly amaze you. The finished picture is in no way inferior in entertainment value to even the podium painting. Not to mention the fact that you will have to train and improve your skills in much less time.
- Painting with varnish, shellac, acrylic.
The best way to learn the art of painting is to start with acrylic. It lays flat on the nails without spreading; it is a more durable material that retains freshness and shine in the wearer for longer. Having filled your hand, you can move on to more liquid and plastic textures (gel polish and varnish), the beauty of the design with which a high-quality top coat will help preserve. - Painting with gel paint.
Thanks to the optimal density of the product, this type of design can be quickly mastered by beginners with proper skill, patience, perseverance and accuracy. The main thing is to monitor the clarity and smoothness of movements, and do not forget to carefully polymerize the drawing.
The best French manicure ideas
With rhinestones and sparkles
Rhinestones and sparkles are a universal addition to a French jacket. Several use cases:
- Attach the crystals under the white rims.
- Decorate the tips of your nails with glitter instead of white polish.
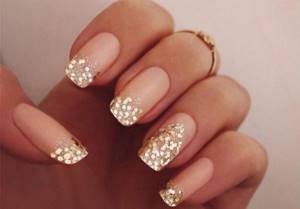
- Emphasize the hole with crystals.
although in fact, accessories on one finger will be enough so that the manicure does not lose its zest. The ring finger is usually chosen for this.
Color
According to manicure fashion 2018-2019, white headbands for this season can be replaced with blue, lilac, pink and orange stripes. And in the cold season, nail stylists recommend purple, red and even black for nails.
Black
Black is generally a universal color - a bold decision and easily combined with any shade. One of the most advantageous types of French is a nail plate painted matte black and rims of the same color, only glossy.
I suggest watching a video of how a nail art master does a manicure with gel polish in the camouflage style and explains all the steps step by step.
What types of French do you like? Leave comments, share with friends on social networks and subscribe to updates. See you!
How to use French stripes
When representatives of the fairer sex decide to make a design on their own, they do not always understand how to use stripes for a French jacket. In modern nail service stores you can purchase French manicure kits. The standard set is:
- Base varnish in pastel colors.
- White nail polish.
- Transparent sealant.
- Adhesive strips.
French manicure strips are glued onto a well-dried base polish. They are applied in such a way that the regrown edge of the nail remains free for the upcoming painting in white. After the white coating has dried well, the strips must be removed. After completion, the nail is covered with a transparent fixative.
French with stripes is very convenient to do, but there are still certain disadvantages. The strips have a standard size, which does not suit everyone.
Some representatives of the fairer sex prefer to use stencils made at home.
Another interesting picture demonstrates the use of round stickers. Not everyone immediately understands how to use them correctly:
General Tips
In order for the result of working with stencils to meet your expectations, you need to follow a few simple tips.
- If you paste a stencil onto a varnish or base, wait until the coating is completely dry. Sometimes, only the top layer of varnish can “grab.” Thus, if such nails seem dry to you and you stick a stencil on them, then when it peels off, it will pull the coating along with it and the manicure will be ruined;
- When covering the nail with varnish on top of the stencil, that is, directly creating a pattern or painting the free edge, do not apply a thick layer. You will have to wait a very long time for it to dry; it will be difficult to remove the stencil, since it will begin to come off, carefully glued into the varnish. It is better to use a coating that creates a rich color in one layer. As a last resort, you can try applying two layers, drying both thoroughly;
- It is better to remove the stencil abruptly, without allowing the under-dried lower layers to drag behind it;
- It is important to remember that a design made using a stencil will always have a slight “height difference” due to the different number of layers of varnish on the plate. That’s why the nail needs to be straightened. To do this, after removing the template, apply a top coat.
A design made according to all the rules will stay on the nails for quite a long time. But some technology violations can reduce the “lifespan” of your manicure. An exception can be made only when creating a suede pattern and using velvet powder. In this case, the use of the fixative can be dispensed with. This video will tell you how to use stencils for nails.
[yandex3] [google3]
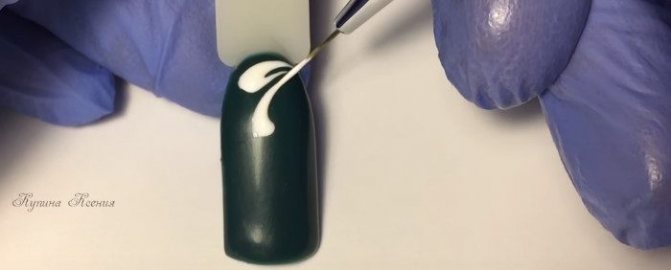
How to draw monograms on nails: step by step photos
The second stage of learning the art of drawing monograms on nails is training on tips. You need to buy tips in advance and try to work out a few simple patterns. First, learn how to draw the simplest monograms on your nails, and only then move on to complex ornaments and designs. Below are several options for step-by-step photo tutorials on nail decoration with simple but beautiful drawings from Ksenia Krupina.
Important rule! To prevent the gel paint from creeping across the surface, it is recommended to remove the sticky layer from the gel polish.
Photo tutorial No. 1: Monograms on nails step by step for beginners
The pattern can be placed on the nail in different ways: fill the entire surface of the nail with them, draw diagonally, in one corner, in opposite edges of the nail, in the center in the form of a vertical stripe, etc.
Photo of the finished drawing with monograms
Gel paint is applied to a brush, a dot is placed at the beginning of the monogram and then carefully drawn in a circle or downwards. There is no need to press the brush too hard. The separation of the brush from the nail should also be smooth.
The second step is to duplicate the line.
Then the same element is drawn in a mirror manner.
The drawing is filled diagonally.
To make the monogram more openwork, the tips of the drops are slightly extended.
If you can’t draw quickly, and the paint spreads during the drawing process, then you can do intermediate drying.
VIDEO LESSON: SIMPLE MONGOLONS
Photo lesson No. 2: Painting nails “Monogram” step by step
The second design involves placing the design in the corner of the nail. To give the drawing additional volume, you can sprinkle it with sand or acrylic powder before drying. Now it has become fashionable to use transparent shimmering powder; it gives a very beautiful glow.
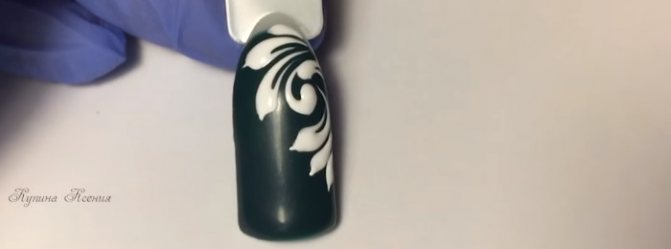
Photo of the finished drawing
First, the patterns are made all in one direction.

Then you need to step back a little and start drawing elements in the opposite direction.
If necessary, during the drawing process, you can add small elements or droplets to the empty spaces.
The ends can also be stretched out a little to give the pattern a more delicate look.
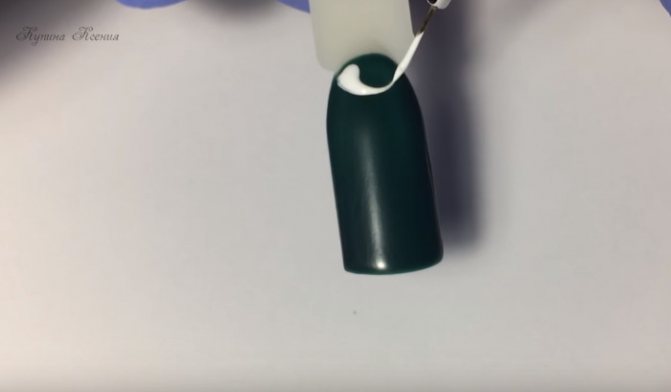
Photo tutorial No. 3: Monograms with gel on nails
The following design involves placing the design on one side of the nail plate. If you don’t have gel paint in your arsenal, then you can only use gel polish with a thick consistency. To add volume, you can draw all the elements twice.

Photo from the finished design “Monograms on nails with gel polish”
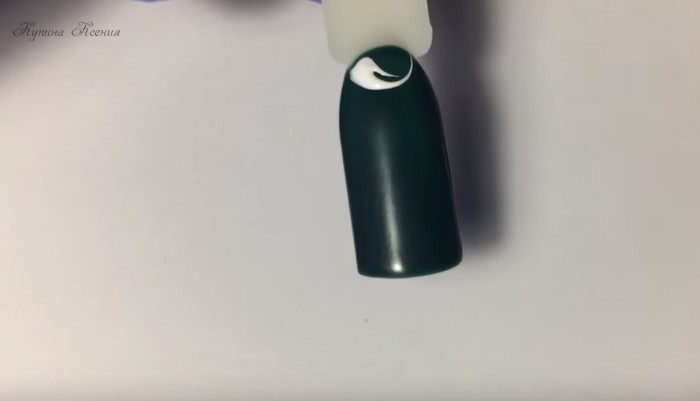
Drawing begins from the center to the edges.
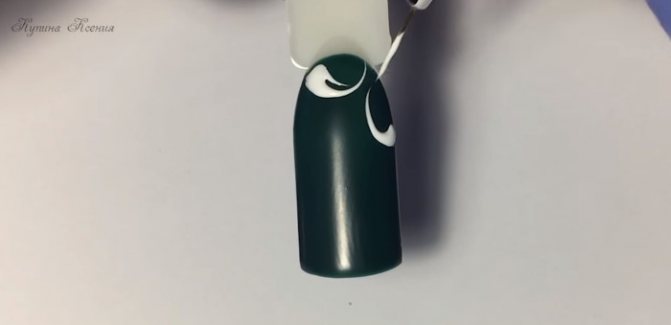
First fill one side, and then the other. There is no need to maintain symmetry.
As in previous ornaments, we extend the edges of the droplets a little.
Use these basic tutorials on how to draw monograms on your nails to practice, and then invent your own unique designs.
Video master class on manicure with heart-shaped monograms for beginners
What is French manicure?
French is a real gift from the manufacturer of manicure products “ORLY”. But with French I was cruelly deceived. It is not known where this name came from, because it was created by an American after one director complained that actresses spend a lot of time taking care of their nails. But this doesn’t matter, the main thing is that now we have a universal manicure option that fits perfectly with any look.
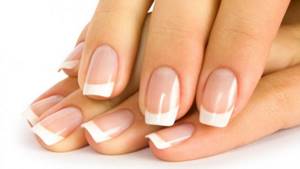
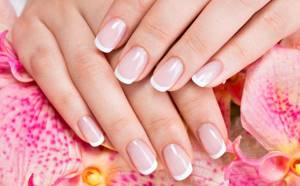
The classic version of the French manicure is short nails that look natural and well-groomed, with a white rim and a base of a natural color - beige or pink.
Making French stripes yourself
It’s not difficult to make strips for a French manicure with your own hands; for this you need the following materials:
- Wide tape.
- Scissors.
- A thin permanent marker that can be used to write on tape and will not smear.
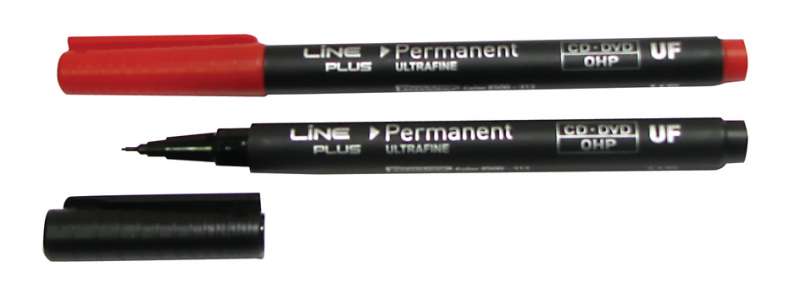
- The glass is wide.
In order to make drawing convenient and the adhesive side of the tape not to lose its properties, the tape is glued on top of a wide glass.
After this, you need to draw strips of the required shape on it using a permanent marker and cut them out. For those who have a printer at home, you need to purchase A4 self-adhesive paper. There are many stencil templates for French on the Internet, you can download and print them (we list the most interesting below). Such homemade strips cannot be distinguished from store-bought ones.
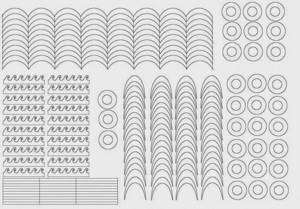
French stencils for printing. Click to enlarge.
Here is another non-trivial photo describing how to use stencils-stickers for French jackets of various shapes: