The development of the nail industry, as well as a large number of video tutorials, allows anyone to do their own manicure at home. For a modern woman, well-groomed nails are as important a detail of appearance as neat makeup or hair styling.
In recent years, nail fashion has moved further and further away from long, extended nails, handing over the palm to short-cut nails. The manicure accessories market offers owners of short nails a wide range of design solutions for every taste and occasion.
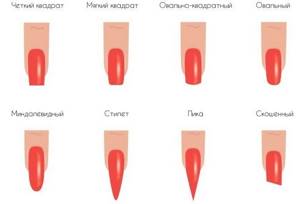
Choosing a shape for short nails
For short nails, it's not always easy to choose the right shape.
There are several useful recommendations for this:
- Experts recommend paying attention to the structure of the cuticle. The shape of the free edge should be close to its structure. This creates an optical balance and the nail plate looks more natural.
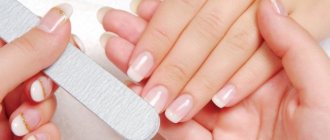
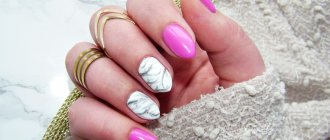
- For short nails, it is not recommended to choose a square shape. This shape of the upper edge of the nail will visually shorten not only the nail itself, but also the hand as a whole. The ideal shape for short nails is an oval; it visually lengthens the nail plate. Nail specialists also often recommend the almond-shaped filing of the free edge to owners of short nails.
How to properly care for your cuticle?
The most important condition for the beauty and health of hands and nails is proper cuticle care. Experts strongly recommend removing the cuticle body, because often this area not only becomes rough and unsightly, but can burst, causing significant pain. In addition, cutting the cuticle lengthens the nail plate, so it is recommended for those with short nails.
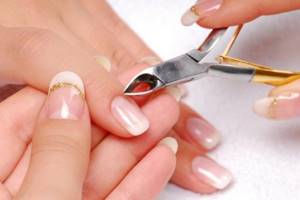
To make it easier to work with cuticles, nail experts recommend hand baths. At home, you can remove the cuticle using nail clippers.
You can also move and lift the edge of the cuticle with an orange stick and trim with sharp, rounded scissors.
At home, the cuticle can be softened with fruit acids, which greatly facilitate the further process of removing the cuticle body.
Today, hardware manicure has become very popular. This manicure is very easy to do at home.
Using cutters, you can painlessly and non-traumatically make the cuticle perfectly smooth. On sale there are not only professional devices for salons, but also small kits for home care.
Do not forget that the cuticle area requires regular care and nutrition with oils. Special oil-vitamin cocktails are widely available, sold in an ergonomic tube-handle with a brush.
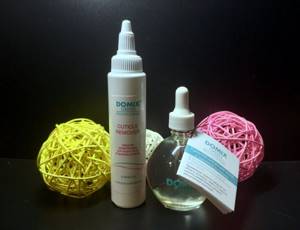
Cuticle removers
A wide range of softening compositions for hardened areas of skin on the fingers and hands are on sale. All of them are divided into three types:
- alkaline;
- acidic;
- based on fruit oils.
The first two require mandatory rinsing after a certain period of time, the third option can be left as is. Alkaline and acidic solutions are suitable for European-style home unedged procedures. They will soften the skin equally well. However, you should carefully study the instructions for the products so as not to overexpose them and not get inflammation, burns or dryness.
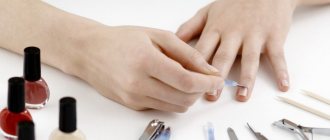
Tools for manicure at home
Of course, for a manicure at home, you can purchase all the same tools as in nail salons. But for many, the basic set will be enough:
The basic element is manicure scissors. They can be of any manufacturer, the main thing is that their blades are sharp and the cutting edge is rounded.

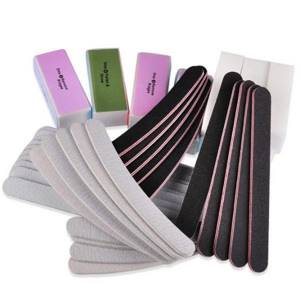
Not only nails can do without a file. It is advisable to purchase a set of files for different types of filing and sanding.
Cosmetic cutters and orange sticks. Orange sticks allow you to push back the cuticle; they can be replaced with a reusable metal spatula. Nippers will help get rid of hangnails and cuticle skin.
This basic set can be supplemented with many other elements, but the most important condition remains the sterility of the devices.
Don't miss the most popular article in the section: How to draw monograms on nails step by step for beginners. Instructions with photos.
Sterilizing instruments at home
It is necessary to clean manicure tools, even if they are used within the home or only used by one person. After all, there are often macro- and microdamages on the hands.
In addition to soap solution and warm water, it is recommended to treat instruments with alcohol-containing liquids. On sale you can find special solutions for disinfecting the surface of instruments.
For heat treatment, metal tools should be kept in boiling water for about 20 minutes. You can also simply douse the tools with water heated to 100 °C.
Useful baths as a preparatory stage
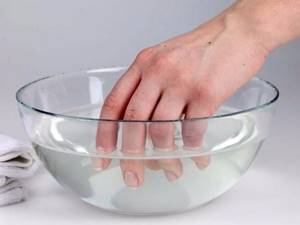
After processing the working tools, you can begin preparing your hands and nails.
Manicure at home is a process in which all stages of preparation are important. One of the main ones is soaking your hands in a bath. This procedure allows you to care for the skin of your hands, soften the cuticle to facilitate further processing, and soften an excessively hard nail plate. In addition, baths relax your hands very well, turning the manicure process into a pleasant spa treatment.
The process includes several main steps:
- Choose a small dish and pour hot water at 38-40°C into it. If the water is too hot, you should not burn your skin, you will just have to keep your hands in the water longer. It is possible to purchase special hand baths of a physiologically comfortable shape.
- You can add decoctions of herbs or oils to the water. Herbal baths can disinfect and heal damage to the hands, and oil baths perfectly soften rough areas of the skin.
- It is recommended to keep your hands in the bath until the water cools down. Estimated procedure time is 15 to 25 minutes
- After the time has passed, you should wet your hands with a napkin or terry towel and apply moisturizing cream to the skin of your hands. If you plan to cover the nail plate after the baths, then the nail needs to be treated with a remover.
Glycerin baths are especially popular among craftsmen and their clients, especially since they are easy to make at home. To do this, add 1 tablespoon of glycerin, one teaspoon of ammonia to 2 liters of warm water, and you can also add a decoction of herbs if desired.
It is important to remember that baths are not taken before a hardware manicure.
Baths and oils to strengthen and grow nails after a manicure.
Baths can be done not only to steam your hands, but also to strengthen the nail plate. To prevent waves and white spots from appearing on your nails, to keep them strong and not peeling, you can prepare baths with sea salt for them several times a week. It is not necessary to use expensive salt from specialized stores; regular salt from the grocery store will do. Just dilute a couple of spoons in a container of warm water and put your hands there for 15 minutes.
After the bath, it is useful to apply a nourishing oil-based cream to the skin of your hands. Choose products that contain avocado, apricot and aloe. If you see essential or mineral oils, do not purchase such cream. It contains products of chemical petroleum processing, so it does not bring a positive result.
What kind of manicure can you do at home?
The simplest is a trim manicure. To perform it you will need a minimum of tools and a minimum of skills. The first stage involves soaking your hands in a bath.
At the second stage, experts recommend pushing back and trimming the cuticle, having first cleared all the pterygium from underneath it.
The third stage involves filing the free edge of the nail.
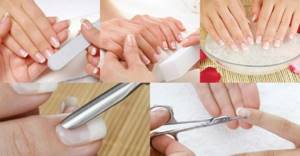
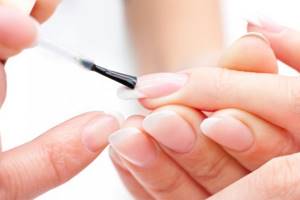
Finally, you can cover the nail with colored or clear varnish, or simply lubricate it with nourishing cream.
What pharmaceutical products may be useful?
You can buy several antiseptics at once at the pharmacy:
- chlorhexidine;
- 70% hawthorn tincture;
- 70% alcohol.
All of them are good as a disinfectant for treating tools and hands before starting a manicure. You can also consult a pharmacist to purchase professional formulations for sterilizing devices. During the work, BF-6 glue may also come in handy: if you accidentally cut your skin, immediately apply it to disinfect and seal the cut instead of an adhesive plaster.
Classic manicure: step-by-step guide
For women who want to know how to do a manicure at home, here are further step-by-step instructions:
- Treat your hands with an antiseptic and, if desired, soften your hands in water.
- Use a nail file to work around the free edge area
- Excise the cuticle area and peel the thin skin of the pterygium.
- Cover the nail with varnish or gel polish; if desired, you can create a unique design. When working with nail plate, you should degrease it, especially if you previously took a bath with oils.
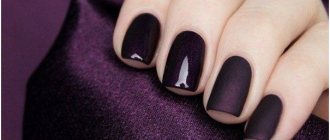
Velvet or matte manicure
In recent years, matte manicure has become especially popular. You can use both special velvet varnishes and regular ones.
Step-by-step instructions for creating a velvet manicure:
- When using regular varnish, apply it in several layers. Dry your nails over steam for a few seconds, keeping a distance of ten centimeters, so as not to burn yourself. After drying, the nails become matte.
- A quick and simple option is to apply matte varnish.
- Using a special sand coating, after drying, it turns into powder.
Matte manicure will look impressive using different textures. For example, you can cover your nails with a dark color, put dots or draw lines. A velvet leopard manicure will look beautiful. Cover the nail plate with light varnish, draw glossy dots on top, and outline them with matte varnish of a different shade. For example, a dot can be put in black and outlined in brown.
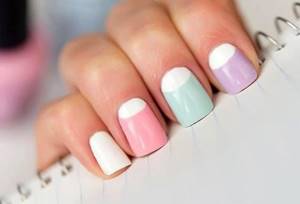
Choosing a color for short nails
Short nails are a fashion trend today, but with such long nails, you should be careful when choosing your nail color. An incorrectly selected color scheme can highlight all the imperfections, making your nails sloppy and your hands unattractive.
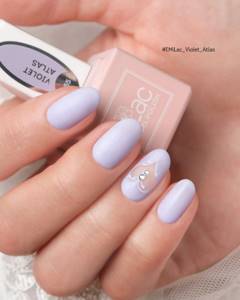
Of course, you should give preference to flesh-colored colors that best match the skin color of your hands. There are many nude colors with pink, beige or even soft lilac shades. A gray shade of varnish looks discreet and elegant on short nails.
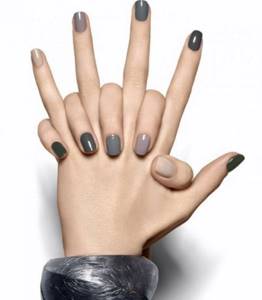
All these colors give your hands a well-groomed look and will be appropriate both at home and at work. But what can you do if you want a holiday and bright colors? Should those with short nails completely give up bright and interesting shades?
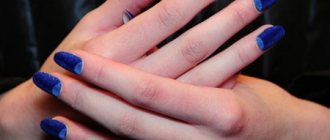
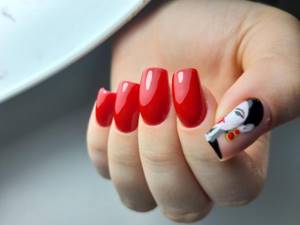
For a long time, it was believed that short nails should not be emphasized with bright colored polish. But now nail fashion has radically changed this belief; one of the basic colors for short nails has become scarlet red, the color of dark cherry.
A bright accent in a woman’s overall look will be deep blue nails or even metallic silver. The main thing is that the colors are monotonous and have uniform coverage.
Masters do not recommend applying neon colors to short nails; they significantly shorten the nail plate and look unnatural.
Features of applying conventional varnish
No matter how correctly the nail is processed, and no matter how correctly the color scheme is chosen, the main condition for a good manicure will be the correct application of varnish on the nail.
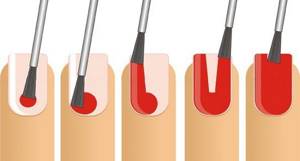
Here are the main recommendations from nail industry gurus:
- Base coat is a must! The base allows you to level the surface of the nail plate and create a perfectly even coating; moreover, with the base, any coating will last longer. Often, after removing budget colored polishes, the nail plate acquires an unhealthy yellow color; the presence of a base coat can eliminate this problem.
- It is important to paint the nail carefully, without bald spots or painted cuticles. The algorithm for proper painting is simple: the first trajectory of the brush with varnish starts from the base of the nail, the next two are carried out along the nail ridges.
- Only after thorough drying of the first layer is it possible to apply the second. To get the color “like in a tube”, you will have to paint the nail in 2-3 layers. When working with short nails, do not put too much polish on the brush.
- A top coat is recommended. It allows the polish to stay on your nails longer, but you should apply it in a thin layer, otherwise the nail plate will appear too thick.
- At all stages of painting, you should seal the end side of the nail, since the varnish coating begins to chip and peel off from the free edge of the nail.
Consumables
For the shellac procedure, you must have various consumables. If you are going to do your own manicure on an ongoing basis, then it is most profitable to buy materials in large quantities. This way, the cost of each product will be much cheaper and you won’t have to spend a lot of time going to the store.
List of consumables:
- Files and buffs of various abrasiveness for correcting the shape and length of nails and removing gloss.
- Lint-free wipes will be needed to degrease the nail plate and remove the sticky layer from the top coat.
- Orange sticks can be used as an alternative to a pusher when pushing back cuticles or for performing a European manicure.
- Cuticle softener. It will be required if you are doing a European or classic manicure when processing the cuticle. You can replace it with a warm bath with soapy water.
- The degreaser is used to prepare nails for applying gel polish.
- Cuticle oil. Rub in after finishing the procedure of covering nails with gel polish to nourish the base of the nail.
- Sticky layer remover. Often comes 2 in 1 along with a degreaser, which allows you to save a little.
- Acid-free primer. Used to improve the adhesion of artificial coating to the nail bed. This allows you to extend the wear life of the coating.
When purchasing liquids, it is best to purchase products from trusted companies. These include popular manufacturers such as Kodi Professional, Severina or Domix.
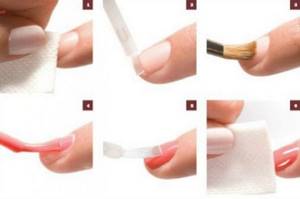
Applying Shellac: A Step-by-Step Guide
Every year the fashion for shellac is gaining more and more momentum. Working with this coating is not difficult. How to do such a manicure at home is described in detail in the following guide:
Here's how to do this manicure:
- After all the preliminary work has been carried out (filing the free edge and trimming the cuticle), degrease the nail. This can be done using a primer or liquid with acetone. For better adhesion, it is also recommended to go over the nail plate with a low imagery buff.
- Cover the nail with base. Many bases are quite liquid, so it is important to be careful to avoid running under the cuticle and side rollers.
- Place the painted nails in a UV or ice lamp for about 1 minute. Remove the sticky layer with remover or nail polish remover with acetone.
- Apply a colored coating and bake in the lamp again. The polymerization time may vary, depending on the manufacturer of the gel polish and the color. The lamp's rays penetrate darker shades of varnish less well and take longer to bake. If the coating is still liquid, then you should return your nails to the lamp for a longer time. Colored gel polish can be applied in several layers, but each of them must be thoroughly dried. At this stage, any design can be applied.
- The final stage is applying the top coat. We also expose it to ultraviolet light for 1 minute. If necessary, remove the sticky layer with remover.
And a few more tips from experts:
- It is better to use a rubber base and top. The rubber in the composition allows the coating to be more flexible and thereby extends the wear time of the gel polish.
- Each layer of the product (base, gel polish, top) must be dried as well as possible, otherwise the gel coating will quickly come off.
- Correction of product streaks under the side rollers or cuticle after baking in the lamp cannot be removed, so you should use special protection around the nail (“pink thing”, etc.)
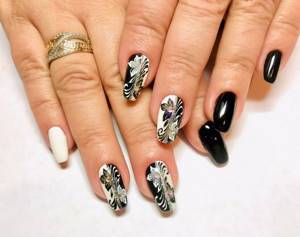
Features of choosing a design for short nails
Working out a design on short nails requires more concentration and experience, but taking into account some nuances, you can create the perfect manicure at home.
The basic rule when designing short nail plates is: “Do not overload the nail.” If the drawing is applied with a brush, then all the details of the image should be drawn with clear but thin lines.
Varnishes of contrasting colors are good for this. All design elements should be small in size, starting with rhinestones and ending with transfers or ready-made drawings. If the design is stamped and it is impossible to reduce it, then nail designers use individual elements of the composition.
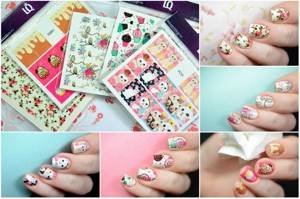
Design Ideas for Beginners with Patterns
Drawings on nails always attract attention, look beautiful and emphasize the individuality of every fashionista. However, no matter how much beginners would like to decorate their nails with outlandish paintings, only experienced craftsmen with artistic skills can create a “wow” effect with their work. If you are just starting to master this creative profession, then we suggest giving preference to images that are not difficult to execute. These can be all kinds of stripes applied with bright varnishes or acrylic paints using a thin brush, zigzags and geometric shapes, flowers and twigs, cute polka dots, abstract patterns and other ideas that you can do yourself.
If for some reason you don’t dare try on the role of an artist, you can always use ready-made stickers, sliders or stamping in your manicure. Stickers are applied directly to the base of the nail plates. Sliders simultaneously act as both a covering and a design. All you have to do is attach the blanks to the base of the nail and carefully trim off the excess parts.
As for stamping, in this case such a device is a set of a stamp, a board with motifs and a scraper for removing excess varnish. Apply the selected shade of coating to the pattern you are interested in, remove the excess, press the stamp firmly onto the image and transfer the design to your nails.
Instructions for applying the design
Each design technique in nail art has its own subtleties and features. But there are basic rules:
- Professional artists use only well-pigmented paints. Paints with weak pigmentation will only spoil the overall look of the manicure.
- Only good glue is used to attach design elements. It not only firmly secures the decoration, but also becomes transparent and invisible when dry.
Classic French
The classic French manicure is the most popular type of design both in beauty salons and when creating manicures at home. You can draw the smile line yourself, or you can use stencils.
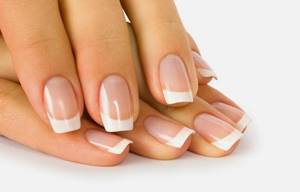
The latest fashion trend has become a French look using colored varnishes. For example, the combination of a blue base and a silver free edge is a current and fashionable solution.
Don't miss the most popular article in the section: How to extend nails with gel polish. Nail extension instructions for beginners. Photo.
Lunar manicure
Lunar manicure is designed to whiten the area of the nail hole by painting it with varnish. Often, outlining the hole is combined with painting the free edge of the nail, although this is not necessary.
Lunar manicure, like a French manicure, can be presented in both classic and bright color palettes.
Sliders
Sliders have become a new word in simplifying nail design. These ready-made designs can be placed either fragmentarily on individual nails or completely on all nail plates.
There are two types of sliders:
- Thin sliders are placed in water and the design itself moves away from the base; all that remains is to carefully place it on the surface. But be careful, such sliders break very easily.
- Thickened sliders have an adhesive base and are suitable for leveling the surface of the nail. But they are extremely difficult to damage.
Stencils
There are 2 types of stencils on the market: classic, for French manicure, and designer, with a patterned cut of snowflakes, funnels, and other things.
Let's take a closer look at how to do a manicure at home using stencils:
- First, you need to cover your nail with a base color. The color can be any, the main thing is that it differs from the second layer of coating.
- Secondly, we will place the stencil on the desired area. If this is a designer stencil, then we simply cover everything with a contrasting varnish. If the stencil is of the classic type, then we paint only the free edge of the nail along the border of the sticker.
- After complete drying, the stencil is removed. All this is covered with a layer of transparent top.
Stamping
Another invention of nail art was the transfer of a design from a metal plate using a gel stamp. Stamping will help owners of short nails to create a unique design with their own hands in a matter of minutes.
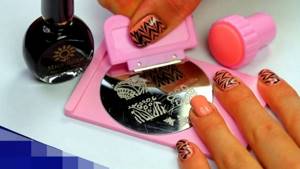
Experts recommend that women with short nails choose plates with small designs or abstract patterns, because many engravings are quite large and may simply not fit on a small nail.
It is often difficult to transfer a small design onto a short nail plate; for this, nail service professionals use stamps with a transparent bottom.
For stamping, it is important to use only thick, well-pigmented varnishes or paints. If you don’t have a special varnish, you can leave the tube you like open for 20 minutes and the varnish will acquire the desired consistency. The greatest visual effect will be achieved due to the contrast of the colors of the base and pattern.
Sequins
Glitter in nail design creates brightness and festivity. They can cover all the nail plates and get a stunning festive effect or highlight individual areas in the composition on the nail. A popular trend today is glitter stretching. To design short nails, glitter is used carefully and in small quantities.
Rhinestones
Designs with rhinestones always look interesting and bright, and rhinestones on short nails can look very stylish if you follow a few basic rules. For small nail plates, experts recommend choosing the smallest rhinestone diameter. Nail experts do not recommend overloading short nails with many rhinestones.
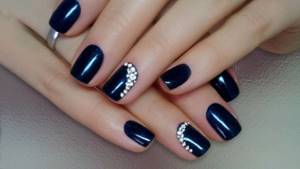
There are several options for unobtrusive and sophisticated design of short nails using rhinestones:
- Rhinestones can be laid out on the border of different colors, which will give the transition line a special appeal.
- Many nail artists offer designs where rhinestones are attached one to each nail.
- Experts do not advise: Combining a bright, flashy design with a lot of rhinestones, it can look vulgar and inappropriate. Therefore, you need to choose one thing.
Matte manicure
Another interesting design technique is matte manicure. It is created by coating with a special topcoat. The contrast between glossy and matte finishes looks especially impressive. Masters suggest matting not the entire nail plate, but only individual parts. You can paint a few nails with a matte top, while leaving the rest with gloss.
Gradient
Gradient is a fashionable and stylish trend today. For short nails, masters recommend choosing a vertical gradient over a classic horizontal one. In this case, the gradient line visually lengthens the nail.
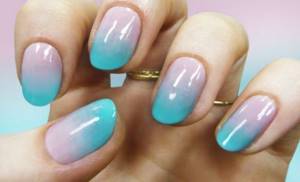
Also, an excellent solution for short nails would be to apply a gradient coating not to all nails, but only to one or two, while the rest can be coated with a monotonous color.
The Baby Boomer gradient has become especially popular. This technique is performed in nude tones. It is perfect for those with short nail plates, making them look well-groomed and healthy without visually shortening their length. So, by doing a manicure at home, you can significantly save money and time.
In addition, by creating unique designs on their own, any woman is able to reveal the talented nail artist within herself.
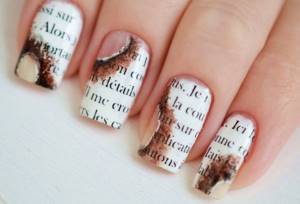
Newspaper manicure
Letter or newspaper manicure is a fashion hit in recent seasons. Created using newspaper, in just a couple of minutes. For printing, ink is used that can be easily erased with alcohol. If you turn the newspaper over and rub alcohol on the back side, the letters will come off to the other surface.
Stages of creating a letter manicure:
- Prepare the nail plate in advance. Then apply the base and varnish in any shade except black.
- Apply a small part of the printed publication to the nail with the reverse side.
- Go over the newspaper a couple of times with a cotton pad soaked in alcohol.
- Once the letters are on the nail, apply a sealer.
Anyone can create a beautiful and unusual manicure on their own; all you need to do is put in a little effort and care.