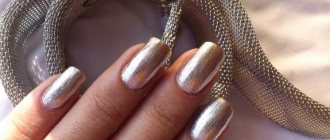
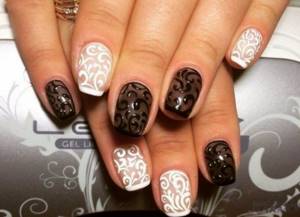
The nail industry changes its directions almost every year, smoothly moving from luxury to minimalism or the shine of shimmering stones. At this time, the hearts of beauties will be simply punished by a manicure with a veil, where the main role is played by the transparent and black shade of the varnish coating. This modern manicure decor takes on a completely unrealistic look with the help of openwork and incredibly beautiful patterns. More self-confident girls prefer to decorate their nails by imitating guipure on them, which in appearance resembles stockings or tights. A mesh with a pattern is decorated using a colored or translucent base. For a more detailed introduction to veil manicure, we suggest you read our article.
Choosing materials and colors
- The highlight of this design is the translucent tone that covers the nail and creates the illusion of nylon. It is almost impossible to achieve a similar effect with conventional varnishes.
- The easiest way to perform this technique is with gel polishes.
- They are also best suited for a base coat under a pattern, just like shellacs.
No matter in what proportions you mix transparent varnish with black, the result is unlikely to meet your expectations - the haze will come out either blurry or insufficiently expressive. Therefore, it is better to avoid conventional varnishes at all stages.
Watch the video for a lesson on nail design using the veil technique using gel polishes.
Color palette
- In the classic version, a tights manicure involves the use of black, white and nude tones.
- Although, more and more often, masters are moving away from this rule and boldly experimenting with colors.
- In order for such experiments to be successful, it is necessary to use a special color wheel, with which it is easy to create a combination of compatible shades.
- There are several examples of the color wheel, but in this case the extended version, consisting of 12 sectors, each of which is additionally divided into another 8 shades, is perfect.
- For a veil manicure, it is better to select colors according to a monochrome scheme (from the same sector).
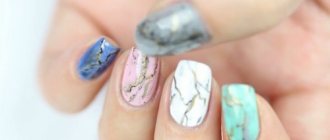
An example of nylon design in nude manicure
The main trends in transparent manicure with gel polish
Transparent manicure with gel polish is a classic, but there are fashion trends here too:
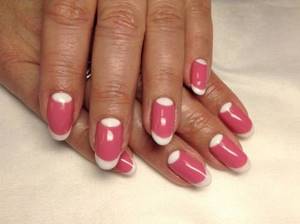
- Unusual French. With it, the main part of the nail is covered with a thick shade and a transparent product is used for the free edge. The tips are painted with patterns in the form of thin intertwining lines or left as is.
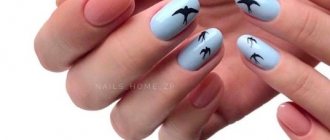
- Watercolor design. They draw thin winding stripes and translucent patterns. Your nails look as if sea waves are crashing over them.
- Painting or inscriptions. Drawings should be modest, that is, medium-sized or in one dim color. The inscriptions are also minimalist, on 1-2 plates.
- Gradient. The combination of two or three translucent shades ensures the smoothest transitions (for the tips of the nails you should take milky or white). This effect cannot be achieved with dense colors.
Translucent gel polish is called stained glass. Usually these are bright colors, they are applied in 2-3 layers. And nails with a stained glass finish look like candy. The fewer layers of this gel polish, the more the plate shines through. But there are also ordinary flower beds with the same property. A hint of a shade with the translucency of a natural nail is obtained when using camouflage bases, if you apply no more than 2 layers.
Fashionable tone of shellac gel polish
For the onset of the warm season, manufacturers have released lines of current tones. For this period of the year, it is proposed to use the best colors shown in the photo:
- sun;
- orange;
- mint;
- heavenly blue;
- azure;
- light malachite.
The best shellac works
For coolness, the best berry and vegetable shades are suitable, which will emphasize the grace of the hands and will suit any look. This:
- plum;
- blackberry;
- raspberries;
- eggplant;
- blueberry.
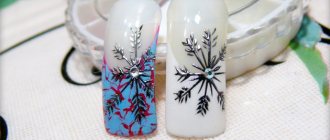
For winter manicure, a cool color scheme with a predominance of blue, blue, white, as well as red and green tones remains relevant. Images of snowflakes, Christmas trees, Christmas tree decorations and traditional characters - Father Frost, Snow Maiden, deer, snowman - are allowed. Using manicure stickers, masters create winter patterns that fit throughout the cold season.
Along with the top shades, the classics, filled with a palette of pink, red, scarlet, and chocolate, remain in favor. Such best shellac design works in the photo will always decorate the plates and make them suitable for any celebrations.
It is known that shellac acts not only as a base coat for the nail plate. Manicurists use it in their work, performing selected best patterns on top of an applied colored layer of gel polish. Moreover, the latest shows show short nails with geometric images applied to them. French stripes, squares, circles, and checkered designs vary.
Color solutions
You can use the “veil” technique in different shades of the color palette. For example, its execution in white turns out to be especially delicate. However, there are nuances: the varnish used must be pigmented, since the expressiveness of the veil design will depend on this
It is important to understand that neither the tone nor the pattern can be tinted, so you need to take care of choosing a suitable varnish in advance
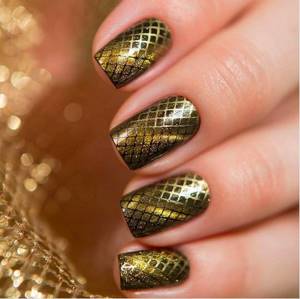
Not suitable for creating a nylon manicure to match the skin. Against the background of the natural nail plate, they will simply be invisible. However, such pigments will be very useful as contrasts. The drawing, like the design in general, is best created in dark colors. It will look great in black, as well as dark purple, rich blue, chocolate brown, coffee and bronze tones.
9 photos
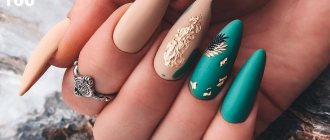
Nail decors in rich tones
With proper use of liner varnish of different shades, the best 2016 shellac nail designs in the photo will help turn your manicure into a true masterpiece. This is, for example, the lunar design, which has become a retro style, or the classic combination of red and black, which has come into nail art for a long time. Such decoration does not exclude the use of other colors of the rainbow.
The main thing is that the jacket will please its owner for a long time. You will have to choose from:
- Classic with a reflective effect on the edges of the cuticles.
- Reverse with the base of the plate completely covered.
- Gradient, created using a rich color palette of nail art. At the same time, you can use the best shades of one color in your work, as well as bright and contrasting tones to obtain a design in a more luscious expression. An interesting decor can be brought into reality using variations of longitudinal or transverse overflow.
- Patterned, achieved with various ornaments through stamping, pigments or varnish-liners of a diverse palette.
The trending pictures of 2016 are considered (they can be seen in the photo):
- peas,
- "tights" design on a transparent background,
- geometry,
- beach,
- floral,
- pajama
Features of manicure veil
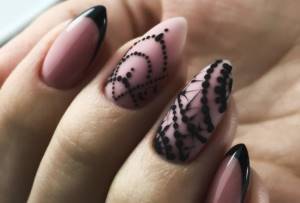
A classic veil manicure or manicure with a nylon effect is visually similar to openwork lace or delicate mesh. In most cases, the design is applied to one or two nails, the rest should have a single-color coating. The veil is made on both light and dark bases. This design looks very interesting in combination with a light background, as the lace appears in a dark color.
The main advantages of a veil manicure are:
- ease of execution (the only exception may be hand painting);
- there is no age reference;
- The design is universal, because it is ideal for both festive and everyday looks.
Veil manicure is performed in several options:
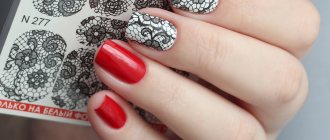
- Black and white veil
. A design made in this style will help emphasize the expressiveness and brightness of the design. It is recommended to choose a black and white design for a business and strict style, which does not lose the elegance of the image. - Lace painting - not only white and black colors are used, but also blue, emerald, red and other shades
. This option for decorating nails looks interesting, unusual and original, ideal for almost any event. Therefore, it is not surprising to anyone that lace painting is very popular. Another advantage is that it is easy to choose clothes to match a lace manicure. - The classic ornament is made in black
. Not every girl likes to paint her nails exclusively black. However, it is this option that changes the usual idea of dark varnish colors. An exclusively black color will make a lace manicure truly ideal and unique.
A veil manicure can also be called “tights”, but to create it, your nails must have an ideal look:
Choosing the right nail shape
It is the correct shape that gives nails a beautiful and well-groomed look and can visually make them longer. It is important that all nails are the same length, otherwise the manicure will look sloppy. Hangnails and cuticles must be removed. The ideal option would be to do a manicure using clear varnish as a base. The veil is applied to one or two nails, and the rest are painted with the selected plain varnish. The glass effect on the remaining fingers looks very nice.
Manicure design in lavender tones with a matte effect
When you want to experiment with the popular retro style, arm yourself with rich pearlescent varnish and multi-colored stickers. In such a bright, almost popular, design, one or several nails are decorated, and for the rest, a calm matte lavender background is chosen.
You can add depth and richness to your favorite manicure color in different ways. Glossy tops compete in popularity with matte ones. There is another fashionable finish option that goes well with lavender color: velor or satin. You don't have to paint all your nails the same way. For example, matte blue nails look great next to lavender, ash and olive. The texture of the finishing compositions can also be alternated and mixed.
Just remember: a beautiful velvety coating does not fulfill the main purpose of the top - to extend the life of the manicure. Knowing this, craftsmen first coat the decorative gel varnish with a glossy topcoat that protects the decor from chipping. And only after this the work is completed with a velor or corduroy coating.
Black veil manicure: step-by-step instructions
The veil design has gained great popularity thanks to its simple execution technique. If you have all the necessary tools, you can create beautiful, translucent nail art in a matter of minutes.
Any design begins with technical processing of the cuticle, length correction and removal of keratinized areas. After which comes the artistic processing of the fingers and the application of coatings and decor. We have already mentioned that black paint can be mixed with a top or base. Stylists recommend choosing a base coat for blending and painting your nails.
- We file off the glossy surface of the natural nail with a buff. Use a brush to sweep away the sawdust and prime the plate.
- Cover the nail with base and dry it in a lamp.
- Mix the black paint with the base coat until smooth, and use a flat brush to spread the resulting transparent mixture over the nails.
- Using a thin brush, we paint the frame with black paint, seal the end, and dry it in a lamp.
- On the dry surface we draw a pattern: fine mesh, polka dots or monograms, imitating a veil or nylon caps.
This manipulation must be done on all nails or on two fingers if an accent manicure is chosen. We cover all the beauty with a top coat, dry it in a lamp, and remove the sticky layer.
The design method is very easy, since it does not require, for example, an airbrush or any decorative materials that need to be laid. A manicure is easy to create at home, following step-by-step instructions.
Voile + velvet design. Three manicures for a beginner master
Watch this video on YouTube
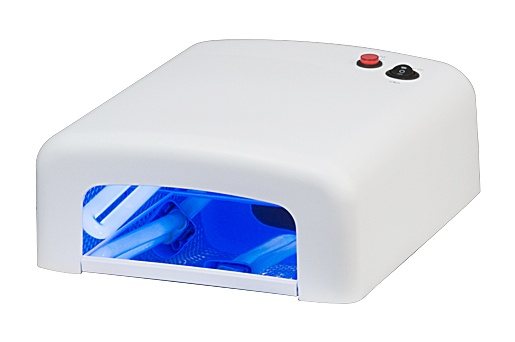
Required Tools
You can create interesting and sophisticated nail art using a kit for coating a plate with gel polish. An important tool is the device itself, with the help of which the gel is polymerized on the nails. Using both colors, transparent and black, you can achieve a good result that will be worn for a long time.
You will need:
- Ultraviolet lamp.
- Buff for cutting off glossy coatings.
- Disinfectant, primer and remover.
- Base, top, black gel polish or paint.
- Lint-free wipes.
- Paint mixing pad or piece of foil.
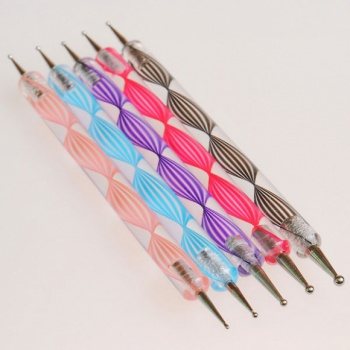
- Dots with a small tip or a thin brush.
There is a small nuance: not all thin hair brushes are suitable for drawing monograms. Artificial types do not hold a drop of paint, it rolls off, so you need to pick up paint with a brush several times.
Execution technique
The procedure for painting a plate with a veil takes about twenty minutes in total, plus the design for each finger for five minutes. In a short period of time, it is possible to achieve complete coloring of both hands and get a well-groomed appearance of the fingers as a whole. The nail design of tights will easily fit into an everyday look, as well as an evening look.
How to stamp tights on nails?
In order to tint a nail, at the very beginning you need to use a pastel gel polish or a camouflage base, if you have one in your arsenal.
Technique for creating a veil on nails using stamping:
- It is necessary to prepare your nails in the standard way for coating with gel polish. To do this, the pterygium is removed, the cuticle is cut or sanded with cutters, and the side ridges are moved back. If this is a primary coating, then the natural shine is removed from the nail using a buff or a soft file, 180 grit.
- A dehydrator is applied, as well as a primer. If your nails are wet or problematic, you need to apply any transparent base using rubbing movements without leveling. Next, you need to act depending on the characteristics of your nails.
- If they are thin and uneven, in order to strengthen them, apply a second layer of base using the drip method. A large drop is placed on the nail and distributed into the area of the cuticle and free edge, as well as the side ridges. Turn the hand down for a few seconds and quickly dry it in a powerful lamp.
- After this there are several options. If your nails do not have any defects, they are uniform, there is no blue discoloration and the color suits you, you can immediately proceed to the design and apply the base with a small amount of black gel polish. In order to fool your head less, it is better to use a top coat, without a sticky layer or with stickiness, but rubbery, thick and one that allows you to apply a second layer.
- After this, the background is listened to in a lamp. This way the marigolds will have a grayish or transparent black stained glass tint. Next, you need to select the stamping plates. It is best to choose a pattern with not very thick, not very large, but thin lines that resemble lace or a veil, tights.
- Half the battle is done. In order to give the design the appearance of tights, manicurists usually paint in the area of the free edge and lunula, that is, along the entire perimeter of the nail, with black gel paint. If you don't have it, you can use the black gel polish that you added to the top coat to tint it. After this, the finished design is covered with a thick leveling layer of topcoat.
This is one of the simplest options. A more exclusive design can be made.
What and how to design tights, veil, lace?
This manicure option is at the peak of popularity and is also the most ordered by manicurists. Many people think that doing it at home is quite difficult, but this is not so if you know how to combine colors and mix some nail service products. It is quite possible to get by with several products that are available in the arsenal of every girl who does her nails on her own. The design is quite simple. There are several techniques:
- Painting with gel paints
- Using stamping
- Application of lace and airpoofing
- Slider design
One of the simplest options is to use stamping. Many girls are interested in how to achieve a dark shade on their nails that will not overlap them, but will create the illusion of translucency or black nylon tights. This is much easier to do than you might think. There is no need to purchase transparent or stained glass gel polish; you can make it yourself, from those products that every girl who deals with gel polishes has. It is necessary to add a drop of thick top or base to the palette. Using a dot or thin brush, apply black gel polish in small portions. Mix until you get the desired shade. The result will be a black translucent color that will perfectly cover the nails and create a veil effect.
Design Veil Tights on nails Tights on nails Veil on nails
Step by step guide
Despite the apparent complexity of this design, the “veil” is quite easy to make, especially if you have basic skills in creating manicure patterns. Let's take a closer look at the technique of creating translucent grace:
- Apply a thin layer of base and dry thoroughly in an ultraviolet lamp (about 2 minutes);
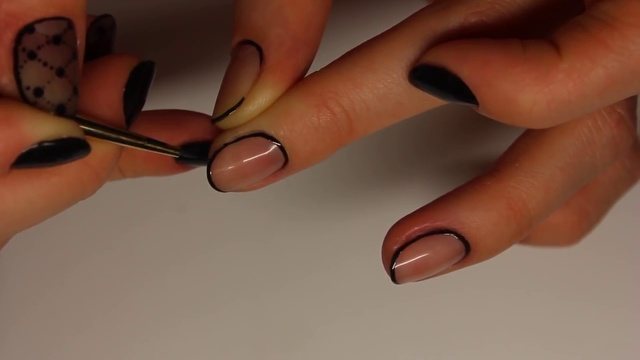
- Draw the edges of the nails with a thin elegant line with undiluted varnish, making a “veil” edging, and then dry the layer.
- Use a thin brush or special manicure tools to draw a pattern. It is better to start drawing with large elements, gradually moving to small ones. The rule “the more the better” does not apply to this design. Excessive density of the pattern or overload with patterns can spoil the impression and dissipate the “airy veil” effect. It is quite enough to make one elegant element or a mesh with dots that will imitate women's tights. “Lace” looks beautiful with a pattern that is not a dense color, but translucent or a tone darker than the haze. You can also use rhinestones, stickers, beads, and glitter as additional decor.
- Apply a thin layer of the previously prepared “veil” and dry.
- After complete drying, enjoy the sophistication and sophistication of the trendy pattern on your nails.
Features of nylon manicure
Manicure with a hazy effect has its advantages and disadvantages.
Main advantages
Classic black manicure tights with glitter
- no age restrictions - tights look great on the nails of both young girls and mature ladies;
- You can decorate nails of any length with a veil;
- nylon is a design that is appropriate always and everywhere. In the traditional version, it is made in two colors - black and beige, which harmoniously combine with evening dresses, business suits and almost any casual wear.
The only drawback of this technique is the difficulty of execution.
Even a professional will need several hours to draw the finest elements of the lace pattern.
But if you don't have that kind of artistic skill and patience, don't despair - in this article you'll learn how to create a flawless drawing without touching a brush!
Original French pattern in the form of a grid on a beige background
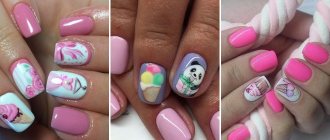
Design ideas for openwork manicure in the style of tights
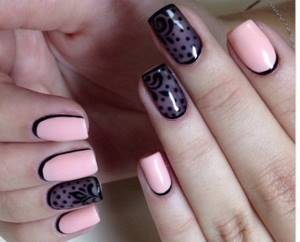
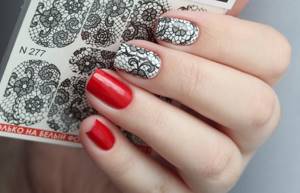
- You can create an extravagant and spectacular tights manicure by playing on the contrast of two colors - black and white.
This design looks as expressive and stylish as possible.It is this combination that business girls, whose wardrobe consists mainly of formal suits, most often choose.
- A white veil looks harmonious with a wedding dress.
By highlighting several fingers with a lace pattern to match the dress, it is easy to achieve integrity and completeness of the image. - An expressive nylon manicure made in red tones will match bold and bright girls. Black, white, gold – choose accents to suit your taste.
Black and white veil on nails
Veil wedding manicure option
Bright red manicure with a black veil
Advice from the experts
To make your manicure neat and last a long time, you should follow the recommendations of professionals:
- Do a high-quality treatment of the cuticle, cleanly remove the pterygium, and do not file down too much the ingrowth points of the plates. Only in this case will it be possible to lay the flower bed flat, and it will not chip or peel off.
- When choosing a pink shade of gel polish, take into account the natural color of your nails. This way the manicure will look neat longer as it grows, thanks to the matching tones.
- For thin nails, use strengthening gel. These products also come in transparent, nude shades.
- Before applying, roll the bottle of gel polish in your palms. This will help distribute the color more evenly on the nails, because some translucent shades appear in stripes.
Transparent nails are one of the win-win manicure options. They look equally good on young girls and grandmothers, and are appropriate on weekdays and for special occasions. A variety of shades and decor will help make the design unique.
Manicure tights: Tips from professionals
Looking at the original design of the tights manicure, it seems that such a creation can only be done by the hands of professionals. In fact, anyone can decorate their nails using this technique by following a few simple but useful tips from nail industry experts.
- For an elegant manicure, it is better to use gel polish or gel paints. They are denser in consistency and do not spread during the application of the pattern.
- Think over your nail design in advance of the session. It turns out interesting and beautiful if you decorate 2-3 nails in the “tights” style. Others are coated with plain varnish.
- It is advisable to draw the mesh in black, comparing the manicure with fishnet tights.
- The classic version of the manicure can be decorated with rhinestones, sparkles, figurines and other decor and feel free to go to a dinner party. Red tones will emphasize the determination and bright personality of a woman, whether she is at work or in the store. Black and white tones are suitable for everyday wear.
Decorating nails with shellac at home
It is not difficult, having all the necessary items, to create an exquisite ombre. You can find complete instructions in our video. You should stock up on:
- gel polish remover solution;
- cotton pads;
- toothpick;
- transparent, beige, pink varnish;
- fixative;
- sponge (sponge);
- a brush with synthetic bristles (ear stick).
When starting to decorate the plates yourself, you need to take into account: the best decor with shellac will decorate only well-groomed hands. Therefore, before work, you should take care of a high-quality manicure with an ideal shape and the same length of all nails.
How to do a veil manicure?
Veil manicure is quite simple. You can turn to an experienced professional for help or do everything yourself at home.
It is imperative to adhere to the following principle of action:
- First of all, the cuticle must be removed, as well as all keratinized skin particles.
- The nails are given the desired shape.
- This design looks most successful on nails that have a “soft square” shape.
- All nails, with the exception of those on which you plan to apply lace, must be coated with a single-color varnish.
- If gel polish is used for coating, a base is first applied to the surface of the natural nail.
- On the nails on which the veil will be applied, it is recommended to apply a transparent or beige base, after which it must be dried.
- Using a thin brush, apply a design to the nail and dry again
- All nails are covered with a finishing layer. An excellent choice would be a colored, matte or glossy top.
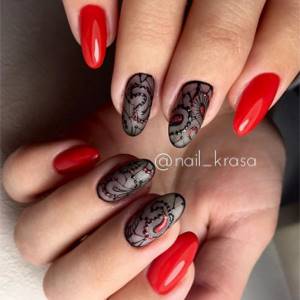
Manicure red veil
The method of creating a red veil manicure is practically no different from previous nail art. Lace, dots, flowers, geometry - all this looks great in rich red color. As for contrasts, the best complement to a red veil will be black elements. Black and red manicure looks truly chic and charming.
Use burgundy, cherry, garnet colors for manicure, that is, deep, not flashy shades. If you still prefer scarlet tones, then use matte gel polishes to create your design. They will smooth out an overly catchy design and make the manicure more casual.
How to make a veil on nails: step-by-step photo instructions
Before doing a veil manicure, make sure that you have all the accessories necessary for nail design. Firstly, varnishes - for the background and for drawings. Secondly, decorative elements. If you want to decorate the lace on your nails with sparkles or rhinestones, you should have them on hand. Thirdly, prepare your tools: brushes, stencils.
- 1
Nail preparationStart with care: adjust the shape of your nails, soften and push back the cuticles. Degrease your nails and apply a base on them, and then, when it dries, apply two more layers of varnish, which will become the basis for the design. For example, “To the Fullest” by Essie is suitable.
We talked more about how to do your own manicure in this video.
- 2
Making a VeilThe next step is “weaving” the lace. It all depends on which method of creating it you choose. Some people find it easier to use stickers or, after fixing stencils on their nails, apply another layer of varnish on top.
Others will choose a thin manicure brush and paint the lines by hand. Many craftsmen achieve the desired result using acrylic powder, but it must be “dried” under a UV lamp. Therefore, it is used only in manicures with gel polishes.
- 3
Pin a pictureIf you used classic varnishes, then all that remains is to apply a top coat and, if desired, complete the manicure with decor.
By the way, for those who are just starting to experiment with nail art, many advise starting with gel coatings: they have a thicker and denser texture. It is easier to paint with such means than with ordinary “flowing” varnishes.
We recommend reading:
- How to create a design on your nails? Lifehacks
- Acrylic nail powder: how to apply it?
- Manicure with black gel polish: 15 ideas
Design of a veil using gel paints with drawing
Another option for applying this design is the use of gel paints and drawing. You will need skills in working with gel paints and drawing.
Instructions:
- To do this, a standard manicure is done and a base is applied as a leveling layer. After which a layer of tinting is applied, that is, a mixture of top coat and black gel polish.
- After drying, you can start drawing. To do this, you need to put dots on your nails that resemble the outline of diamonds. With a very thin brush, it is best to use a needle brush, connect the dots.
- This way you will get a mesh on your nails. In order to give your nails a believable look and really the appearance of tights or a veil, draw a line around the perimeter of the nail. That is, a thin edging with black gel paint. Seal everything under a thick layer of topcoat. This design can be diluted with glitter, rhinestones or bouillons.
Tights design
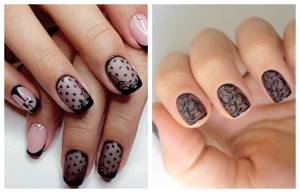
Veil effect design ideas for short nails
Polka dot stockings
Initially, in manicure with a veil, they tried to recreate the effect of nylon. Remember what black nylon stockings look like on your feet. The color is not lost on the skin, but at the same time the layer of translucent fabric is almost invisible. This is exactly the result that is achieved in the manicure we are talking about today.
For the background coating, the black color is “diluted”, and then this translucent base is decorated with a pattern. The pattern can be as simple as a regular polka dot; It is not at all necessary to draw complex openwork patterns.
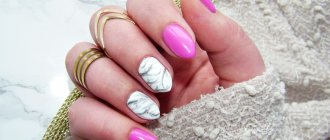
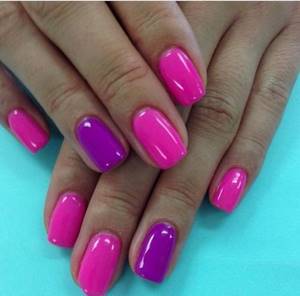
Colored veil
The fashion for manicure with a veil began with black. However, experiments were not long in coming. Very soon, in addition to black, white and all nude shades, more vibrant colors began to be used in this design, including red, blue, green, purple, pink and many others.
Want to draw attention to short nails? Add color to your veil manicure. Pay attention, for example, to “Lilac” from the Gel Setter line from Essie
Mesh veil
The basis of a veil manicure can be a pattern of fishnet tights - simple and effective; just right for short nails, on which a “complex” design, overloaded with details, does not look the best.
The mesh can be used to cover both a transparent base coat and a colored background. The result will look equally interesting.
Try a combination of a shiny background and a matte design. We are sure that you will find this solution very effective.
Lace nude manicure
Girls with short nails will find stickers with a lace pattern very useful when creating a veil manicure.
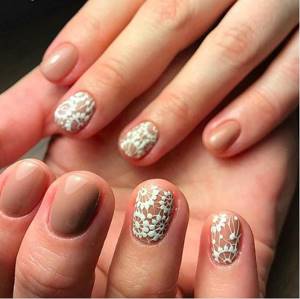
The drawing will turn out beautiful and neat - if you do not yet have enough skills to depict lace with your own hands, this will be an excellent way out of the situation. And neutral light shades will provide the manicure with neatness, which can be difficult to achieve in the case of short nails.
Veil manicure using sliders and stamping
Not every girl can create beautiful patterns on her nails, which can significantly complicate the creation of a translucent manicure. In this case, use ready-made sliders or a stamping kit. For a design with sliders, choose stickers with a transparent background, through which the smoky layer will be visible.
Stamping helps out many girls who want to see complex and original patterns on their nails. Use plates with openwork, floral or abstract decor. Using a roller, transfer the pattern onto the nail plate, covered with a translucent layer, and secure the result with a topcoat.
Translucent veil manicure is a new product of the season, which has already gained unprecedented popularity among women of all ages. Even if you don’t know how to draw beautiful patterns, ready-made sliders or stamping come to the rescue. With this set of tools, you can easily create an effective and stunning veil design.
News Media2 News Media2 News MirTesen News MirTesen
- How to do a manicure for yourself: step-by-step instructions, photo design ideas
- What do you need for a manicure?
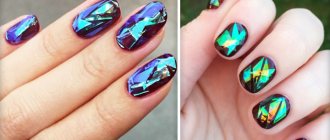
Iridescent nail decor
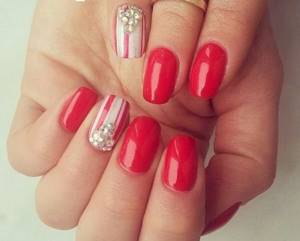
The best French manicure with sparkles, rhinestones, and bouillons will help a woman appear irresistible at an important event.
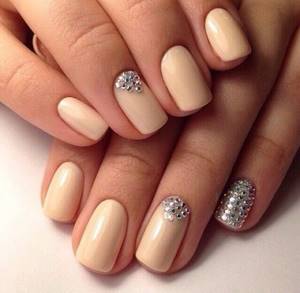
By applying rhinestones to the base of the plate while working, you can turn your manicure into a luxurious and sophisticated one. There are many variations. The arrangement of rhinestones can be in a single copy on each nail, and it is also possible to hide the entire nail under the decor.
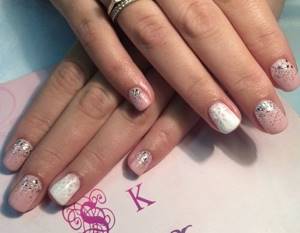
Iridescent shellac is used to cover all long or short nails or to highlight 2 plates on the fingers of each hand. To ensure a satisfying result, you should seal the shellac layer by layer in the light of a lamp for a period of 2 minutes. A good solution is to use glitter to decorate the borders of a single-color shellac coating, as can be seen in the photo.
The trend of 2016 was 3D design with broths and fimo sticks. A variety of overlays can turn a manicure into a fun and unique one.