Marble on nails with gel polish is a coating with the main color, along which blurred, winding lines are made in other shades in combination with clear thin stripes. This is how the effect of natural stone is achieved - opal, quartz, etc. It is done using wet and dry gel polish, with acrylic paints and a marker.
You can create a design using water, alcohol solution or plastic film, as well as a stamping die. The effect of natural stone never goes out of style and is suitable for any length of nails.
Marble on nails: design features
- The special attractiveness of manicure is based on the imitation of natural stone, which is distinguished by its incredible natural beauty.
- Uniqueness of the design: each marble manicure is unique.
- Possibility to use several colors in a design at once. Creation of drawings can be done based on various shades.
- Unusual: this design can surprise others.
- Effective design. You can create a marble effect on all nails or on several.
- Many options for implementation.
- Easy, interesting technology that even a beginner can do.
And most importantly: there are at least 9 ways to recreate marble on your nails. Each has a different degree of difficulty and the design looks completely different! Choose what you like!
Options with patterns and designs
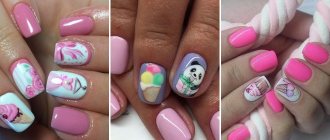
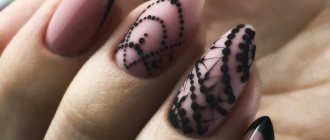
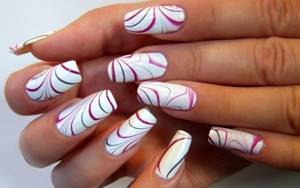
Manicures with marble designs are also complemented with various designs and patterns. Moreover, they can choose any palette of varnishes. So, these can be all kinds of flowers, floral patterns, or various butterflies and bees.
Insects or laconic floral prints on a white background look especially beautiful. They make your nails look elegant. This style is very suitable for creating romantic summer looks.
In spring or autumn, you can also use a floristry theme in the design of your nail plates, for example, images of various leaves and twigs. All kinds of abstractions are considered trendy designs. They add unusualness and mystery to the nails. Geometric shapes and straight lines are no less popular. Such elements help to create a discreet style for them.
In winter, nail art with frosty patterns looks interesting. It is also decorated with sparkles to enhance the effect. The design is applied like snowflakes, frost on glass, or a starry sky.
In addition to the seasons, all kinds of curls, uneven lines and other prints are drawn. Ornaments are made on nails of various lengths, regardless of their shape. They are worn in everyday life and created for special occasions.
Making a marble nail using film
The technique for performing this manicure is very simple. At home, you can easily make marble nails yourself using cling film. The design can be done using regular polish or gel polish. We will describe the technology using varnish. And for the gel polish method, you need to follow the same steps, only using a lamp to dry the product.
- Cut the film into two strips and crumple well.
- Apply thick cream or Vaseline to the skin of your hands, especially around the nail plate, to absorb excess polish.
- Prepare the nail plate: file, remove the cuticle.
- Cover the nails with base. Allow to dry thoroughly.
- Paint your nail plates with the base color. The varnish should lie evenly and tightly so that there are no translucent, uneven stripes. If the shade is light, you can make the base in two layers. Wait until completely dry.
- Drop varnishes of other colors onto the foil.
- Press the crumpled film against the drops, and then put a light stamp on the foil to remove excess varnish.
- The next stamp is directly on the nail.
- Let the varnish dry.
- Secure the finished design with colorless varnish.
Still have questions about the aliveproxy.com technology? Then watch a short video tutorial from nail art professionals.
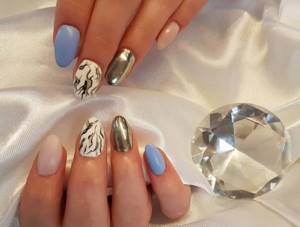
Sparkling Jewel
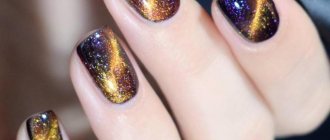
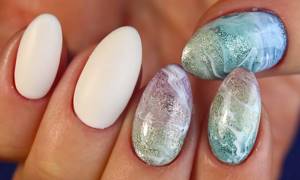
A light and pleasant abstraction that shimmers in an unusual way. Marble manicure is performed with metallic colored gel polishes with large glitter. This technique is done wet.
What you need
- base;
- colored gel polishes;
- metallic gel polishes with dense glitter;
- flat brush;
- top;
- lamp.
Execution technique
- It is good to degrease your nails and apply a base.
- On nails without a design, apply white polish or a neutral, delicate cream color.
- Cover the design nails with metallic varnish with thick glitter. For a deep effect, you can create a gradient of several metallic varnishes, smoothing out the transitions with a flat brush.
- Place a drop of thick topcoat and white gel polish on the palette. White should not be dense and should not spread in the top.
- Use a flat brush to grab the top coat and white gel polish. Transfer it to the nail so that chaotic stripes form on the surface. You can move the brush and braid the texture in any direction, changing only the pressure. Don't apply the polish too close to the cuticle and side rollers, otherwise it will bleed.
- Cover the design with a transparent top.
- And apply a matte top coat to nails without a design.
- Send everything to polymerize in a lamp.
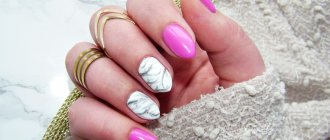
The marble design in the photo looks quite mysterious. White nebula and streaks on a sparkling gradient in naive colors successfully echo each other. They slightly hide the unbridled shine, which adds uniqueness to an unusual manicure.
Marble manicure with sponge
This method of making marble on nails is similar to the one described above. Only instead of cling film, a piece of sponge is used. Apply a few drops of varnish to the foil, contrasting with the base. Next, blot the product with a piece of sponge, remove the excess onto foil, and apply it to the nails with light movements. Do not press the sponge very hard on the base, otherwise, instead of an exquisite marble design, you will end up with sloppy, huge spots.
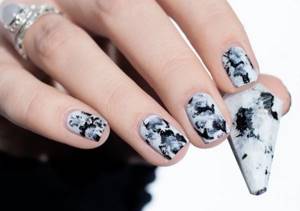
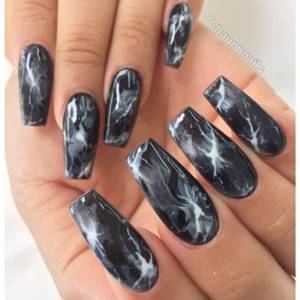
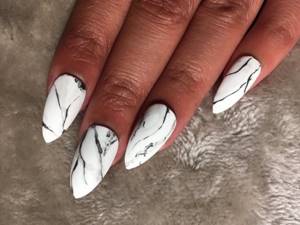
Rock
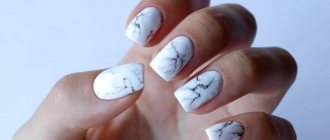
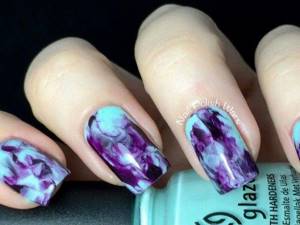
Marble manicure design looks very impressive on nails of any length. It is a substrate with chaotic stains. It is the veins of different widths that help create the unique texture of the precious stone. The most popular coating substrate is white. Black and dark gray stains that imitate marble look best on it. But for those who like to experiment with nails, gel polishes can create an imitation of malachite, turquoise, jasper, agate, quartz and many other stones.
Marble design using oilcloth
For the design you will need varnishes (or gel polishes) of different colors and a piece of thick oilcloth.
- Apply the base color to the nails and dry the layer.
- Apply several drops of varnishes of different shades in random order onto the finished color base.
3. Immediately apply a thick film to the plate and press it to the nail. Under the oilcloth, the varnish spreads into spots with jagged edges.
5. Remove the oilcloth. We get a surface with beautiful spots of different shades. We clean the periungual surface of the skin from varnish, then dry the layer.
6. Cover the “marble” with a transparent top.
Ideas and photos of designs
In 2022, masters are offering girls dozens of photos of marble manicure designs with gel polish.

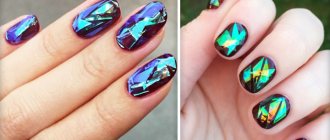
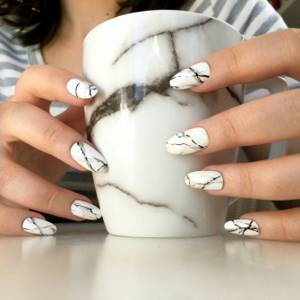
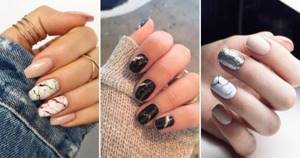
The most common are “classic” combinations of white, black, and beige colors. Brave, creative girls can try bright combinations - shades of green, red, blue and other colors. The standard drawing can be supplemented with:
- Shining and iridescent elements - sparkles, rhinestones.
- Classic "French".
- Mother-of-pearl or mirror rubbing in different colors.
- Foil in the form of a whole sheet or thin strips.
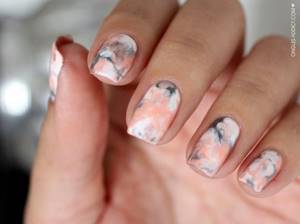
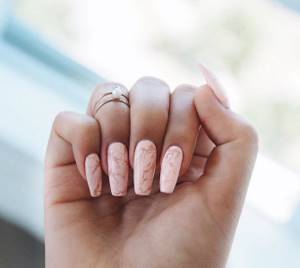
The new product of the season looks impressive - contrasting stains along the edge of the nail plate, painted in soft pink or peach. For everyday design, matte varnish in light pastel colors is suitable.
Marble manicure looks equally attractive on long and short oval or square nails.
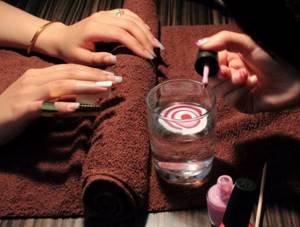
Water marble: the nails of your dreams
The technology for performing marble manicure using water is somewhat more complicated. You need to spend at least two hours on this procedure, but the result is worth it. The color applies easily and beautifully to the nail and dries quickly.
- Prepare a bowl of water at room temperature.
- Prepare the nail plate: sharpen it, remove the cuticle.
- Cover your nails with base coat.
- Apply an even layer of base color. Dry.
- Drip the colors chosen for the design into a bowl of water. Several varnishes can be used. In this case, the drops should fall exactly into the center of the spreading circles.
- Dip your nail into the pattern on the water.
- Use a cotton swab or toothpick to separate and collect excess varnish on the water.
- Remove your finger from the water and let it dry without wiping it.
- Do the same procedure with other nails.
- When the polish is dry, coat your nails with a fixative.
Watch all the intricacies of water marble in a short video tutorial.
Fashion trends in 2022
Marble manicure or design in the marble stone style appeared relatively recently and has already gained popularity among women of all ages. It consists of original stains on the nail plates that imitate the surface and pattern of natural stones.
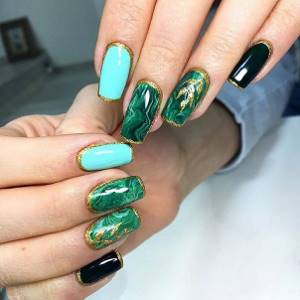
Fashionable colors of this season are gray, white, beige tones. And also black and pale pink shades. This traditional palette of colors will appeal to girls who prefer discreet nail art. No less popular are rich blue, green, and red colors. They are also used as a base or addition.
The marbled design is created on all fingers at the same time or one or two are selected as desired. Also, individual nails are complemented with a mirror polish. In addition, they are trimmed with gold or silver stripes, threads, or decorated with elegant rivets.
Today, sharp, rounded, trapezoidal nail shapes are most relevant, and they can be both long and short. Marble manicure goes well with any type of nail art, for example, French manicure.
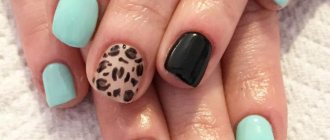
Asymmetry has become widespread. This is when two nails are covered with marble, and the rest are decorated using a different technique. Often, the marble stone design is combined with various types of coatings, creating simply incredible patterns on the nails of both hands. They are also treated with a special composition that has a matte and sugary effect.
A stone-inspired manicure has a huge variety of different shades and textures with a marble design. The most common methods of decorating nails are presented here, but this does not stop you from experimenting and coming up with new variations of fashionable nail art.
Marble manicure with gel polish
This type of manicure is best done in professional salons, as it requires special care and perseverance. Masters perform this procedure using a special brush. The convenience of gel polish is that it does not dry, so you can use it to create any ornament. There is no need to rush; you can correct the lines with a brush and partially mix shades.
- Degrease nails, give them the desired shape, remove cuticles.
- Apply a thin layer of base gel coat. Dry in a UV lamp.
- Paint your nails with the main color. Dry in a UV lamp.
- Pour clinser into a small container for subsequent cleaning of the brush.
- Drop the colors of the gel polishes chosen for the design onto the foil.
- Dip a thin brush into the drop and draw patterns on the nails. Curved, weak lines of any length should be applied. The pattern should imitate the structure of the stone.
- After each detail, dip the brush into a container of clinser, and then move it along the newly drawn strip. This way you can achieve blur.
- Let the drawing dry.
- Cover with gel top and dry under a lamp.
Marble with acrylic paints
In principle, you can work with ordinary, not too liquid varnishes. But they are still less convenient and drag on the brush. In addition to varnishes, we will need the paints themselves and a small palette for mixing them. Since plastic can dissolve, it is better to use a small plate of foil or metal. If you don’t have a brush at hand, you can replace it with a regular toothpick or needle.
In principle, you can work with ordinary, not too liquid varnishes.
We will need the paints themselves and a small palette for mixing them.
If we worked with water-based acrylic paints, then there is no need to dry them under a UV lamp
So, let’s describe step by step the creation of a marble manicure (photo) using a brush:
- To make the polish last longer, as always, treat your nails with nail polish remover or regular alcohol;
- apply the base varnish and dry it thoroughly; some nail designers advise working with a slightly sticky base, in which case the pattern will turn out chaotic and less clear;
- now we need to select the background; to create real white marble, you can take a slightly grayish varnish or a composition with a bluish tint;
- to obtain gray stains with darker veins, mix black and white paints or varnishes; if the acrylic composition is thick, you can add a little water;
Now we need to select the background; to create real white marble
- carefully look at photos online with samples of this stone; Of course, it is not necessary to repeat its pattern one by one, just pay attention to how the finest veins are located in it;
Carefully look at photos online with samples of this stone.
Of course, it is not necessary to repeat the pattern of the stone one to one
- draw broken lines with a brush; they must have different directions and different thicknesses;

With a brush we draw broken lines; they must have different directions and different thicknesses
- dry the nails;
- we make the veins a little brighter by adding darker thin stripes to them;
- dry the nails again and coat them with finishing varnish, preferably not completely transparent and have a white or pastel shade.
You can buy them at any store that sells art supplies.
Advice! If we worked with water-based acrylic paints, then there is no need to dry them under a UV lamp. You can buy them at any store that sells art supplies.
How to make a marble manicure with varnish
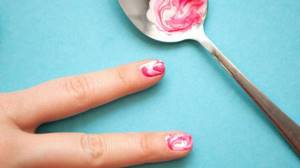
There is also a convenient option for creating a manicure using a spoon. This method can be compared to the water method, but there is no need to use a container of water. However, when performing this manicure, it should be taken into account that the layer of the top coating - the pattern - will be thick, so it requires longer drying. Not everyone can achieve marble design using this method.
- Prepare and polish your nails.
- Cover with base coat. Let dry.
- Drop the varnishes chosen for the design into a spoon.
- Use a toothpick to stir the varnishes.
- Dip the nail plate into the spoon.
- Next, pull out the nail and let it dry.
- Remove excess polish from leather.
- Cover with a colorless fixative.
Successful color combinations
marble manicure with a pattern in soft colors
The selection of varnishes for manicure is a purely individual matter. Each girl chooses certain colors depending on her mood or the nature of the event for which she is designing her nails. Marble manicure looks best when using the following colors:
- Black and white;
- Pink and white;
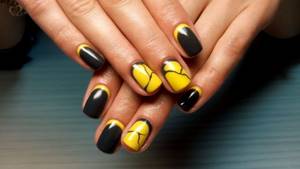
- Yellow and blue;
- Purple and red.
Triple combinations are also popular:
- Black – white – red;
- Yellow – pink – blue;
- White – purple – black;
- Any three colors that are next to each other in the color scheme, for example: burgundy - red - pink, dark green - green - light green, etc.
bright nail art design
Drawing marble with a toothpick
A very beautiful drawing can be obtained if you use the technique of drawing on wet gel polish.
- On the colored layer of gel polish, dried in the rays of the lamp, apply another layer of the same color.
- Using a toothpick, pick up a different shade of varnish and begin drawing lines along the wet base. It is better to use several shades of varnish of the same range.
- Then we slightly mix the borders in some places and blur the lines.
- Dry the layer in a lamp and cover with finish.
Types of techniques
Recently, marble nail art has been chosen by many girls, as it is characterized by an unusual look and allows you to stand out from the crowd. The process of creating such a manicure is complex, but if you wish, you can do it yourself.
The stone effect is created in several ways.
Waterless technology. The stains are formed using ordinary cellophane. In this case, water is not used. To work, you need to select several tones of gel polish and cut 10 pieces of cellophane in advance. First, a base is applied to the nails, it is dried under a UV lamp, then the plates are covered with a colored background. For example, if you want to get soft pink marble, then your nails should be painted white. When the base layer has dried, other colors are applied to it, cellophane is applied, making movements in different directions. The result is a pattern that looks like marble. To ensure an accurate texture, you need to choose a gel polish of a trusted brand and a thick consistency. Upon completion, the plate is coated with a finishing agent and dried in a UV lamp.
In addition, fashionable nail art can be created with a special marble gel polish. This effect is created much easier compared to previous techniques. Since gel polish contains special marble particles, it allows you to create interesting compositions. This product is also easy to apply to the surface of the plates, lasts a long time and does not lose its original appearance. To make the design attractive, you need to choose a thick varnish with a dense texture.
To summarize, we can say that the marble effect is available to everyone. Before you do it, you just need to decide on the appropriate technique and purchase high-quality gel polish.
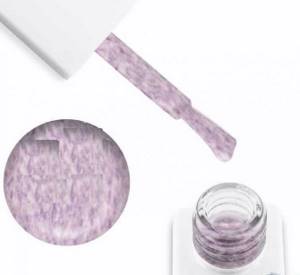
Using marble gel nail polish
The easiest way to create a marble manicure and at the same time economical in time is to paint your nails with marble gel polish. The original new product is currently presented only in some specialized stores. The product contains small particles of flock (villus) or other small inclusions, which create the marble effect. The application procedure is the same as when painting with conventional gel polishes. By drying your nails under the rays of a UV lamp, you can become the owner of a beautiful textured manicure.
Some tips, video tutorials
Before you start creating a manicure with a marble effect, pay attention to:
- The varnish should be of medium thickness. Otherwise, the product will not mix properly with other layers.
- Pay attention to the quality of the products you use.
- Take your time during the procedure. This is a reverent and painstaking process that must be carried out carefully and patiently.
- If you failed the first time, don’t despair, next time everything will definitely work out!
A good and clear video lesson to help you:
How do you like the article?
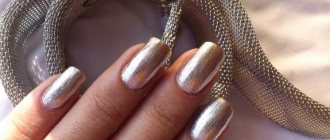
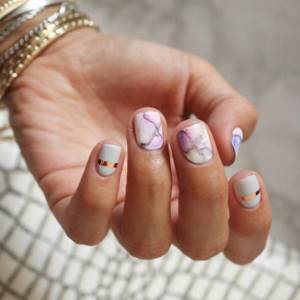
With decorations
By itself, a marble manicure looks complete and without additional decor, but when the coating needs to be added to the solemnity, sparkles, rhinestones and patterns are used.
A double silver ribbon accents the length of the nails and complements the gray matte finish.
A similar option, but with stripes of different widths.
Design of two nails in the Ruffian style - the cuticle growth area is highlighted in gold. By the way, the photo shows a very feminine combination of colors – muted mint and beige.
A metal rivet adds variety to the ribbon design.
A spectacular and bright manicure with the addition of dense sparkles on the little finger.
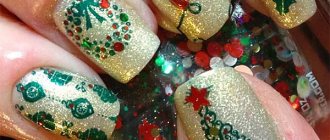
Festive manicure for long nails with rhinestones.
Fashionable this season, plant motifs in tandem with a stone pattern are a truly natural manicure.
Glitter decoration idea. Look how finely the marble pattern is made - this option is appropriate for any occasion, including everyday wear.
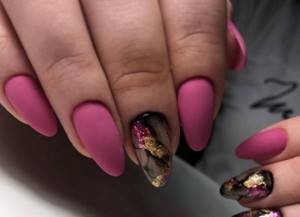
Plum matte with rhinestones and marble will complement a festive dress or formal suit.
And again Ruffian, but in a graphic version.
For very long nails, a combination of several decorative additions is suitable. Due to the large area, there will be no feeling of overload.
Marble manicure and French manicure with mica decor.