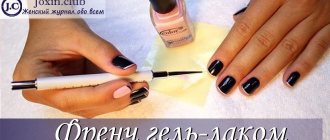
Performing a lunar nail design on gel polish.
A strip in the shape of a crescent of a young moon at the base of the nails is called a lunula. Thanks to the special art of its application, this nail art design got its name. Since making a moon manicure with gel polish at home is not difficult, but every novice manicurist should know the small tricks of doing it.
Important! The holes are made in the form of a semicircle or arc, also in the form of a triangle. Each option is correct and unique in its own way.
Preparing all the necessary tools to create an inverted French design is half the battle. Only a thorough study of the technology of how to do a lunar manicure with gel polish step by step with thematic photos will help you achieve salon results.
History of origin

Lunar manicure appeared in the 20-30s of the last century. He owes his design to the morals that were accepted then; painting over the entire surface of the nail plate was considered a sign of bad taste, and fashionistas of that time left part of the nail plate untouched by varnish, usually the base of the nail, which is shaped like the moon. This is where the very name of this design came from, which is used only in our country; in the rest of the world, this design is usually called the Hollywood French.
For a long time, this design remained in the shadows and only in 2007, at a fashion show, Christian Dior revived interest in it. From that time on, lunar manicure no longer lost ground, and the army of its fans became larger and larger.
Learning to Coat
Many girls do not know how to do a moon manicure with gel polish at home. In fact, this is not difficult, but initially you will have to buy everything you need to carry out the procedure:
- Trimming manicure set (or its electric equivalent)
- UV lamp (it’s most convenient to use portable USB lamps at home, which take up minimal space and dry the coating in just 10-15 seconds)
- Buff (special file for polishing)
- The basis
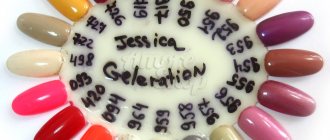
- Varnishes of the desired color
- French stripes (with them your manicure will be much neater)
- Fixer
- Degreaser
- Cuticle oil
Instructions for beginners
There is a lot of information on the Internet about how to do a moon manicure with gel polish. It is necessary to study it with special care - only if all stages of the procedure are performed correctly can you achieve an ideal result.
You need to start with a classic manicure: remove cuticles and shape your nails. Then, using a buff, you need to file off the shiny layer of the nail. It is better to polish them with light movements so as not to damage the nail plate. It is better to wipe off all the dust with a special brush, without touching the nails with your fingertips.
After this, apply a thin layer of base along the entire length and send the nails into the lamp (you need to keep them there for as long as indicated in the instructions for your device).
If you want to make a feminine and elegant manicure, stick two French stripes on each of your fingers. One should be located closer to the tip, the other at the base of the nail. Make sure that the stripes on all nails are glued at the same distance.
Next, apply varnish. Classic white enamel will look natural and at the same time stylish. You need to paint your nails in a thin layer, without going beyond the boundaries of the stripes. After drying the first layer, apply a second if necessary and also send your hands into the lamp.
If desired, you can complement the coating with various accessories: sliders, bouillons, rhinestones. It is better to do this on one or two fingers so that the manicure does not turn out to be sloppy. Having secured all the decorations, the nails are covered with a fixative and thoroughly dried in an ultraviolet lamp.
The manicure already looks ready, but the coating is still too sticky. That is why you should use a degreaser, which many experts replace with an alcohol solution. Finally, the cuticle area is lubricated with oil, which gently nourishes the skin and promotes speedy healing after trimming the manicure.
For which nails is moon manicure suitable?
In the classic version, lunar manicure involves carefully highlighting the natural shape of the base of the nail. The size of the hole is selected taking into account the shape of the nail plate; if it is close to ideal (almond-shaped, oval), then you can safely experiment with design and color. But it will also be possible to implement this design on short nails, you just need to give the nails an oval shape and choose the appropriate hole size and color.
Useful tips for beginners
In order for the gel polish to last really long, it is better to listen to the advice of nail service specialists. Experts recommend:
- Clean a few days before applying gel polish. Before starting the procedure, you should avoid prolonged wetness of your hands.
- Immediately after coating, it is better not to wet your fingers for several hours.
- On the day of applying gel polish, you must avoid visiting the bathhouse or sauna.
- Peeling off and “picking” at the cracked coating (this usually happens after two weeks) is strictly prohibited - you risk damaging the nail plate.
Covering your nails with gel will save you from a lot of the hassle that classic polishes caused you. Cracked nails and chips of paint will be a thing of the past forever. In addition, with a neat moon manicure, you will feel confident in any life situation.
Types of lunar manicure
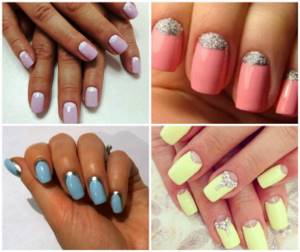
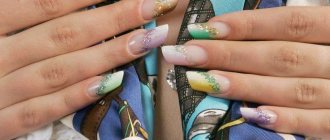
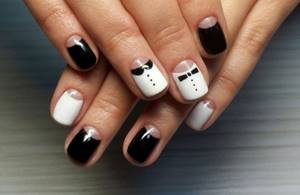
In the original version, the lunar manicure left the base of the nail unpainted, and the color scheme was selected to match the natural shades of the nail, from soft pink to beige. Over time, new design options emerged, sometimes quite extravagant and daring. Nail designers offer many options for lunar design. You can draw a crescent moon with its horns up, or you can also add a classic French jacket. The hole itself can be designed in the form of a semicircle, arc, corner or strip. You can combine several holes on one nail.
The changes also affected the color design. Increasingly, combinations with 2 or more colors, as well as various textures - matte and glossy - have begun to be used. You can decorate the hole using various decor: rhinestones, bouillons, sparkles, foil, gradient, polka dots, flowers, graphic patterns, etc.
Let's get started
To perform a moon manicure (like any other) with gel polish, you must:
- Remove old coating.
- Disinfection means cleanliness not only guarantees health, but also ensures that no mold or other unpleasant things form under the coating.
- Using a pusher - this tool pushes back the cuticle and moves the pterygium. It is almost invisible on the nail until you start to move it. Also located in the cuticle area. Remember that if nothing moves, then you don’t need to be zealous and harm your nail, which means you simply don’t have pterygium. This tool can be replaced with an orange stick, which will reduce the risk of damage to the nail plate several times.
- File - used for two actions - giving shape to the free edge (even if you like it, still use the file purely symbolically, the edge needs to be updated) and for removing the top fatty layer from the surface of the nail. It's important not to overdo it here. There should be no pain, red spots, etc. You just need to remove the shine from the nail.
- Removing sawdust - you can use a special brush or a lint-free cloth soaked in a cleanser.
- Dehydrator - it must be applied to the entire nail, it dries quickly and the surface remains matte. After using it, you should not touch your nails with your fingers, lips, or anything that can make them greasy.
- The base is the first layer. It must be applied thinly and carefully. It is necessary to retreat from the cuticle and side ridges to 1 mm. This will help avoid material peeling and prolong the life of the coating. Dry in a lamp for the time specified by the manufacturer.
- Colored coating. There are several application methods, depending on both the color scheme and technique. In any case, you need to cover the nail in several layers, drying each one, and do not forget about the indentations as in the previous paragraph.
- Top. May be with or without a sticky layer. Apply last, dry well and remove the sticky layer if necessary.
Lunar manicure at home
You will need: A file, cuticle scissors, an orange stick, base and top coat for varnishes, two colors of varnish, stripes and a little patience and diligence :-)
Before you begin the design, the nail plate and cuticle must be carefully prepared. Shape your nails into an oval shape using a fine-grained nail file, followed by a hand bath and removal using an orange stick and a cuticle nipper.
You can also perform a hardware manicure if your knowledge allows and you have a manicure device and manicure cutters available. 1. Degreasing the nail plate 2. Basic colorless coating. 3. Primary color, usually lighter. Then it takes 3-15 minutes to dry the layer. 4. Using manicure strips, glue them onto the nail so that a kind of lunar line is formed between the sticker and the base. 5. Apply a second color, from strip to tip. This must be done as carefully as possible so that the varnish does not go beyond the borders of the sticker. Immediately after applying the second coat, remove stripes 6. Apply a clear topcoat. That's it, the moon manicure is ready!
Gel polish – what is it?
Surely every girl, having painted her nails in the evening and waiting for them to dry completely, went to bed with a clear conscience. But bad luck, in the morning the manicure looks simply disgusting: the varnish has shrunk, the imprints of the sheet are visible on the nails, and on some fingers the coating has completely fallen off.
Classic varnishes really cause a lot of unpleasant troubles: they quickly deteriorate, take a long time to dry, and the coating lasts only a few days. That is why modern gel polishes are considered one of the best developments in the beauty industry in recent years.
Benefits of technology
The appearance of gel polishes led to a real revolution in the field of nail services. This substance really has many advantages in comparison with classic varnishes:
- Easy to apply and remove
- Hypoallergenic
- Durability and stability
- Rich color range
The advent of gel varnishes has opened up enormous opportunities for realizing design ideas: during painting, the varnish is applied in thin layers and does not roll off, and the colors do not mix.
The structure of gel polish allows the nail plate to breathe, and therefore many girls apply the coating to grow their own nails. After removal, the nails become much stronger and stop peeling.
- Do not rush to remove nails infected with a fungal infection. Modern varnish for nail fungus can solve this problem quickly and effectively.
- A professional device for performing manicure and pedicure is suitable for all women without exception, more here.
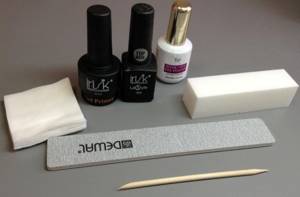
What materials are needed
To carry out such a special type of manicure as gel polish, you will need a remarkable set of materials. True, most of them are practically no different from those used for regular manicure and are always on hand for the fair sex at home.

So, the complete list is:
- a set of manicure tools (cuticle pusher, files, manicure brush, scissors, nippers, polishing buff);
- special lint-free manicure wipes;
- degreaser;
- acid-free primer;
- base and finish for nails;
- gel polish with color;
- UV or LED lamp for drying;
- cuticle oil.
Lunar Design Fashion Trends
Unlike previous seasons, lunar manicure in 2016 acquired absolutely non-classical features and is offered to lovers of unusual nail art in a trendy and unusual style.
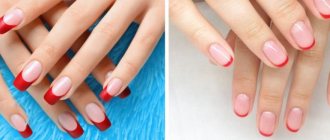
- Moonlight nails in Dior style. This technique appeared relatively recently, but has already won everyone’s attention among lovers of the original classics. To decorate your nails in this style, you need to cover the tip of the nail and the area near the lunula with different colors, leaving a small transparent gap between them.
- Matte moon manicure looks amazing on nails, which is why for many seasons in a row it has not lost its leading position among fashionable nail art.
It is worth noting that an inverted French coat made with matte gel polishes in any color looks amazing. However, the lunar style looks best only with varnishes of strict dark shades. For example, an elegant burgundy color or a strict black matte varnish in combination with a shiny lunar smile looks flawless and luxurious.
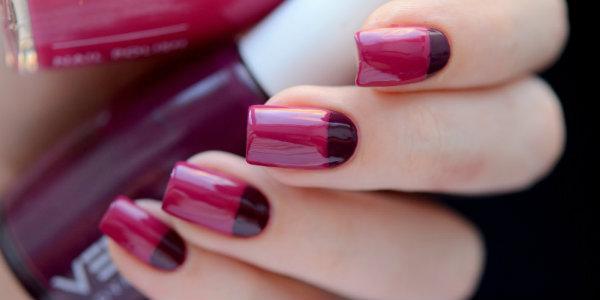
- Colored moon manicure. Bright and rich variations of colored lunar design have a unique look and are particularly attractive. And don’t think that this design will be appropriate on cold days. On the contrary, a colorful moon smile will give you cheerfulness and lift your spirits on rainy days.
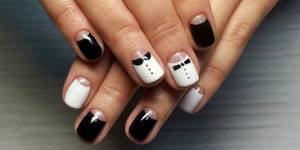
- Lunar design, decorated with drawings. Another fashionable variation of the traditional moon manicure. Moreover, you can use not only hand-drawn drawings, but also special stickers, appliqués or stencils.
- Volumetric inverted French jacket. Although this manicure is quite difficult to do on your own, it looks amazing on your nails. As a rule, for decoration, craftsmen use all kinds of decorative elements, various accessories or special 3D applications.
- Negative moon manicure. This design is a favorite trend among sophisticated fashionistas and lovers of eccentric new items. And it’s not surprising because negative space in combination with an inverted jacket looks impeccably beautiful and is very easy to do yourself.
- A clear triangular line of the moon. This design is radically different from previous stylish nail trends, but due to its unique appearance it has gained great popularity and is considered one of the most spectacular designs in the moon manicure style.
Features of care after the procedure
When creating a lunar manicure, especially using gel polish, the nail is under a thick layer of polymer coating. This can affect the condition of the nails, they may weaken, so it is necessary to ensure proper care for them after the manicure.
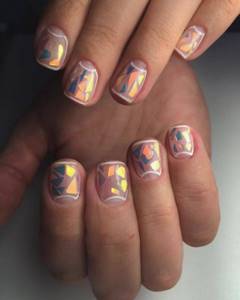
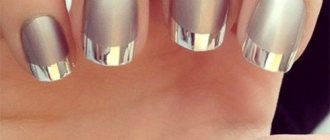
Nails using foil look very nice
To maintain the vitality of nails, a woman must observe the following points:
- All varnishes must be of high quality, instruments must be sterile, so as not to cause infection during the procedure.
- The full strength of the gel polish occurs only on the second day, so you should treat your hands with care during this time. Even contact with water can negatively affect strength.
- Until the manicure is completely replaced, you should not cut or file.
- Nails should not be allowed to come into contact with aggressive chemicals (containing acetone or alcohol). Upon contact with them, the coating will not disappear completely, but the shine will disappear.
- If the skin is too delicate, or the cuticle is prone to dryness and cracking, then you should regularly use nourishing or softening creams and masks.
- To prevent the applied manicure from causing harm to the nail plate, it should be removed regularly (every few weeks).
Every woman should remember that a beautiful decorative manicure is not the key to healthy nails. Therefore, you should properly care for your nails and provide them with nutrition. With the right approach, even with home treatments, women's hands can be healthy, beautiful and well-groomed. When choosing methods and means for care, you should take into account the seasons, since in autumn and spring you need nutrition with vitamins, in summer - protection from the sun, in winter - strengthening from the cold.