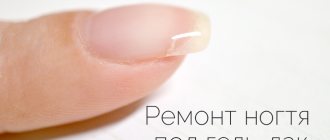
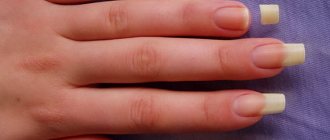
What to do if your nail is broken?
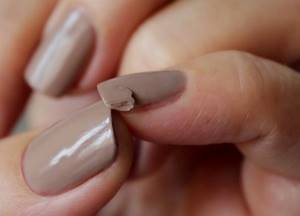
If a nail is broken (you can do the restoration yourself or in a cosmetology office), decorative nail art instantly takes on an unkempt appearance, and the chip site begins to cause a lot of inconvenience, constantly leaving behind hooks and further enlarging the crack.
The causes of nail injuries are related to:
- With a lack of vitamins and microelements. A balanced diet rich in high-protein foods, vegetables, and grains helps maintain the mineral balance of the body, which is responsible for the condition of the skin, hair and nails.
- With mechanical damage caused by improper care of the nail plate. Frequent use of cosmetics containing formaldehyde and acetone, abuse of manicure with gel polish leads to thinning of the plate and frequent injuries.
Having discovered any, even minor damage, it is necessary to immediately take measures to avoid further destruction of the nail. Restorative actions can be done independently or in a salon, and the order and technology of their implementation will directly depend on the nature and type of injury:
| Injury | Necessary procedure |
| Lateral cracks (the nail bed is not affected). | Processing with a nail file and applying a fabric or paper patch. |
| Root injury. | Using acrylic tix. |
| A chip affecting the root bed. | Removing the deformed part with scissors, followed by filing. |
| A plate with “meat” torn off. |
|
Long-term nail repair (for up to 3 weeks followed by gel or acrylic coating) is possible only if a chip appears that affects less than 2/3 of the plate. Otherwise, camouflage measures are carried out only in a nail salon using biogel, which gives a lasting result for up to 7 days.
In this case, home repairs will not give the desired effect and will lead to further expansion of the crack.
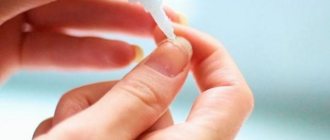
Instruments used to treat a broken nail are widely available and consist of:
- a degreasing (disinfecting) solution, which allows not only to clean the plate from dust particles, but also to remove excess moisture;
- patch plates (silk, linen fabric, fiberglass);
- instant-drying glue for nail restoration;
- file (hardness no less than 240 grit) and polishing buff.
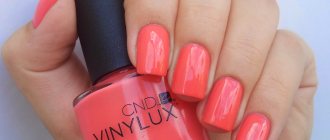
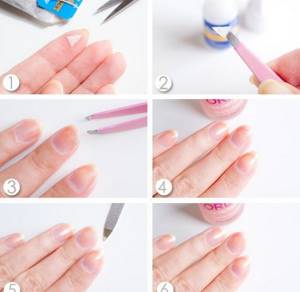
Covered with gel polish
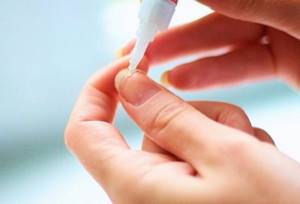
If a nail is broken (it’s easy to do home repairs using a special kit that includes repair tools and fiberglass) under the gel polish, then before starting the repair, the decorative coating must be removed.
Shellac can be removed with a special solution (acetone). If the coating is firmly in place, the patch can be placed directly on top of the gel polish, masking it with an additional layer of shellac.
Progress of the procedure:
- The crack is lubricated with degreaser and filed.
- A piece of silk (fiberglass) smeared with glue is placed on top of the plate, selected so that the fabric covers the fracture site by 3-4 mm.
- The material is straightened with a toothpick or a stick with a sharp edge, and then firmly implanted with your fingers for 1-2 minutes.
- The glued patch is polished with a buff until smooth, and then the previously described manipulations are repeated.
- Depending on the injury, from 1 to 3 camouflage strips can be applied.
- The sealed nail is covered with shellac and dried in a UV lamp.
The crack formed along the edge of the “smile” can be cut off and the length of the nail restored using biogel. To do this, the finger is placed in a special layout or the missing length is fixed with foil, which is removed after drying the structure in a UV lamp.
Extended
If a nail is broken (camouflage procedures on “living” nails can only be done using a special quick-drying gel) extended with acrylic powder, then for restoration work it is allowed to use only acrylic tix with any synthetic glue (such as “Moment”).
Acrylic nails do not contain living particles that can be damaged by an artificial adhesive solution. A nail that is broken to the base should be re-grown.
For minor damage:
- The plate is lubricated with glue, on top of which the patch is placed.
- The top of the tix is covered with a 2nd layer of glue, and after it dries with another
- The supplied patch is sanded with a buff and coated with shellac.
Natural
If a nail is broken (resuscitating manicure procedures in case of severe breakage should only be done in a special room, after complete healing of the damaged tissues) and is of a natural nature, then the type of repair is carried out only in accordance with the type of damage.
If chips appear around the perimeter of the “smile,” simple nail art can be completely restored, with a slight loss of strength of the injured plate.
Recovery stages:
- The decorative covering is removed from the damaged nail, the broken area is treated with a disinfectant solution and filed.
- A strip of fabric (or fiberglass) moistened with quick-drying glue is placed on the plate prepared with a buffer, selected so that the material covers the crack by 3-4 mm.
- The patch is carefully adjusted with a toothpick and pressed with a cloth for 2-3 minutes. After adding glue, the unevenness of the nail is corrected with a buff.
- With the next patch, the manipulations are repeated. In total, the repair may require from 1 to 3 strips of patching material.
If the nail is severely damaged, you will not be able to restore the manicure yourself. The injured skin and the area of the chip should be carefully treated with Chlorhexidine, Miramistin or hydrogen peroxide for disinfection, and then the chips should be trimmed with scissors.
Repair of the plate for such injuries is carried out only in the salon after complete restoration of the skin tissue. To correct manicure, special biogels are used, created on the basis of protein, which allows you to simultaneously restore and strengthen the nail plate.
In the future, women should carry out all housework only with gloves, since the reagents or acetone contained in detergents can easily destroy the created structure.
When repairing a damaged “living” nail, you should not:
- Use synthetic “Moment” or its analogues, since the chemical elements contained in such products strongly corrode the tissues of the nail plate. Synthetic adhesive is allowed only when restoring artificial (acrylic) nail art
- Use nail polish remover containing acetone in case of damage to the skin tissue under the nail. The stratum corneum, broken down to the base, should be carefully treated with disinfectants that do not irritate damaged tissues, and then a fixing bandage with healing ointment should be applied.
- Delay in repairing a small crack, since delay can lead to further expansion of the crack, touching the bed, or complete breakage of the nail.
Causes
Most injuries occur accidentally.
They are caused by the following reasons:
- Blows, bruises. They occur most often. These are blows with a hammer or other heavy objects, pinching by a car door, an entrance or interior door, or a drawer;
- Cuts. Occurs when handled carelessly with scissors, a knife, or sharp instruments for manicure or pedicure;
- Tears. Formed when a long nail catches on objects and then turns or bends the nail plate;
- Getting wood chips, splinters or other sharp foreign bodies under the nail;
- Habit of biting nails. Often causes chronic nail injuries in children.
Toenail injuries, usually to the big toe, are often caused by shoes. Wearing uncomfortable and tight shoes, sandals, boots, or boots puts pressure on the toes and nail plates of the foot, causing them to bend and become ingrown.
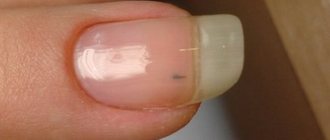
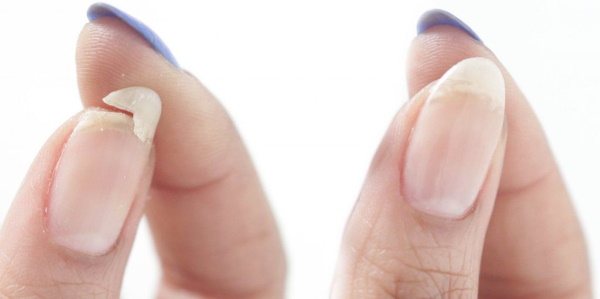
Broken in the center
A nail broken in the middle can be easily repaired using acrylic tix. All manipulations must be done very carefully, using only special quick-drying glue that does not injure the living tissues of the plate.
Stages of work:
- Cleaning the injured part from shellac and filing the sharp ends.
- Preparing the tixa. The material should be cut in the form of a small square.
- The plate and the inner edge of the patch are covered with adhesive and overlapped so that the edge of the “smile” of the nail coincides with the end of the material.
- The patch is fixed with a cloth for 1-3 minutes.
- The dried tix is coated with glue for the 2nd and 3rd time.
- The restored nail is sanded smooth, trimmed and filed to the required length.
- A layer of decorative coating is applied over the patch.
Broke on the side
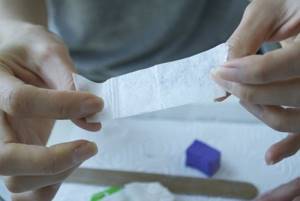
A nail that is broken on the side is repaired by applying fabric or paper strips.
- The broken edge is filed and disinfected.
- 2 strips are cut out of paper. One should be slightly larger than the break line, the other should coincide with the main length of the nail.
- A smaller strip is coated with glue, applied to the nail and fixed.
- After hardening, the material is sanded and fixed with a large patch.
- Using a sharp toothpick, the plate is straightened, merging with the rest of the nail, glued, trimmed and polished.
- The plate is coated with a transparent decorative coating on top of the glue.
A plate injured at the root can only be restored in a salon setting.
In case of severe damage affecting the subungual tissue, it is necessary:
- Remove chips with small scissors and treat the wound with Chlorhexidine or Miramistin.
- Stop bleeding (if it occurs).
- Remove the protruding edges of the broken plate to allow further growth of the crack.
- Place your hand in cold water (to reduce pain).
- Twice a day, put your hand in a bath containing 100 ml of boiled water and 1.5 tsp. table (sea) salt. This procedure must be done within 4 days after the injury.
- Apply a gauze bandage with healing ointment to the damaged skin. This measure will help to avoid further injuries to the plate caused by mechanical stress.
A broken nail can only be restored in a salon after the subungual tissue has completely healed. For this procedure, a special protein biogel is used. After restoration, all household work should be done only with gloves to avoid dissolving the gel with chemical detergents.
Broke at the root
It is easy to restore a broken nail yourself using a special kit sold in haberdashery stores or with improvised material.
A prerequisite for repairs is the purchase of:
- quick-drying, special nail glue;
- degreasing and disinfecting solutions;
- nail files;
- buffs.
Among the most popular restoration options:
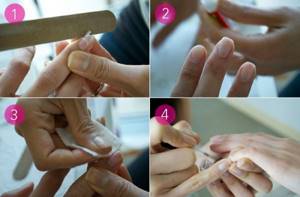
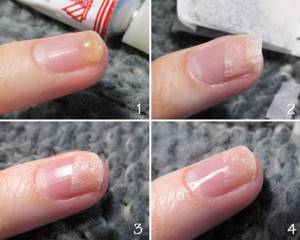
Using a tea bag
A dry, unused tea bag can serve as a patch, allowing you to maintain the appearance of your manicure.
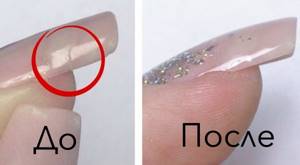
The photo shows step by step what to do if a nail breaks.
For repair:
- A small strip is cut from the bag, 3-4 mm larger than the break size, and fixed on a prepared, buff-polished nail plate using special glue.
- The patch is pressed, and after hardening it is treated with 2 additional layers of adhesive.
- The restored nail is polished with a buff until smooth and covered with transparent varnish.
Scotch tape
Transparent stationery narrow tape will perform camouflage actions, allowing you to restore your manicure before a visit to a specialist.
- A small piece of clear adhesive tape is applied to the broken area on both sides of the nail.
- The tape is pressed to give greater adhesion.
- The restored nail is treated with a buff and varnished.
- Further work is carried out only by a manicurist.
For such a restoration, only one-sided, transparent adhesive tape is suitable. Do not repair broken nails with duct tape.
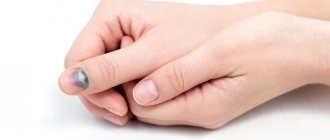
Serious case
However, all these problems with nails and repairs will seem like baby talk if you break the nail to the meat. Fortunately, this does not happen so often and it takes a lot of effort to cause serious damage. By the way, most often such problems are faced by people whose nails are very peeling. What to do in this case?
It is necessary to thoroughly disinfect the wound. In all cases where blood appears, the use of antiseptics is required. A chlorhexidine solution would be ideal because it will not sting. The nail must be sealed, or better yet, bandaged. It will be easier for you when bandaging. After all, it must be removed for nightly treatment with an antiseptic.
For housework, it is recommended to wear special rubber covers. They cost rubles at the pharmacy. With their help you will protect the wound from moisture. However, they should not be used on an ongoing basis. There must be access to oxygen to the wound.
It is recommended not to touch the cuticle. Ideally, it needs to be moisturized even more actively than usual so that the nail grows back as quickly as possible. The situation is even more complicated when a person pulls out a nail. In this case, you must contact a specialist.
The surgeon will examine the damaged area for any remaining nail fragments and will also recommend good treatment. Most often, it is based on dressings with restorative ointment, as well as disinfection of the wound.
Restoration at home
A special quick-drying adhesive used for nail restoration will connect the 2 broken parts of the plate for a period of 2 to 4 days.
Progress of the procedure:
- Rinse your hands well under running water and dry.
- A hand with a damaged nail should be placed in a warm bath to prevent premature keratinization of broken off particles.
- If the plate is not completely broken, this procedure can be skipped.
- Apply glue to the broken area, placing the broken fragment on top.
- The particles of the nail plate are pressed tightly against each other for greater tenacity.
- The glued fracture site is treated with an adhesive composition 2 more times.
- The restored nail is sanded with a buff and coated with clear varnish.
You cannot use regular superglue (such as “Moment”) for the procedure due to the risk of injuring the living parts of the nail plate and skin.
You can only remove minor damage yourself. A thorough repair of the plate, including sealing with wax, restoring with biogel or supplying a long-term patch, should be entrusted to a manicurist.
Such a restoration will last about 7 days, but will require constant wearing of gloves when carrying out any household work due to the danger of the cosmetic being corroded by acetone or household chemicals. Frequent fractures of the nail plate indicate a lack of vitamins and minerals in the body.
Helps prevent brittleness:
- Proper nail care, with constant application of nourishing and moisturizing creams to your hands.
- Compliance with the drinking regime, which consists of drinking at least 1.5-2 liters of water daily.
- Carry out any cleaning only with rubber gloves.
- Protecting the nail plate from any mechanical stress.
- Avoid using nail polish remover solutions containing acetone. It is mandatory to take breaks between gel nail art. Careful removal of hangnails.
- Filing nails with a file located strictly at a right angle.
- Eating plenty of vegetables and fruits.
- Taking vitamin-mineral complexes containing calcium.
At home, you can help strengthen your nails:
- baths with sea salt;
- lubricating nails with iodine solution;
- use of medicinal wax;
- hand baths with the addition of essential oils of fir, orange, lemon, tangerine.
Such a common nuisance for women as a broken nail can cause a lot of cosmetic and practical inconvenience. During the repair, the repair will allow, by masking the crack, to return the manicure to its original appearance and prevent further destruction of the nail plate.
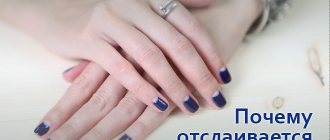
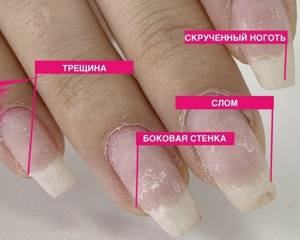
Why do nails under gel polish break on the side most often and generally burst?
Nails under gel polish often break on the side, but they also break in other areas for several reasons:
- The side zone is the most vulnerable. Here, the growth points are often sawn through due to the desire to narrow the wide plates. And when your nails touch hard objects, the side parts are more often hit.
- Another vulnerable spot is the stress zone, which starts from the natural “smile” line and extends to the lower third of the plates. The side parts enter into it, but a break can also form in the middle if material was saved during coating. After all, this area is subject to the most severe mechanical stress.
- Nails are weakened. This happens when their outer layer is cut off excessively when the shine is removed. And also when peeling off the peeling coating. Fragility occurs due to a deficiency of vitamins in the body and certain diseases. They are spoiled by cheap materials, violation of hygienic manicure techniques (moving a file back and forth, using metal tools).
You cannot tolerate it if you feel a burning sensation during polymerization; this also contributes to weakening of the nails.
- Material applied incorrectly. Its thickest layer should be in the stress zone, just to avoid breakages from the sides and at the root. And if more material ends up on the free edge, especially with a considerable length, injuries cannot be avoided.
- The material is not suitable for this type of nail, or the different products do not combine. If the plates are hard, the hard coating will encourage breakage. And a flexible base for soft nails will not make them strong either. In the latter case, it is worth using additional reinforcing materials.
- Some women do not know how to wear a manicure, ignoring the danger of mechanical damage to their nails. They do household chores and play around in the water without gloves. Or they scrape pots with their nails, tear off old wallpaper from the walls during repairs, etc. You need to understand that gel polish strengthens the plates more than regular varnish, but does not make them absolutely invulnerable.
What not to do when gel polish breaks
If the gel polish is broken and the nail is damaged, do not do the following:
- Walk for a long time with a cracked plate without doing anything. The damage will begin to grow further, deeper and may affect the bed, which is very painful.
- To eliminate the defect, use glue that is not intended for use on natural nails. Its composition is such that they will deteriorate, and the crack will also go further.
- If the nail is broken at the root, remove the coating with a remover or other liquid containing acetone until it hurts and bleeds. These remedies will make it even more painful and cause a burn, that is, they will cause additional damage.