Signs of nail injury
The sensations and visible changes in the nail after injury depend on the cause of the injury.
Each of these symptoms can appear on its own or in combination with others. The severity of pain depends on the severity of the injury.
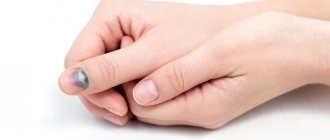
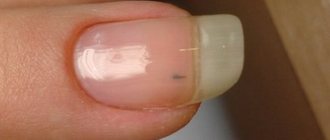
With minor injuries to the nail matrix, their consequences are not immediately noticeable, but appear after 1–2 months as the nail plate grows. This happens if the damage affects the growth area. The nail growing back after an injury may have white spots or dots and deformations in the form of transverse convex lines.
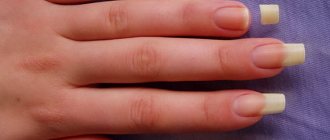
The extended nail is broken, what should I do?
Very often, manicurists do not use any additional products, but carry out repairs using gel, acrylic or acrylic. This method also works, but it is necessary to cut out the nail from the inside after the repair is completed. This is due to the fact that very often the edges of the cracks are torn, so in such places they form from the puff paste.
That is why the nail is cut out after repair, leaving only the artificial coating. However, this option is only possible if you use artificial nail polish and do not simply strengthen your nails using acrylic, gel or polygel.
An extended nail breaks, what to do:
First aid
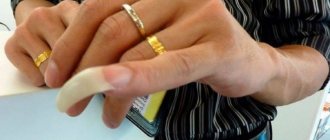
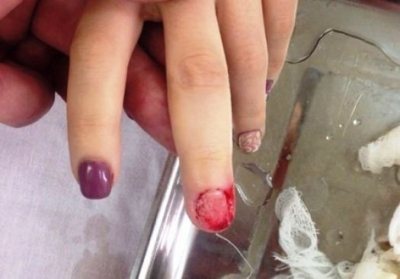
To provide first aid for a fingernail or toenail injury, first remove all jewelry from your hand and fingers. If swelling is present, lather your finger with soap to remove the rings.
Place your finger under running cold water to clean the wound of dirt and treat with an antiseptic. If bruised, apply an ice compress. This will reduce pain and stop bleeding under the nail caused by injury.
If there is open bleeding, use hydrogen peroxide solution or apply pressure with a clean cloth to stop it.
To reduce throbbing pain, hold your injured arm or leg above the level of your heart. If the pain is severe, take a pain reliever (Ibuprofen).
After cleaning the wound and stopping the bleeding, treat the wound with an antiseptic and bandage it with a sterile bandage.
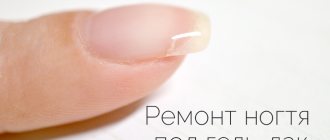
Crack under gel coating
In order to glue the nail under the gel polish, you need to remove the polish. You don’t have to remove all your fingers, limit yourself to just the broken nail, and leave the rest alone. For removal, use special means for removing Shellac or biogel, depending on the coating of the nail. If you can’t remove the gel polish, you can glue a patch over the old coating.
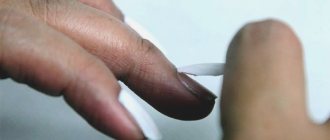
A “patch” is applied to the place where the nail is broken.
The technique of applying a patch to gel polish is the same as for a natural nail, and it is covered with a new varnish, which is dried under a UV lamp. For home repairs using gel technology, you need a UV lamp and gel polish.
If the crack is located along the edge of the nail, then it can be cut off and rebuilt with biogel . To do this, use a special form or foil, which is placed under the nail and used as a support for applying the biogel. After the biogel hardens under a UV lamp, the foil is carefully removed.
How to build up a broken nail with biogel or a rubber-based base coat, see the video instructions:
How to treat nails after injury?
Treatment depends on the type and severity of the damage. Before surgical treatment of the nail, local anesthesia is used so that the victim does not experience pain.
In case of a hematoma, a puncture is made in the nail plate to freely drain accumulated blood, eliminate throbbing pain and alleviate the condition.
The parts of the nail that are torn and peeled off after injury are removed; they do not grow back. If necessary, the skin around the nail and the nail bed are sutured, and a therapeutic protective bandage is applied.
For open wounds and a large area of damage, the doctor may prescribe antibiotic ointments.
If a bone is fractured, they are referred to a traumatologist to install a splint, fix the fragments with wire or other methods.
After treatment, you must strictly follow all of its recommendations at home, take prescribed medications and come for follow-up examinations on the appointed days.
Complete recovery of a nail after an injury takes from 2 to 6 months until a new nail grows.
With correct and timely assistance, the prognosis for treating nail injuries is generally good. The most common complication is deformation of the growing nail plate. But over time it goes away. Failure to follow proper care instructions can lead to onychomycosis or bacterial infection due to pathogenic fungi or bacteria entering the skin. With severe damage, there are cases when the nail does not grow after the injury.
To keep your nails intact and healthy, be careful and follow safety rules. Keep them trimmed short so they can't get caught on anything.
If you cannot avoid trouble, seek help immediately to reduce the risk of complications.
At the Eva Korneeva Podology Center, you can quickly get help with varying degrees of severity of injuries to your fingernails or toenails. And also learn how to grow your nails faster or temporarily disguise an existing cosmetic defect.
Source
First aid: how to treat, what to apply?
The following describes what you need to do first if you tear off a nail from the root or partially on an arm or leg, how to treat the wound, what to apply and what to smear. First of all, don't panic.
Assess the extent of damage.
Do not try to press the nail or tear it off all the way , as you risk damaging the soft tissue.
Cleansing
First, stop the bleeding:
Disinfection
Now let's move on to the stage of tissue disinfection:
If you have completely torn off a nail plate, focus your efforts on ensuring healthy growth of new tissue. Even if the nail is only partially separated from the nail bed, it will not return to its original state, but will grow back from the cuticle.
Do I need to bandage?
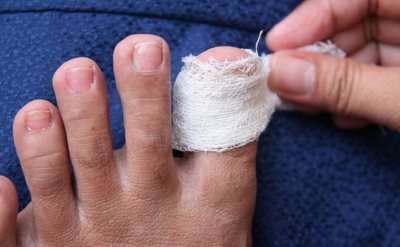
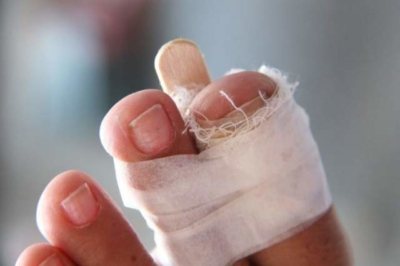
In order for the injured nail bed to heal faster, you need to fix the medicinal ointment on it. This can be done with a bandage, but if the toenail is damaged, it is better to use a sterile bandage wrapped around the toe.
This way you can create a kind of air cushion that protects the damaged area from excessive friction from the shoes. In addition, it comes off quite easily from the skin, which makes subsequent care easier.
Home remedies for treatment and recovery
Below we list several folk recipes and techniques that can help speed up the recovery of a torn nail.
Bath with laundry soap
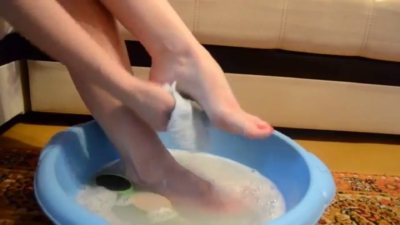
Laundry soap has powerful bactericidal properties and can soften rough tissue.
In case of a nail injury, a warm bath based on it will come in handy: Repeat twice a day every day until the wound is completely healed.
Compress with Rivanol
As an addition to laundry soap or instead of it, you can use lotions from the universal pharmaceutical skin care product “Rivanol”. You can soak a gauze compress or a cotton swab with it to bandage it overnight.
"Rivanol" has powerful bactericidal properties : its components stop the synthesis of polypeptides.
Regular pruning
If the nail has been torn off obliquely or lengthwise, periodically trim it at the root to straighten the growth line.
It is noteworthy that nails grow fastest during hormonal changes. These include:
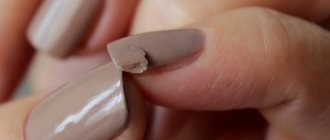
Broke on the side
A nail that is broken on the side is repaired by applying fabric or paper strips.
- The broken edge is filed and disinfected.
- 2 strips are cut out of paper. One should be slightly larger than the break line, the other should coincide with the main length of the nail.
- A smaller strip is coated with glue, applied to the nail and fixed.
- After hardening, the material is sanded and fixed with a large patch.
- Using a sharp toothpick, the plate is straightened, merging with the rest of the nail, glued, trimmed and polished.
- The plate is coated with a transparent decorative coating on top of the glue.
A plate injured at the root can only be restored in a salon setting.
In case of severe damage affecting the subungual tissue, it is necessary:
- Remove chips with small scissors and treat the wound with Chlorhexidine or Miramistin.
- Stop bleeding (if it occurs).
- Remove the protruding edges of the broken plate to allow further growth of the crack.
- Place your hand in cold water (to reduce pain).
- Twice a day, put your hand in a bath containing 100 ml of boiled water and 1.5 tsp. table (sea) salt. This procedure must be done within 4 days after the injury.
- Apply a gauze bandage with healing ointment to the damaged skin. This measure will help to avoid further injuries to the plate caused by mechanical stress.

A broken nail can only be restored in a salon after the subungual tissue has completely healed. For this procedure, a special protein biogel is used. After restoration, all household work should be done only with gloves to avoid dissolving the gel with chemical detergents.
What to do to speed up the healing process?
In case of a nail injury, doctors recommend:
On average, the nail grows back completely in six months to a year. You will have to be patient and make every effort to ensure that the new nail plate takes its “rightful” place.
A torn nail on the little finger or other finger is a fairly common situation, and there is no need to be alarmed. Timely treatment and consultation with a doctor will help you quickly solve the problem and return to your normal lifestyle without pain and discomfort.
Source
"First aid" for manicure
Even if the work is done well by a master, there are situations in life that are difficult to predict.
What should be done immediately if the artificial nail plate is damaged?
How to repair an extended nail
? If the situation is not critical, then you can cope at home. The wound surface must be disinfected; if there is bleeding, use hydrogen peroxide. After this, you should give your finger a little rest.
An extended nail has fallen off - how to glue it?
The type of material does not guarantee its durability in case of damage due to injuries or household carelessness. a broken nail extension at home
can be done using manicure accessories, clear polish and glue.
Useful tips for owners of artificial manicure:
The RichcoloR online store offers a large selection of high-quality coatings, tools and equipment.
The site presents products for creating manicures, restoring plates, sanitary sprays for hands and equipment. Nourishing products with caring and moisturizing ingredients can quickly restore beauty to your hands.
Taking care of yourself together with RichcoloR is simple, affordable and safe!
Source
How to properly glue and remove false nails
There is an opinion that false nails do not hold well, fall off almost immediately and for this reason are absolutely not practical to use. In this article I want to dispel this myth, as well as give some useful recommendations for caring for your own nails, which will help you restore your exhausted nail plates from the consequences of sadistic manipulations of extensions and corrections.
So, three basic rules for firmly and securely gluing anything to anything:
1. Thoroughly clean the contacting surfaces (remove any remaining paint, rust, grease, glue, etc.)
3. Press the glue-coated surfaces firmly against each other.
An hour later at the disco we discover that the thumbnail has gone off to do its own thing, leaving behind an unsightly speck of dried glue and a bit of disappointment. In another couple of hours, the second arm will also thin out. When we try to tear off the remaining “three poplars on the ivy” ourselves, we experience pain and anger at the disgusting Chinese who “are churning out this rubbish.”
And in order to deprive you of these unpleasant moments in the future, I will now tell you step by step how to properly glue false nails.
You can glue them in three different ways:
1. Temporary gluing (used for trying on the nails themselves, trying them on with certain outfits and wigs, for photo shoots and modeling shows, when nails need to be replaced at lightning speed several times within a short period of time, etc.)
2. Permanent adhesion with the possibility of reusable use and self-removal of nails without damaging them.
3. Gluing tightly to victory.
Is everything clear with the first method? Nails are glued with Velcro (so-called double-sided tape). These Velcro are usually present in each bag of false nails along with cheap disposable glue. Professionals, however, have their own Velcro, which is also more stable and sticky. Well, that's why they are professionals. Nails glued to tape stay straight and strong enough to take a couple of shots or try on a couple of dresses.
Well, I’ll skip the “foreplay” in the form of manicure cleaning and pushing back cuticles here, okay? Any woman knows about this. Let's get straight to the process. Lay your nails out in front of you and choose the appropriate sizes. Clean thoroughly. We completely degrease the surfaces of both our nail plates and the inside of false nails with acetone.
I explain why we need a cocked hat. Everything is very simple. In this tiny gap, which remains unglued, we can subsequently insert the tip of a sharp nail file or nail scissors and, with careful movements up and down, left and right, we will gradually loosen and crack our adhesive layer under the nail, having previously steamed the handles in hot soapy water.
And now a little about nail treatment.
Source
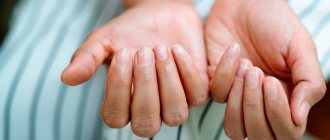
Why do nails break?
There are many reasons that can be divided into 2 groups: external and internal.
Let us list and discuss the external ones in more detail.
- One-time mechanical impact (strong blow of nails on a hard surface).
- Systematic mechanical influences (typing on a keyboard, opening packages, cans, bottles, tapping fingers on the table).
- The use of an aggressive remover, which leads to overdrying of the plate and, accordingly, fragility.
- Application of gel polish without preliminary strengthening.
- Incorrect filing technique.
- Interaction of hands with chemical reagents and household chemicals
- Hand contact with low and high temperatures.
As for the internal causes of failure, they are as follows:
- lack of vitamins,
- dehydration of the body,
- hormonal imbalance.
“One evening” method
Regular tape is exactly what you can use to seal your nails at home.
For repairs, you will need a small strip of tape of the required size; its length should be slightly larger than the surface of the plate itself, this will make it easier to attach it. Then, once the material is attached, the free edge can be cut off. You need to choose single-sided tape with low adhesive ability. Adhesive tapes for gift wrapping are also suitable for these purposes. Before the procedure, it is necessary to clarify that both parts of the broken nail are correctly joined. The tape or tape should be gently pressed against them and the tip of the nail of your other hand should be used to squeeze out any remaining air underneath. The tape should be smoothed in the direction of the nail break. If you do it in the other direction, then on the contrary you can do harm. Then you need to check how tightly the edges of the tape adhere to the surface.
If this repair method gives the desired effect, it is not recommended to consider it as final; to consolidate the effect, the correct solution would be to apply glue over the tape.
Effective methods
As in other cases, you must wash your hands before performing the procedure.
Then place the nail in water at the optimal temperature. If a piece of the nail breaks off completely and the girl wants to attach it back, then this will require placing it in warm water for a few minutes so that it becomes more flexible. Then apply a thin layer of glue to one side of the damaged nail using a toothpick. Superglue and any other glue that contains cyanoacrylate will be suitable for these purposes. You need to carry out the procedure carefully only with the help of a toothpick, since the fingers of one hand can stick to the nails of the other. Applying a piece of nail to the plate, you need to hold it for about a minute. Then the gluing area is polished and a protective agent is applied. There is another nail repair scheme, but its implementation is possible if you have tips. It consists of the following stages:
Thus, there are a large number of nail restoration methods. Many of them take only a few minutes, which can be an extremely important factor when you are short on time.
Source
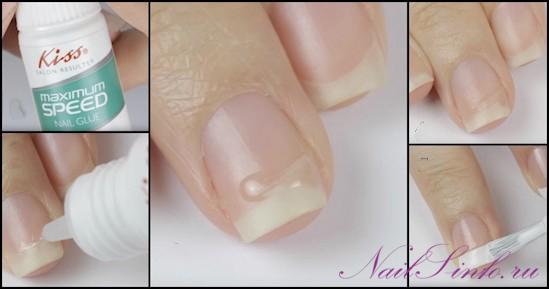
Superglue - the main assistant when breaking a nail?
The question of whether it is possible to seal a broken nail with superglue has a positive answer. Before you begin the procedure for restoring a broken nail, you must wash your hands thoroughly and make sure that there are no particles of oils or cream left on them. Then wipe them dry with a towel. This nail restoration method consists of several steps:
- It is necessary to cut off a small piece of material with which the nail will be sealed. The material itself can be taken either from a nail restoration kit, which is sold in cosmetic stores, or from a tea bag. In the first case, you will need a strip of fabric of such a size that you can wrap it around the entire plate, and fix the edges of the material under it. In the second case, you should use a strip of material from a regular tea bag, which is an excellent alternative to store-bought materials. If both are missing, you can use a coffee filter. The main criterion in the selection of material is its size; it is necessary that it covers absolutely the entire plate.
- Then the material is glued directly to the nail using superglue. To do this, apply a small amount of superglue to the plate. Using the tip of the applicator, carefully spread the glue over it. Then, using tweezers, you need to place the pre-cut material on top of the glue.
- If the nail restoration is carried out using a purchased repair kit, then you can use the included glue. It must be applied with a brush, also included in this set. It is important to monitor the material; folds should not form on it.
- In order to remove excess part of the prepared fabric, you can use nail scissors or regular scissors.
- If the material does not stick, then you should add one drop of glue on top of it.
- In order for the surface to be as smooth and even as possible, it is necessary to use a nail file to make the plate even and polish it. It is advisable to do this using a special polishing file and only after the glue has completely dried. The movements of the nail file should be unidirectional.
- Then the top coat is applied. A regular nail strengthener is also suitable for this stage; it will serve as additional protection for the surface.
- After 6 hours, you can already apply it to polishes, gel polishes and other products.