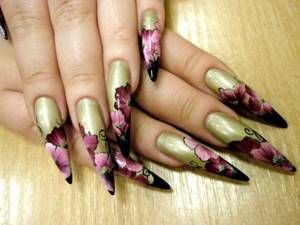
At any time of the year, every woman wants to smell like a flower of paradise. Even if there is bad weather outside, you can decorate your life, and at the same time your appearance, with a manicure with a floral print. How to make a greenhouse on your nails with taste - we will tell you in detail in this article.
Fashion does not stand still, it is constantly changing, and we change with it. abstract nail art was in trend , now women increasingly prefer beautiful designs of flowers and oriental patterns.
The technique of making such drawings has reached its perfection, and it seems that real flowers of incredible beauty . A truly elegant summer manicure will add femininity and mystery to your look. And it certainly won’t go unnoticed!
How to draw a flower on nails for beginners?
In order for a beautiful flower to bloom on your nails, you don’t have to go to the salon . You can make this beauty at home yourself. Even a beginner can handle this job. It will take a little patience and diligence, but believe me, the result is worth it!
It’s very easy to create a whole greenhouse on your nails
You will need regular nail polish and a toothpick. The process includes several stages. First, prepare your nails thoroughly. Remove the polish from your nails, clean them well and file them. After this, use a base coat.
When the coating is dry, you can begin to apply the design. Dip the tip of a toothpick into your chosen polish and place a dot on your nail. This way you will mark the middle of the future flower . Then, also using a toothpick, apply several circles or ovals around this point. A simple flower is ready.
You can paint several colors on one nail this way. If you want to add a stem, you will have to work a little more. Draw a thin curved line from the flower with varnish using a toothpick and add the petals to the stem. Now let the varnish dry well and you can apply a layer of fixing varnish.
Nail preparation
Before applying gel polish, it is necessary to properly prepare the nail plates:
- Remove old nail polish using special products.
- Use a file to give your nails the desired shape.
- Use tongs to remove hangnails and push back the cuticle.
- Level the surface of the nail plate with a buffer until matte.
- Treat with anti-silicone to remove remaining nail dust, dirt and grease.
- Use a dehydrator to get rid of excess moisture in the nail.
- Apply an acid-free bonder for better adhesion of the gel polish to the nail.
- Apply a primer (base coat) to prevent the color pigment from penetrating into the nail and for better adhesion.
- Dry in a UV lamp for about 10 seconds. After drying, the base will acquire a sticky structure that must be smoothed out with a dry brush.
- Apply all coatings in as thin a layer as possible, spacing 0.3 cm from the cuticle.
Nail color schemes
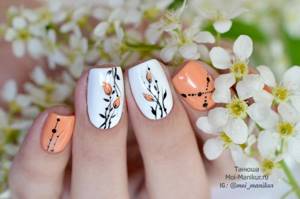
Among the most popular floral prints are poppies, tulips, sakura , etc. Here are some examples of how to depict these flowers on your nails.
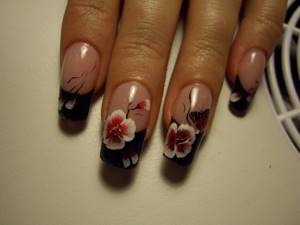
Sakura:
- Lines of twigs are applied to the jacket with black varnish.
- Using delicate shades we draw several buds and open flowers.
- Place a black dot in the middle of each flower.
- Apply fixing varnish.
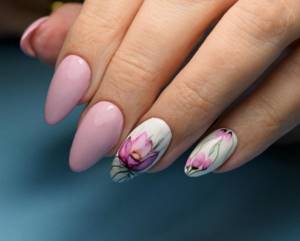
Tulips:
- From the middle of the nail plate we draw three wide lines - these will be the tulip petals.
- Between these lines we draw small protruding teeth.
- We outline the petals with a black outline, add vein lines and green leaves.
- Apply fixing varnish.
Before drawing on your nails, it is better to practice on tips or paper.
If you are confident in your abilities, then you can safely draw a picture - nail polish remover and a cotton swab will help eliminate all inaccuracies.
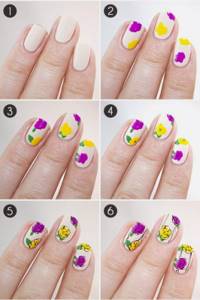
We offer several simple floral print patterns:
Simple floral pattern
Multicolored Chinese flowers on nails

Round buds on nails
Stained glass flowers
Stained glass nail design
- We start drawing with a black outline: first the flowers, then we add the leaves, and then the lines. To make an imitation of stained glass, we break the picture into particles, drawing curves in different directions. Let's dry it.
- Now we begin to paint along the contours. First I fill the entire outline with one color, and then shade it with white. This also enhances the stained glass effect. Now you can send it to dry.
- When all the figures are painted over, cover the design with topcoat and dry it in a lamp.
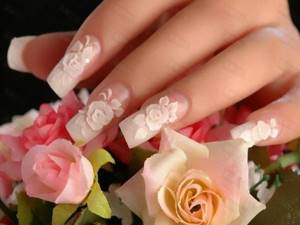
Acrylic flowers on nails, photo
Acrylic paints are very popular. They are odorless, easy to apply and amazing in their palette of colors. With their help you can depict magnificent voluminous flowers on your nails. It is not necessary to use professional manicure paints. You can use stationery paints. They are no different in structure.
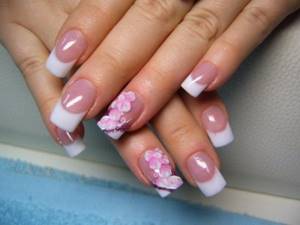
Volumetric acrylic flowers combined with French manicure
To get a professional result, you must follow certain recommendations:
- Prepare the necessary materials: base, colored and clear varnish, acrylic paints, a piece of cardboard, water and thin brushes
- First of all, give your nails the desired shape. Then sand the surface of the nail with a nail file. This will allow the paints and varnish to go on smoother.
- Apply base coat . Let it dry thoroughly. Then you can apply the background polish and dry your nails again.
- Press acrylic paints of the required colors onto a piece of cardboard and start creating. If the paints are too thick, they can be thinned with water.
- Seal the design with clear varnish . This will make the manicure more durable.
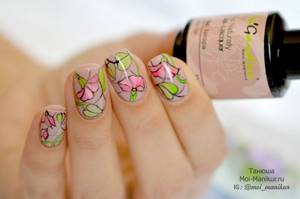
Watercolor drawings
Watercolor images seem to be made with ordinary water-based paints, they look so delicate and airy. But more often they use gel polishes mixed with top coat or special water-soluble gels. You can prepare a homemade remedy on a palette. Sometimes it is more convenient to apply a design with gel polishes, and then shade the lines with a brush dipped in topcoat.
The flower is done like this:
- Using 2-3 gel polishes of similar shades, several wide wavy lines are drawn from one point - petals.
- They are shaded with a top coat so that the colors are almost blurred towards the edges.
- A bold dot of bright color is placed in the center of this blurry spot.
- Thin lines lead from it, dividing the petals.
- The coating needs to be dried.
- The dividing lines between the petals are also drawn with thin white lines and polymerized.
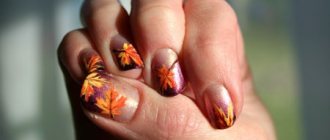
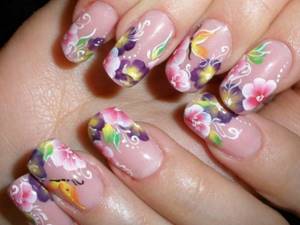
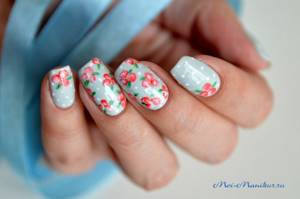
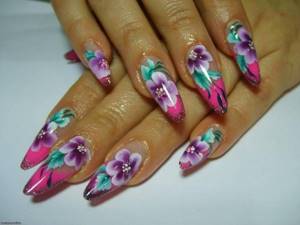
Summer flowers on nails
What kind of colors can you find in manicure? The design directly depends on the woman’s character, her style preferences and even the season . Summer flowers will look great on the nails of both young beauties and older ladies. The choice is huge - daisies, lilies, pansies, cornflowers , etc.
Summer nail designs can be in the same color scheme or combine bright summer colors
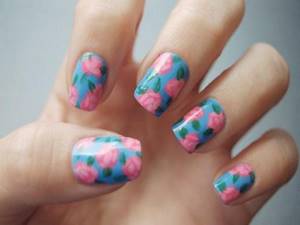
Roses will decorate the nails of romantic people , peonies will add charisma, and bright poppies will suit purposeful women who are not afraid to experiment.
It’s very easy to create a sunny summer mood for yourself. Decorate your manicure with light floral art and feel the beauty of summer . Cute daisies, delicate violets, passionate roses or bright poppies - it doesn’t matter what you choose.
Original floral print in manicure
They will highlight your individuality and create a light summer mood. The main thing to remember is that there are no boundaries in floral design!
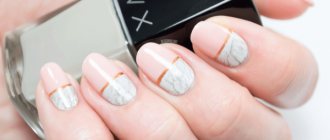
Irresistible minimalism
Modern design, made in a floral style, literally represents more than just flowers. The world of floristry is very multifaceted and images of all kinds of twigs, leaves, blades of grass and buds are very relevant this season. For fashionistas who prefer simple and delicate notes in a stylish look, you should pay attention to the exquisite and fascinating offers of gel polish manicure, made in the style of minimalism. Neat branches or single buds beautifully accent several fingers, and the finest weaves elegantly act as a frame on the nail plate. The drawings can be bright and colorful or done in monochrome, as you prefer.
Chinese flowers on nails
Chinese painting was known many thousands of years ago. Gradually, it smoothly migrated from paper to nails. Volumetric flowers and incredibly beautiful patterns now adorn the fingers of beautiful ladies. This painting is not as complicated as it seems.
Chinese flowers on nails
Chinese flowers on square nails

Option for floral manicure using Chinese technique
Any detail of a drawing , be it a flower or an ornament, involves drawing in one stroke. But the technique of such strokes can be varied:
- Smooth surface - the brush is not lifted from the surface, the stroke should be even
- Pen technique - moving the brush intermittently from bottom to top
- Wave - brush stroke without lifting with twisting
- Openwork - the brush moves from top to bottom and comes off sharply, resulting in a stroke with an uneven edge
- Aqua - a clear varnish is used to give the detail a three-dimensional look
If you want to apply a simple flower using the Chinese technique, then you only need to use one technique . A more complex and voluminous flower will require the use of several techniques.
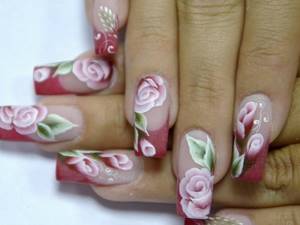
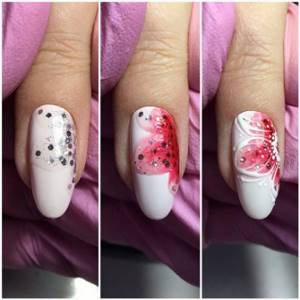
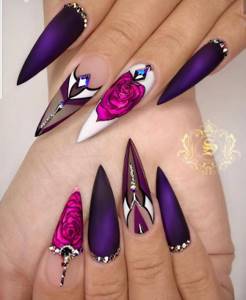
Delicate roses
Flowers with gel polish
- We start the drawing with rosebuds. For this I used the Roubloff Chinese Painting Brush. It is flat and allows you to draw red from the palette on one side and white on the other. The rose is drawn as a regular spiral from the center in a circle, but thanks to the mixing of colors, such a beautiful naturalistic effect is obtained. We make 3 flowers side by side so that they form mini bouquets. There are 2 roses peeking out at the edges of the nail. We send it to dry in the lamp.
- Next, add green leaves to the roses. For this I used a thin brush and green gel polish. I drew 2 leaves for each trio of roses. Dry it in a lamp.
- Next, it would be nice to shade the flowers too. For this you can use either a darker green or a lighter one. If there are no such colors separately, then you can dilute the original one a little with black or white gel polish on the palette. Having added a highlight, we send it to dry.
- To complete the design, we place white dots diagonally between the roses, which together forms a beautiful pattern, similar to a slider design. Dry it in a lamp.
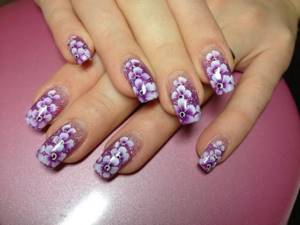
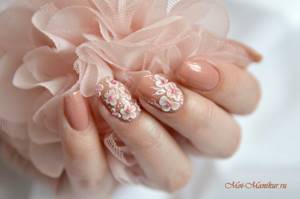
Volumetric flowers on nails
Flowers made using the 3D technique look original on nails . To create them, a soft pliable mass is used. It is made from a special gel and acrylic powder. In this case, the drawing is done with a brush, and it looks like a three-dimensional figure due to a special technique .
Volumetric roses on nails
You can decorate voluminous flowers with rhinestones or crystals. Then the drawing will acquire special originality. 3D patterns are best applied to long nails. This way the drawing will look more advantageous.
Stained glass patterns with gel polish: how to make a three-dimensional drawing
Gel polish patterns in the form of a three-dimensional pattern are made not only by modeling, but also by one flower bed:
- First, the contours of the petals, stems, leaves and veins on them are made in black.
- The hand is placed in the lamp.
- The details inside the contours are painted with colored gel polishes.
- Some areas of the petals and leaves are painted white to enhance the stained glass effect.
- Another drying is needed.
- All that remains is to use the finishing coat and cure.
The three-dimensional effect of the image is achieved by highlighting some of its details. To make the transitions more natural, white can be mixed on the palette with the top coat.
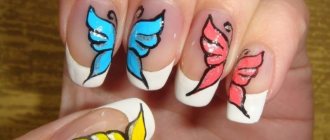
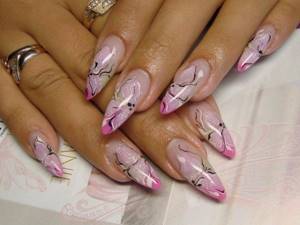
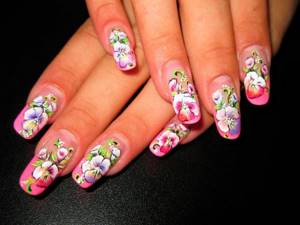
French nail design with flowers
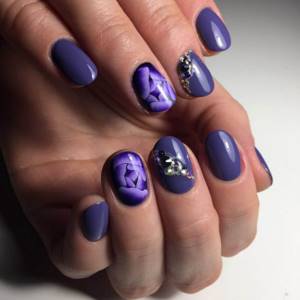
Discreet and elegant French manicure always remains in trend. But now in nail art it is common to combine several techniques. Therefore, more and more often you can see marigolds with French and beautiful floral prints . Doing this manicure at home is quite simple. Let's look at one example of a French manicure with purple flowers .
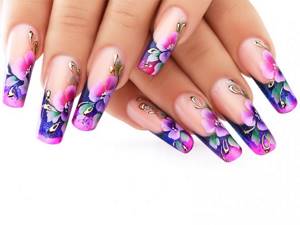
French with flowers
To do this you will need a base varnish, a wide brush, varnish of several shades, glitter and a fixer.
The sequence of creating a manicure is as follows:
- Apply base to your nails. Next, the tip of the nail must be painted with purple varnish and dried. Apply another coat of purple polish to the tip of your nail and sprinkle with glitter
- Now you can start drawing the flower . Using several shades of varnish, paint the petals.
- Trace the outlines and attach a few rhinestones or sparkles. Apply topcoat
As you can see, there is nothing complicated about this technique. Even a beginner can handle this. An original French manicure with magnificent flowers will decorate your nails and attract attention.
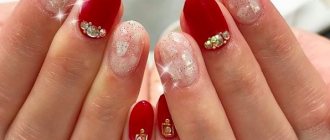
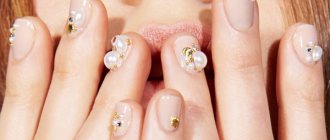
Flower with rhinestones on the ring finger
To make floral nail art look more elegant and fabulous, you can decorate it with rhinestones.
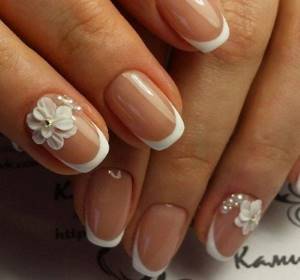
For a more casual and discreet option, a flower decorated with rhinestones should be placed only on the ring fingers.
Necessary:
- Basic top coat and several gel polishes (mint for the main tone, yellow and black for the flower).
- Brushes for drawing details.
- Rhinestones.
Step-by-step instruction:
- Paint your nails with mint-colored gel polish and dry.
- On the ring finger, use a brush to draw a flower in yellow.
- Use black varnish to paint the petals and core on the flower and dry it in a lamp.
- Place a yellow rhinestone in the core of the flower.
- Secure with top coat.
Manicure with flowers for long nails
The main rule for long nails is don’t overdo it. Long marigolds provide a wide horizon for imagination and experimentation. However, do not lose your sense of proportion, otherwise a messy and overly intricate manicure can ruin the impression. Therefore, when applying a floral print on your nails, do not forget about simple rules:
- Do not apply the pattern to the entire nail plate so that the manicure does not catch your eye.
Manicure with flowers on long nails
- You can turn to a master and create a real masterpiece on your nails - a drawing. The individual elements on each nail will merge into one design
- On long nails, sculpting looks especially attractive. But on all fingers, this technique will look good at special events. But for everyday manicure, sculpting on one or two fingers is suitable.
Floral print on long nails
Manicure option with flowers
The choice of palette and types of colors depends on individual wishes. Any floral prints will look great on nails of sufficient length.
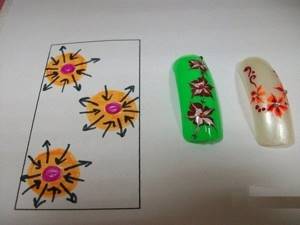
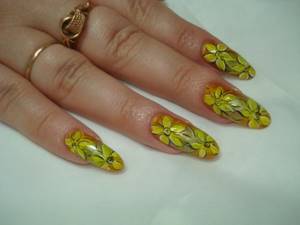
Dandelions
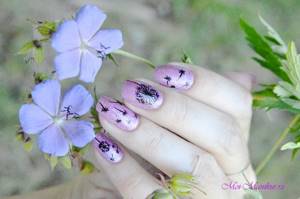
Design “Dandelions” with acrylic paint
- I made the drawing here with acrylic paint, but you can also use black gel paint. You will also need the thinnest nail design brush that you have in your arsenal.
- You need to start with a large flower - a stem or bud, and then supplement the composition with flying particles of the flower. It’s difficult to explain the drawing process in more detail - watch the video.
- After the acrylic paint has dried, apply a final thin layer of topcoat and polymerize it in a lamp for the time required according to the instructions.
Manicure with flowers for short nails
A well-chosen ornament will hide imperfections on the hands and emphasize their advantages. Floral patterns also look interesting on short nails. However, you should listen to a few tips before applying flowers to your nails:
- It is better to place the flowers closer to the free edge of the nail, this will help visually lengthen your fingers
- To make the nail plate appear narrower, several dark accents should prevail in the design.
Short nails can also be decorated with flowers
- When applying a floral pattern to a colored base, leave one millimeter on the sides of the nail unpainted.
- For short square-shaped nails, clean lines are suitable. Smooth and blurred lines will look great on other shapes
Remember that the manicure should not be dissonant with your image. For the rest, use your imagination and act!

Floral manicure for short nails
3D flowers with gel plasticine
3D flowers gel plasticine
- So, you have covered your nails with colored gel polish and applied a top coat, removing the sticky layer from it if there is any. Next, take a very small drop of gel plasticine and roll it into a ball. We transfer this ball to the required place on the nail and press it slightly to the surface, making it flat. We do the same with the remaining four petals of the flower, placing the balls in a circle.
- Take a brush and soak it in liquid to remove the sticky layer. We use it to open our flat balls into petals, pressing with a brush from the middle of the flower to the edge of the petal. Let's dry it.
- Next, I wanted to decorate the flowers, giving them a tint color. For this I used the same color of gel polish as for the background so that the colors would complement the design nicely and not stand out too much from it. Colored gel polish is not applied completely to the petals with a thin design brush, but only closer to the core of the flower, shaded as it opens.
- To finish, I added some decorative stitches in the shape of petals, swirls and dots using white gel paint.
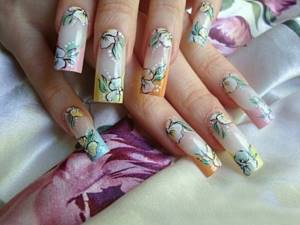
Flowers on extended nails, photo
To make the floral print on your extended nails look neat and elegant, follow these simple rules:
- It is better to apply a floral design, in which there are many small details, additional lines, not on all nails . It will be enough to draw on one or two fingers on your hand
- To make the manicure on extended nails look more rich, be sure to add green . These can be leaves, stems or buds
Flowers on extended nails
- Think in advance where the flower arrangement will be located. It should be combined with the length and shape of the nails, background varnish
- A large flower located at the base of the nail plate, surrounded by smaller flowers
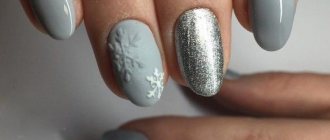
When creating a floral manicure, don't forget about the season. In spring , lilacs, tulips or daffodils may bloom on your nails. In summer it is better to give preference to summer flowers: roses, peonies, forget-me-nots. In winter, you can transfer carnation flowers to your nails, and in the fall, please your nails with asters or dahlias.
Long nail extensions decorated with floral print
Experiment and be beautiful. And original ideas will be suggested to you by nature itself and your imagination. Don’t be afraid to look bold and unconventional , because this can have a bright twist that attracts attention and emphasizes your uniqueness.
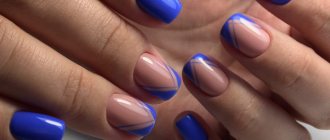
Flowers in thin lines
Subtle flowers on nails
Tools and materials:
- the thinnest brush (I use Roubloff 00)
- black gel paint or gel polish.
The drawing is done only with the tip of the brush. Drawing stems for flowers is even easier than lines in geometry, since you can use different brush pressures and make the stem thicker at the base and very thin at the tip. Add flower buds to match the main color and outline them. And small leaves are generally drawn with one touch of the brush. At the end, we cover the design with a top coat, leveling the nail plate.
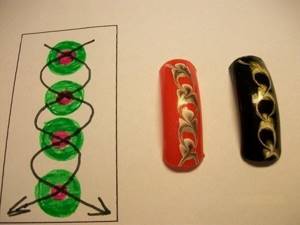
Draw flowers with a needle or toothpick
Above we have already described several schemes for drawing with a needle or toothpick. This technique is not at all that complicated and you can draw flowers on your nails using these tools without much difficulty. Just be prepared for the fact that you will need a firm hand and accuracy. Thin-diameter needles are used for drawing small elements; larger tools can be used for larger drawings.
You can draw with a needle or toothpick both on wet varnish and on already dried coating. In the first case, the patterns are applied before the varnish has time to dry. In the second, the design is depicted with varnish of a different color on a frozen base.
You can clearly see the drawing procedure in the video tutorial:
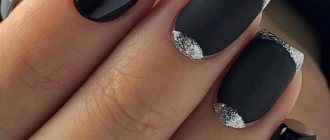
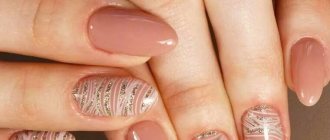
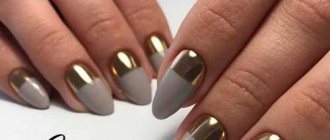
Matte manicure
Luxurious notes of floral nail design look great in a matte finish or a combination of matte and glossy finishes. The matte floral manicure proposed by designers this season can complement the image of any fashionista with magical and mysterious notes, because both bright and calm shades in the design look equally beautiful in this style. To complement the matte finish of gel polish, you can use rhinestones, glitter or foil. This technique will diversify the manicure with spectacular contrasting details and complement the nails with a chic shine.
Short marigolds
For short lengths, this season a whole series of interesting new floral manicures with gel polish have been proposed, because this length is very popular and in demand today. Fashion trends include all shades of pastel and nude color palettes, as well as cute small images and unobtrusive decor. Floral motifs act beautifully as an accent and go well with plain nails and many techniques in one manicure.