Hello, dear readers! A manicure with a weaving effect, the so-called “sweater”, looks fascinating and attractive. It seems that only an experienced craftsman can do it. But in fact, it is not so difficult to cope with this task at home - even for those who do not know how to draw or work with acrylic.
In this article we will talk in detail about how to make a knitted manicure with gel polish in various ways, what tools and materials are required for this, and we will give examples with design options.
Basic elements of the pattern
Drawing a sweater on your nails is not a difficult task even for beginners. But of course, first it’s better to practice a little on tips. A typical pattern with imitation weaving may consist of the following main fragments:
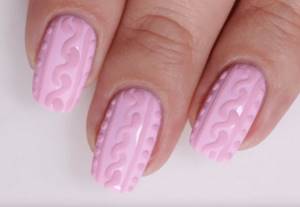
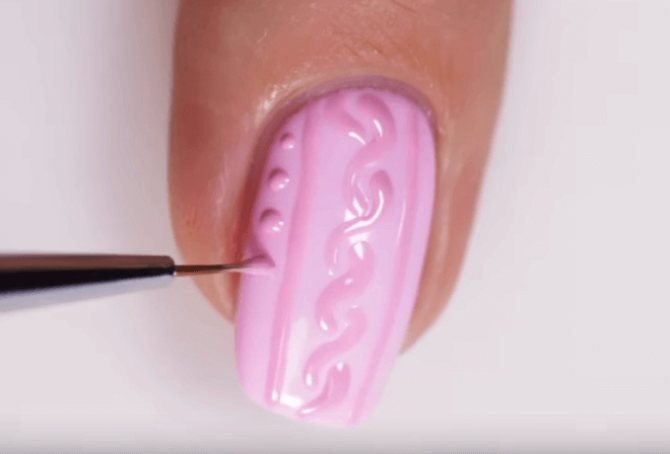
Pigtail. It can be drawn with just one element - a slightly curved stroke.
For work it is better to use a brush with short bristles. Most often it is drawn along the entire length of the nail in one or two rows.
Straight lines. They emphasize symmetry and give the entire design a finished look. Usually two or three vertical lines are drawn parallel to the braids or herringbones. It is better to do them with a brush with long bristles - this way they turn out more even and straight.
It is also desirable that their thickness be the same - otherwise the manicure will look sloppy.
Christmas tree. To draw a Christmas tree, it is enough to make two rows of inclined strokes directed in different directions. The main thing is that all strokes have the same angle of inclination. This pattern looks simple, but at the same time very cute.
Diamonds. They are also quite often used in this design, as they resemble patterns on sweaters.
Such patterns look best on long nails, since it is desirable that the vertical row on the nail plate consist of at least three diamonds. It is better not to use such elements on short nails, as they will visually make the nails even shorter.
Strokes and dots. They not only perfectly complement the design, but may well be its main fragments.
They can be applied either with a brush or with a dot.
The elements listed above are not difficult to draw. And at the same time, with their help you can create a myriad of design options such as “knitted nails”. Of course, you yourself can come up with something original, but in any case you need to start from something!
Important! When making patterns that imitate a knitted sweater, it is recommended to make the lines wide enough, but not to draw them too close to each other. Otherwise, during the process of sprinkling with powder, the pattern may be spoiled, since in some places it will simply merge into one blot.
What you need for work
In addition to the full set of materials and tools necessary for gel polish manicure (there is no point in listing them in this article), we will definitely need and may also find the following useful:
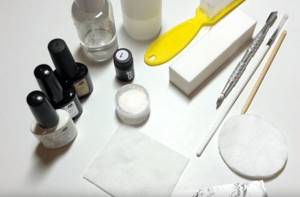
- gel paint or thick gel polish - for drawing patterns;
- two thin brushes - with short and long bristles;
- acrylic velvet sand or acrylic powder is the necessary material for this design;
- a pusher or any other similar tool that can be used to sprinkle acrylic powder on your nails - even a regular bank card will do;
- brush - for removing excess powder from nails;
- a piece of foil or a regular sheet of paper - so as not to waste excess material;
- lint-free cloth - it is recommended to always have it on hand.
Note: If you use an acrylic composition with glitter for a knitted manicure, take finely ground velvet sand with glitter—it’s better not to use coarse sand for braids.
Methods of execution
The weaving effect can be done with either gel polish or gel paint. And yet, many craftsmen recommend choosing gel paint for this design. Gel polish has a more liquid consistency, so it can spread a little when drawing patterns or adding powder and spoil our manicure.
Acrylic paint is unlikely to be suitable in this case, since it is difficult to give sufficient volume to the weaving effect. If you want your manicure to please you longer, you shouldn’t use regular varnish either - such a coating is not durable.
In this article we will look step by step at three ways to perform a knitted manicure - the generally accepted and most common (let's call it classic), as well as two interesting alternative methods.
Classical
So, let's start creating our knitted manicure.
- If necessary, we remove the old coating and carry out all preliminary hygiene procedures.
- We give the nails a neat shape with a nail file.
- It is advisable to apply a cuticle softener and soak your fingers in warm water for about 5 minutes. Then we remove or push back the cuticle.
- Before applying the coating, be sure to file down the nails with a mildly abrasive buff—we just need to remove excess gloss from the surface.
- Then we degrease the nails with a dehydrator or other means you are familiar with. The primer may not be used.
- Apply a thin layer of base coat, making sure to seal the ends of the nails. Dry: in a UV lamp - 2 minutes; in an LED lamp - 30 sec.
- Apply the gel polish coating in two layers, drying each layer and not forgetting to seal the ends. If you are using a thick gel polish, one coat may be enough.
- Apply the finishing coat and dry.
- If you used a topcoat with a sticky layer, remove the stickiness from your nails with a lint-free cloth moistened with a special liquid.
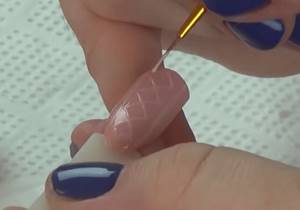
- Now let's proceed directly to creating the design. You can use gel polish or gel paint - whichever is more convenient for you. We put some material on the brush and draw an imitation of weaving on the nail - the so-called sweater. The patterns in this nail art are drawn with medium-thick lines.
- Sprinkle the design nails generously with velvet sand or acrylic powder. This can be done with a pusher, an inverted tip, or any other suitable tool. The main thing is not to skimp on the material. Shake off the excess by tapping your finger and pour in again. You need to sprinkle it several times to give the design more volume. It is advisable to perform this operation over a piece of foil or simply over a sheet of paper - so that later it will be convenient to collect excess material and pour it back into the jar.
- Dry in the lamp 2 times longer than usual.
- Remove excess glitter with a brush.
- Done - admire the result!
With the help of dots or vice versa
With this technique, we pour acrylic powder not onto the pattern, but onto a smooth surface. And then we draw the design by making grooves in the powder.
More details:
- After all preliminary operations, apply the background color with gel polish. It is better to choose a dense, thick color - with a translucent composition it will be difficult to achieve the desired effect.
- After polymerization in the lamp, cover the nail with topcoat.
- Dry and remove stickiness if necessary.
- Then we evenly apply a second layer of gel polish of the same color, not too thick, but not too thin - it’s better to choose something in between.
- Without drying, generously sprinkle the nail surface with acrylic powder. Shake off excess by tapping on your finger.
- Take a dots with a medium-sized ball and draw our pattern in acrylic powder. The easiest way to draw a Christmas tree with this method. The tool must be cleaned during the process. It is convenient to use a lint-free cloth soaked in cleanser for this.
- Dry it in the lamp twice as long as usual.
- We remove the remaining powder with a brush, and then process our design with a manicure grinder.
- After we have smoothed out all the excess, we remove the dust again with a brush. If there is a need for this, we repeat grinding and cleaning again until we achieve the desired result.
If everything is done correctly, the grooves will turn out glossy, and the rest of the surface of the nail will be matte.
Gel paste and shading
Instead of gel polish or gel paint, you can use a thicker and more “clumsy” gel paste. This material allows you to use a different, simpler technique for a sweater.
First you need to apply the gel paste to the nail in several uneven parallel vertical lines. In this case, the distance between them should be greater than the thickness of the lines themselves. And then we simply stroke them with a brush at an angle of about 45 degrees, as if cutting through each line. The result is a very cute and believable knitted pattern. More details in the video from the author of this design.
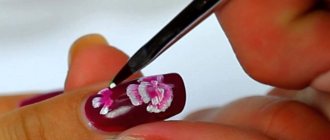
How to draw braids
The question of how to make a three-dimensional design on nails worries many novice nail technicians. There is nothing difficult in creating a convex ornament, so if you don’t succeed the first time, then it’s only a matter of time. In order for the client to get what he wants, it is necessary to perform simple steps: after processing and drying the main layer of gel polish, you need to draw the selected pattern with a thin brush, then dry it and apply several more layers on top. Each new layer should clearly follow the lines of the previous one.
- Cheese balls - recipes step by step with photos. How to make cheese balls for appetizers and deep-frying
- Medicine for worms for humans
- Right side hurts: causes
Pros and cons of knitted manicure
Advantages
- This type of nail art looks impressive and elegant - you want to take a closer look and touch it. This manicure is perfect for the fall-winter season, as it resembles a warm, cozy sweater.
- It’s not so difficult to do it yourself at home - you will create a truly magnificent design, while saving on the services of a master.
- The acrylic powder or velvet sand used in this technique makes the nails stronger, which means they will be less susceptible to mechanical damage.
Flaws
- The texture of a knitted manicure can cause some inconvenience, especially at first. You need to get used to such nails and not everyone can do it.
- Knitted patterns absorb dust well - no matter how hard you try to preserve them longer, after a few days the nails will still lose their original appearance a little. Of course, you can clean your nails with a brush and soapy water - there is no particular problem here. But if your “sweater” is not black, but made in light colors, and you accidentally stain your magnificent manicure with something difficult to wash off, it will be very difficult to erase the stains.
Tip: If you want to make a wicker design for a special day, it’s better not to risk it and decorate your nails immediately before it. And to keep your gorgeous manicure intact for longer, don’t forget to wear rubber gloves when cleaning or washing dishes.
Color spectrum
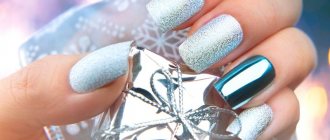
Deep matte blue manicure with white knitted design
of pastel colors are classic for creating a knitted manicure , but if you wish, you can choose absolutely any colors of varnish - it all depends only on your imagination and the chosen images with which the shades of the nails should be combined.
Of course, acidic colors are unlikely to look appropriate with cozy knitted patterns, but everything else - from the classic black and white combination to bright and bold shades - is “open” for experimentation.
Design selection
Nail art using the weaving effect is becoming more and more popular every year. This can probably be explained by its unusualness combined with the ease of execution - it is difficult for a person unfamiliar with the technique of creating a weaving effect to believe that such beauty is not at all difficult to make at home, without resorting to the services of a professional craftsman.
Knitted manicure remains trendy in the 2022 season and is unlikely to go out of fashion in the coming years.
The sweater looks great on both a glossy and matte top.
Most often, the backing and the woven pattern itself are made in the same color - this is how a knitted sweater is most accurately imitated.
But of course, it’s not at all necessary to do everything exactly like that - you can fantasize as you like! You can use different colors on different nails, and also combine the weave effect with other styles, for example, with a French manicure or moon manicure.
Knitted nails go perfectly with a gradient - color transitions in this design look unusual and interesting.
Note: When creating a gradient for a knitted manicure, it is not at all necessary to make it perfectly smooth - all flaws and stripes will be hidden and corrected when drawing the design.
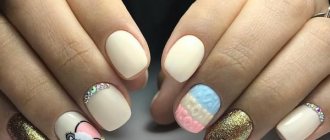
Knitted nails harmonize well with rhinestones.
For example, you can glue a rhinestone to each intersection of lines or vice versa to empty spaces in a braid or diamond.
And of course, a knitted design is an ideal manicure for the New Year.
It can be varied with snowflakes, images of deer, penguins and other winter symbols. A white knitted manicure with sparkles looks especially great - as if the snow on your nails sparkles in the bright sun.
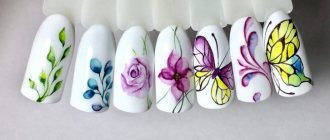
And a few more photos with different options for “braided” marigolds.
At home
It is quite possible to make such decor at home. First apply the base, then two layers of shellac or gel polish in the color you like. Place a matte top coat on top and start creating a design based on the finished sketch. Before putting your nails under the lamp, you need to sprinkle them with dust, and then, at the end of the process, use a special brush to get rid of excess material.
Designed nails look very delicate, and acrylic sand will help add an interesting accent. The pattern is applied in the form of loops, braids, strokes, and so on.
If we talk about winter motifs, then Scandinavian motifs will be an excellent addition to knitted decor. Drawings of deer, snowflakes and ornaments on the nail plate will give the pen an unforgettable look.
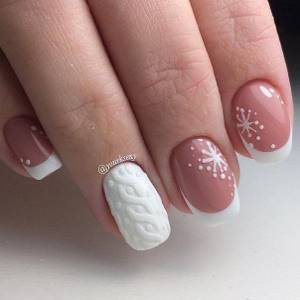
The snowflake design was created exclusively in a winter theme. You can choose sequins as an additional decoration.
An excellent solution for everyday use would be to combine a transparent jacket, a negative and, of course, snowflakes. You can “tie” your ring finger or little finger. The color scheme is preferably blue and white or pastel.
Classic knitted manicure
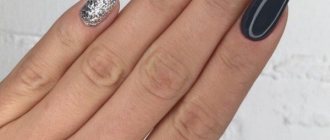
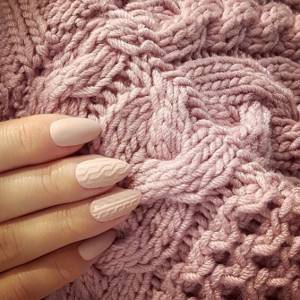
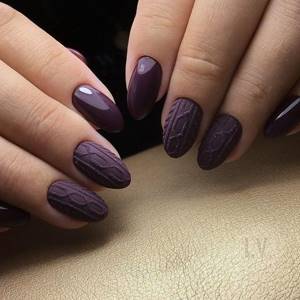
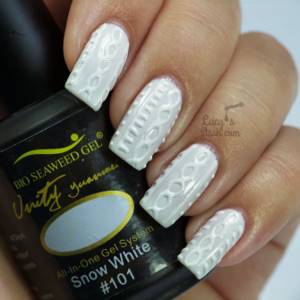
The classic manicure design in the form of knitting is most often done in pastel colors, close to the nude style. This manicure option looks very gentle and attractive. You can apply the design to one or more nails. For a classic look, choose shades of white, gray, beige or burgundy.
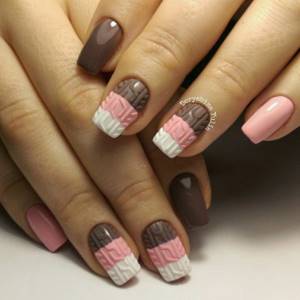
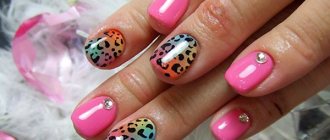
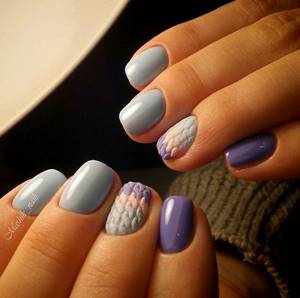
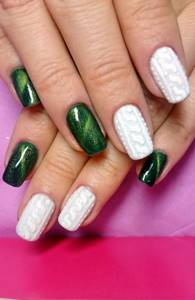
Multi-colored knitted manicure with gel polish
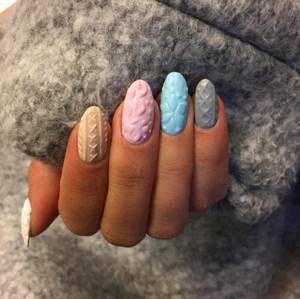
For girls who prefer brighter colors, there are no restrictions this year. You can easily combine different colors. Multi-colored knitted patterns look very attractive.
This year you can’t do without sparkles and laconic rhinestones. Combinations of milk and chocolate, red and white, peach and grey, blue and white gel polish in knitted nail art look ideal.
Knitted manicure with sand or powder
Knitted manicure with sand or powder is the most popular and sought-after manicure among the knitted style. This design option looks soft, natural and very gentle. To complete the design, craftsmen use classic snow-white powder, and colored sand for an unusual gradient look.
It is important to consider that the entire design depends on the powder. For example, with fine acrylic powder, the design will look more natural due to the fact that its particles settle on the paint, acquire its color, and the sand always remains white.
Knitted Scandinavian design
The knitted pattern goes well with snowflakes, deer and Scandinavian patterns. This style involves a gray-brown color scheme or a red and white combination of gel polishes. To draw a Scandinavian snowflake, it is best to first make marks in the form of dots, which should then be connected with a thin line and colored.
The photo below shows a design option for a Scandinavian snowflake. The knitted pattern alternates with snowflakes and is complemented by dots and other Scandinavian geometric patterns.
Sweater design with snowflakes
The “sweater” design is considered winter, so a pattern with openwork snowflakes sprinkled with dust or sparkles is more appropriate than ever in tandem. A classic manicure option for every day is a transparent French manicure with white snowflakes in negative space and a knitted ring finger design. This design is usually done in blue and white or pastel colors.
Knitted manicure with Teddy bears
Cute Teddy bears are another design option that is often found in combination with a knitted manicure. Experienced craftsmen can easily paint bears with gel polish or acrylic paints, but it will be difficult for beginners to paint such a small and complex design, so it is better to use stickers.
Now in specialized stores there are a lot of stickers and sliders with bears and other cartoon characters, which are also suitable in combination with knitted patterns.
New Year's knitted design
If you are planning to celebrate the New Year in a country house, a cozy knitted design is perfect for a New Year's manicure. Usually the design on the nails is complemented by snowflakes, Christmas trees, balls, music boxes and other New Year's accessories. Instead of acrylic sand, you can use a new product - loose powder, it will give the design a more festive look.
Knitted ombre design
The spectacular solution of a gradient transition in the horizontal or vertical direction continues to be popular. The option with a stretch of color and a smooth transition from one finger to another looks elegant - you just need to shade the central nails using only 2 colors.
Knitted style with original patterns
Knitted manicure with the addition of sequins, foil, film or glitter is very rare. The volumetric pattern itself is already considered a striking decorative element. But this has nothing to do with the drawings. After all, a stylish and sophisticated look on one finger will in no way interfere with the overall look of the manicure. Popular designs include funny stories, colorful spots, stone age or ethnic designs.
It is worth noting that knitted manicure with the addition of stripes is always at the peak of popularity. For lovers of the cutest and most modest patterns, multi-colored bows, ornaments, grammatical figures and flowers are an excellent option. You can combine motifs and patterns according to your desire and flight of fancy.
Knitted manicure with fluffy pile
Embossed and flat knitted patterns covered with fluffy pile on top are gaining enormous popularity. This option indicates modesty, restraint and at the same time the ability to emphasize elegance. Knitted patterns on nails also reflect the unusual and original taste of its owner.
Unique manicure in a winter “sweater” design
The sweater design is definitely considered winter, so it looks sophisticated and impressive with voluminous snowflakes sprinkled with glitter or dust. For everyday life, a transparent French manicure with elements of white snowflakes would be an excellent option. It is best to highlight the ring finger with a voluminous knitted pattern. This nail art is often done in pastel colors or blue and white.
Combination with other decorative elements
Knitted manicure will suit:
- French is made in any style. It can be classic or colorful;
- Lunar manicure. In addition to French, it is performed in several styles;
- "Cat's eye" A cover that can be either standalone or in perfect harmony with the “sweater”;
- Thematic design. Knitted manicure allows not only its independent presence, but also combination with various models.
How to complement a knitted nail design
The variety of patterns in knitted manicure is amazing. Elements can be used:
- patterns;
- weaving;
- points.
They are often made using the same gel as the base. So the drawing turns out to be highlighted only by the relief. You can emphasize the intricate lines of the pattern with a contrasting color, powder or rhinestones.