Classic options for winter manicure are snowflakes, white patterns on a blue background, imitating a frozen window, and elements of large knitting. But if you use your imagination, you can find more original and fun solutions. Why not design your nails with mittens? You may think that such a manicure will look too frivolous, but in fact it looks very stylish and interesting. That is why today we will tell you step by step how to draw a simple, but at the same time stylish image of mittens on your nails.

What is a knitted “sweater” manicure?
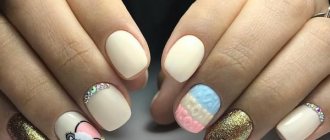
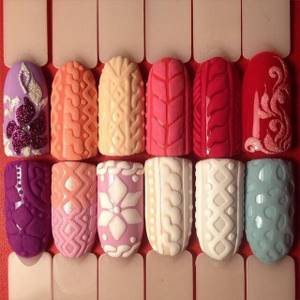
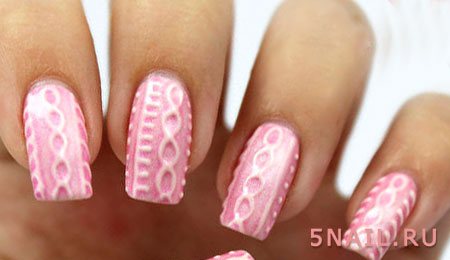
Knitted manicure, “sweater” or “braid” nail design are variations of the name of the same design, which becomes popular every winter. This design imitates knitted patterns, most often found on sweaters. As a rule, it is done in muted warm or pastel colors, so it looks cute and creates a mood of warmth and comfort.
The “sweater” pattern can be anything that only a master can execute
Color combination rules
The winter palette is usually represented by all sorts of shades of cold blue and white, characteristic of the landscape of this time of year. Therefore, the most “winter” design is created by various combinations of white and blue. Metallic colors – silver and gold – fit perfectly into the theme of the season.
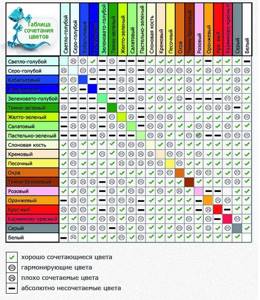
Blue varnish is most often used. It harmonizes well with bright blue, white, pink, silver, gold, and black. Deep blue varnish is also combined with these same colors, as well as yellow.
You can dilute the palette with juicy berries, green and emerald tones that are popular this season. Don't forget about the elegance and sobriety of pastel shades, which can be a wonderful backdrop for bright, cheerful mittens.
Important! When applying a white or beige coating, all minor imperfections and imperfections become visible.
Therefore, before using them, you need to get your nails in perfect shape - shape them, trim cuticles, polish the nail surface, remove burrs. The slightest errors will be evident.
Making a “sweater” design step by step
Here we will describe the implementation of the design on tips. When working with natural nails, you must first perform a manicure, prepare the nails for coating, and strengthen the nails or level them with a base.
To achieve this design, choose dense, well-pigmented or thick gel polishes. If you want to add shine, then choose the smallest sparkles, as large ones will break the boundaries of the design and ruin it.
1. Cover the nail with the selected colored gel polish in 1-2 layers until an even, dense color coating is obtained, polymerize in a lamp for 30 seconds.
2. Cover the color with a matte top coat and cure in a lamp for 60 seconds. If the matte top has residual stickiness, it must be removed.
To ensure that individual elements do not merge and the drawing looks neat, you can draw it in stages. First we draw the supporting and large elements, then we finish drawing the secondary ones.
3. Draw a knitted pattern with gel paint in the background color or with the same gel polish that was used to cover the entire nail. To do this, select a thin brush and try to paint with its very tip, without unnecessary pressure. We make sure that there is space between the parts. Sprinkle the painted part of the pattern with acrylic powder or a mixture of acrylic powder and glitter. We use a pusher or a clean tip as a spoon, scoop the powder from the jar and sprinkle the nail over the jar.

4. Let the powder absorb a little into the gel polish - wait 5-10 seconds - and send it to the lamp for polymerization for 60 seconds. Here it is important to double the drying time, since powder and glitter reduce the polymerization rate and increase the thickness of the layer.
5. After polymerization, carefully brush off excess powder and glitter from the surface. To do this, you can use a sweep brush or a fan brush. Let's draw the following elements.
6. Sprinkle them again and dry them. After drying, brush off the excess.

7. We finish drawing the pattern, sprinkle it again and send it to dry.

After drying, brush off excess powder and glitter as usual and dry for another 60 seconds. The “sweater” is ready!
There is no need to cover the design with a top coat. The top will destroy the velvety effect obtained with acrylic powder.
Any knitted design can be made this way. The thicker the material used to make the drawing, the less intermediate drying can be done, since the gel polish will not spread. If possible, try to match or mix gel paint in the same color or a little lighter.
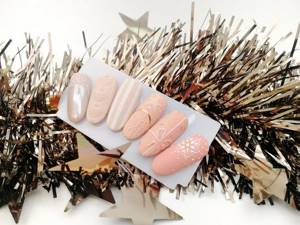
Knitted nail designs can be combined with other techniques, add stickers, apply only to part of the nail, or play on the difference between glossy and matte textures.
Knitted manicure with stickers
This option uses shiny metallic crescent-shaped stickers, but you can also use long stripes, individual shiny shapes, for example, a star or a heart, etc., drawing a “sweater” around them. The main thing is that the sticker fits harmoniously into such a delicate design.
- Cover the nail with colored gel polish in 1-2 layers. Dry each layer in a lamp for 30 seconds.
- We erase the residual stickiness and install a silicone sticker on the selected place, cover it with topcoat and dry it for 30 seconds. Then we cover everything except the sticker with a matte top, carefully go around it with a thin brush, and dry the top in a lamp for 60 seconds.
- Using the same gel polish, we draw a knitted pattern step by step, first the main elements, then the secondary ones. At each stage, sprinkle the drawing with acrylic powder and polymerize it in a lamp for 60 seconds. After drying, carefully brush off the powder at each stage.
- Draw a sweater-style pattern on the bottom of the nail, below the sticker.
- At the top, you can draw a similar velvet design, but with different elements, or install rhinestones, or leave it clean - whatever suits your taste.
Volumetric design knitted on nails with gel polish
This method of decorating fingers is suitable for those girls who do not like their nails to be rough, but want a smooth surface. How to draw a sweater without using acrylic and powder? Yes, it’s very easy, you only need gel polish binding:
- Cover the surface with topcoat and colored varnish.
- Do not remove the sticky layer.
- Apply a knitting pattern and dry in a lamp.
- Cover with top.
Any girl can do this knitted manicure at home. In this case, she will need a minimum of materials.
Knitted manicure with rubbing
A gentle and cozy “sweater” design can also be made bright and eye-catching by adding glitter to the background or part of it.
- Cover the nail with colored gel polish in 1-2 layers. Dry each layer in a lamp for 30 seconds.
- Apply top coat without l/s to the area into which we want to rub the product. We polymerize half the drying time, rub the desired rub into the hot top. Brush off excess rub and dry.
- Place a silicone sticker on the selected location, then cover the entire nail with topcoat and dry for 60 seconds. Then we cover with a matte top all the remaining space, except for the rub and sticker, carefully painting the border with a thin brush, and dry for 60 seconds.
- Using the same gel polish that was used to cover the entire nail, we draw a knitted pattern on the matte top above the sticker. Sprinkle the design with acrylic powder and glitter and polymerize it in a lamp for 60 seconds. After drying, brush off excess powder.
As you can see, knitted nail designs are a simple and quick way to add variety to your winter manicure. It does not require expensive materials and equipment and, if desired, can be combined with other decor.
Important: “sweater” nail design refers to “velvet” designs with sprinkles. This means that it has a slightly rough surface, which tends to absorb bright dyes and get dirty quite quickly. Therefore, if you have chosen a velvet design, then wear gloves when preparing food (with carrots, beets, potatoes, turmeric, etc.) and working with dyes. If after some time the design turns yellow, clean it with a toothbrush and toothpaste.
To support the knitted pattern, you can add snowflakes, stripes and bows, a cage, cute animal faces, etc. on adjacent nails.
Winter manicure 2019-2020 – the most beautiful photo ideas, trends and examples
Very often, we don’t even have time to notice how warm and sunny days are replaced by rain and greyness, followed by frost and snow. Along with the weather, your mood also changes, which is definitely worth improving in various ways, among which lovely girls know firsthand that there will be a beautiful nail design for the winter.
In order not to lose heart, it is better to get creative, coming up with new nail art ideas and bringing them to life either on your own or with the help of a professional nail artist.
Previously, in previous posts we got acquainted with fashionable manicure for spring, ideas for summer nail art, manicure for autumn, but now the turn has come to the new winter manicure 2019-2020, which will be no less exciting than its predecessors, we tell you this we promise.
Each season has its own specific motifs that we are ready to see on our nails in one or another seasonal nail design, and this also applies to winter manicure ideas, which are associated with a restrained design and dark shades of coatings.
But we hasten to reassure you that the new winter manicures for 2019-2020 will be so different that you will want to try them all at once. Among the new winter manicure solutions will be bright coating options, with glitter and decoration, as well as stylish winter nail design examples in light and dark palettes in a laconic design.
What innovations in winter manicure design 2019-2020 await fashionistas in the coming season? Modern winter nail art design will delight you with the richness of colors, variety of decor and many manicure techniques for the winter period.
Among the leading winter manicure techniques, photos of which are offered in our collection and trend rating, you can find the favorite French manicure, luxurious matte and ombre manicure, winter stamping nail design, brush strokes manicure, lunar nail design for the winter, as well as newfangled “unicorn tear” manicure and “spider web” nail design.
You can also pamper yourself with different options for winter knitted manicure, which is ideal with patterns, velvet powder or a matte finish on your nails in winter.
But nothing compares to fashionable winter nail art, which will involve a variety of thematic designs, patterns and prints. Everything related to winter - snowflakes, snowmen, frosty patterns, Santas and reindeers, Christmas trees and Christmas balls will be great ideas for painting nails in the winter season.

In addition to the usual Scandinavian motifs and winter motifs, in fashionable manicure winter 2019-2020 you can use simple hearts and stars, depict bears with scarves, playful bunnies and deer with antlers, which will create a special atmosphere of winter images.
You can achieve a sophisticated and romantic manicure in winter with cute floral and floral motifs. For business looks, you can choose a strict and discreet geometric manicure, which in winter will look very beautiful with sparkles.
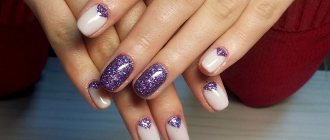
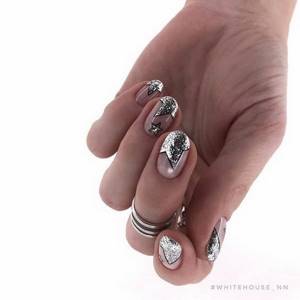
Decorative elements will play an important role in the trendy winter nail design. This can be glitter in various variations, rubbing, foil, Yuki flakes and other pigment products, sequins and kamifubuki, rhinestones and crystals.
Thanks to all these solutions that are presented in nail art today, you can come up with and bring into reality any of the desired types of manicure for the winter that you desire. Many fresh winter manicure ideas 2019-2020 for your inspiration are collected in the photo gallery.
Fashionable nails winter 2019-2020 – the latest trends, styles and images of winter manicure in new solutions and techniques in our photo rating

Are you looking for worthy examples of winter manicure for a holiday, New Year, corporate party, business winter nail design or winter manicure for every day? Our photo examples of fashionable winter manicure will undoubtedly help you decide on the choice for the design of your nails, and find fresh manicure ideas for the winter in the best options.
Winter manicure with white polish

The number one shade for winter is white, which will turn out to be a favorite among winter nail design options 2019-2020. In this case, it is not necessary to completely cover all the nails with white varnish - it is enough to highlight one or two fingers. An interesting winter manicure with a white coating and pearl rubbing, sequin and glitter decoration, as well as a combination of white varnish with a creamy-coffee palette.
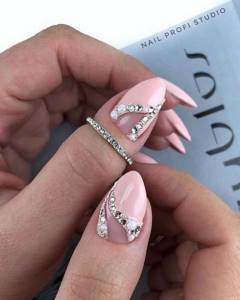
Winter manicure with Christmas balls and rhinestones
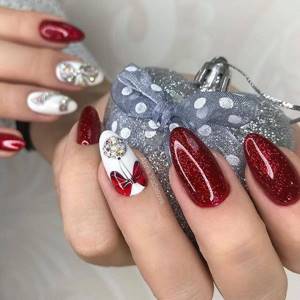
Among the trends in winter manicure 2019-2020 there will be designs made mostly from pebbles and sparkles, and only some design elements will be drawn with a brush. This style features a fashionable winter manicure with prints on the thumb or several nails at once in the form of Christmas tree balls or toys, which will be an ideal solution for a festive look for the New Year or Christmas.
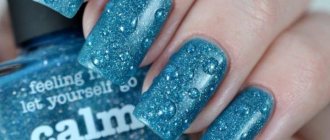
Winter manicure with rubbing

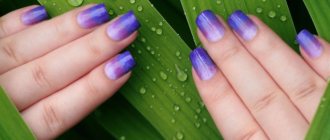
Fashionable images of winter manicure cannot do without sparkles and radiance, which the rub will give to your nails. Pearl tints or other color options will be great in a fashionable manicure design for the winter of 2019-2020. New will be a multi-colored winter manicure with rubbing, as well as a winter ombre manicure with pearl glitter.
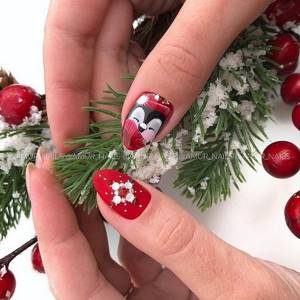
Winter nail design with Teddy bears

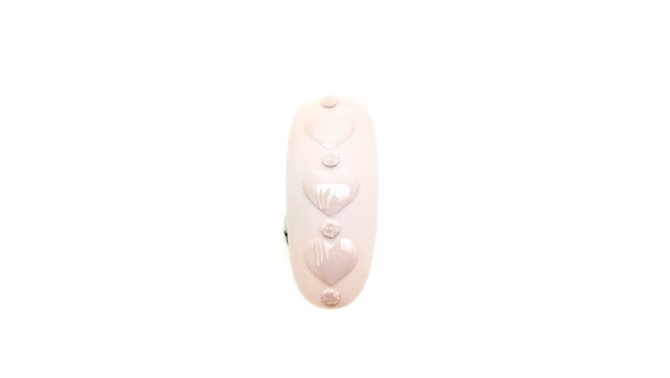
Adorable teddy bears have already become traditional “guests” on nails in the winter, lifting the spirits of everyone without exception. Masters create manicures with Teddy bears using glitter, flock and powder, adding volume and effectiveness to such prints. Stars, hearts, snowflakes and a knitted pattern on nails also look great in a winter nail design with Teddy bears.
Winter manicure with stars and sparkles
The masters offer to bring a stylish and fashionable winter manicure into reality using star designs. The latter can be done using black and white paints, with sparkles in the form of glitter, as well as with a velvet effect using flock. A manicure for the winter with foil stars, for example, kamifubuki, will also be spectacular and brilliant.
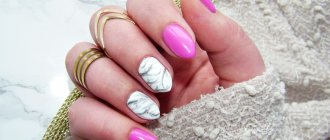
Marble winter manicure
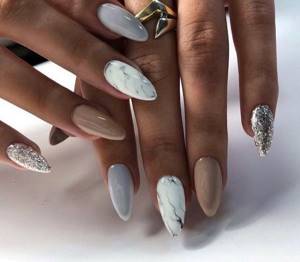
One of the most popular winter nail design techniques is still marble manicure, which looks stylish, unpretentious and interesting. Marble manicure for the winter is also great because it can be perfectly implemented in any look, both in the office and for every day, so in a festive outfit, marble winter nail design looks very worthy.
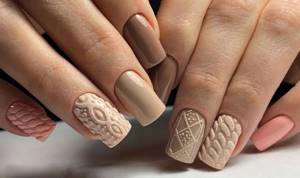
Knitted winter nail design

A voluminous winter manicure with a “knitted” pattern looks very winter-like and fits perfectly into any winter look. A similar design of nails in winter can be done as an accent on one finger, as demonstrated by examples of winter manicure with bears and Scandinavian patterns, or it can become an independent style for designing nails for the winter. Knitted patterns on nails can be made velvety and fluffy using flock and powder, which looks very impressive in a fashionable winter manicure.