Manicure with acrylic powder is the most favorite type of nail art among fashionistas in the winter season. And there is nothing surprising here, because the velvet design really looks very cozy, cute and attractive. And there are simply countless options for patterns that can be depicted on nails using acrylic powder. And we will talk about many of them here today. So, if you are also interested in this type of manicure, join our discussion today.
https://youtu.be/https://www.youtube.com/watch?v=cD1pXnrR_S0
_
What is acrylic powder and what are its features?
But, before plunging into all the delights of nail design with acrylic powder, let's find out where this unusual powder in the nail service came from. It will probably be interesting for many to know that this light, durable and porous polymer dust, which is now so actively used by manicurists, actually came to the nail industry from dentistry. And its original purpose was to restore tooth enamel. But especially advanced specialists were able to see something more in this powder, and now acrylic powder also serves our nails. And now the list of its main features includes the following points.
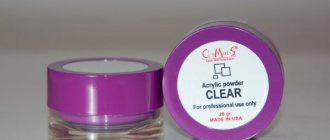
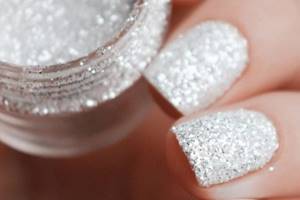
- Transparent acrylic powder strengthens nails well, protecting the plate from delamination.
- Also, using the same white or transparent powder, you can extend your nails.
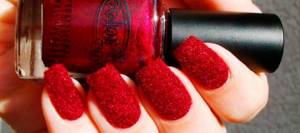
Acrylic powder to strengthen nails
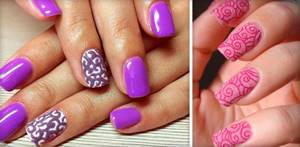
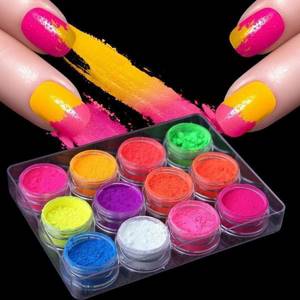
- But colored powder is most often used to create an unusual design. And for this reason it is mixed with other materials. This is necessary so that it can easily take any shape and harden quickly.
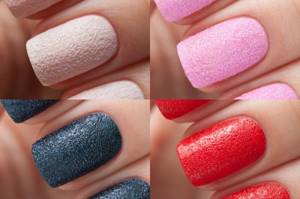
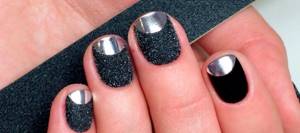
Colored acrylic powder for nail design
- Acrylic powder is very easy to use. The main thing is to do everything quickly so that the resulting substance does not harden before giving the desired shape.
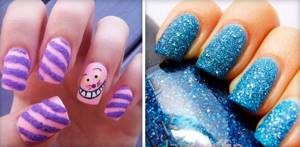
- In addition to transparent, white or colored, the powder can also be shiny or neon. Such diversity significantly increases the number of design types available to every fashionista.
Important! Work with acrylic powder should be done in a well-ventilated area, as this polymer has a very strong chemical odor. In addition, before starting work, your face must be protected with a mask. If these rules are not followed, then after a few hours of inhaling acrylic fumes, your health may deteriorate sharply.
Interesting : Manicure with flowers
Prices
Depending on the artist and the popularity of the salon, the price for strengthening nails with acrylic powder can range from 1000 to 1500 rubles. To save money and give strength to your nails at any convenient time, you can purchase special repair kits. The kit includes all the necessary materials that you can use at home. The cost of the set is 1100 rubles.
The price of one jar of acrylic powder weighing 21 grams varies between 350–450 rubles, the cost of a monomer is 900 rubles. Once you buy several colors of powder and monomer, you can strengthen and design your nails at home for a long time.
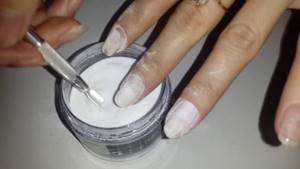
Manicure with acrylic powder at home
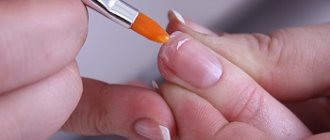
Is it possible to do a manicure with acrylic powder at home, and not in a salon? Of course yes, especially since there are simply a huge number of educational videos and photos on this topic on the Internet. But, as we said above, in order to create a successful voluminous decor on your nails, beginners will have to practice a fair amount. After all, powder mixed with liquid monomer (this is the name of the substance intended for diluting acrylic powder) subsequently takes the form of a soft plastic substance, which, however, quickly hardens.
Therefore, the drawing should be applied with confident and clear movements, which must be fine-tuned.
And in order to make the simplest manicure with acrylic powder at home, you will need to follow these steps.
- Put your nails in order: remove traces of the old coating, give them the desired shape, treat the cuticles, degrease the plate.
- Next, apply a thin layer of base polish to your nails. There is no need to dry it.
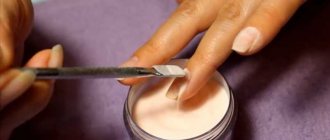
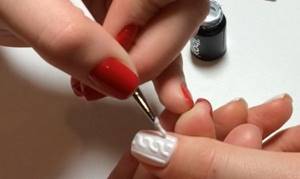
- Now open a jar of acrylic powder of the desired color and, using improvised means, such as a brush, sprinkle the powder onto the sticky surface of the nail. At the same time, it is better to hold your hand over the jar so that excess powder falls back into it.
- Dry the nails in a lamp and shake off excess dust.
Loading …
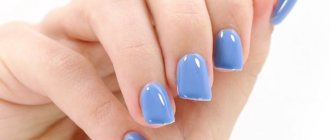
This way you will get a monochromatic bright velvet manicure in your favorite color. However, if you want to create a more interesting design, then use the following tips.
- Keep your nails in order as described above.
- Cover them with a base layer, which then needs to be dried in a UV or LED lamp.
- Next, start creating a manicure with acrylic powder and gel polish. And to do this, apply two, or preferably three layers of the selected gel polish to your nails, remembering to dry each of them.
- Now we move on to creating patterns and, using a thin brush, apply the desired design to the nails.
- Without letting the gel polish designs dry, sprinkle the sticky layer with acrylic powder. And then we dry our nails in a lamp.
Acrylic powder application technique
Important! Do not apply acrylic to nails infected with fungus or nails with a crack, as this can be very dangerous. After all, you risk getting either a complete separation of the plate, which can be very painful, or complete loss of your nails.
Interesting : Strengthening nails with acrylic powder
Gradient manicure
This fashion trend continues into 2022, so you can try making it at home. The procedure is simple, and the result exceeds all expectations.
- Your main tool is a foam sponge.
- Next, you need to select colors for the future gradient. Which do you prefer: bright or neutral?
- Apply them onto the sponge in stripes. The area of your design should be approximately equal to the area of your nail.
Gradient manicure technology
- The only thing left to do is to use a needle to create a smooth transition between colors and alternately apply the sponge to the nails so that the design is imprinted.
- After the gradient has dried, seal the result with clear varnish.
What is powder used for?
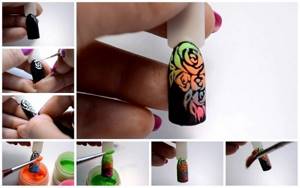
Acrylic colored powder is used for decorative modeling. It may contain sparkles of silver or golden color; it also comes in pastel and bright colors and is transparent. An experienced acrylic professional skillfully shapes leaves and flowers. Since this material has the ability to harden almost instantly, the work must be done quickly. Otherwise, after a short period of time it will be impossible to correct anything. Compositions using decorative molding look very beautiful, which is why they are often made for special occasions.
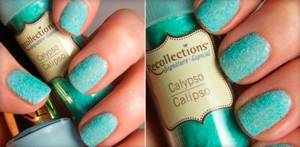
This material is also great for creating the effect of velvet sand. A manicure with acrylic powder and gel polish turns out gentle and at the same time chic. To do this, acrylic powder is applied to the sticky layer of varnish, which spreads delightfully over the surface of the plate and immediately hardens. Nails become very attractive.
With the advent of acrylic extensions, it has become possible to have long, beautifully shaped nails. After the procedure, the plates are strong and very similar to the real thing. The technology for performing such a manicure with acrylic powder is as follows. The brush is dipped into the monomer and then into acrylic powder. When mixed in this way, a hardening reaction occurs, which ensures easy application of acrylic. As a result, a ball is formed on the villi, from which you need to quickly create a plate. This procedure is performed on special tips or forms.
One of the fashion trends is matte manicure with acrylic powder, which is very easy to create. First, all stages of applying gel polish are performed, and the top coat is covered with polymer powder. It is recommended to do this procedure directly over a jar of powder. And only then dry it in a lamp, and remove the remains with a brush. If you want the base coat to retain its original color, then you need to use transparent powder.
Features of velvet sand on nails
Velvet sand on the nails makes their surfaces rough, matte, and a little “fluffy.” The material is a granular substance consisting of small particles and similar to coarse powder or fine sugar, semolina. It comes in three types:
- Translucent. Gives a velvety effect, but retains the visible shade of the gel polish.
- Color. It is used directly on the base coat, as it has a pronounced tint, sometimes melange.
- With sparkles. It also has color, and it is not only pigment, but also shining particles.
Velvet sand manicure can be done on the entire nail or used for part of the plate to highlight the pattern and create a voluminous texture.
Benefits of rough manicure
Rough manicure is in demand because it has many advantages:
Velvet sand can be used on short or long nails of any shape. If you follow the application technique, it will not fall off when washing your hands or doing any work while wearing gloves.
Manicure options with acrylic powder
Acrylic powder is a polymer powder, which is one of the integral components when creating extended acrylic nails. During this procedure, the powder is mixed with the monomer and quickly hardens, creating a durable coating of a given shape. But this material is also used to create a decorative coating - it is thanks to it that it is possible to form a matte surface and intricate velvet patterns.

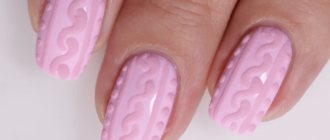
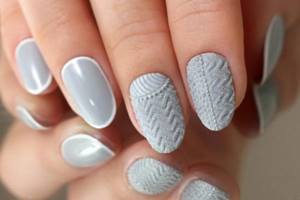
Knitted sweater with velvet effect
Imitating a knitted sweater on nails is one of the most popular trends this year. This design immediately attracts attention - on the glossy or matte surface of the nail, knitted patterns are recreated, which, thanks to the powder, look like real ones, they have some fluffiness and velvety, you just want to touch them.
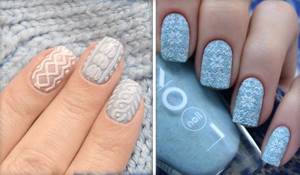
There are a lot of variations of this nail design. The choice begins with a specific pattern for application, color and selection of a harmonious combination of shades. Most often, soft, pastel colors are taken as a basis, and the pattern itself is made in a similar color. This choice is not accidental - it is in light, calm shades that the texture is best seen. However, this does not mean at all that you cannot do it differently, there are no restrictions on the selection of colors and you can very successfully combine different shades of the base and the design itself.
Matte manicure
The glossy surface has been popular for a very long time; everyone liked bright and shiny nails, regardless of age and profession. Today, matte, satin nail art has taken the palm - this is what can be increasingly found on the pages of magazines and on the hands of models on world catwalks.
Undoubtedly, the most popular are natural, nude shades of such coatings - they look gentle, neat and suitable for any occasion. But this is just one of the matte design options. Bright colors, velvety textured coatings, designs with matte patterns, and even successful combinations of lacquer and satin surfaces on one hand are actively used. Acrylic powder is the number one assistant for creating such designs; almost all manicurists use it, as it gives the perfect texture.
Nail art with designs on nails
This design option is more interesting than just a plain matte or glossy finish. Usually, when resorting to creating velvet designs on nails, they play on the difference in effect, that is, they apply a design using acrylic powder onto a standard glossy coating, and even if these two elements match in color, all the details will be clearly visible.
There are several technologies for applying a design with acrylic powder; both the exclusively artistic abilities of a manicurist and special stencils can be used. You can create such beauty on your nails at home, having all the necessary tools and materials.
Gradient manicure
A gradient implies a smooth transition of colors from one to another, and creating this on your nails is not as difficult as it might seem. You will need a base coat (usually a gel or gel polish) and acrylic powder in the desired colors. Using a brush, the master applies the colors one by one, and if using varnishes with this technique nothing good comes out, then due to the fact that the powder consists of a large number of small particles, it is easily shaded and creates the effect of a smooth “flowing” of one color into another.
Such a manicure will never go unnoticed and receive admiring reviews, and given all the possible color combinations, gradient nail art is simply an inexhaustible source of designs for a variety of occasions.
Features of matte shellac
In order to understand what matte gel polish , let's briefly look at the basic procedure for applying gel polish to nails.
The standard diagram looks like this. Preparing the nail for applying the first layer of the system - degreasing and treating with a primer, which improves the adhesion of the material to the nail plate; then applying the base layer, drying in a lamp (it is important to remember that gel polish does not dry in air, only in a UV or hybrid lamp!); directly applying colored gel polish in several layers to obtain the desired pigmentation and density of the coating, and at the end - applying the final coating - top .
A regular topcoat for gel polish gives a lasting glossy shine for several weeks and protects the coating from minor damage. The idea of a matte manicure is the absence of shine on the nail plate; the coating with this design option is truly matte and velvety.
Matte manicure is more durable, but has one unpleasant feature - on light shades of gel polish, the matte coating quickly gets dirty.
Even at the first experience of wearing such a design, a girl may be surprised by the rough surface of the nail; this is not familiar to everyone and sometimes causes a certain psychological discomfort.
In general, matte Shellac rightfully holds one of the leading positions among nail designs. This manicure looks expensive, looks great with dark shades of varnish, is suitable for office workers, and at the same time remains in trend for a long time. If you have never tried this manicure before, we are sure that after the first experience you will truly love it.
Application methods
There are several ways to make a manicure with granulated sugar at home. However, the end result will always be different.
Design with acrylic powder
The method is suitable for gel polish lovers. The procedure is simple and does not take much time.
You will need:
- ultraviolet lamp;
- gel polish (color chosen at will);
- acrylic Powder;
- base and fixative;
- tassels.
The design is created in several stages:
- Upon completion of the hygienic manicure, apply a base coat, and then apply gel polish in 2 layers. Dry in a lamp between procedures.
- The last layer does not dry immediately. First, sprinkle the nail plate with acrylic powder.
- After drying, the final result is corrected with a brush, carefully removing excess grains.
- Apply a fixing layer.
Using this method of creating a sugar manicure, you can achieve a velvet effect. To do this, the patterns are first drawn with gel polish, and then the contours are sprinkled with powder, and all excess is removed with a brush.
Melange
To carry out the procedure at home you will need:
- gel polish;
- melange;
- brushes;
- base and fixer.
After preparing to apply the decorative coating, you can begin creating the design:
- Apply base to the nail plate. Dry.
- You can cover your nails with colored gel polish in several layers to create a specific design. Dry.
- The last, not yet dried, layer must be immediately covered with melange. Apply with a tapping motion of the brush.
- Remove excess and secure the result with topcoat.

How to make matte shellac: all the ways
Now let's move on to the most interesting part. Let's talk about how to make a matte manicure easily and without unnecessary problems.
These methods are suitable for both nail artists and girls who apply gel polish on their own. three options in total to achieve a matte finish : a special matte top; sawing off the glossy top coat with a buff or file with soft abrasiveness and using acrylic powder.
The last option is the easiest to implement, and gives not just a matte finish, but the effect of real velvet on the nails. Hence its second name - “velvet manicure”, or “velvet sand”.
The easiest way to get a matte finish is to use
a special topcoat. The best manufacturers are KODI and Masura; the top-end coatings from the E.MI and Canni line have also proven themselves positively.
The usual budget Bluesky, despite the manufacturer's loud promises, still gives a satin finish, which cannot be called truly matte with complete confidence. The most popular technique among masters is the technique of performing matte manicure using acrylic powder. Why? You will find out by reading the section below.
What is a DIP system in manicure?
During the polymerization process of gel polish, the nail plate becomes very hot. Due to the use of low-quality Chinese materials, the number of cases of onycholysis, burns of the nail plate and the skin under it, has increased. More and more craftsmen are faced with the problem of allergies, when, after applying gel polish, the surrounding skin becomes covered with ulcers and blisters, from which a clear liquid is released. Many of the masters’ regular clients who once experienced allergies, onycholysis, or a burn to the nail plate are forever deprived of the opportunity to wear a beautiful manicure. A DIP system was recently developed especially for these women.
What is a DIP system in manicure:
- This is a special technology that provides unique materials for leveling and coating nails. Just like gel polish coating, this system is worn for 3-4 weeks.
- However, the coating process does not use ultraviolet lamps, the coating is not heated, but dries in air. It is worth noting that this system consists of several drugs, which should not be replaced with similar ones from other manufacturers. This is due to the difference in composition.
- If, when coating with gel polish, you can use the base of one brand, and the flower beds of another, then in the DIP system you need to buy the entire kit with which the coating is carried out.
How to apply powder on gel polish: step-by-step instructions
For extensions:
- Special forms or tips are put on the nails;
- Next, mix acrylic powder and monomer. To do this, dip the brush in the monomer, and then dip it into the powder, and, making circular movements, envelop the brush with it. A thick drop forms on it.
- This drop is quickly transferred to the nail and distributed in a thin layer over the form. Then, using patting, pressing movements, level the layer. It is necessary to avoid getting the acrylic mixture on the side ridges and cuticle; the distance between them should be at least 0.3 mm.
- After each drop of acrylic, wipe the brush with a napkin.
- While the acrylic has not completely hardened, the nail is given a natural bend using tweezers. This is also done using a mold with a tube.
- When the acrylic has completely hardened, begin filing and polishing the nails. First, use a file with a large fraction of grains, and at the end a buff.
- The final design is then applied.
For design:
- First the base is applied. She is allowed to dry. Some products dry in air, some in a UV dryer (you need to read the instructions for the specific product).
- Shellac is applied to the entire surface and end sides.
- Before the gel polish has time to dry, apply powder. If you need to cover the nail completely, then first of all you need to dip the tip of the nail into a jar of powder. Then, holding your finger over the stand, apply powder with a brush over the entire surface of the nail. The brush cannot touch the surface of the nail plate.
- Shake off excess by lightly tapping on your finger.
- Dry under a UV lamp.
- Next, the nail is treated with a brush. This will help remove loose particles of powder and smooth the surface a little.
- You can stop at this stage. But you can also apply a finishing layer of gel polish. Then the nails will be smooth, without roughness.
Camouflage
It is this powder that masters most often use when it is necessary not only to strengthen the nail plate, but also to hide such a defect as yellowness.
French
To perform a French manicure using acrylic powder, you can choose any color you like. A dull white powder is considered classic. First of all, prepare the nails and give them the required shape. For a French jacket, a square one is best suited. The nail plates are degreased, a base layer is applied, followed by two layers of gel polish, each one needs to be dried in a lamp. After this, gel polish is applied again, but it is not dried. One by one, dip the tips of your nails into a jar containing acrylic powder. If everything is done correctly and carefully, you will get an even and thin strip. Excess polymer dust is removed with a dry soft brush, and a transparent finishing layer of gel polish is applied on top and dried in a lamp. The resulting manicure with acrylic powder and gel will look just great.
Matte manicure. These nails have become increasingly popular lately. Some paint all the plates completely, others create a beautiful effect on only one or two. To create a matte manicure, you first need to degrease your nails, then apply a base layer, double gel polish and a finish that does not need to be dried. Afterwards, sprinkle each plate with powder, it is better to take transparent one. After polymerization in a UV lamp, remove excess powder with a brush.
Velvet manicure. Making a velvet design differs from a matte design only in that after covering the nails with a finishing agent and drying them in a lamp, the design is applied with gel polish or gel paint. To do this, use a thin brush. The patterns are sprinkled with acrylic powder on top, dried, and excess powder is removed. You can take colored or transparent.
Rhinestones and bouillons
There is a manicure option with acrylic powder, decorated with broths and rhinestones. For it, the nails are first prepared, the plates are degreased and a thin layer of base is applied. Then take the finishing gel without a sticky layer and mix it with transparent acrylic powder to form a thick mixture. It is used to cover the nail, onto which broths or rhinestones are placed and polymerized in a lamp. At the end the decorations are fixed. When using broths, the nail is completely covered with finishing gel, and if rhinestones were taken, the product is applied between them.
How to do a manicure using acrylic powder
A manicure with a velvet effect, in fact, is not so complicated if you know all the stages of the procedure for creating it.
Necessary materials
For matte nail art, you first need acrylic powder as the main component to create velvet elements or coating. The color is selected as desired; as a base on which the particles will be fixed, it is better to choose a white gel paint or a shade that matches the shade of the powder. You can just use gel, but it is more fluid, which means it will be more difficult to create thin and clear lines.
To create the main color when applying a velvet pattern, use gel polish, applied in several layers to obtain a dense background.
Step-by-step execution
First of all, the base is created - the nail is covered with the desired color and the required number of layers of gel polish. Then it all depends on what kind of design is being created. To cover the entire nail, the last layer of gel before drying is sprinkled with powder and sent to dry in a lamp, after which the residue is removed with a brush. If it is necessary to create a design, then draw it with a thin brush with gel paint, and also sprinkle the entire top with acrylic powder.
When the excess grains of sand are removed, you can enjoy the wonderful final result - a beautiful velvet manicure.
Velvet sand painting
The technique allows you to combine several decoration options in one composition. Painting is done with gel paint, top coat or gel polish. The technology is as follows:
- After applying the main color of the gel polish, seal it with a top coat.
- Remove the dispersion layer.
- Using gel paint, gel polish of the selected shade, or just a transparent top coat, we draw monograms using a thin brush.
- Sprinkle the drawing with velvet sand.
- Dry it in the lamp for double the time.
- Brush off any remaining sprinkles with a brush.
The monograms of the painting must contain a sufficient amount of liquid and be “fat” in order to “take” the sprinkles. Otherwise, the drawing will have bald spots and will be uneven.
Techniques to perform at home
Now let's look at each of the described methods in detail, starting with the easiest.
Matte Shellac using a buff
In order to make using a buff , you will need the buff itself - if you already have a coating on your nails and a glossy top coat applied.
Buff is a rectangular file with soft abrasiveness, designed to remove shine from natural nails. Sold in any nail design store. If the coating is already ready, you only need to remove the shine from the top using a buff. This is done with light movements, in the direction from the cuticle to the free edge of the nail.
You don’t need to be very zealous to get the desired result, just go lightly over the surface of the top with a nail file.
If you file too vigorously, you will not only remove the shine from the final layer, but also damage the gel polish coating itself.
Disadvantage of the method: it requires time, it is easy to damage the coating itself.
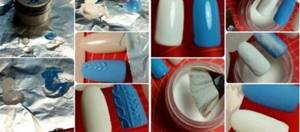
Matte manicure using acrylic powder
The ideal method, according to the author's biased opinion.
For it you will need any transparent acrylic powder, even the Chinese one from AliExpress for 50 rubles will do. The jar lasts for a very long time, consumption is economical. Follow the standard steps for applying gel polish:
- degrease the nail, cover with primer;
- apply the base in a thin layer, dry in a lamp for 1 to 3 minutes (1 minute for hybrid and LED lamps, 3 minutes in a 36 W UV lamp);
- Without removing the sticky layer from the base, apply the first layer of gel polish and dry;
- Apply the required amount of gel polish to the nails, not forgetting to seal the end of the nail, dry each layer;
- apply a regular topcoat with a sticky layer, and - ATTENTION! , - do not dry it.
the technology itself acrylic powder to the top coat.
Open the jar and take a pusher or tip - something with which you can scoop out the required amount of acrylic powder. Place your finger over the jar to avoid wasting acrylic. Sprinkle the nail generously with powder and repeat with all fingers of one hand. Place your nails in the lamp for 1-3 minutes. Brush off the remaining powder with a brush - either a regular makeup brush or a fan brush for nail design will do. All! Your matte design is ready.
An even easier way to use acrylic is to simply dip your nail in acrylic powder, making sure that the entire surface is evenly covered with powder.
We do the same with the second hand. The perfect velvet manicure is ready! It turns out right the first time, even for beginners.
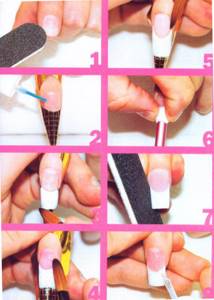
Preparatory stage
If there is old polish on your nails, it needs to be removed - use a special liquid (preferably without acetone) and cotton pads. This method is only suitable for regular varnish. But you can just take a durable gel coating. Here you have to arm yourself with a special device. If you don't have one, cover each nail with a cotton pad soaked in nail polish remover and wrap the top in foil. After 10 minutes, remove the varnish as usual.
Procedure for removing old coating
- It would be a good idea to take care of the skin of your hands in the evening. Apply your favorite cream overnight: this will give it enough time to fully nourish and soften the skin.
- The ideal preparation of nails for the procedure includes a hand bath. Set up a mini spa at home. To do this, fill a deep container with warm water. Add sea salt, your favorite aromatic oil or lemon juice. All you have to do is relax and enjoy the procedure for 5-10 minutes.
Hand bath before manicure
Now the skin is steamed and ready for the upcoming manicure. All that remains is to take care of your nails. Push back and lift the cuticle with a special stick, and then cut off the unnecessary cuticles with tweezers. You can speed up and ease this stage with cuticle oil.
Pushing back the cuticle
Next you need to take care of the shape of your nails. You can achieve the desired result using a nail file and scissors.
Please note: nails must be filed in one direction to avoid damaging their structure. A velvety nail file or buff will help make the surface smooth and even. The final step is to wash your hands to remove grease and dust.
Nail buff
Now you are ready for a new manicure at home using the most ordinary varnish: step-by-step photos from our article will help you decide on the design.