Today you will surprise few people with a manicure done with gel polishes. It has firmly entered the beauty routine of modern beauties. Durability of the coating, bright colors, spectacular design - all these are undeniable advantages of gel manicure. However, not all women can fully appreciate all the advantages of the coating. For example, those with fragile nail plates often experience chipped decorative coatings and even breaking off their own nails. Especially for women who cannot boast of a strong structure of the nail plates, many options have been developed to correct the situation, one of them is strengthening the nails with acrylic powder.

Photo from the site: ezoplanet.ru
The procedure for strengthening with acrylic powder is simple and does not require any special skills. So, if you practice gel manicure yourself, you can easily do this method at home, and “Red Lipstick” will help you with this.
What is acrylic powder used for?
Acrylic powder is a powder with small particles related to polymer materials. After contact with the monomer substance, the acrylic powder hardens, forming a durable protective coating.
The first use of this material was noticed in dentistry. Later, the manicure guru decided to try the powder while doing nail extensions. Acrylic has strength and ductility; the hardened substance is elastic and does not require special care.
The powder is used to:
- strengthen nails with gel polish;
- improve the condition of natural nails;
- create a design;
- fill microcracks;
- quickly correct a broken area of the nail plate;
- increase the length of the nail.
Using powder for gel polish
The gel has gained its popularity due to its durability; even with constant contact with water, the coating lasts a long time. A manicure made using gel lasts on the nails for more than two weeks without fading or losing their original shine.
Due to the characteristics of the body, chronic diseases and the structure of the nail plate, for some girls, the manicure deteriorates after a couple of days. To increase the wear time of a beautiful design and give strength to the nail plate, experts advise strengthening the nails with acrylic powder before using gel polish.
Home Strengthening Tools
- nail scissors;
- cuticle softening liquid;
- container with warm water;
- manicure brush;
- manicure spatula;
- base coat;
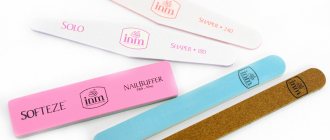
- file;
- antibacterial agent;
- degreaser;
- colorless powder;
- monomer;
- primer or primer;
- brush for applying acrylic;
- finishing coating;
- Ultraviolet lamp.
Step-by-step preparation
- Remove any remaining varnish;
- Wash your hands with soap;
- Get a manicure;
- Treat the nail plates with alcohol or hydrogen peroxide;
- Apply a soft buff to remove excess shine;
- Degrease the top layer of the nail using a special liquid.
It is better to do a manicure without cutting, so as not to injure the skin. In case of trimmed manicure, wait 24 hours before applying the material to the nails.
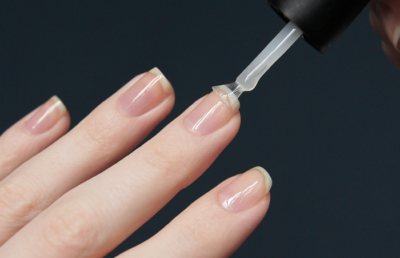
Step-by-step instructions for applying polymer powder
- After manicure and degreasing, apply primer to your nails. For sensitive skin there is an acid-free one.
- Wait a few minutes until the primer is completely dry.
- Cover with base gel.
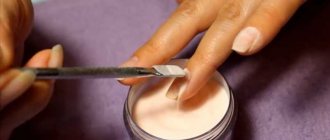
- Next, using a special brush, pour acrylic powder or dip your nail into it. The more powder, the stronger the nail will be.
- Hold your nails for 2-3 minutes under an ultraviolet lamp.
- Remove any remaining material using a special brush.
- Using a nail file and buff, correct your nails.
- Apply the selected shade of gel polish.
- Dry the coating using a UV lamp.
- Apply the finishing coat, dry the layer using a lamp.
- Remove sticky layer.
- Apply emollient oil to the skin around the nail.
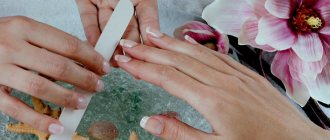
How to strengthen natural nail plates: step-by-step instructions
Strengthening with acrylic powder is done by manicurists in salons. You can carry out the procedure at home. If you cover your nails with gel polish yourself, this will not be a problem for you. But it is important to follow the instructions to avoid detachments and layers. The procedure consists of several steps. Prepare tools and materials in advance:
- manicure set;
- cuticle products;
- dehydrator;
- abrasive sticks and buffs;
- antiseptic;
- primer and bonder;
- acrylic Powder;
- brush to remove dust;
- modeling gel or colored gel polish;
- base and top coat;
- lamp (LED or UF);
- orange sticks;
- lint-free wipes.
Preparation

- Before starting the procedure, it is important to treat all instruments, hands and nails with an antiseptic.
This is a significant stage that should not be ignored. Gel polish lasts quite a long time and even a minimal infection, once under the coating, can cause the proliferation of harmful microorganisms. Many troubles can be transmitted through poorly disinfected instruments. It is necessary to carry out disinfection even if you use the tools only for yourself. - Nails need to be given the desired shape and a hygienic manicure done. Remove the cuticle, push it back and clean the nail plate from the pterygium (this is the name of the area in front of the cuticle). Please note that improper nail treatment is the most common cause of coating peeling.
- Afterwards the nail is polished with a buff or a soft file. The resulting dust is cleaned with a brush. At this stage, it is important to eliminate the gloss so that the gel sticks better without causing cuts.
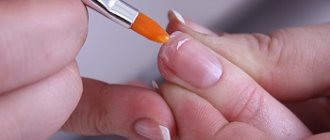
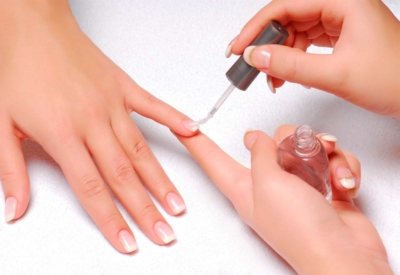
How to apply primer?
After you have sanded your nails and brushed them, you need to degrease them. To do this, wipe the nails with a cotton pad soaked in a dehydrator or degreaser. The primer must be applied to the entire nail plate. It prepares the nail for further work, evens out the water balance and eliminates excess moisture. The primer also improves the adhesion of the plate to the artificial turf.
Primer is a liquid-textured product that dries almost instantly in the open air.
An acid-free primer is better suited for home use.
To improve the result, you can additionally apply a bonder. It should dry well. This product prevents peeling of materials. It is denser and similar to glue, which is why it is called “double-sided tape.” Thanks to the gel structure, the bonder is distributed evenly, but it is important that it does not flow. It is also recommended to “seal” the edges of the nails with a bonder.
If you use both products, apply the primer before the bonder. Some of the bonders dry exclusively under a lamp, so in each case you need to follow the manufacturer's instructions.
Although both drugs are aimed at improving grip, their effects are somewhat different:
- Thanks to the primer, a film is formed that protects the nail from penetration of chemicals into further layers. Its tasks also include cleaning, disinfection, degreasing, and adjusting the pH balance.
- Bonder is elastic. It bonds the layers together to the maximum, preventing detachments and cracks.
In view of this, you should not choose between the means - they act differently and are not a replacement for each other. You don’t have to use them at all, limiting yourself to filing and degreasing the nail. But if the durability and aesthetics of a manicure are important, it is still better to apply both a primer and a bonder.
Base layer
In order to strengthen the nail, it is better to use thick silicone consistencies or rubber bases.
- The base layer is applied immediately after the primer or bonder has dried. To distribute the base evenly, it is recommended to apply the first layer onto four fingers and dry it. This is done on both hands alternately.
- Then apply the base separately to your thumbs. Due to this, it will be more convenient for you to dry your nails, and the gel will not run off. Make sure that during the application process the coating does not affect the cuticle or skin on the sides of the nail - this can lead to detachments.
If the gel leaks, you can carefully remove it with an orange stick.
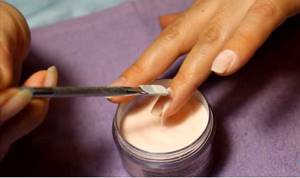
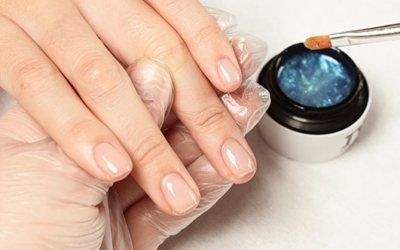
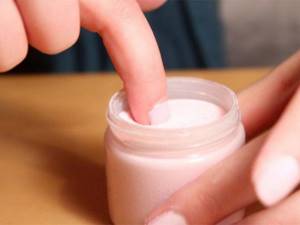
Acrylic
- Acrylic powder must be applied to the base or shellac before the last layer dries. Immediately after painting your nails, sprinkle them with a thick layer of acrylic powder. It is important not to leave empty spaces.
- You can sprinkle the entire nail or just problem areas - the center and sides. You can also simply dip your nail into the powder and then tap the edge with your finger to release any excess powder. You need to dry the coating under ultraviolet light for a couple of minutes.
- Remove excess with a brush. If the surface is uneven, it is sanded.
Fixation with base coat or gel polish
When the acrylic hardens, the nail is covered with gel polish in one or two layers. Each layer must be dried in an ultraviolet lamp.
If you used acrylic only for strengthening, without covering the nail with colored gel polish and decor, then after application, fix it with a base layer and then use a finish. The top coat also needs to be dried in a lamp. Its task is to protect the nail plate from ultraviolet radiation and create a glossy shine. The finish can be applied in one or two layers.
If a sticky layer remains after finishing, then after drying it must be removed with a cotton pad soaked in a degreaser. An alternative is nail polish remover that does not contain acetone.
Strengthening natural nails
Acrylic powder is used under gel polish, creates decorative patterns, and gives durability to natural nails. The process of strengthening your own nails is similar to using acrylic for gel polish, but the final moments are different. Strengthening nails with acrylic powder begins with preparing the nail plate; you should follow the first three steps from the above step-by-step instructions. Next, dip the brush into liquid liquid and sprinkle it with powder. Wait a little time for the two materials to react.
Stepping back one millimeter from the cuticle, apply the resulting mixture to the nail plate. Distribute the material in a thin layer over the entire surface and dry under ultraviolet light. After hardening, level the surface of the nail, smooth out any unevenness and secure with regular varnish or use shellac to add shine and longer wear. After applying shellac, dry your nails under a UV lamp. Nails will look natural when using colorless powder.
Types of acrylic powder
Strengthening nails with acrylic powder will only be beneficial if used correctly, following safety precautions and choosing the right material.
A good acrylic powder should have a porous structure, completely cover the nail plate, not spread or crystallize, and at the same time be plastic and easy to sculpt.
Special series - capable of reacting not only with odorless monomer, but also with ultraviolet curing substances. The powder has good plasticity, making it easy for beginners to work with. The special series is easy to apply to the nail plate, does not spread, and is excellent for the base layer and creating a natural finish.
There are three shades:
- Special White – bright white powder;
- Special Pink – pale pink shade;
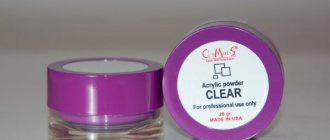
- Special Clear - transparent powder.
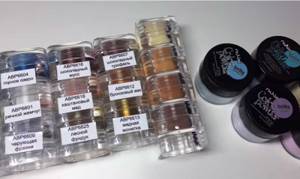
Camouflage powders - designed to eliminate unevenness of the nail plate. There are several items on sale:
- Cover Pink is an opaque pink powder that optimally lengthens the nail.
- Beige – has a dark beige color that goes well with natural shades.
- Light Pink is a translucent powder with a cool tint that becomes pink-beige during interaction with the monomer.
- Ice Pink is a translucent powder with a matte finish. In most cases it is used under gel.
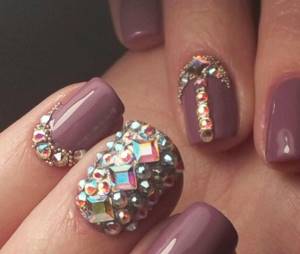
Stained glass powders are used to build up “crystal” nails and create a “candy” effect. They are widely used by specialists to create a unique design. To create a beautiful applique or make a unique design, use colored powders.
They are divided into several types:
- bright colors are used for sculpting and creating a unique jacket;
- mother-of-pearl - created to create a shimmering French manicure;
- glitter powder - necessary for tinting the nail plate and creating a good mood;
- with glitter – used to create a multi-holographic effect;
- neon - reflective powders, especially loved by young girls, glow under ultraviolet light.
Contraindications
Polymer powder does not contain harmful components. It can be used with virtually no restrictions. The exception is individual intolerance to the material and hardeners, as well as the presence of fungal diseases.
It should be remembered that before it hardens, acrylic can emit a sharp and very unpleasant odor. In this regard, during the procedure it is necessary either to ventilate the room well or use a special protective mask.
How to extend nails with acrylic powder
Nail extensions using polymer powder provide the opportunity to walk longer with a beautiful manicure and prolong the life of artificial nails. Nails look natural, as there is no thickening of the nail plate, as when using gel.
For extension you will need:
- primer;
- degreaser;
- transparent or camouflage powder;
- liquid;
- extension forms;
- tassels;
- sanding file – 180 grit;
- buff.
Step-by-step instructions for acrylic nail extensions
- Wash your hands and remove the remnants of the previous manicure.
- Push back the cuticle using a nail file.
- Remove the shine with a nail file and make the plate rougher.
- Take the form and put it on your finger, position it exactly relative to your finger. To secure it, you need to press it tightly to the nail, connecting the ends.
- Using a straw, crimp the paper form.
- Apply a dehydrator to prepare and remove excess moisture.
- Apply primer, preferably acid-free.
- Dip the brush into the liquid and lightly walk over the nail plate.
- With the same brush, using circular movements, pick up powder.
- Distribute the resulting ball on the nail using a brush.
- The powder should be distributed from top to bottom.
- At the base of the nail there should be a thinner layer than at the edge of the form.
- Crimp the edges of the nail using tweezers, giving it a natural bend.
- File the edges and end of the resulting nail.
- Lubricate cuticles with oil.
- Apply clear varnish.
What is needed for the procedure
You may be interested in: Manicure with brown polish: design ideas with photos
Strengthening your nails with acrylic powder itself is not at all difficult to do yourself. That is why many girls prefer to carry out the procedure at home. After all, this way you can significantly save your time and finances. And in the process you will only need a little patience, diligence and, of course, some set of tools and materials.
To carry out the procedure at home you will need:
- liquid - liquid for creating an acrylic ball that will be applied to the nails;
- primer - a solution that ensures reliable adhesion of the material to the plate;
- degreaser - necessary to remove excess fat and disinfection;
- keratolytic - removes dead skin particles;
- actual acrylic powder;
- convenient brush for application;
- nail file - with its help you will remove all the unevenness and give your nails a beautiful shape.
In the room you will be using for your manicure, it is advisable to open the windows, as the chemical aroma may make you dizzy.
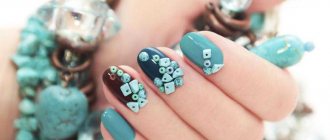
Nail design
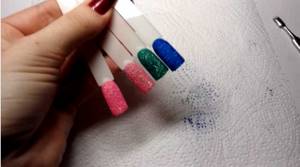
Acrylic powder is widely used for sculpting; you can create three-dimensional shapes on your nails, give the design a convexity, the effect of sugar or velvet sand. Not everyone can do sculpting, but creating the “sugar” effect doesn’t require much effort.
Apply a thin layer of acrylic powder with glitter onto the gel polish using a brush and spread evenly over the surface of the nail. Let it dry. Depending on the size of the grains of sand, you can thus give your nails a “sugar” or “velvet” effect.
To give your nails a matte tint, you need to purchase matte powder. Follow all the steps of applying gel polish sequentially, then apply powder to the nail using a brush. After uniform distribution, dry under a UV lamp.
To create a three-dimensional pattern without modeling, you should perform a number of steps:
- prepare the nail plate, do a manicure and push back the cuticle;
- treat each nail with an antiseptic;
- degrease the nail plate;
- carefully remove shine from nails using a sanding file;
- apply a layer of primer;
- let dry for a few minutes;
- apply base gel;
- dry under an ultraviolet lamp;
- apply the desired color of gel polish;
- dry;
- remove the sticky layer;
- apply a second coat of varnish;
- dry;
- remove the sticky residue again;
- using a brush, draw the desired pattern;
- dry;
- without removing the sticky layer, cover with acrylic powder;
- dry under a UV lamp;
- remove the remaining powder with a brush.
The result of strengthening nails with acrylic
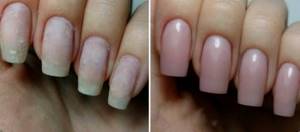
Acrylic, when distributed evenly over the nails, creates a thin but dense film that covers the entire nail plate. It looks natural as it adapts to the natural shade of the nails.

The powder lasts until the girl herself wants to remove it. Typically, it remains in its original form for up to one and a half months, because it is not exposed to aggressive external factors, including weather conditions and the use of chemical components in work.
Correction of acrylic powder is done quite simply, easier than correction of extensions, since removing the coating from all nails is done in 5 minutes.
How to remove acrylic powder from nails
If you urgently need to remove the acrylic coating from your nails, but there is no time to visit the salon, the removal procedure can be done at home. To do this you will need to follow a number of simple tips:
- Carefully remove the top coating using a file;
- moisten a cotton pad or swab in a special product designed to remove shellac and gel polish;
- put cotton wool on the nail plate;
- wrap the nail tightly with foil;
- wait 10–15 minutes;
- remove the foil and remove the cotton pad;
- using a pusher, move the exfoliated layer to the edge of the nail plate;
- repeat the wrapping procedure;
- remove acrylic residues using a pusher;
- polish with a buff.
If you do everything correctly, your nails will not be damaged, they will remain strong, without scratches and will not peel off.
A simplified method of applying acrylic under gel polish
For those who are just starting to use polymer powder at home, we can recommend a simpler option for applying it. The preparation of the marigolds is carried out in the same way as in the first case, but the sequence of further actions looks somewhat different:
- A primer is applied as a preparatory layer.
- Next, the nails are covered with a base for gel polish.
- Without waiting for the second layer to dry, sprinkle it generously with powder and then dry it.
- Shake off any remaining powder from your fingers.
- Reapply the base.
- After removing the top sticky layer, the nails are painted with decorative varnish.

Advantages and disadvantages of acrylic powder
Further in the table you will find the advantages and disadvantages of using the material in question.
| Advantages | Flaws |
| Eliminates cracks | Strong specific odor |
| Aligns the nail plate | Poor quality material, can lead to allergic reactions |
| Gives a beautiful design | If you do not disinfect the nail plate and immediately apply a layer of powder, fungus may appear |
| Makes manicure more wearable | If used incorrectly, there is a possibility of damage to the outer layer of the nail. |
| Artificial nails look natural and are very durable | |
| Strengthens the nail plate |
Materials and tools
When performing this type of work, you cannot do without
:
- degreaser, you can use nail polish remover;
- a bonder containing substances necessary for adhesion of artificial materials to the nail plate;
- brushes for applying glue;
- fan brush to remove powder residue;
- files (coarse abrasive) to even out the length of the nail;
- buff (bar-file), which has a rectangular shape and is used for polishing nail plates.
Prices
Depending on the artist and the popularity of the salon, the price for strengthening nails with acrylic powder can range from 1000 to 1500 rubles. To save money and give strength to your nails at any convenient time, you can purchase special repair kits. The kit includes all the necessary materials that you can use at home. The cost of the set is 1100 rubles.
The price of one jar of acrylic powder weighing 21 grams varies between 350–450 rubles, the cost of a monomer is 900 rubles. Once you buy several colors of powder and monomer, you can strengthen and design your nails at home for a long time.
Strengthening with powder for gel polish
At the end of the standard initial treatment, the marigolds are coated with the base composition and dried. Then another base coat is applied, sprinkled with powder and dried. Next, the surface is sanded, leveled and covered with another layer of base. After drying under the lamp, you can start painting your nails with gel polish.
Why and in what situations is it needed?
Acrylic powder or “powder”, as it is more often called by nail professionals, is a material that is used to strengthen nails with a porous structure. It is light (hence the name “powder”) and flexible. The powder completely fills any microcracks and smoothes out unevenness.
At the same time, the material does not create an airtight layer, therefore it allows the nail plates to “breathe” freely, which is very important for their health.
Acrylic powder helps prevent mechanical damage to the plate, as it makes it more durable. The powder does not have any special therapeutic effect. The powder does not treat nails and does not affect their structure. It can be compared to a reinforcing mesh that strengthens a building structure. Nails additionally strengthened with powder break much less often, which allows you to maintain your manicure longer and need to visit a nail specialist less often.
Acrylic powder coating is recommended to be applied under gel polish for those who have naturally brittle and flaking nails. The powder will be useful not only when nails cannot be grown to the desired length, but also when there is a risk of breaking and cracking due to changes in the shape of the nail plate.
Although gel polish is also considered a strong and durable coating (this is its key advantage), applying it to previously unprepared nails may end up being completely pointless. The very next day, excessive softness and flexibility of the nail plate leads to the fact that the coating begins to peel off, become covered with a “mesh” of small cracks and loses its attractive appearance. With such a manicure, it’s time to go back to the salon for help from a specialist.
These unpleasant consequences can be prevented with the help of acrylic powder. Additional strengthening of nails allows you to make them not only resistant to mechanical damage, but also protect them from the negative consequences of contact with high-temperature liquids or aggressive household chemicals if a woman, for example, forgot to put on rubber gloves before cleaning.
Additional recommendations from the experts
To do a chic, professional manicure at home, you need not only to train a lot, but also to listen to the advice and tricks of real experts
It is advisable to include calcium, vitamins A and B, iron and foods rich in calcium in the diet, because the hardener does not treat nails, but only masks the problem of a fragile plate. The coating will ensure a long-lasting manicure, but as a precaution, still wear protective gloves for housework, especially laundry, wet cleaning and dishwashing. Don't forget to give your hands a gentle massage, use hand moisturizer, and stay hydrated. And most importantly, remember that your nails will need periodic rest from the material to prevent their condition from deteriorating. After using acrylic for a long time, take a break and provide the necessary rest from the procedure.