I don’t want to think that summer will soon end and autumn will come. However, it cannot be said that autumn is a less wonderful time of year than summer. Cooler, but at the same time very cozy autumn days delight with their bright and rich colors. Just recently, the trees were surrounded by lush greenery, and with the arrival of cold weather, the leaves turn into incredible shades. This amazing wealth of colors becomes a source of inspiration and creative creativity, which finds its manifestation in manicure. We invite you to plunge into the world of magical colors and shades of autumn by checking out some great fall nail art ideas. In our article you will find step-by-step instructions for a beautiful design, learn how to draw magnificent leaves on your nails, and also be able to enjoy the beauty of a chic autumn manicure presented in a delightful photo gallery.

Manicure in autumn style: design ideas
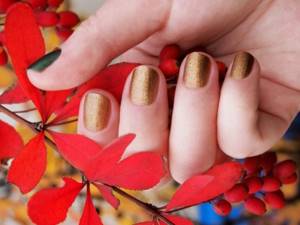
Autumn manicure is very popular due to its bright colors, rich colors, beautiful patterns and interesting decor ideas. This manicure is often done in shades of brown , decorated with gold and foliage patterns. The advantage of this decor is that it suits almost everyone : young girls and mature ladies.
Depending on your preferences, you can choose any design that matches your look. Autumn manicure can be done on long and short nails of any shape.
Nail decor ideas:
Coral color is associated with autumn . Nails with this shade will emphasize the femininity of their owner’s hands, their brightness will lift the mood. You can decorate such a design with a dot pattern in autumn motifs. For example, draw a tree with falling leaves.
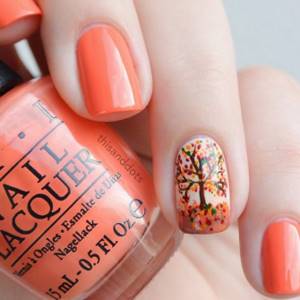
Autumn manicure in coral color
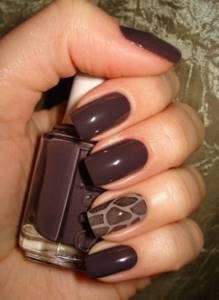
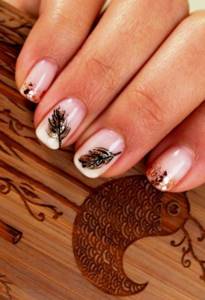
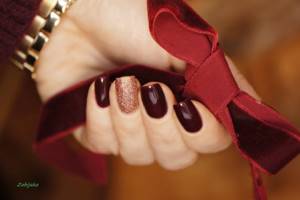
A dark brown manicure with a bright design on the ring finger looks very gentle and stylish. You can choose colors for the pattern depending on your preferences.
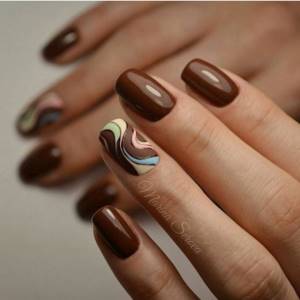
Autumn manicure: stylish decor
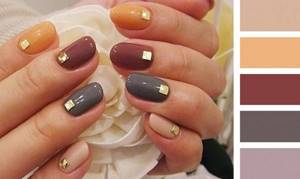
A bright option for decorating your nails is to paint them in different colors. If twenty years ago such a manicure design could have been considered tasteless, now it is a trend for both young and mature women. The main thing is to clearly pursue the autumn shades of varnish.

Correct nail decor in autumn style
Leaf options
What leaves are most often chosen to create a manicure? You can draw one or several, which will look original.
- The most popular option is maple leaves. They look especially beautiful against a dark, rich background.
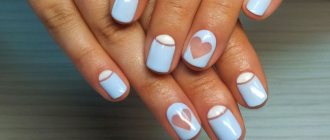
- You can make leaves in a classic shape - several on one nail. Most often they are made in green, which looks stylish against a soft blue or mint background.
- A more exotic option is bamboo leaves. As a background covering, choose calm, muted shades. And for the leaves themselves, use a dark green color.
- Birch leaves look beautiful - they will add more tenderness and sophistication to your image. It is better to draw them from the base of the nail towards the top - this way you will make the nail visually longer.
- Fern leaves look unusual. If you have chosen a dark, rich shade as the background, add some sparkles to the design. And if you made the background light, then choose a dark shade for the picture.
You may be interested in:White manicure: fashion trends, new items, ideas, types of designs, photos
You may be interested in: White French manicure technique, choice of colors, rules for applying varnish and useful tips from experts
A manicure with leaves looks beautiful and impressive. You can decorate the edge of the nail or its base with them. Depending on the chosen shades, you can do a manicure with leaves not only in autumn, but also in summer and spring.
Nail design with maple leaf, nail decor with pattern
The maple leaf is often associated with golden autumn. That is why it is often depicted on nails . Such a manicure will definitely attract the attention of others and will be able to give aesthetic pleasure to its owner.
There are a lot of techniques for depicting a maple leaf on nails: from simple to very complex with detailed detailing. In any case, the leaf should be bright and noticeable against the base background (varnish color). You can paint a leaf using both professional and regular nail polishes using a thin brush.
Nail decor options with maple leaves:
The basis of the manicure can be a gradient flow of yellow into orange - it is not only bright, but also very impressive. The maple leaf in this decor is depicted figuratively, only its shape is painted with dark brown varnish.
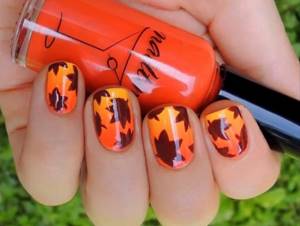
Bright autumn nail decor with a maple leaf.
A manicure with a detailed drawing of a maple leaf using acrylic paints looks gentle and very feminine. This decor will be skillfully complemented by golden sand.

Beautiful detailed maple leaf design on nails
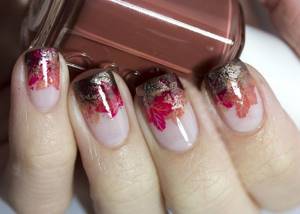
Lovers of red manicure will love the image of a maple leaf on their nails in bright shades of red. In this way, you can decorate some fingers and paint the rest with your favorite red varnish.

Red manicure with maple leaf designs
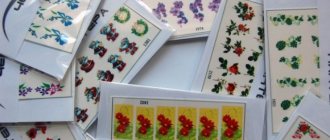
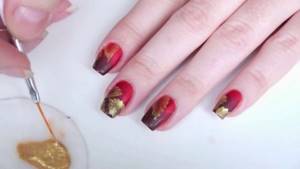
An original manicure idea is to paint a maple leaf with gold. This can be done using varnish or by applying special “slider” stickers . A gold maple leaf will look perfect against a black, cherry, plum or burgundy base background.
Nail decor with gold maple leaf
We draw maple leaves and flowers on our nails. Step-by-step lessons with photos
To create fashionable nail designs with thematic elements, we most often use ready-made prints and simply transfer water stickers, prints from stamping stamps or airbrushing using stencils onto the main coating of the nails. But hand-made drawings make the manicure original, adding zest and special charm to the whole image. Absolutely every woman can learn to draw not only simple designs on her nails, but also master artistic painting. Modern nail art allows you to create very unusual compositions for fashionable manicure using any technique using different tools and special devices. But before you draw beautiful designs on your nails, practice orderly making simple patterns of dots, straight lines, curls on cardboard or on artificial (false) nails. Having gained experience, try to create a light geometric manicure with the simplest shapes (triangle, square, circle) on a plain surface, and then try to depict maple leaves, a flower, butterflies for a nail design.
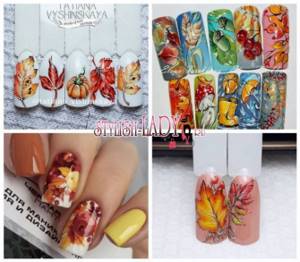
It is not necessary to decorate all the nails on each hand with images. Now it is fashionable to focus on one finger, decorating the nail with an interesting design with the addition of shiny rhinestones, glitter, and crystal stones. You can paint on a hardened coating with regular varnish, but it has a rather dense texture and it is very difficult to apply elements of different thicknesses with smooth transitions with a brush. It is best to use acrylic paints, which are quite suitable for painting on gel polish after drying the color layer in a UV lamp. The top gel will protect the dried pattern on the gel polish and the manicure will remain in perfect shape for several weeks. To draw maple leaves, flowers, bows and other designs on your nails, use the video tutorials and step-by-step master classes for beginners below. ♦ TOOLS FOR NAIL DESIGN • Thin brush. A brush with synthetic bristles, the tuft of which tapers at the end. With this tool it is easy to draw small details, edges, shadows of the picture; • Fan brush. This brush is convenient for creating background elements, gradient transitions, and color flows. Often used for Chinese nail painting; • Flat brush. The pile in the bundle is evenly distributed, the villi are adjacent to each other in dense rows. This tool is convenient for depicting large elements of a design, three-dimensional patterns, making fills, mixing acrylic paints; • Liner brush. A very thin brush with elastic bristles for painting fragments of a design along the contour line, for making thin, uniform stripes; • Dots with different tips. Using a dot with a ball at the end, you can draw tapering lines, dots and circles of different diameters, curls and monograms on your nails; •Additional. Pieces of foam rubber, sponges, sewing needles, orange sticks. ♦ NAIL DESIGN WITH DRAWINGS IN THE FORM OF LEAVES AND FLOWERS ► How to draw maple leaves, as well as birch and oak leaves on your nails:

— in the photo: step-by-step drawing of leaves ► How to draw a flower on your nails:

— in the photo: step-by-step drawing of flowers ♦ USEFUL TIPS FOR BEGINNERS ❶ There is no need to buy a large palette of acrylic paints. It is quite possible to get by with a set of 6-7 colors (must be white), from which you can get any desired shade; ❷ Any drawing begins with a contour. If you carefully draw the contour lines, then painting the drawing with acrylic paints will not be difficult. Place your elbow and hand comfortably on the table, take care of comfortable lighting of the workplace; ❸ Under the layer of varnish or gel polish there must be a base to protect the nail plate, and the design itself must be covered with a fixative (top gel); ❹ The background layer must be completely dry on the nails before painting on it; ❺ Large designs and compositions look harmonious on long nails, and on short nails it is appropriate to draw small prints (repeating ones are possible); ❻ In order to visually lengthen your fingers, you can make a colored jacket with a neat pattern along the 'smile line'. Repeating prints in the form of vertical stripes lengthen the fingers; ❼ It is advisable to start doing a nail design on the little finger to reduce the likelihood of smudging already completed designs on other nails; ❽ The background coating must be perfectly smooth. To do this, carefully remove the overgrown cuticle and pterygium film from the surface of the nail plates, treat the nails with a manicure file and polishing buff. ♦ VIDEO LESSONS FOR BEGINNERS
Dear girls! Please share with beginners your secrets, experiences, tips for creating nail designs with patterns and designs. If you want to post your photos and video materials on the topic on the site, please write a message to us by email: This e-mail address is being protected from spambots. You need JavaScript enabled to view it. To the main page
ALSO FIND OUT...
| Comments | Add new | Search |
Children's Portal: Home Page
3.26 Copyright (C) 2008 Compojoom.com / Copyright (C) 2007 Alain Georgette / Copyright (C) 2006 Frantisek Hliva. All rights reserved."
Related materials:
- A tiny newborn baby looks very fragile and mothers take their firstborn in their arms with understandable trepidation and are afraid of accidentally harming him...
“>Learning to hold a baby in your arms in different ways
- I recently added peach oil to my home “beauty” collection to care for my brittle hair damaged by ironing during styling...
">How to properly use peach oil for hair care
- The unique restorative and rejuvenating properties of golden olive oil have been well known since ancient Greek times. If you will…
">Homemade masks based on olive oil, 5 best recipes
- Orange-red oil from sea buckthorn berries can often be found among other ingredients in homemade mask recipes, since regenerating ...
“>How to make oil from sea buckthorn berries, mask recipes
- You probably have known about the benefits of castor oil since adolescence, since many girls (including me) used it to care for inflammation...
">How to apply a mask with castor oil to the roots and hair
The following materials:
- Well-groomed nails with an immaculately executed manicure perfectly emphasize your feminine image and a single color is quite suitable for everyday style...
“>Draw simple monograms on the nails. Photo and video tutorials for beginners
Previous materials:
- Acrylic is still considered one of the best means for performing nail design, among the most affordable and easy to use. Even with minimal experience...
">Step-by-step lessons on making drawings with acrylic paints
- A beautiful, carefully executed manicure harmoniously complements a woman’s sophisticated image and visually lengthens well-groomed fingers. And in order to design...
“>Learning to make simple designs on nails at home
- Many women prefer to wear a single-color or two-color manicure (for example, now an extravagant colored French manicure is in fashion) on short nails, so...
“>Beautiful manicure with patterns on the nails. Photo and video materials
- Stamping (translated from English: embossing or stamping) is a unique nail art technique for quickly applying designs and...
“>How to do stamping nail design. Photos and videos for beginners
- The popular technology of transferring any thematic design or pattern onto nails using a special stamp is ideal for active, business women…
“>How to use stamping varnish. Gel polish coating
- Stamping allows you to quickly apply absolutely identical designs to all nails, which are no different in appearance from those made with a thin brush by a nail artist...
“>Which stamping plates are better. Tips for choosing
- With the help of stamping, you can quickly and easily create nail designs with drawings, patterns or ornaments at home. For this popular type...
“>Comparison of stamping dies. Photo design and video tutorials
- Openwork nail design is rightfully one of the most sophisticated and sophisticated ways to decorate a manicure. They look especially elegant...
“>Manicure with lace. Nail designs, fabric and sticker designs
- If you are looking for an easy and inexpensive way to create trendy nail designs at home, be sure to pay attention to the videos below...
“>We draw patterns and designs on nails with a needle at home
- Looking at the latest in modern nail design in photos in fashion magazines, you inevitably wonder how much time and labor the artist spent creating...
">Fashionable manicure. Drawings and dots monograms on nails
- It's no secret that French-style manicure on short nails continues to be popular this year. But on the eve of some sign...
“>Chinese painting on nails, photo. Video lessons for beginners
- Today, manicure with a pattern is back in trend and graphic patterns, which were at the peak of popularity quite recently, are gradually replacing the elegant, subtle...
">Manicure with butterflies. How to draw on nails, step by step with photos
- It probably won’t be easy to find a girl who hasn’t at least once thought about doing nail art on her own, without leaving home and...
“>Beautiful designs on nails at home. Photo, video MK
How to draw a maple leaf on your nails?
To beautifully depict a maple leaf on your nails, you will need a little artistic skill and knowledge. First of all, you should carefully examine a real leaf (live or photo). It has five sharp ends and many veins inside. It is these details that will help you draw it as realistically as possible in a manicure.
It is best to first apply a bright color (yellow, orange or red) and only then start drawing the outline, as well as the veins.

How to draw a maple leaf on your nails step by step?
Autumn leaves on nails, manicure options
The maple leaf is very beautiful, but it’s not the only thing that can be depicted on nails. Bright colorful foliage of different shapes can also decorate your manicure and give it an “autumn mood.” The main thing is to stick to gold and brown shades appropriate for this time of year.
Autumn style manicure ideas with foliage:
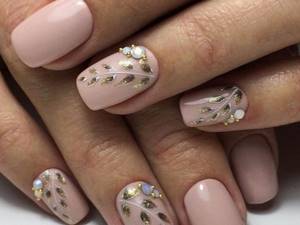
A light manicure on a beige or transparent base can match any style and clothing.

Autumn leaves: a decor option
Zentangle and doodling are a popular drawing technique not only on paper, but also on nails. Unusual leaves will help you decorate your autumn manicure.
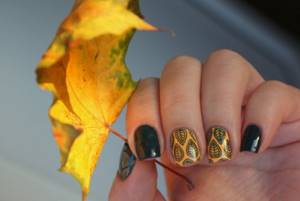
Stylish autumn manicure with leaves using the Zentangle technique
You can decorate any color of nail polish with a simple pattern of autumn foliage in gold. Just apply the design with a brush and make a black outline over the gold.
Golden leaves - autumn manicure decor
Design options for short nails
Despite the short length, you can do a manicure with leaves on short nails. The main thing is to choose the right size and quantity so that they look harmonious.
- Use clear varnish as the base coat. And highlight the protruding edge of the nail with a bright shade - for example, orange. And on one or two nails draw small leaves.
- You can apply a monochromatic coating of some bright, juicy shade on all nails, except one. Paint one nail with a contrasting color (for example, white) and draw a leaf. You will get a beautiful and stylish manicure.
- Choose a dark shade for the background, and use a light color for the design itself. You'll get an interesting manicure option.
You should not make leaves that are too large - such a design will not look harmonious and aesthetically pleasing on short nails. Also, you don’t need to paint too many leaves so as not to “overload” the nail plate. Then you will get a beautiful and stylish design.
Autumn manicure with gel polish for short nails and long nails
The advantage of gel polish is that it always looks good, has a glossy sheen and a dense texture that prevents the coating from cracking. You can do an autumn manicure on long or short nails; it suits everyone.
Depending on the shape of the nails and their length, you should select a pattern. Long suits French and large-scale drawings with many details, short ones “love” decoration on one or several fingers.
Autumn manicure ideas for long nails:
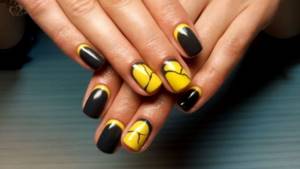
When decorating long nails, you can not be afraid to experiment and combine colors. For example, bright yellow leaves will contrast greatly with a gray base background. Black and white varnish will help add detail to the picture.
Original autumn manicure in gray and yellow tones
The longer the nail, the more space there is for drawing and realizing your fantasies. Long nails allow you to decorate them with a large number of interesting patterns.

Bright, spectacular manicure in autumn style on long nails
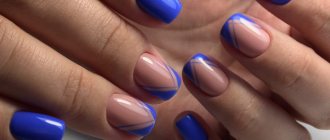
Geometric designs on nails have become very fashionable and popular lately. The correct selection of polish colors will help you transform a geometric pattern into an autumn manicure. For example, burgundy is the color of autumn, fallen leaves and ripe apples.
Autumn manicure with a geometric pattern
Autumn manicure with gel polish for short nails:
Short nails also leave space for painting. A gradient transition of colors or a jacket will help to visually lengthen such a nail.

Autumn manicure on short nails
Painting them in different colors will help to emphasize the beauty of your nails, even if they are not very long. Choose the right fall shades and patterns that resemble foliage.

Stylish autumn manicure with gel polish for short nails
Design options for long nails
Of course, on long nails it is easier to create various patterns that will look impressive.
- The combination of a background covering of several shades turns out to be interesting. For example, use one color for four nail plates, and another, contrasting color for one. Draw leaves on one nail - you get a beautiful manicure.
- Experiment with textures. Use a matte finish in combination with a polish with fine shimmer. Get an amazing manicure.
- Delicate pastel shades also look beautiful on long nails. On one nail, draw leaves - for example, birch or fern. Also complement the design with rhinestones. Just don’t use too many of them to make your manicure look organic.
- If the length of your nails allows, then you can create foliage from maple leaves. And if you add droplets of water to it, you will get a very effective and beautiful design.
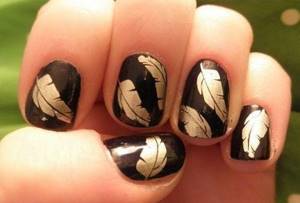
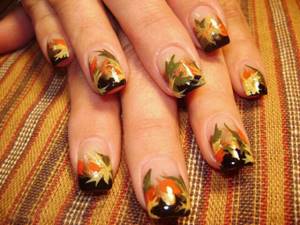
- On long nails you can do a black manicure with leaves. They just need to be made in bright contrasting shades. Maple leaves look especially beautiful.
On long nails this manicure looks impressive and original. And the length allows you to create entire small paintings.
Autumn matte manicure for short nails and long nails
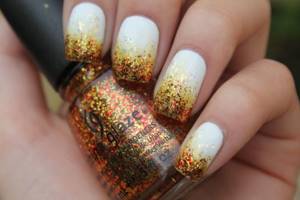
Autumn manicure isn't just about painting your nails with foliage. This is, first of all, adhering to a certain “warm” color scheme , which is associated with the onset of the “golden time” and the cold season.
Decorating your nails can be done by a specialist, but it is quite possible to do it yourself at home. For example, choose any neutral base polish color and cover it with bright gold and orange glitter.
Simple autumn manicure at home
depict autumn motifs yourself using special acrylic paints for painting on nails. Such paints do not dry quickly like varnish and are as easy to work with a brush as, for example, with gouache.

Painting with special paints on nails to create autumn decor
polish with fine gold glitter will help you decorate short nails, giving them an “autumn mood . There are a lot of color shades of this varnish on sale.
Autumn decor for short nails
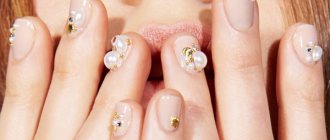
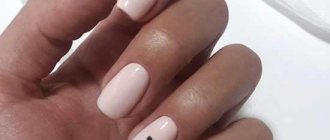
Lovers of classic manicure will be pleased to know that nude shades (beige) are also considered autumn. You can decorate nails with a light base color with a pattern, monograms or dotted patterns.
Nude autumn manicure
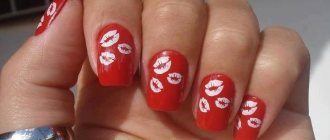
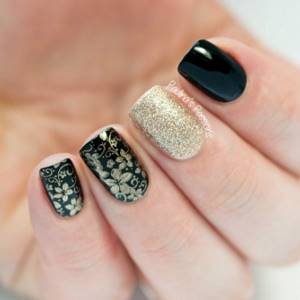
Red, burgundy and black polish also corresponds to autumn manicure. Decorating with rhinestones and gold sand will help to decorate and make it brighter.
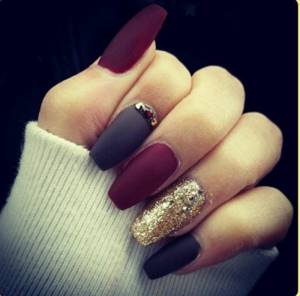
Elegant autumn manicure
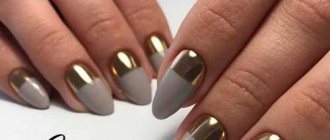
Over the last 2-3 seasons, lunar manicure has become especially popular, and for good reason.
This is a chic, universal nail design option, ideal for lovers of delicate, pastel shades who are already tired of the French look. Initially, this design was even called “reverse French”, because it emphasizes not the smile line at the tip of the nail, but the crescent or semicircle at its base.
Unlike the French manicure, not translucent flesh tones are more popular in lunar manicure, but rich enamels without shimmer. Moreover, their colors can be very different: from nude to rich red, blue, mint, etc. It is very popular to highlight the “hole” or “crescent” in white, although this is not an axiom or even a rule.
Of course, it is most convenient to do a moon manicure with gel polish. Colors can always be corrected in time, excess can be removed, and drying any number of layers does not cause any problems. But the Manikyr.ru team understands very well that not every woman has everything necessary to apply shellac at home, so today’s example is based on ordinary coatings.
For work we will need:
- Base coat for varnish;
- Thick enamel varnish of the main color (ours is pastel pink);
- Thick, rich varnish for decoration (ours is classic white) or acrylic paint of the desired shade;
- Thin brush or hair brush;
- A piece of foil or any palette that is convenient for picking up varnish;
- Wooden stick;
- Dots;
- Transparent top (preferably with a quick drying function).
So, let's start our moon manicure with flowers
Please note, in order not to visually weigh down your hands, but to give them a special charm, we place the floral pattern only on a pair of nails. Traditionally this is the middle and ring fingers
The pattern can be applied with regular nail polish or acrylic paint. The second one is brighter, denser, dries better.
Step 1
Preparing your nails for manicure. We give them the desired configuration, remove the cuticle, and degrease the surface. It is desirable that the degreasing liquid also have the effect of a disinfectant.
Apply a thin layer of base clear polish to dry nails. It is better to smear it from a drop placed in the middle of the nail.
Dry the base thoroughly. This usually takes no more than a couple of minutes.
Step 2
We paint all the claws with varnish of the main color in one layer and dry thoroughly. You should not try to apply a thicker coating; anyway, the first application of varnish usually does not give the desired shade saturation. Two thin, thoroughly dried layers will look much better.
Moon manicure with flowers Step 2
Step 3
When the first layer of varnish has completely hardened, apply a second layer to all nails, except those that are planned to be decorated with flowers. We also dry it thoroughly so that at the most crucial moment nothing gets smeared.
But we will draw flowers with dots directly on the undried second layer. That is why we are leaving the nails intended for decoration free for now.
Step 4
Drop a little decorative varnish or acrylic paint onto the foil/palette.
Quickly paint the nail with a second layer of the main background varnish. We take dots and using 4-5 large dots located close to each other, we depict a schematic flower.
Moon manicure Step 4
Immediately take a wooden stick and draw thin straight lines from the center to the middle of the petals to give the pattern additional volume.
Step 4-2
We complement the composition with a thin, light “tail” of dots. This makes the floral design more dynamic.
Step 4-3
Step 5
Now on all the claws, using a thin brush, draw a neat semicircle at the base of the nail. First we draw an arc, and then fill it with color
It is very important that the “holes” turn out the same
Moon manicure with flowers Step 5
Step 6
After drying the finished pattern, cover everything with a thin layer of transparent top.
Autumn black manicure, decor options
Black varnish very successfully serves as the base color for applying decor and designs on nails. It contrasts with gold, orange and yellow lacquer.
Autumn manicure with black polish:

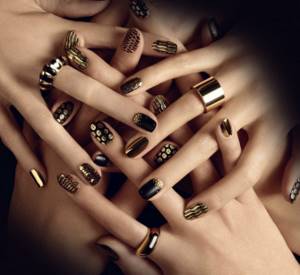
Nail styling, autumn manicure
Autumn manicure in black and gold colors
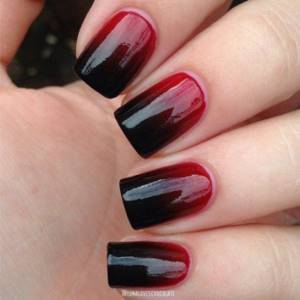
Gradient black and red autumn manicure
Black and yellow autumn manicure
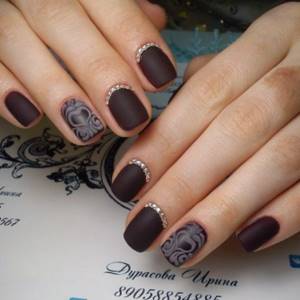
Matte manicure
Nail design trends change with each season. Matte manicure is valued for its uniqueness, but it is worth considering its ability to emphasize the imperfections of the nail plate.

Delicate colors can contrast with bright patterns that will highlight the girl’s individuality. Executing this technique is not particularly difficult. You just need to purchase special materials and then start creating.
Tools and materials
The following instruments are prepared and disinfected in advance:
- scissors;
- fine-grained file;
- grout buff;
- orange sticks;
- cotton pads (lint-free);
- brush (thin);
- Ultraviolet lamp.
Materials for work:
- base and top (matte);
- cuticle cleaner (solvent);
- degreaser;
- means for removing the dispersion layer;
- varnishes (coffee with milk – base, green, black, pink).
Step-by-step instruction
Pre-prepared nails treated with a degreaser are covered with a base and dried in a lamp. Colored varnish is applied in several layers to give uniformity and placed in a lamp. One of the fingers is decorated with a twig, which can be painted with a brush and green varnish. The drawn element is dried.
Green leaves are drawn on the branch, dried and additionally shaded with a black line. Then the dried design is covered with pink buds and the nails are placed in a lamp. After this, all nails are covered with a matte top coat, dried and the dispersion layer is removed.
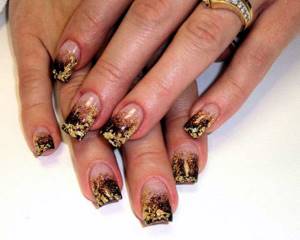
Autumn French manicure: photos of nail decor
French is a classic way to decorate your nails and at the same time make them visually longer. French can be white or have any other shades. The autumn jacket is distinguished by gold decoration, patterns and foliage designs. This French style suits short and long nails.
Ideas for an autumn jacket:
A black French jacket will be able to contrast the beauty and bright colors of the painted foliage.
Black jacket in autumn style
The advantage of the autumn jacket is that the overgrown part of the nail covered with varnish can be hidden with a pattern or design.
Stylish autumn French manicure
Autumn lunar manicure: photos of nail decor
create an autumn manicure using glossy and matte nail polish colors. Highlighting the holes will help decorate it in a modern style , and decorate it with gold. Burgundy, red and brown manicure colors are invariably associated with autumn.
Ideas for autumn manicure with holes:

Matte manicure with holes in autumn style
knitted manicure , is becoming increasingly popular It can only be done using gel polish. It looks not only stylish, but also very “autumn-like”.
Knitted autumn manicure

Knitted autumn manicure with holes
Choosing a leaf pattern
Leaves can be widely used in nail design, but it is in the fall that the traditional autumn shades of such designs become especially popular: burgundy, cherry, red, orange, yellow, gold. In this range you can create countless different options, and all of them will look stylish and modern.
Different types of leaves can be used in the designs, but most often those that are easily “recognized” at first glance are used: maple, chestnut, oak, lilac, acacia, and so on.
Maple leaves
These are one of the most popular types of leaves. In our minds, it is the colored maple leaves that symbolize the onset of autumn. They are beautiful in shape, and the easiest to find in the form of sliders and stencils. Also, a large number of stamping designs use popular motifs with the inclusion of maple leaves.
- Maple leaves in nature can be colored in intermediate tones from light yellow to dark red. They often have uneven coloration, where the color appears in patches or is distributed between veins of a different color. This is very beautiful and gives the drawing more volume.
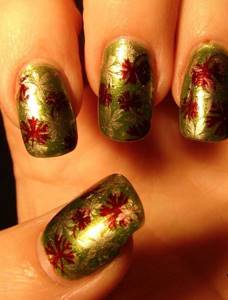
- Maple leaves go well with nail polish colors traditionally considered fall: gold, yellow, orange, red, burgundy, cherry, brown. Light leaves look beautiful against a dark background, and dark leaves made in rich colors look beautiful against gold and yellow.
- You should not paint all your nails with patterns, as unnecessary variegation may appear. It is enough to decorate 1 – 2 nails. But to enhance the effect, you can add a tiny rhinestone, a little glitter or sequins, or a drop of “water” from a special silicone. This will enhance the fall theme and brighten up your manicure without overwhelming it.
- A combination of several colors of varnish in a manicure looks beautiful, which will be emphasized by a pattern of maple leaves on several or one finger. For example, you can cover all your nails with dark cherry polish, and your ring nail with gold or yellow. Apply a leaf pattern on it in burgundy and cherry tones so that the design is organic and matches the color of the manicure. It will turn out stylish, fashionable and not at all overloaded with details.
Autumn brown manicure: photos of nail decor
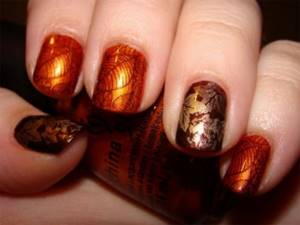
Brown color is ideal for creating an autumn manicure. It can be successfully decorated with gold sparkles, foil or sand. The classic brown color and its dark as well as light shades have become extremely popular and fashionable.
Autumn manicure ideas in brown:
Original autumn manicure in brown Brown autumn manicure in two shades Modern dark brown manicure
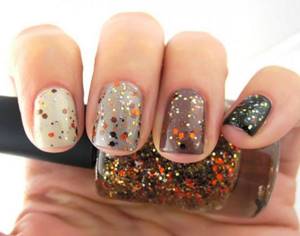
Autumn manicure with rhinestones and sparkles: photo
Sequins and rhinestones are one of the most spectacular decorations for manicure . They can be chosen in any color and size and attached in your preferred location. Rhinestones and glitter will make your nails shimmer and display highlights . This manicure will definitely attract attention.
Ideas for autumn manicure with rhinestones and sparkles:
Manicure in autumn style, decorated with rhinestones
Dark autumn manicure decorated with rhinestones

Light manicure decorated with rhinestones in autumn style
Light manicure decorated with sparkles in autumn style
Beautiful autumn manicure: green, orange, red and white
Autumn manicure can be very bright, because in the autumn season itself there are many colors: green, yellow, orange, brown, red. A manicure in an autumn style is also distinguished by the presence of these colors, which can be decorated with patterns, gold, rhinestones and other elements.
Autumn style manicure ideas:

Green autumn manicure

Original autumn green manicure

Bright orange autumn manicure

Red autumn manicure for long nails
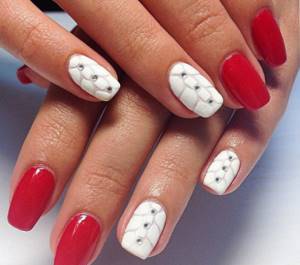
Red and white manicure with powder
Design with birch leaves
This design option looks sophisticated and elegant. This manicure idea with leaves looks especially beautiful on long nails.
- Apply base coat to your nails.
- Then make the background a soft pastel shade.
- Using a thin brush, paint several vertical stripes, slightly curved. You need to draw from the base of the nail upward.
- Draw small birch leaves on the branches. When the design is dry, add some gold glitter.
- Apply top coat over the design.
Manicure with leaves is not only relevant in autumn. If you paint them green, it can be done in both spring and summer. You will get an interesting stylish nail design that looks bright and original. You can add gold glitter to make the design more elegant. If you choose bright colors for your manicure, then the design will be spectacular, while pastel colors make it more delicate and sophisticated.
Autumn manicure with gold: photos of nail decor
Gold is a symbol of autumn. That is why gold decor in manicure is invariably associated and harmonizes with the autumn season . You can make this decoration on your nails in any way: using sand, foil, rhinestones, slides or varnish.
Ideas for gold nail decorations:
Modern gold manicure
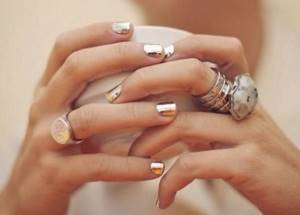
Mirror gold manicure Fashionable gold autumn manicure
Nude manicure
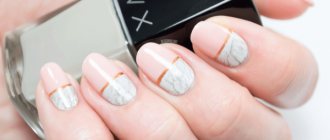
Minimalism is characterized by the use of nude shades, which are combined in clothing, makeup and manicure. The pastel palette contains colors from nude beige to taupe. The practicality and simplicity of the design attracts women of all ages.
A minimalist design done with discreet varnish colors looks sophisticated on neutral shades. Manicures are often decorated with a sakura sprig, which symbolizes spring and romance and matches the nude design.
Tools and materials
The procedure will require the following tools:
- basic set;
- brush (thin);
- dots;
- Ultraviolet lamp.
Materials:
- base and top;
- degreaser;
- means for removing the dispersion layer;
- gel polishes (beige – base, brown, white, pink: light and dark).
Step-by-step instruction
Pastel shades highlight skin imperfections, so you should approach the preparatory stage responsibly. Use a file to give short nails an oval shape. The cuticle is treated with a softener and removed with an orange stick. Nails are polished with a fine abrasive buff to eliminate unevenness.
Finish the preparatory stage with a degreaser, which is used to wipe each finger.
A base is applied to the nails, dried in a lamp and covered with beige varnish in 2 layers, each dried separately. Take a brush and draw thin ornate lines in brown. If there is no pure shade, it is obtained by combining blue and green varnishes.
Using dots, white dots are placed to represent buds and dried. Next, take light pink varnish and put specks inside the buds and place them in a lamp. Additionally, dark pink dots are applied to add realism and dried again. The nails are covered with top coat, dried and the sticky layer is removed.
Autumn manicure options, design, photo
It’s not difficult to choose a suitable autumn manicure for yourself; the main thing is to adhere to fashion trends in choosing the color and decor of your nails. A beautiful design can be made both in the salon and at home.
Ideas for autumn manicure:
Manicure in green and gold Unusual autumn manicure with a crackling effect

Decorating manicure with gold
Gold painting for autumn manicure
Autumn manicure in burgundy color Gold reptile decor for autumn manicure
Manicure in “autumn” colors and gold decor
With a branch and rhinestones
Rhinestones are a common attribute in nail design; they come in a variety of colors and shapes. They make the manicure voluminous, realistic, and allow it to sparkle in the sun.
The main disadvantage of rhinestones is that they catch on clothes and fall off. But there are methods by which they stay on the nails longer, preserving the beauty of the design.
Tools and materials
Manicure is performed with such tools as:
- scissors;
- fine-grained file;
- grout buff;
- orange sticks;
- cotton pads (lint-free);
- brush (thin);
- Ultraviolet lamp.
Materials:
- base and top;
- degreaser;
- cuticle solvent;
- means for removing the dispersion layer;
- pigment – rubbing (burgundy color);
- varnishes (green, black, red and white);
- rhinestones.
Step-by-step instruction
Prepared nails are covered with 1-2 layers of base and dried (each separately). The nails chosen for the design are painted with white varnish, dried and the creation of the design begins. The green branch requires working with a thin brush, then the nail with it is placed in a lamp, and after that the pattern is shaded with black and dried again.
Red flowers are placed on the branch and the nail is placed in the lamp. Top is dripped in the center of the bud, which is covered with rhinestones and sent to dry.
The remaining nails are painted black to diversify the design. Then it is dried in a lamp. There is no rush to remove the sticky layer: burgundy pigment is rubbed into it. After the process is completed, a top coat is applied to the nails, dried and the dispersion layer is removed.