Every woman should look 100% not only her body or face, but also her arms, legs - especially her nails. Nails must be well-groomed and clean - not only from the point of view of hygiene, but also aesthetics. Recently, fashion trends offer women, girls and even little ladies to create an extraordinary manicure using design tape.
Among the many nail design options, it is worth paying attention to nail design tapes. A photo design for step-by-step use of different types will be offered in several options.
What is nail design tape?
Nail art tape is a metallic tape in a reel of different widths, lengths, colors and shapes. An adhesive coating is applied to the back of the tape, with which the tape is attached to the nails.
This tape is used in nail design, in any manicure and with regular nail polish, acrylic coating, and gel polish . The main rule for its use is that the nails must be dry, then the tape will hold firmly and lie flat, photo of the design.
Don't miss the most popular article in the section: How to draw monograms on nails step by step for beginners. Instructions with photos.
Attaching the tape to the gel polish coating
The procedure for applying stripes with a metallic sheen to a gel polish coating is not much different from a varnish coating. The tape coating as an accessory is applied to the nail plates only on ready-made gel polish coatings. Then it is secured with a finishing layer.
Before gluing the tapes, the coating is removed from the sticky layer. The tape, fixed on one side or in the middle (in the case of a lunar design), is tightly stretched to avoid creases. Excess tape protruding beyond the edge of the nails is trimmed and secured with a top coat.
View this post on Instagram
Posted by Unreel (@extremeofficial)
Benefits of using tape
The main advantage of design tape is the huge selection of shapes, colors, widths, and thicknesses.
And:
- The price of the tape is low, you can buy at least a pack of different tapes at once;
- Easy to use, even an inexperienced person can handle its use;
- Creates a beautiful, sophisticated design on the nails;
- It may be stored for a long time - without using it, it takes up little space;
- Retains its appearance for a long time; Nail design with ribbon for short and long nails. Photos, ideas with rhinestones, tape. Master class: how to do a manicure with gel polish
- Helps in creating straight lines if you have difficulty drawing them on your nails.
Working with such a design, there are many more advantages that every woman will highlight for herself.
Stencil tape in nail design
If you want to add some zest to your ordinary manicure, make, for example, a perfectly even stripe, geometry, but with a poor eye and a trembling hand you cannot draw the lines perfectly, then tapes can come to the rescue. After all, it is not at all necessary to glue them on the nail; they can be used as a stencil.
It’s not difficult to make such a design, for this you need:
- Apply polish to prepared nails and wait for it to dry.
- Place a tape with a pre-designed design on top, sealing it well to the nail.
- Cover the nail with varnish of a different color, being careful not to touch the decor. Then all that remains is to remove the adhesive tape and dry your nails.
This manicure is suitable for those girls who do not like excessive shine, but at the same time want to see the clarity and evenness of lines, diamonds, squares, etc.
Two options for using tape in manicure
First of all, nail design tape is a decor that is used to create and highlight a design on the nails using a certain color of the tape.
When creating an aquarium design in the form of a 3-D effect, it is carried out in several stages:
- Apply one layer of gel to match the tone of the nail plate, glue several tapes on top, and dry;
- Apply a transparent gel, crumble cut tape or strips on top, but in a different direction, dry the nails under the paw;
- Apply another layer of clear gel.
- A beautiful 3-D manicure with ribbons is ready.
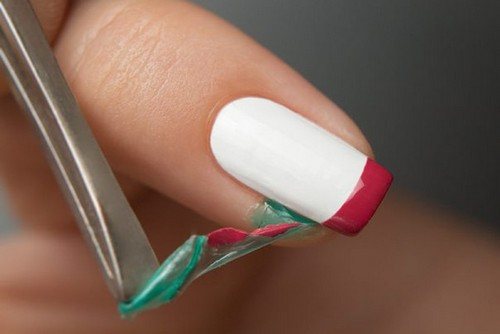
The second option for using ribbon is as an auxiliary design element. It creates various geometric and other shapes on the nails and removes the tapes using tweezers.
Practical tips for use
Beginners who decide to try a manicure using tape for the first time may encounter some problems. Now we will try to warn fashionistas against serious mistakes and give some practical tips on using sticky strips.
- Choose the simplest patterns possible. There is no need to immediately grab onto complex multi-level and intricate drawings. One strip will be enough to start with. Try to get used to it and learn how to carefully transfer the decor so that it does not extend beyond the nail.
- It is necessary to carefully ensure that during gluing the strip is smooth and does not wrinkle. Otherwise, the result is unlikely to please you, and the manicure will look careless and untidy.
- Using several color schemes and additional decoration with sparkles and rhinestones within one decor, it is important to know a sense of proportion and taste.
- When choosing the width of the tape, carefully evaluate the shape and length of your nail plate. For short, round and square nails, a thin version is more suitable. While owners of an almond-shaped nail plate can experiment with the width of fashionable decor.
- The widest options are used as an independent accessory, which can be the main focus of a manicure.
As you can see in the photo, a manicure with a design ribbon looks stylish and original, especially if you learn how to properly combine it with other options for modern nail art. Therefore, if you want to look stylish and beautiful in the coming season, feel free to go to the store for ribbons. By the way, they are quite inexpensive, so any fashionista can afford to assemble a whole arsenal, differing in color and width.
https://youtu.be/https://www.youtube.com/watch?v=6kWMhTqN1fc
_
Nail design with ribbon (+photo)
To design nails with tape, you need to prepare your hands and nails for manicure:
- Make a bath for hands and nails;
- Wipe your hands dry;
- Apply hand cream;
- Remove the cuticle with a wooden stick;
- Trim and trim nails to the required length;
- Use nail polish remover to degrease the nail plate;
- Apply varnish, acrylic or gel polish;
- Dry thoroughly;
- The surface of the nail plate should be smooth;
- Glue the tape according to the sketch of the future manicure design, stretching its edges and pressing tightly;
- Apply clear varnish and sealer on top.
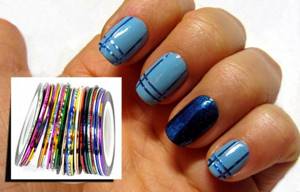
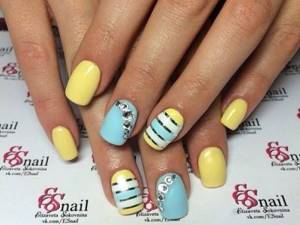
Where to begin? The simplest option for manicure with tape is zebra:
- Choose a thin black or white ribbon;
- Apply nail polish (gel, acrylic). If the tape is black, then the varnish is white and vice versa. You can use other colors, but so that they are contrasting;
- Glue the tape in 2-3 rows - on short nails, and in 3-5 rows on long nails. If desired, the ribbon can be additionally decorated with rhinestones, stickers;
- Cut off the remaining tape;
- Apply clear varnish;
- Dry thoroughly.
Striped manicure: color palette
When choosing a color palette for a manicure with stripes, you should remember that the final look of the image depends on this. Let's look at some very popular color combinations today. They will allow you to create a manicure with more organic strips of gel polish.
Nude
Black
Burgundy
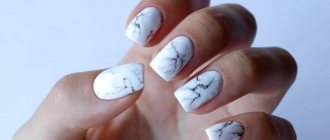
White
With gold
Pink
Red
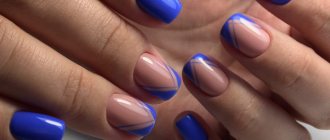
Blue
This color palette opens up the opportunity for the artist to experiment and create a completely new design.
Using any combination of colors from those presented above, you can create a manicure that the client will definitely like and can complement the look.
However, the choice of color palette largely depends on the length of the nails and their shape. For example, when wondering how to make a striped French manicure, it is important to give preference to a suitable design. After all, there are some restrictions.
For short nails, a design made of thin stripes is more suitable. If the length of your nails allows, feel free to experiment with geometric shapes and wide ribbons. Rhinestones are also best used on longer nails.
Yellow
Add gray and black if you want to be on trend. Have you chosen green? Please note that in a bright version only thin and discreet stripes are suitable.
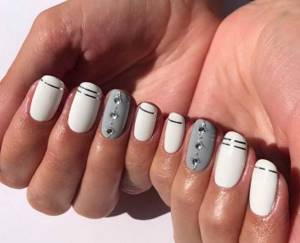
Grey
This is a stunning combination with black geometric stripes, especially if they are folded into a patterned pattern. Minimalists will love the transitions from gray to beige and brown.
Lilac
Lunar manicure
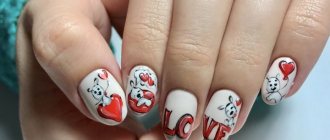
Fashion trends are constantly changing, but every woman wants to be in trend from the top of her head to the tips of her nails. One of the fashionable trends in nail art is moon manicure.
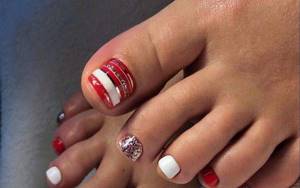
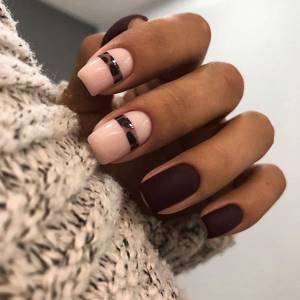
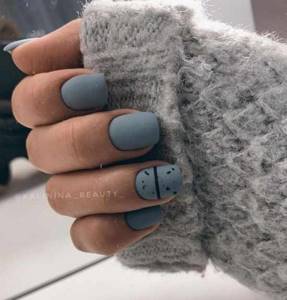
What is a moon manicure? It is quite easy to recognize; the base in the form of a “crescent” stands out on the nails, but some create a square or triangular, double highlight with ribbons, in combination with a jacket. There are many ideas, everyone chooses according to the event: for everyday or special occasions.
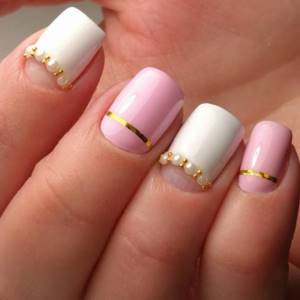
For an everyday lunar manicure, a design in white and pink tones with a gold or silver ribbon, as in the first photo, is suitable:
- Prepare hands and nails for manicure;
- Apply the base as a white varnish;
- Dry the white varnish;
- Apply pink polish to the top of the nail and dry;
- Secure with gold ribbon;
- Apply clear varnish on top of the manicure.
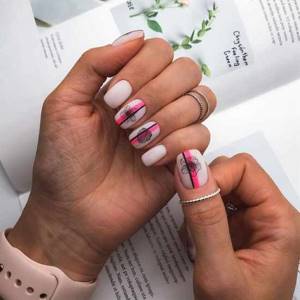
It is possible to create such a manicure with one color of varnish (second photo):
- Apply colorless varnish to your nails and dry it;
- Fasten the tape;
- Apply white varnish to the top of the nail and dry;
- Apply a transparent sealer on top.
Stylish options
Using a special tape for manicure allows you to create a wide variety of original patterns on your nails, as well as update existing ones. Below we will introduce you to the best ribbon manicure ideas.
Interesting! A manicure with a ribbon is versatile, as it looks great on both long and short nails.
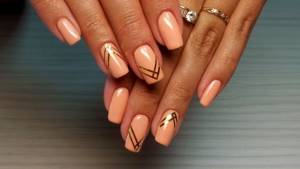
French
If you have ever tried to make a French manicure at home, then remember how much effort it takes to make an even and neat stripe on all nails. Even the use of special kits for French manicure does not always save the situation. Adhesive tapes allowed us to look at French clothing in a new way. All you need to do is glue the strip at the required distance from the edge of the nail, and this does not have to be done evenly. Take a look at the photo - the V-shaped jacket looks fresh and original.
There are no restrictions when choosing the tape itself. A fashionista can stick on a strip of any color, for example, choose a stylish metallic or gold.
Geometry
Surely we won’t surprise anyone if we say that geometric motifs are still at the peak of popularity. And what could be simpler than creating squares, rhombuses, triangles and other shapes using stripes.
In this case, the strips can be left on the nails, choosing the desired shade, or removed after the procedure is completed. Step-by-step instructions for an original and easy-to-perform manicure with design tape are presented below.
With the help of such sticky strips you can easily do both everyday manicure and business and evening nail art, while the number of geometric shapes can vary from one to several pieces.
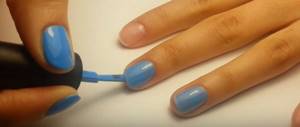
Striped
The striped design looks incredibly original and will certainly make others pay attention to your manicure. All you need to do is apply regular or gel polish of the desired color to your nails, and after it is completely dry, decorate it with adhesive tape. Just like in the previous version with a geometric design, the stripes can be left or covered with varnish of a contrasting color and removed after it has dried. Step-by-step instructions for the latter option are presented in the photo below.
Interesting! When using gel polish, the tape must be glued before applying the top coat.
Interesting: Gel polish manicure 2022: new items
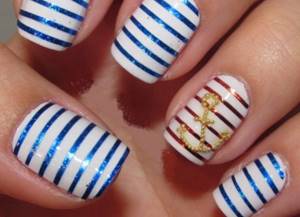
Striped manicure is a real find for summer marine nail design. Decorate one or more fingers with a red and blue stripe and enjoy the admiring glances of passers-by!
Beautiful blue
Gradient
Manicures with color transitions are very popular among fashionistas today. Despite the fact that this nail design is self-sufficient, it looks great in combination with ribbons.
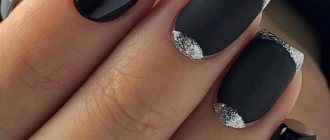
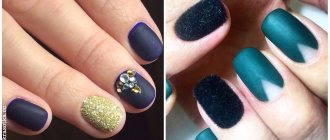
Matte
A matte manicure creates a velvety effect on the nails, but most often this design requires additional decor, as it can look quite boring on its own. In this case, ribbons come to the rescue, especially metallic and golden shades. They add luxury to your nails, making the manicure festive and presentable.
Lunar French
Like the classic French manicure, moon manicure requires updating. Fashionistas are constantly looking for something new and unusual. Design with ribbons is a great opportunity to make your look more interesting. Take a look at the photo; colored stripes not only simplify the process of creating a “hole”, but also allow you to design it in an original way, changing its shape and outline.
Interesting: Moon manicure: original ideas
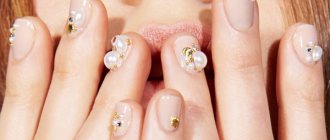
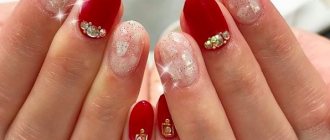
Rhinestones and sparkles
Despite the fact that experts warn fashionistas and always advise moderation in everything, a manicure with a ribbon can be supplemented with rhinestones, sparkles or glitter. The main thing is not to overdo it. Small rhinestones glued along the shiny line, glitter between the stripes - all this will make the manicure even brighter and more festive.
Rubbing
When creating a manicure with acrylic rubbing, you can also use tapes. The nails are not just fashionable, but also ultra-stylish, bright and catchy. Try one of the options suggested in the photo below.
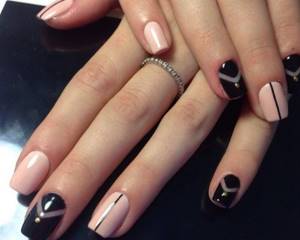
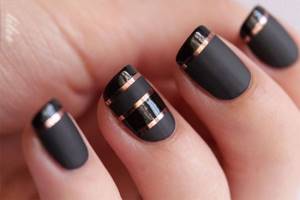
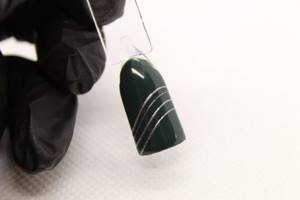
Black and gold
Black color is not only sadness, but also the color of creative individuals, and a manicure in the form of black polish with a gold ribbon or vice versa is a refined and elegant classic. This manicure on your nails will look rich and luxurious.
To create this nail design using tape, you will need several steps (design photo):
- Black varnish (gel, acrylic), gold ribbon, colorless fixative;
- Clean nails and remove cuticles;
- Apply black polish (gel) to dry nails and dry under a lamp;
- Glue a gold ribbon: along, across, diagonally, or create checkered patterns and diamonds from them, perhaps imitating a moon manicure - glue a gold ribbon at the base of the nail onto the black polish. The design depends on the woman's unlimited imagination;
- Apply fixative and dry nails again.
LED strip in the interior of a children's room
This room should be very calm, decorated in warm, pleasant colors and have appropriate lighting, especially if your child is overly active. The use of bright lighting is only permissible in the play area or in the area where developmental activities take place.
- If your child is old enough and it's time to do homework, you need to provide him with sufficient lighting. Sometimes the dimensions of a nursery force the use of furniture such as a loft bed. On the ground floor there is a desk, which cannot boast of large dimensions. Putting a table lamp on it also means taking away some free space. But if you have a roof over your head, you can try sticking a diode strip of neutral white light, which will do the job perfectly;
- In the same way, you can highlight wall shelves or a desk extension;
- If your little astronaut dreams of his own spaceship, use colored tape to highlight some pieces of furniture. For example, his bed is below and a wardrobe or chest of drawers. And then your child’s imagination will do everything for you;
- If a child is afraid to sleep in the dark, the above method will help get rid of this problem;
- You can also create a soft glow by placing tape on the curtain rod behind the curtains;
- In the play area, you can highlight chests with toys to make it easier for your child to find the desired item in them. The main thing is not to use cold white light, which will turn the room into an operating room and can distort colors and do not overuse it.
Quick Ribbon Design
At home, you can quickly create a manicure design using tape on your nails; there are many options with a photo of the design.
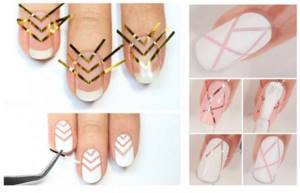
1st option – “Herringbone”:
- Prepare hands and nails for manicure: wash, clean, file;
- Choose a varnish. In our case, white;
- Cover your nails with clear varnish or gel;
- From the base of the nail, use tweezers to glue a tape in the form of a triangle without a base or in the form of a tick, this creates 3 rows;
- Cover the top of the entire nail with white varnish;
- Dry the varnish under the lamp;
- Use tweezers to remove the tape, removing it by the protruding tails along the edges of the nail;
- After removing the tape, apply clear polish and dry your nails.
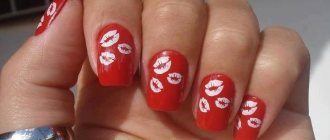
2nd option – “Sailor”:
For this manicure, we select the colors of the ribbon and varnish in accordance with the marine theme: blue, blue, white, coral, silver.
- We completely cover the nails with white or coral varnish;
- Dry your nails under a lamp;
- We glue a blue or silver tape across the nail in several rows, depending on the length of the nail;
- We cut the edges of the tape with scissors to the very base of the nail;
- Apply the final sealer and dry the nails.
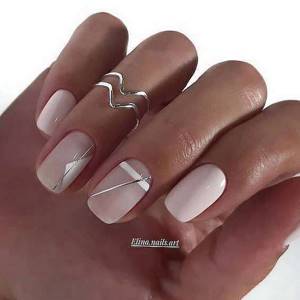
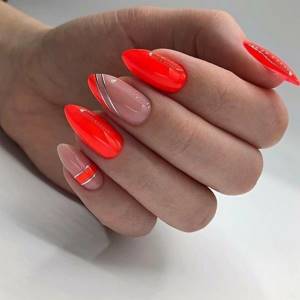
3rd option – “Oblique lines”:
In this manicure, the tape plays a supporting role for an even distinction between colors.
- Apply light pink polish and dry your nails;
- Glue the tape diagonally at the base of the nails;
- Paint the upper part of the nail with varnish 1 tone darker than the previous one, dry it and remove the tape;
- On top of the second layer of varnish, closer to the center of the nail, at the same angle, glue the second tape;
- Paint the edge of the nail above the tape with varnish 1-2 shades darker than the previous one, dry it and remove the tape;
- Apply clear varnish to all nails and dry the nails under a lamp.
Each of the presented options takes from 40 minutes - quickly and beautifully.
Manicure tape as a template
Manicure tape is used as a template to temporarily cover up parts of the nail plate and create a two-tone design. This option is suitable for beginners who have not yet mastered nail painting and have problems drawing straight stripes.
Prepare everything the same as for a regular manicure:
- manicure kit to treat the cuticle, free edge, side rollers, and the nail itself;
- 2 colors of gel polish, top and base;
- tweezers and scissors;
- Scotch tape for nails. Here you can take a regular white one, since in the end no one will see it anyway. RocheNail has one with a width of 1 mm.
Perform your usual manicure – hardware, combined, file, edged.
- Apply the base and dry in a lamp in accordance with the instructions for the device;
- Cover your nails with colored gel polish in 1 layer. Dry;
- Cut the tape into the required fragments and cover those places on the plate that should subsequently remain the background color. When gluing strips, be sure to leave protrusions for gripping so that you can easily remove them later;
- Apply contrasting gel polish to the pasted strips in an even, thin layer;
- Gently grab the protruding edges of the strip with tweezers and remove them from the plate with a confident movement. It is important here that the top layer of gel polish is as thin as possible, otherwise the edges of the strips will turn out torn;
- Dry the gel polish, cover the design with a top coat and dry again.
When working with gel polish, the order will be exactly the same - base for varnish, color, stripes, color. The only difference is that it is recommended to remove strips from slightly dried varnish. Don't forget the sealer at the end.
Geometric designs with ribbons
The most beautiful manicure using ribbons is creating geometric shapes for nail designs - easy and simple.
1st option – “diamonds”:
- Cover your nails with blue varnish and dry;
- Glue the tapes obliquely to one side of the nail, and then in the opposite direction on top of the first tapes;
- Using a cosmetic sponge, lightly apply blue or white varnish over the ribbons;
- Dry your nails and remove the tapes, first those that were glued with the last layer;
- It turns out on the nails - diamonds. Decorate the nail with rhinestones and beads.
If you want to make a large rhombus, then you will need 4 ribbons. 2 are glued so that a triangle is formed on the edge of the nail and 2 more so that a sharp triangle is formed at the cuticle.
Next, you can cover the entire nail with a different color and remove the tapes or paint over the resulting diamond in the center of the nail. If you leave the diamond in the form of ribbons, then the edges must be trimmed so that they fit tightly around the nail and secured with clear varnish.
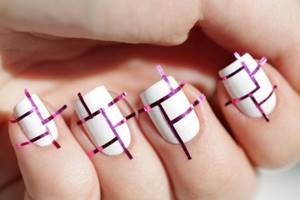
2nd manicure option – “spider”:
- Apply golden varnish to the nails and dry;
- Cross the tape with glue so that the intersection point of the cross is in the center of the nail;
- We glue the tape at an angle on 4 sides of the nail, so that the angle faces the center of the nail;
- Apply black varnish on top, dry it and remove the tapes, first the corner ones, then the cross;
- Apply clear varnish on top and dry.
This option is possible in various matching tones; you can use Goethe’s “modern color wheel” to choose matching tones.
3rd option of geometric shapes – “multi-colored triangles”:
- Apply beige or pale pink varnish, preferably to match the skin tone;
- On the dried varnish we glue 3 tapes diagonally from the bottom of the nail to its outer corner, parallel to each other, in the same way, glue 3 more tapes in the opposite direction;
- After applying the tapes, triangles are formed on the nail, which are painted with multi-colored varnishes;
- Dry the nail and remove the tape, apply colorless varnish on top.
4th option:
- Cover your nails with pink polish and dry;
- Apply 2 tapes from the center of the edge of the nail, diagonally to the cuticle;
- Glue two tapes so that it separates the outer edge of the nail;
- We take 2 more tapes, one edge, each of the tapes should be glued inside the first triangle closer to the tape that separates the edge of the nail;
- 2 inner ribbons must intersect - with a cross, so that a rhombus is formed between the 2 corners (external and internal);
- After applying the tapes, paint the nail with a varnish of a different color from the main one, for example: coffee color and dry it;
- Remove the tapes and apply sealant.
Don't miss the most popular article in the section: How to extend nails with gel polish. Nail extension instructions for beginners. Photo.
The nuances of performing a manicure with dots with regular polish and gel polish
Like a manicure with stripes, the technique of decorating with ribbons can be done using regular varnishes and coatings with a gel base. The use of each method guarantees its own specific advantages and disadvantages. Next, you will become familiar with the main nuances of using the two coatings, which will later allow you to make a reasoned choice in favor of one product or another.
Active formula
In ordinary varnishes, besides the dense structure and coloring pigments, there is practically nothing, which is why they are capable of performing an exclusively decorative task, while basic gel varnishes form comprehensive care for the nail plates .
Their structure usually contains a large amount of useful microelements and vitamins that nourish the structure of the nail, preventing it from weakening in the face of various external negative factors. That is, you get a great appearance and minimize the need for additional care.
Practicality
A responsibly selected gel polish from a reputable manufacturing company will save you from the need to take breaks. You can apply this composition to the surface of your nails regularly, something that, in principle, ordinary varnish cannot boast of.
In other words, the aggressive nature of standard varnish coatings not only does not nourish the nails, but also prevents them from receiving natural vitamins from the environment. As a result, the plates lose their elasticity and healthy color, becoming prone to aches and other problems.
Application process
Conventional varnishes are applied to the surface of the nails in just a couple of minutes. They do not require any additional materials or tools. The main thing is to choose a branded coating and a comfortable brush . Gel polishes in this case are inferior to their opponents. To fix them on the nails, it is necessary to use ultraviolet lamps.
They allow the polymers in the preparations to harden, creating the necessary conditions for everyday wear. The cost of such lamps is quite high, which is why not all representatives of the fair sex can afford a home manicure with gel bases.
Removal
The procedure for removing the coating is also important. In this case, gel polishes are also inferior to standard coatings. To remove the remnants of the hardened polymer base, you will need to apply a fair amount of a special product to each note, designed to soften the structure of the coating. Thus, the procedure for neutralizing the composition may not take one minute, but an order of magnitude longer.
Durability
Gel polish wins here completely. Unlike his opponent, he guarantees the formation and preservation of an attractive image for 7-30 days. It all depends on the quality of materials, professionalism of application and compliance with relevant rules. A manicure with regular varnish will delight you for just 2-3 days . Then it will begin to peel off and lose its color.
Strength
A significant indicator, especially for those representatives of the fair sex who have to work with their hands. Unlike conventional varnishes, gel-based coatings last much longer. Moreover, they can cope with temperature changes, shocks and other mechanical impacts. To achieve the desired result, it is enough to properly apply and dry each layer.
Important! Try to apply the tape to dry nails. This way you can prevent the appearance of depressions in the varnish from pressing the decorative element against their structure.
Striped frappe
Women who love the taste of coffee or coffee drinks can please themselves with one of the most fashionable, stylish, discreet designs in the Striped Frappe style. It perfectly combines shades of beige and brown.
You can combine these colors and their shades using water and liquid tape, then a design in the form of intricate patterns is formed on the nails, similar to coffee foam (design photo).
Smooth, straight lines are made using regular nail design tapes. Dividing the nail along, across, diagonally, in the form of geometric shapes. Adding touches of black varnish, rhinestones, beads, seed beads and additional designs as decoration.
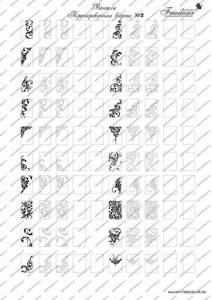
Drawing monograms on nails: diagrams and training cards
There are tons of photo tutorials on the Internet that teach you how to draw monograms on your nails for beginners. It can be quite difficult for inexperienced craftsmen to depict these beautiful patterns and curls; it is recommended to think through the composition in advance, draw it on a stencil, and only then on the nails. For training, special training cards are used.
Photo: training cards for painting monogram nails
Monograms consist mainly of curls and commas located in different directions. Once you master the basic elements, you can make any monogram nail design.
The first stage of training is drawing not on nails, but on a training card or piece of paper. Each element is worked through 50–80 times. For complete beginners, you can work out the element with a pen the first 10 times, and then with a brush. In the photo below there are several examples of training cards with simple elements and monogram diagrams.
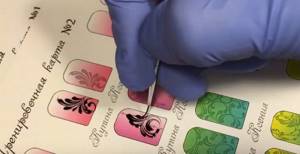
To begin with, it is better to work on the simplest elements, and then move on to more complex “royal” monograms.
Training cards and stencils for nail monograms
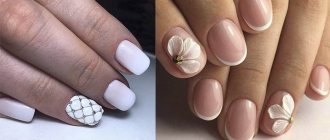
Wedding manicure design with ribbon
What is the difference between a regular manicure and a wedding manicure? Wedding nail design consists of delicate light tones of varnish, light, airy designs. Use gold, white, silver, beige, soft pink ribbon. Most often you can see a French manicure on the bride’s hands; some frame it with shiny ribbons, others with rhinestones and beads.
The idea of a wedding manicure depends on the wishes of the bride and the capabilities of the master. The fashionable trend is to decorate nails with some kind of decor on one finger, the rest are done in the same style.
Bathroom lighting
This room is certainly not particularly spacious. That is why the right solution would be not only to use finishing materials in light colors, but also to fill it with a sufficient amount of light. It is important to choose the right light temperature. Cool white is not suitable for these purposes. Only neutral or, as a last resort, warm spectrum. So, where is it appropriate to use tape:
- Of course, gluing tape to the mirror will be not only beautiful, but also rational. It’s not for nothing that mirrors with built-in LED lighting are sold. Their cost is sometimes simply unjustified, so it is much more economical to use our idea. The tape can be placed both around the perimeter and only on the side or on the top and bottom edges. In any case, it will be convenient for you to apply makeup and perform other procedures;
- The bathtub lighting around the perimeter of the floor looks very interesting. Such a soft glow will be comfortable for the eyes even at night and will slightly expand the space;
- The same can be said about lighting the ceiling in the bathroom;
- Recently, it has become very popular to use lighting for various plumbing fixtures. And we are talking not only about illuminating the bathroom, which is located on the protective screen, but also about illuminating the sink by gluing tape to its lower surface around the perimeter, as well as illuminating the toilet. Whether it’s beautiful or not – judge for yourself from the photo;
- It will definitely look impressive if wall-mounted plumbing fixtures are used;
- It’s simply a sin not to decorate wall cabinets or cabinets in this way. The soaring effect will be achieved to the maximum;
- You can also highlight wall shelves, if any.
When organizing lighting in the bathroom using LED strip, do not forget that this is a room with high humidity. This means that the tape must have the appropriate protection class. And again, don’t try to use all the ideas within this modest space at once.
Liquid tape for nail design
Liquid tape - dries quickly, forms a dense film, protects the cuticle and skin around the nail from excess varnish. With the help of such tape, beautiful, original drawings are created. The advantage of this tape is that it dries quickly, is easy to remove, does not leave stains on the skin and cuticle, a convenient brush or sponge, and a small bottle.
Apply liquid tape to the skin around the nail with a brush, wait 30-40 seconds for it to dry. Remove it by prying it a little from one edge, it is elastic and can be easily removed. It is well suited for airbrushing, stamping nail decor, water-based, gradient manicure.
For water-based nail design using tape, it is done in several stages:
- Apply base – nail polish;
- Apply liquid tape around the nail;
- Create a pattern in water using several colors with a thin wooden stick;
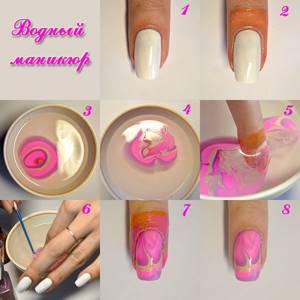
- Place your finger on the drawing;
- Pull out your finger, let it dry, apply a transparent fixative;
- In this way, designs are created for each fingernail.
At home, liquid tape can be replaced with PVA glue, tape, or cling film.
LED strip in the interior
Within even the most modest apartment, there is definitely a suitable place to place an LED strip, let alone spacious private mansions... Those who have already personally tried all the delights of using this decorative element are unlikely to be able to deny themselves the pleasure of lighting with it using literally every possible corner. Having seen enough stunning pictures on the Internet, where the tape not only helps to create bizarre illusions, but also performs a practical function, you instantly want to implement what you see in your home. In addition to the fact that diode strip is beautiful and stylish, it is also:
- A very convenient way to create an additional light source thanks to the ability to adjust the length and connect the elements together;
- Due to the fact that the tape is not only monochrome, but also multi-colored, it is possible to purchase the color of the glow that best suits your wall or ceiling;
- It is possible to purchase a tape that changes its color using the control panel. Thanks to such simple manipulations, your interior will be radically transformed in a matter of seconds;
- The tape is a flexible element capable of repeating curved contours as accurately as possible. This means that any curved niche, arch or other decorative element can be emphasized favorably using this type of lighting;
- LED strips are moisture-resistant and even sewn into a special waterproof profile, which makes it possible not only to use them in rooms with high humidity levels, but also in aquariums. Imagine how magical a large aquarium will look with a light on the bottom;
- It is with the help of diode strips that you can achieve the effect of floating or blurring boundaries. The most striking example is the organization of lighting along the perimeter of the ceiling, which creates the illusion that the ceiling vault is absolutely weightless and does not touch the adjacent walls;
- You have the opportunity to create both directional lighting and a soft, diffused light source by simply placing the tape in a special profile;
- And the most important advantage is that the tape does not emit radiation harmful to humans, such as ultraviolet radiation, etc., and does not heat adjacent surfaces. Thanks to this, it can be safely used to illuminate a stretch ceiling.
As for the disadvantages of using LED strips, there is perhaps only one - a decrease in the brightness of the diodes after a certain number of hours. Now about the ideas themselves regarding the use of tape in the interior.
Materials and tools for execution
Materials and tools for performing manicure and design with ribbons, each woman chooses her own set, which she is used to working with.
Basic tools:
- Bath with aromatic oils;
- Hand cream;
- Penza;
- File;
- Scissors;
- Varnish, Gel polish, Acrylic;
- Nail lamp - for drying gel polish, acrylic;
- Napkins;
- Nail polish remover;
- Liquid tape;
- Design ribbons;
- Tweezers.
This list may be expanded or reduced depending on the type of manicure and design.
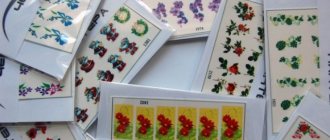
Types of tapes for manicure and pedicure
The shiny metallic comes in a variety of shades. Stripes can be narrow and wide, long and short.
The most popular among nail design artists are sets with thin ribbons. Tape material with a metallic sheen is used to decorate varnish and any other artificial coatings.
In addition to shine, transparent tapes are available in different lengths, thicknesses, and colors, with a textured, rough, shiny coating and rainbow tints.

How to make a design with ribbons: step-by-step instructions
The first step in creating a beautiful nail design with ribbons is preparing your hands and nails:
- Make a hand bath;
- Clean and straighten your nails with a nail file;
- Treat nails with nail polish remover or alcohol;
- Apply a transparent base to the nails and dry;
- Apply varnish of the selected color;
- Draw white lines near where the tape will be glued.
- We paste the tape so that there is 1-1.5 mm left to the edge of the nail, then the tape will not come off.
- Apply colorless fixing varnish. We dry our nails and the manicure is ready.
With the advent of a variety of tapes for nail design, every woman can create a unique, neat manicure at home, at the right time for her, and save her money.
Typical installation errors
It is quite difficult to install a diode strip incorrectly, however, there are such unconventional mounting methods that are best avoided:
- Fixation using a construction stapler. Undoubtedly, this is a very fast method and quite reliable, but one wrong move and your tape will become unusable;
- It is also not recommended to use hot melt glue. After hardening, it will serve as a layer that does not remove, but rather accumulates heat. The tape may overheat;
- Often, when peeling off the protective tape from the adhesive layer, places where conductive paths pass are exposed. If you stick a tape with such an unprotected place on an aluminum profile, a short circuit and burnout of the device will inevitably occur. You must first stick a small piece of electrical tape onto the profile in the place where the tracks come into contact with its surface and only then continue installation;
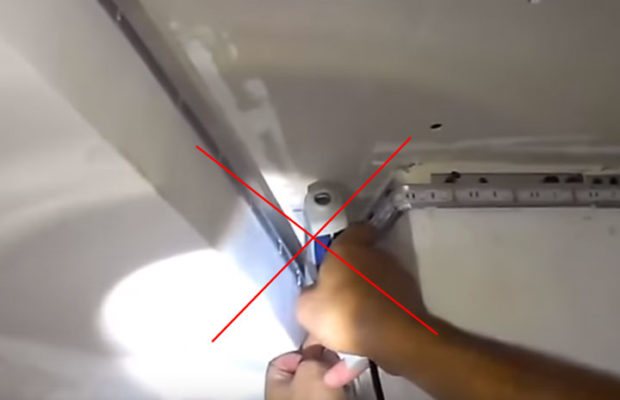
- Do not use cable ducts not intended for this purpose to lay the tape. She'll just overheat.
The article was written for the site.
Tags:Lighting systems
DIY manicure with gel polish at home
It’s a little more difficult to do a manicure at home with gel polish. This requires at least minimal practice and, of course, the presence of a UV lamp, which will allow you to quickly and reliably dry the material. If you wish, you can learn any design, especially since all detailed lessons can be watched in online videos. To do this, just enter the query “do-it-yourself manicure for beginners” into a search engine.
The first stage always includes preparing the nail plate. Treat the cuticle and, if desired, remove it using special nippers. Also, for a beautiful gel manicure you will need to purchase the following consumables:
- Top for gel polish;
- Gel polish of the required shade;
- Finish coating;
- Cuticle softener;
- Liquid for removing the sticky layer.
How the procedure itself is performed is shown step by step in the photo (based on materials from the ArtNail Cafe channel).
How to properly apply gel polish on your nails with your own hands
To prepare the nail plate you will need a file and a buffer.
It is also recommended to coat your nails with an acid-free primer before applying gel polishes.
The three-phase system consists of a base, gel polish and top coat. For thin and brittle nails, it is better to use a rubber base coat.
Each master selects gel polish individually for himself. The main thing is not to take coatings that are too cheap, so that during the training stage you do not become disappointed in the procedure or your abilities. A high-quality manicure depends not only on skills, but also on the materials used.
You can also choose a rubber top, it is thicker and easier to work with.
Additionally, you will need cuticle oil.
As well as a liquid for degreasing and removing stickiness.
First of all, you need to lightly walk over the nail plate with a buff to give the necessary roughness. You don't have to work too hard to avoid damaging your nails.
Next comes the degreasing stage. It will require lint-free wipes and a special product, as in the photo above.
Before applying the base, it is recommended to cover all nails with a thin layer of primer. Remember that this product dries in the air.
To apply the base coat, you can use a brush from the bottle, or you can purchase a wider and more convenient one in the shape of a spatula. The base should be applied in a very thin layer, while rubbing a little into the nail. Most gel polishes dry in a UV lamp for 2 minutes; in an LED lamp, the time is reduced to 30 seconds. Each layer of gel coating must be thoroughly dried.
The first layer of color is applied in a very thin layer.
The end must be sealed. To do this, use the edge of the brush to carefully walk along the edge of the nail.
The second layer of color may be slightly thicker than the first.
Three-phase coating involves applying a finish. The top, as a rule, has a more liquid consistency, so you need to work with it carefully but quickly. If necessary, you can do interlayer drying.
If you used a topcoat with a sticky layer, you need to remove the stickiness from it with a degreaser.
At the end of the manicure, you can apply care oil to the cuticle.
As you can see, doing a manicure with gel polish yourself is not so difficult.
Technique for working with cobwebs
Let's start with the technique and answer the question: “How can you make a design with a cobweb”? There are different webs for design, but the essence of the manicure technology is the same. This is a viscous, viscous material that is applied using various tools. There is one important point that you need not to miss when working with spider web or it is also called spider gel. When you apply the material to the nail, you need to use the fingers of your left hand to carefully push away the side ridges (the skin around the nail). Then you will have no gaps and the work will look more complete, neat and beautiful. When working with cobwebs, you can use “skin defender”. It will protect the skin around the nails and allow you to quickly remove excess material before drying. Next, let's move directly to the technique of applying the web.
Technique #1 – Finger Application
How to do a manicure with a spider web if you need to create a pattern with many very fine lines? Simple enough. Put on nitrile gloves, drop a drop of spider web gel paint on your nails, rub the material between your index and thumb, unclench your fingers and wrap your finger several times, repeating the procedure. The photo below shows the meaning of the technique.
Technique No. 2 – Application with a dot or orange stick
This is also a very simple design option using spider web gel. With this method, the thickness of the line can be varied. You can also draw some patterns. Dip the tip of the dot into the jar with the spider web, pull out the “string”, wait until it becomes thin, then put it on your finger. Just make sure that the line thickness does not exceed 1 mm. Otherwise, the material may not dry out. Some webs can be applied after the topcoat, but it is better and safer to cover them with a topcoat.
Using a spider web, you can draw a variety of line patterns. It all depends on your imagination. You can interrupt the line, turn it sharply, let it appear on the nail in the form of a blot, etc.
Technique #3 – Geometry
The third option on how to use a web is to draw thin lines and geometric patterns. And, indeed, with the help of a spider web, novice artists who, for some reason, could not get thin lines, with the advent of spider gel, were able to make them quite quickly and easily. How exactly does it work? Take a brush or the same dots, dip it into the gel paint, brush off the “thread” that is trailing behind the tool, then place a small drop on the nail and pull out strips from it, alternately in different directions.
Mastering simple techniques
Most of the most complex drawings, if you look at them carefully, are built on a combination of ordinary elements: dots, commas, straight lines. They are not difficult to complete. To obtain a neat pattern, you can use dots, tape, and stencils. When applying, you should carefully monitor the amount of pigment applied to the tool so that there is not too much of it.
A simple monochromatic manicure in a fashionable color looks attractive. If you complement it with fashionable small accents, you get a unique design. In this way, you can use a contrasting color to decorate the hole at the base of the nail or the edge using the French manicure technique. You can shade all your nails or just accent ones. Adding a strip of rhinestones along the edge of the lunula or in an even row along the nail will look attractive.
If you use a rather bright shade for your manicure, you can try the fashionable negative space technique. To complete this you will need tape or stencils. The point is that part of the nail remains unpainted. Usually the lunula gel is left untouched.
Gradient is a very popular and delicate pattern consisting of colors flowing into each other. It can be smooth (ombre) or clear, even geometric, consisting of identical stripes or shapes of different colors. Modern technology gives a wide range of imagination. You can combine not only shades of the same tone, but also the brightest colors.
Flowers and floral patterns are popular among women in all seasons, regardless of changing fashion trends. Beginners can make simple drawings from simple dots circles or master a simple technique of painting on wet gel polish. More complex and naturalistic designs are created with the smallest details with a brush and using volumetric sculpting. If you don’t have time to draw a pattern, you should use a stamping kit or stickers.
Predatory print is back in fashion. Drawing blurry ovals in a dark color on a light background is not difficult. The zebra pattern of uneven contrasting stripes is also trending. This season, the main thing is to choose a trendy color. An animalistic design should not exactly replicate the colors of an animal skin. It can be a combination of red and green, gray and orange, yellow and indigo.
Circles form the basis of many complex patterns and designs. With their help, you can make any pattern, play with national motifs, various textures, create a floral pattern or catchy monograms. Even a few dots of contrasting color placed at the base of the nail will make a regular monochrome coating fashionable. An eternal classic, polka dots also consist of circles and dots of different sizes. Sequins and kamifubuki are a fashionable version of an evening club manicure in circles. You can create any pattern from dots: butterfly, animal, sun, ladybug.
Monograms are another popular pattern that decorates many types of manicure, from everyday French manicure to luxurious wedding manicure. To create it you need a brush, dots or a regular toothpick, and a ballpoint pen. A dot is placed on the base varnish in a contrasting color, and a comma is drawn out of it. The next part of the ornament is made in the same way. You can put curls of different sizes and send them in different directions. They create a luxurious ornament or floral decor.
Geometry has been popular for several seasons now in all techniques and types of nail coatings. This design looks very fashionable. And it’s quite easy to make it on your own fingers using tape or stencils. You will need varnishes of two or three contrasting colors and a brush.
Glitter and stones can add a luxurious shine to any manicure in a matter of minutes. To prevent the design from being tasteless, you should learn how to correctly place the decor on the nail plate, choose the optimal size and quantity. Excess in this case is worse than the effect that something is missing. We put luxurious accents on one nail. On the rest we glue only small pieces of decor or even leave them with the base color. Most elements are glued onto wet gel polish and then dried together with it under a UV lamp.
Raindrops are an interesting and easy-to-perform technique that complements different types of manicure especially well in the spring-summer season, as well as in the fall. Delicate translucent droplets are created using a regular topcoat and a brush or dots. They are placed in different sizes and in a chaotic order, imitating spreading droplets of moisture or fresh dew. Designs with flowers, fruits, ombre and just a solid color will make this method more realistic, lively and fresh.
Monograms on nails: design features
To learn how to draw beautiful monograms on your nails, first of all you need to stock up on the necessary tools and materials: manicure brushes, gel paint or gel polish, training tips, stencils and training cards.
Brush for monograms on nails
To draw small designs on nails, including monograms, use brushes with thin short bristles. Good reviews on the Internet can be found about the brush InGarden, Global Nail, as well as some brushes from Aliexpress, for example, MAKARTT, BQAN, Monja, KASAKO, etc. But no matter how good the brush is, many masters cut “brushes to suit themselves” ” to make the thinnest hair possible. The brush is cut at the base in a circle, one hair at a time. For long curls, it is better to use brushes with longer hair.
Gel paint
Some masters manage to draw monograms on their nails with regular gel polish of a thick consistency, but it is much more convenient to use products specially designed for this, namely gel paint or gel paste. Among the gel paints, E.mi, NeoNail, InGarden, UNO, Nail Passion, Maranda, Patrisa nail, etc. are praised.
Kinds
Decorative tape for creating the perfect nail design is in demand among professional and home artists. Different in shade and thickness, it allows you to diversify your look and add originality to any gel polish coating.
Adhesive tape is sold in small rolls and comes in a thin strip of various metallic shades. The cost of such an accessory is low, and the range is simply huge.
Using adhesive tape you can create a laconic manicure or an intricate design with a geometric pattern. Stripes are used to emphasize the geometry of the nail plate or coating, design the color or shape of the nail.
Liquid tape is not an accessory for creating nail designs; such an object acts as protection for the periungual area from contact with gel polish, including base and top coat. The product is sold in a standard bottle with a brush, applied to the area around the nail using the latter using gentle movements, without entering the territory of the nail plate. The use of adhesive tape is useful at the beginning of a manicure: after processing the nail and plate and before applying the base and pigments. The tape allows you to protect the delicate area from contact with persistent gel textures and create a neat, perfect manicure with a durable coating.
It will be difficult to get rid of the coating on the skin, and it’s easy to ruin the appearance of the manicure with such manipulation. The liquid tape absorbs the blows of awkward hand tremors and small errors of the master, which is especially typical when performing a complex design or ombre manicure. It is easy to remove the accessory after all stages of applying the gel coating, including the top coat. Simply pull the tape with tweezers - it can be easily removed without the risk of damaging the coating or skin.