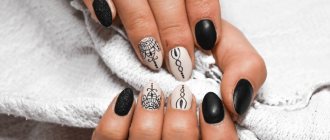
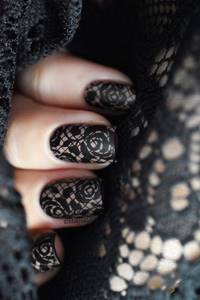
Stamping is a new technique for applying patterns to the nail plate. The designs themselves are created on a disk/plate with a stencil, after which they are transferred to the nails using a stamp. The resulting result is identical on all nails, as if the design was made by a professional master. This nail art looks very impressive and interesting.
If you want to learn how to do a manicure using stamping yourself, it’s not difficult, the main thing is to practice a little, get a suitable varnish and a stamp. Below we will tell you in detail how to correctly apply stamping patterns on varnish, and also consider the TOP 5 good varnish coatings.
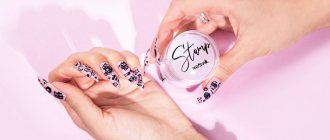
Special varnish for stamping - what is it?
The technology itself for creating a pattern is correctly called stamping nail art; it is a new product in the field of nail design, which has already gained enormous popularity.
The essence of the procedure is that the pattern is applied with a special stamp tool, which can be silicone, rubber or with a sticky imprint pad. One of the main conditions for obtaining a high-quality result when stamping is the use of a special coating for nails. Many manufacturers already produce entire series for stamping, so finding the desired color will not be a problem. The peculiarity of this varnish is that it is thicker than usual, and, most importantly, it is highly pigmented.
- Such qualities help create clear and precise lines of the design; they do not spread and are easily visible on the nails. Today, it’s very easy to get acquainted with this technology - they even sell ready-made kits that include everything you need to create a design, including several nail polishes of different shades.
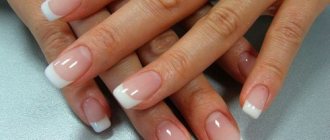
Manicure with stamping: symmetry, precision and sophistication!
Stamping technology is based on the ability to make designs, patterns, and prints on nails using a small stamp. Most likely, the idea of banal ink stamping was taken as a basis. Only the tools and materials are slightly different. The technique made it possible to move manicure stickers far back. And all tools and materials are available for sale for every woman. Moreover, the price for them is not so high, considering that now there is no need to rush to the salon and carry out the design for fabulous money! Any woman can master the method of work. Now complex patterns are easy to complete! Let's start the story in order!
Which polish is best for nail stamping: review
With the growing popularity of stamping, the range is also growing; more and more well-known companies are producing high-quality coatings for creating ideal designs on nails. Let's look at the characteristics of the most popular stamping kits today.
Konad Special Nail Polish
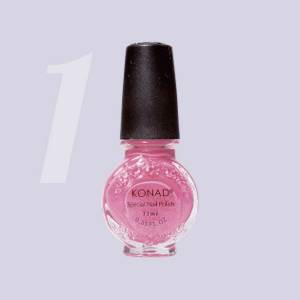
The manufacturer Konad produces several versions of acrylic varnishes for creating stamping patterns on nails: in volumes of 5, 11 and 12 ml. The range includes a variety of coating options: pearlescent, matte, transparent, glossy in different shades. It is possible to purchase the rest of the necessary tools for nail design from this manufacturer; only under this condition does he guarantee the perfect design.
The consistency of the varnishes is viscous , the color is rich, which fully satisfies all the requirements for use in stamping.
El Corazon Kaleidoscope
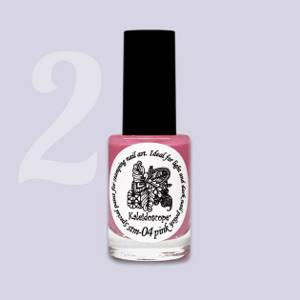
Stamping paints from El Corazon and Kaleidoscope are offered in an economical and convenient volume of 15 ml; a separate collection of 8 ml format has been released, which is gradually being replenished with new colors.
The easiest way to verify this is with the example of white and black varnish - the colors used in a duet completely overlap the substrate, even despite such intense contrast. In the line you can find cream shades, neon colors, and iridescent duochromes, not to mention simple plain glossy and matte options.
The manufacturer notes the high concentration of pigment, which ensures the clearest pattern and 100% color rendition.
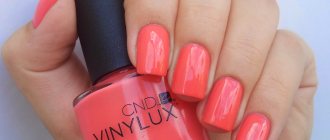
Golden Rose Rich color
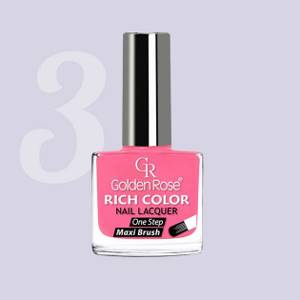
Many fans of stamping use Golden Rose varnishes, and not only a special collection for nail art, but also certain options from among the usual ones, which are sufficiently rich. A huge advantage of the product is its low cost and prevalence, but before creating a manicure, it is better to conduct several experiments and check exactly how the colors will look on dark and light substrates. Golden Rose varnishes are available in different volumes depending on the series; the product for nail art comes in long 7.5 ml bottles.
The varnish has good durability and lasts about 5 days. For best durability, it is recommended to apply a base and top coat.
Kand Special nail polish
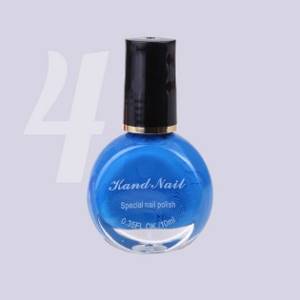
Available in standard glass bottles (10 ml), the price category is average. Produced in South Korea. Products can be easily found in online stores and choose the color you like from the offered range. This brand also produces convenient stamping kits that will allow you to immediately begin creating a beautiful design.
Kand brand varnish has the necessary consistency and saturation to obtain clear and expressive patterns. Not intended for use alone as a single-color nail coating.
Born Pretty Nail Art Stamping Polish

Born Pretty stamping paint is famous for its excellent quality. The varnish is dense and spreads well over the plate; prints when transferred with a stamp turn out clear and bright. It does not dry quickly, which allows for high-quality drawing. During the year of storage of the bottle, the consistency of the paint does not thicken and does not require dilution.
The only drawback of the paint is the difficulty in removing it from the nail plate. You need to rub it well with nail polish remover to get rid of the pigment. But this is most likely a disadvantage of all stamping paints.
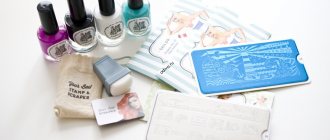
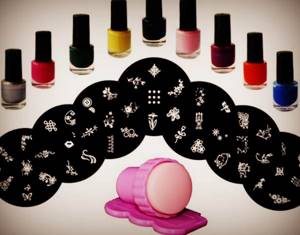
Tools and materials
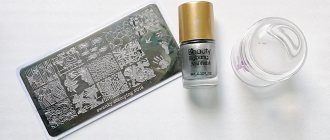
Stencils
Stencils are plates of various shapes and sizes on which patterns are engraved. They can be plastic and metal. The first option is more suitable for working with thick paints, since the embossing of plastic stencils is deep and wide. Their service life is short.
Metal stencils are more versatile because they are suitable for working with paints of any consistency. But over time, scratches appear on their surface from the scraper. This negatively affects the result.
All stencils differ from each other in the material used for production, the depth of embossing, patterns and shape. It can be: rectangular, round, shaped. Up to 30 drawings can be presented on one plate. If you only liked one of them, then you shouldn’t buy an expensive plate just because of one image.
The most common option is a disc-shaped stencil. It can contain from 4 to 8 pictures. It is better to buy several disks than one rectangular plate. Laser engraved stencils are of high quality, especially branded ones - Konad. Chinese replicas can please or disappoint.
Stencils are always protected by a thin film that may not be noticed. When using for the first time, you must carefully move a sharp object along the part of the plate where the pattern is missing. This will allow the film to peel off and be easily removed.
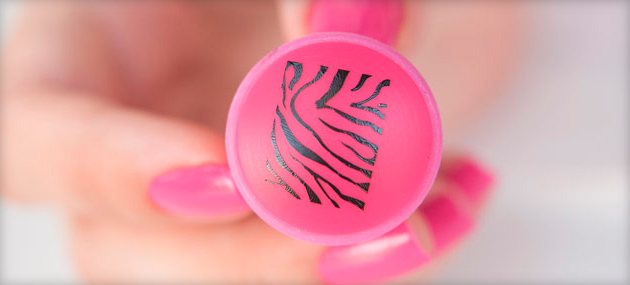
Stamps
All stamps have approximately the same appearance, but their pad can be square or round, made of rubber or silicone. Rubber pads are harder and will not work the first time. Their silicone analogues are softer, but in order for them to tolerate the pattern well, they require preliminary surface treatment with a buff. Silicone and rubber have approximately the same number of fans.
The surface of a good pad has a semicircular shape, which is necessary to obtain a clear image. The presence of a crack on the stamp indicates that this tool will soon become unsuitable for work. Replacement pads are freely available, and “consumables” can easily be matched to any stamp. For precise application of small designs, it is recommended to use a stamp with a transparent body and a silicone pad.
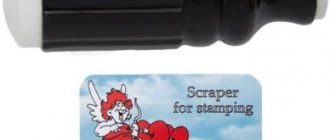
Scraper
A plastic tool is much preferable because it does not scratch the plate and does its job well. If you don’t have a scraper, you can use improvised means, for example, a plastic card. Over time, nicks appear on the end of the plastic scraper. This results in poor image quality.
A scraper with a metal blade more thoroughly cleans the surface of the stencil from excess paint, but it tends to leave scratches on it. From this we can conclude that an ideal scraper does not exist in nature.
Paints and varnishes
This technique of decorating nails involves the use of special varnishes and paints, the bottles of which are marked “for stamping.” Theoretically, regular nail polish can be used to create stamped designs, but it must have a high concentration of coloring pigments. To check the degree of pigmentation, the print should be applied to a black background. It is necessary to take into account that there are quick-drying varnishes and paints, the use of which requires efficiency from the master. If you miss the moment, the varnish may dry out while still in the stencil.
Popular brands:
- MoYou London;
- TNL;
- Born Pretty;
- El Corazon;
- Konad;
- Dance Legend.
For wide patterns, a thicker varnish is required, for thin and elegant ones (lace) - a medium consistency.
Is it possible to do stamping with regular varnish?
The basic requirements for stamping varnish are thickness, bright, rich color. In addition, many prefer the coating to be matte - this way the greatest clarity of the design is achieved. This is where a popular question arises: is it possible to use regular varnish if it meets these requirements?
Theoretically, this is possible, the main advice is to first try to manipulate the transfer of the pattern with a regular coating, and only if the experiment is successful, create a full-fledged manicure.
In order to avoid buying a special varnish and replace it with a regular one, you will have to work hard to find a more or less suitable one. But even here, not everything may turn out so smoothly. Ordinary varnishes may behave “badly” in the process:
- when transferring the design, it may turn out that the varnish is not pigmented enough, the picture will turn out pale and translucent and will lose all attractiveness;
- some slightly thickened varnishes may pull behind the stamp when removing the stamp, leaving small “hairs” on the edges of the design, which will make the appearance of the nails sloppy;
- Often, ordinary varnish simply dries on the stamp sheet itself and simply does not transfer to the nail.
If you managed to choose a good regular nail polish that allows you to create neat and beautiful designs when stamping, you can safely use it.
Step-by-step instructions for use
To use stamping varnish correctly, step-by-step instructions will come in handy:
- A top coat and a colorless base are applied to the nail.
- Prepare the tools for applying the design: the stamp is thoroughly degreased (especially if we are talking about a device made of metal). For degreasing, you can use alcohol tinctures.
- A layer of pigmented shellac is applied onto which the design will be subsequently transferred. First, the nail plates should be degreased in a similar way.
- A layer of varnish in one or two strokes is applied to the selected design on the engraved plate.
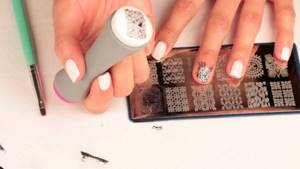
- Transfer the design from the plate directly to the nail using a stamp in one of three ways:
- with varnish removal from the stamp (similar to a sticker);
- rolling motion;
- pressing (impressing) movement.
Nail stamping: how to use with gel polish
It is difficult to say which of the listed methods can be called classical, since in practice all three are equally widely used. It all depends on the habits and personal preferences of the manicurist.
To avoid damaging the drawing, apply a layer of transparent protective varnish to it as quickly as possible. This is best done with one movement of the brush.
Advice. When working with plates on which varnish is applied, they should be placed on a napkin. Otherwise, you may stain your manicure tools or work surface.
How to properly use varnish and stamping
The stamping procedure requires the presence of the following required items: varnish (the main color and for creating the design itself), a sheet with a pattern, a scraper for removing excess coating, a stamp for transferring the image.
The technology involves the following step-by-step actions:
- cover the nail with the base color;
- apply a varnish of a contrasting color to the disc with the pattern, trying not to go too far beyond the image;
- remove excess varnish with a scraper so that the paint fills only the contours of the design itself;
- attach and press the silicone stamp tightly to the plate, trying not to smudge the picture, then transfer it to the nail, also applying the stamp tightly;
- If nail polish gets on your skin, carefully remove it with nail polish remover;
- If you are completely satisfied with the result, it is recommended to coat the finished nail with a colorless fixative varnish.
Advice from experienced cosmetologists
Those who are just starting to master the technique of stamping a design on the nail plate will find it interesting to familiarize themselves with some advice from experienced cosmetologists:
- Despite the fact that you can find a variety of stamps on sale, not only in shape, but also in material, it is recommended to choose gel stamps. Practice shows that they are the most convenient to use in practice.
- If stamping paint is not used for a long period of time, it begins to fade. In order to solve this problem, in most cases it is enough to shake the composition thoroughly before using it. This action will improve the consistency of a special varnish or paint, making the product much more uniform, simply by lifting the coloring pigment from the bottom of the bottle.
- In order for the design to be applied as evenly and clearly as possible, it is strongly recommended to use silicone stamps, which are made from a transparent material, rather than rubber stamps. This type of device, among other things, has a tube-shaped handle, which simplifies the process of using the tool.
- In the absence of special paint for stamping, some semblance of it can be made from the most ordinary varnish. In order for it to match the thickness of the specialized one, it is recommended to leave the bottle open for a while. As a rule, 30-60 minutes are enough for the density to increase.
- If there is an urgent need to transfer the design to the surface of the nails as quickly as possible, it is recommended to think through and select the application area in advance. This will make it possible to avoid forced downtime and will not allow the varnish to dry before the moment when it is transferred to the nails.
- After applying the decoration to each nail, both the stamp itself and the plate should be cleaned with nail polish remover. It is allowed to contain acetone. But oil-based formulations should be avoided. This is due to the fact that after wiping, an invisible film will remain in the engraving, due to which the quality of the transferred design will significantly deteriorate.
- If the room is too hot, low humidity or drafty, the varnish on the metal disc will dry much faster. In this regard, it is recommended to carry out the procedure in a cool room with tightly closed windows.
- If the stencil becomes clogged, you should never try to pick out the remaining varnish using needles. The engraving will be damaged and the disc will become unusable. It is much more effective to soak the disc in nail polish remover containing acetone for just a few minutes and wipe it with a napkin.
- Before stamping, you should not apply cream or other oily substances to your hands - the designs will not be printed properly.
Beautiful stamping does not always work out the first time
If you put all the above tips into practice and fully follow the stamping technology, the drawing will turn out exactly as it should be: bright, clear and beautiful, and your nails will look amazing.
Reviews
Anya: I had a lot of Golden Rose polishes at home, I love them so much. And as it turned out, many of them are ideal for stamping. The biggest difficulties arose with white varnish - it gives a pale design, but for some delicate designs this is just right!
Katya: I was given a set from Konad and I am delighted with it! All the elements are of very high quality, I got it right the first time and it’s very beautiful.
Alina: In the absence of special varnishes, I used my old ones, which had thickened a little. It worked, of course, but I can’t say that it was possible to achieve beautiful thin lines. Now I ordered a professional series, and everything has become much neater and simpler.
Mistakes when using stamping
In order for the first attempt to be a success, and for you to get a beautiful manicure with stamping on gel polish, you need to adhere to the following tips, failure to follow which will lead to damage to the nail design.
- You should not leave the varnish on the disc for too long, as it dries quickly and you will not get the desired result. That is, the main rule of stamping is speed;
- Cleaning the image is one of the most difficult and important moments; you need to scrape it very quickly, which is better done with a plastic tool or an unnecessary bank card;
- When scraping, you need to apply the correct pressure, that is, it is best to do it at an angle of 45 degrees, since a soft pressure will not completely squeeze out the varnish, but very strong pressure will provoke a three-dimensional pattern;
- Press the stamp onto the engraving for no more than 3 seconds;
- Wait until the drawing you have made is completely dry, and only then cover it with a fixative, and you need to apply the top coat once and quickly so as not to smear the print;
- Liquid coating must not be used.
Thus, we have told you about the most common mistakes that beginners most often make. In addition, remember that such a moment as stamping with gel polish will also lead to failure, since the gel coating does not print well on the stamp, so it is best to use ordinary varnishes with a dense texture. Thanks to these simple tips, you can create new interesting images for your nails, and manicure with stamping will not only become an exciting process for you, but will also allow you to get unsurpassed results.
Advantages of gel polish over other coatings
Gel polish is a decorative coating for manicure that combines the advantages of two materials - modeling gel and colored nail polish. Thanks to the gel, the coating stays on the nail plate for a long time, dries quickly and is odorless. The varnish provides beautiful color and shine, ease of application.

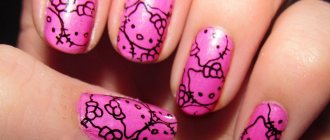
Bright manicure using stamping technique
The coating has many advantages:
- protects against mechanical and chemical damage;
- does not peel off when doing household chores;
- convenient and easy to use;
- hypoallergenic;
- provides a durable and durable coating;
- retains rich color for a long time;
- has a rich color palette;
- the colors of the gel polish are rich and tightly cover the nail plate;
- has a healing effect on nails;
- nails under gel polish look stronger and healthier;
- economical consumption due to the fact that the gel polish needs to be used 1-2 times a month and it does not dry out for a long time while in the bottle.
Laconic stamping design