A fashionable volumetric manicure provides endless possibilities for decoration, and it is quite possible to do it at home without resorting to the services of a master.
The main materials used for volumetric nail art are polymer clay and acrylic. Tips, sparkles, glitter, pebbles (for example, pearls) and so on are also often used. You can use ready-made motifs for applying to nails. These are the so-called “fimki”: sticks made of polymer clay with drawings inside. It is better to buy them ready for use: cut into the thinnest slices.
You can perform a variety of types of 3D manicure yourself, but the most relevant this and last season were:
- knitted and fur patterns,
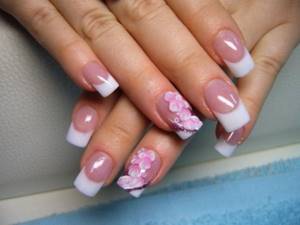
- voluminous floral motifs,
- monograms, lace, openwork frames,
- beads, caviar, abstractions, etc.
Are you planning to create a stunning voluminous nail design? First they need to be thoroughly prepared. Then the base, the main varnish, is applied. And then the fun begins: modeling from polymer clay, making applications from foil, flowers and bouillons.
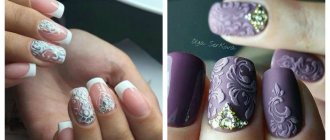
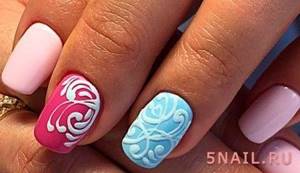
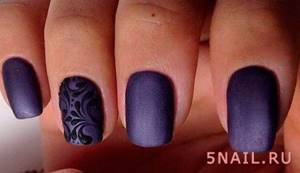
Openwork frame or monogram
- To draw such a pattern on a nail with 3D gel, take a dots and mark the outline of the design with dots, first with the same varnish that is already coated on the nail. The dots can be larger or smaller, depending on how thick the line is. Dry it.
- The next step is to draw lines with the same color. It is better to start from the free edge of the nail and move along the oval to the cuticle, where the line becomes thinner. Dry it.
- Next you need to work with gel polish: outline monograms, patterns and dots. You need to draw without pressure so that there is more volume. The gel polish should stick to the brush.
- After drying the base layer, you can add volume to the drawing. This is done with strokes of the base color, as if applying shadows. The next step is to add veins, gold sparkles and other decorations.
Unicorn horn
Nowadays everything fabulous and sweet is in fashion. Here the creator's imagination is limitless. If you look through your Instagram feed, it is filled with a huge number of things on this topic: macarons, sweet milkshakes, inflatable mattresses in the shape of pink flamingos, colored ice cream and Katy Perry songs. So why not decorate your nails with unicorns? These can be various yoghurt shades, chrome mirror surfaces and an indescribable shimmer of glitter. Volumetric unicorn manicure is a real hit of 2018.
You determine the shape of your nail yourself. It is possible to make a cone-shaped stiletto that follows the outline of the horn of this mysterious animal. Or you can choose a shortened version of a soft square to make the design look neater.
Cornucopia
The substrate in this technique can be any. And the coating itself can be diversified as follows:
- glitter gradient;
- volumetric relief with rubbing (mirror, glitter, mother-of-pearl);
- relief with melange or acrylic powder;
- if acrylic lining is used, it is recommended to add kamifubuki and various sparkles;
- broken glass;
- foil;
- filling the “horn” with decorative elements using aquarium design techniques;
- a soft gradient of bright colors to give the horn a luxurious shimmer.
Unicorn horn manicure technique
If you want to create a stiletto-shaped horn, then you will need acrylic powder and molds for laying out acrylic. To create a design on fingers of a regular shape (oval, almond-shaped or soft square), you need to degrease your nails and cover them with a base coat. If you decide to make an original relief on your own nails, then skip the first 3 points.
- Attach the acrylic molds to the nail.
- Using a flat brush, pick up acrylic powder and roll into a ball in monomer (liquid for acrylic). For convenience, you can use thick acrylic gel.
- Carefully give the desired architecture to the nail in the shape of a horn.
- For the design, you need to cover the nail with any color (it is best to choose white, pink or black).
- Dry the layer well in a lamp.
- Mix several shades of gel paint on the palette (pink, coral, fuchsia, purple). If this is not available, regular colored gel polishes can be mixed with a thick rubber topcoat.
- Using a thin brush, scoop up one color and draw smooth lines that follow the contours of the spiral-shaped edges of the unicorn's horn.
- Dry the layer in a lamp.
- To make the relief more voluminous, duplicate the lines with multi-colored gel polish.
- The coating can be left as is, add glitter on top and secure with a top coat.
- But if you need a special fabulous shimmer, then you should cover the nail with a mirror or glitter rub, gently rubbing in the mirror powder with an eyeshadow applicator or your finger.
Video instruction
A voluminous unicorn manicure looks magical and unusual. Detailed execution techniques and other ideas can be seen in the video.
Wedding volume manicure
Fashionable versions of wedding nail art use delicate romantic colors, elegant patterns, and catchy stones. A voluminous manicure with gel polish on the bride’s nails is always appropriate and looks great.
Current trends
A modern, stylish voluminous manicure provides fashionistas with ample scope for experimenting with their image and realizing their secret desires. We invite you to familiarize yourself with the main directions of convex nail design.
Sculptural images on nails in the new season can be anything you want. When choosing the theme and style of the drawing, consider the purpose of the image. Volumetric nail art is perfect for any length and shape of the nail plate.
It is very pleasing that in modern conditions it is possible to perform a three-dimensional manicure without any special reason - it has long ceased to be an attribute only of special celebrations: fashion shows, Hollywood film awards and wedding ceremonies.
Our photo selection presents to your attention the most beautiful and fashionable relief design options. Among the most popular it is worth highlighting:
- knitted and fur patterns;
- luxurious lace and openwork elements;
- delicate everyday or luxurious decor: beads, sequins, sparkles, rhinestones, bouillons, feathers and velvet sand;
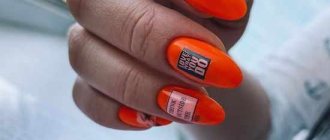
- letters and inscriptions;
- floral motifs;
- sparkling structure, drops, abstraction and blots;
- animal prints and imitation of natural textures.
Wedding
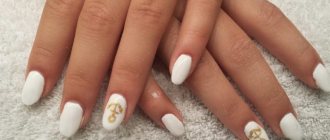
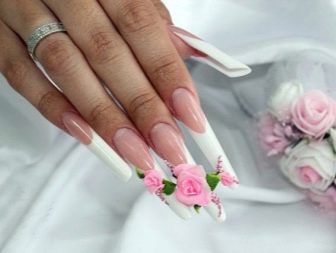
The main reason to try 3D nail design is a wedding. On this day, a woman needs a special outfit, special makeup and hairstyle and, of course, a stunning manicure. After all, all eyes are turned to her. The options that look best are those in the form of a classic or reverse French manicure with convex decor on several nails. This is an incredibly gentle and feminine option that will not leave anyone indifferent.
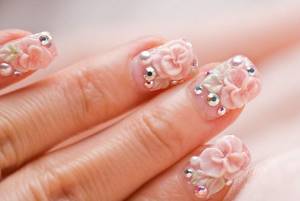
A very beautiful manicure is a stucco molding in the form of white roses on a transparent background. This classic of the genre is ideal for a bride of any age and status. In general, any flower arrangement is perfect for a wedding celebration. Openwork patterns and voluminous manicure in the form of velvety matte shells are trendy.
For wedding nail art, mainly light, pastel shades of varnish are used. Often, golden and silver elements and decor in the form of beads and beads are superimposed on top of nude white or flesh-colored patterns. Moderate use of rhinestones is encouraged.
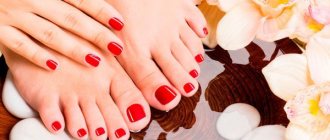
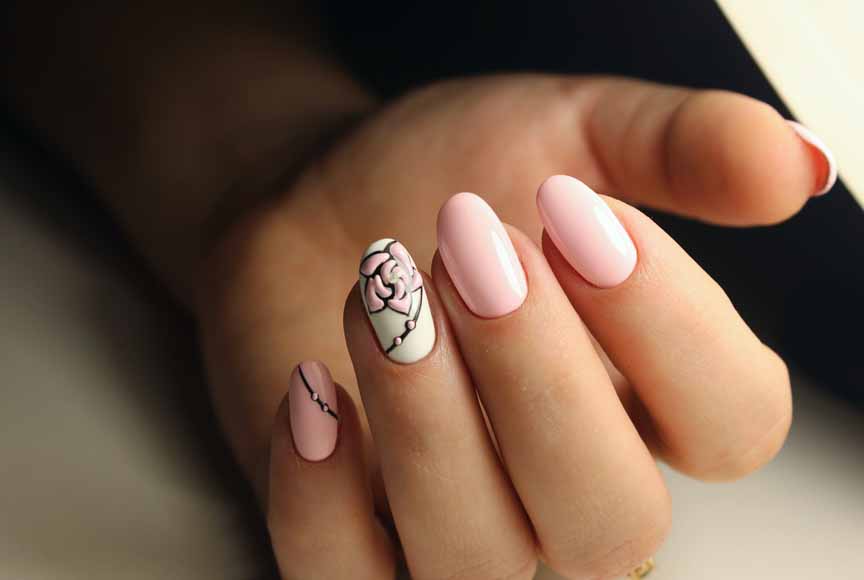
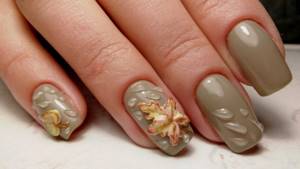
Nude
Many sensible ladies prefer discreet options for embossed nail designs; an example of this is nail art in discreet nude tones. All shades of beige are perfect for this purpose, perfectly fitting into discreet business, casual and laconic evening looks for women.
A raised, convex flesh-colored manicure on nails looks truly stunning, despite its modest, inconspicuous shade. Tones such as beige, soft blue, mint, bleached pink, coffee, milk, cream and light blue, on the contrary, emphasize the relief of the design more. All nude design options with a matte velvet effect look great. This design looks soft, gentle, homely.
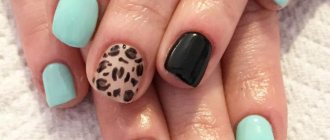
Animalistic ideas
It is impossible to imagine a bright, fashionable 3D manicure without an animalistic theme; the relevance of such design techniques is confirmed by photos of the latest experiments in this direction.
Images of animals and animal prints always look original and bright. Animal drawings are suitable for absolutely everyone, the main thing is to organically fit them into your image. Young fashionistas will love funny little animals or zebra print. For more mature young ladies, professionals advise trying leopard patterns, peacock feathers and stylized images of the animal world. Ladies of Balzac's age may well surprise their friends with marvelous patterns on their nails that imitate python skin.
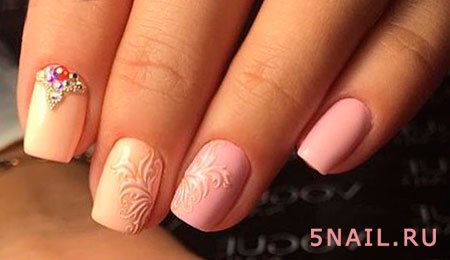
Floral motifs
Flowers bloom in a woman’s soul, all year round - it’s rare that a lady doesn’t like bouquets, even if they grow lushly only on her nails. Therefore, it is not surprising that the fundamental ideas of volumetric design are associated with floral arrangements.
The key to stylish manicure 2018-2019 is minimalism, so most manicures use each color as a single color, with the exception of a transparent or similar base tone.
A voluminous manicure with flowers is suitable not only for a wedding; depending on the color scheme and decor, nail art can decorate an evening or everyday look. In the new season, floral images of all sizes and shapes are in demand.
Brave ladies choose a 3D ornament on a contrasting background to immediately declare themselves as a creative person. The main condition is not to cross the line beyond which they will point fingers at you as an example of terrible bad taste.
Depending on the flight of your soul, choose a modest or extreme, gentle romantic or aggressive design with any representatives of the plant world: roses, gladioli, tulips, daisies, bindweed, cornflowers or exotic orchids. These may well be luxurious abstract stylizations.
For spring or summer holidays, there is nothing better than white lilies of the valley against a fuchsia background. Take this as a useful life hack.
Nature design
Inspired by vivid photographs showing the beauty of nature, nail industry masters create extraordinary examples of three-dimensional manicure. A modern 3D manicure can easily pamper lovely ladies with a luxurious image of a dense forest, a convex pattern of meadow grass against the backdrop of a serene shining sky, or stucco in the form of a chamomile field. An amazing opportunity to surprise loved ones and strangers!
Nails with a 3D effect look great in the summer, during the holiday season or at theme parties: in all these cases, a convex manicure helps to blend seamlessly into the surrounding reality.
Professionals say the design looks most advantageous on long nails; the complex relief design makes short nails look bulky.
Volumetric manicure in a marine style in the form of shells is in great demand. This pattern is very easy to make despite its amazing appearance. With this design, you automatically turn into a Disney princess or little mermaid. Shell manicure goes great with light summer dresses, pleated skirts and chic flowy chiffon blouses. There is no better solution for a summer holiday by the sea.
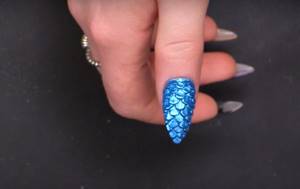
It is more difficult to perform an equally sophisticated voluminous manicure that imitates fish scales or a fairy-tale mermaid tail. But with some practice, you can wear the luxurious design proudly and receive the compliments you deserve.
Winter
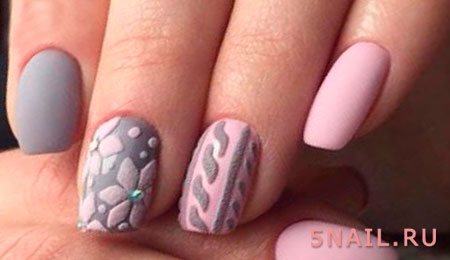
A manicure with voluminous patterns reminiscent of a loose grandmother's knitting is often quite justifiably called a “sweater”. This name is known more by professionals than by amateurs in the nail industry, but it fully reflects the appearance of winter design. A knitted or fur manicure consists of patterns typical of cozy, warm sweaters: braid, snowflake, stripe, diamond.
A special feature of winter designs are their velvety, cozy textures, achieved using special sand or powder. Winter knitted design is a great everyday option for girls of any age.

For everyday life
Volumetric nail design with gel polish is quite suitable for everyday life and a work environment, the main thing is to choose a laconic option and discreet colors. The emphasis in this case is on one or two nails. A classic French or moon manicure with delicate geometric or floral patterns is the perfect solution for a stylish lady for everyday use. Such a design solution will show the delicate, refined taste of the charming woman and her knowledge of fashion trends.
Quilted volumetric manicure
The newest trend for the 2022 season is 3D gel nail design with a discreet checkered pattern. To perform a voluminous checkered manicure, masters use various techniques. Checkered nail art is also called quilted, as it looks like an ordinary blanket. Despite its simplicity, the design adds a touch of true elegance and grace, like the famous plaid jacket from Coco Chanel.
First of all, matte geometric patterns with delicate inclusions of small rhinestones are in fashion. Quilt manicure in the autumn-winter season is usually performed in noble, restrained color combinations. Most often used: blue, light plum, gray, light green, beige, ash pink, soft mint, light shades of orange and red.
Unicorn horn
The 2022 season is characterized by ladies' passion for everything unusual and fabulous: this directly applies to nail art. At the peak of popularity is a manicure with a voluminous pattern in the form of a unicorn horn or a cornucopia.
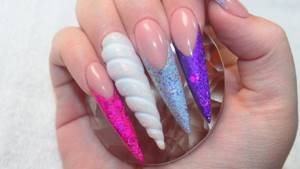
The hit 3D image is usually done in sweet, sugary colors, so this is definitely not an option for every day. Moreover, this design looks most impressive on long, sharp stiletto nails.
Options for everyday voluminous manicure
3D gel manicure is great for daily wear, if you don’t overuse it. Let the spectacular three-dimensional pattern flaunt on one or two fingers. This is enough to make an impression. Combine it with ombre and various types of French.
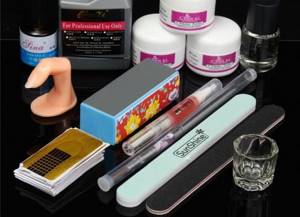
What do we need
Finger separator If you are doing a pedicure Sold in any themed store. For example, "Girlfriend".
Lamp Designed for drying You can find out about the varieties in this article.
Every lady has wire cutters. You can't do without them.
Regular manicure scissors The main condition is that they are sharp and do not break the nails.
Cuticle oil Don’t neglect it
Orange sticks for cuticles
Nail file Choose any
Regular lint-free napkins will not work
Shellac remover liquid Sold separately or as a set
Means for degreasing and removing the sticky layer
Bath You can find an alternative Available in sets and separately
Molded flowers
This type of volumetric nail design with gel polish requires skill development. There is gel plasticine for sculpting nail decorations. It is produced under the brands Arnelle, Lady Victory and others. Some artists use “liquid stones” to create nail bas-reliefs. To make a simple flower, apply petals with thin strokes onto a prepared, sanded nail. We add volume with each new layer, drying the previous one.
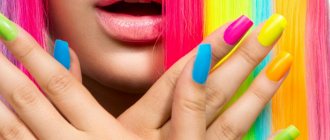
Glitter
Glitter polishes are indispensable in nail design. After all, glitters come with small and large sparkles, different colors and textures. With their help, you can create a stunning manicure, no worse than a salon one, for example, using the same gradient effect.
Video posted by NailsByCambria (@nailsbycambria) Jan 1 2016 at 12:20 PST
You can also highlight your ring finger with glitter polish. It's fashionable.
Photo published by Yolanda (@fabulous_10) Feb 1 2016 at 9:59 PST
Knitted manicure
Spectacular voluminous manicure imitating braids and other knitted patterns is now in trend. They are performed only with gel polish, since other types of materials do not give a similar effect. How to make such nail art? The method of creating a pattern is similar to drawing monograms: first, outline the general appearance of the pattern with dots, and then, without pressing, apply gel polish with a dot, weaving the patterns. There must be at least three layers. Each subsequent stroke should be narrower than the previous one. And each one must be thoroughly dried. The top layer can be dipped into flock before drying, or given a rough texture. Knitted patterns are especially good in pastel colors.
Drawings for beginners. Schemes and implementation features
Professionals advise beginners to start with training tips. And when your hand works more confidently, you can start practicing on the model. When performing the sequences and directions of drawing on wet gel polish, the following basic schemes can be distinguished:
- “dots”, “circles”;
- “cobwebs”, “twigs”;
- “stains”, “spirals”, “curls”.
Of these, more complex designs are already combined: “rose”, “butterfly”, “peacock feather”, “marble”, “abstract patterns”, “reptile skin”.
To make drawings on wet gel polish spectacular and bright, it is better to take contrasting colors of varnishes, you can use varnishes with glitter
Before applying, you need to carefully straighten the cuticle with an orange stick. The first color layer is applied to the nail plate and dried in a lamp. You need to paint in a thin layer so that it does not flow under the cuticle and side ridges.
Important to remember!
To draw on wet gel polish, you need a good colored base so that the nail plate does not show through it.
To do this, you need to apply 2 preparatory layers of varnish and dry in a lamp. And only the third layer will be working. The number of layers depends on the manufacturer. Some high-quality varnishes can achieve the desired effect with one coat.
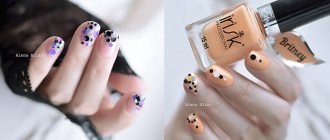
"Dots", "circles"
Dots are applied to the wet layer of gel polish with a dot. Depending on the order of application and size, different patterns are obtained.
By combining colors you can achieve spectacular results.
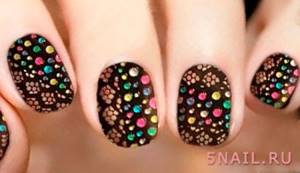
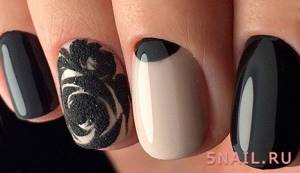
Small dots and circles in pastel shades look beautiful on a black background. The stone effect is obtained by applying large dots to a wet layer. The edges flow beautifully, and you get a smoky edge, like a shadow cast on a stone.
"Cobwebs", "twigs"
“Cobwebs” should be carefully applied with a thin brush. The thinner the line, the more attractive the drawing will be.
The thinner the line, the more attractive the drawing will be.
You can draw without dots, like a cobweb, by first drawing the twig itself, and then placing a dot and pointing it slightly to the side to achieve the desired shape.
“Smudges”, “spirals”, “curls”
It is also possible to apply the finishing coat over a wet layer.
In this case, a thin layer of topcoat is applied to the dried white color, from under which the nail plate does not show through. The required colors are laid out on the palette.
Note!
Using a palette saves the amount of varnish used.
The drawing on wet gel polish begins on one side, with lines going diagonally. On the other side of the nail plate, another color is applied towards the first. If the color is too bright, you can dilute it with a top coat.
Its application also helps to achieve greater blur if the result is not enough.
The lines blur towards each other, you can add several points in the resulting voids. After drying in the lamp, a finishing coating is applied, which is also sent to dry.
To obtain a “spiral,” the nail plate is painted in two colors.
The border between them can go anywhere, according to the plan. With a smooth movement of the dot, a line is drawn from one color to another.
“Curls” are obtained from a line drawn on wet varnish. It is enough to make a schematic drawing on the color border, as shown in the photo below.
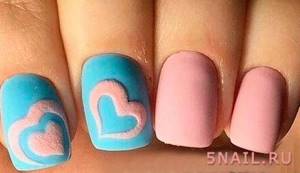
"Hearts", "shells"
Drawing “hearts” begins with drawing dots. For a multi-layered shape, you can make several dots of different sizes.
With the thin end of the dot, starting from the top, draw a line through the center of all points. They flow into one another, with the tail of the shape indicated at the bottom. You can make a whole branch of “hearts”.
Imitation of a “shell” can be achieved by semi-circular arrangement of dots on a wet layer.
Starting from the edge of the nail, dots are applied with the small end of the dot. With each row their size increases. The longest and most elongated points are located in the center. After it the size decreases.
3D effects on a matte background
It’s worth “playing” with matte and glossy varnish of the same tone or with companion colors. This is enough to give a voluminous look to your manicure. If you don’t have a matte top coat that matches the color, then rub the buff over the dry glossy layer with gentle movements. Do not press hard, use even pressure. After this, draw a monogram or other pattern using the method described above. Rhinestones along the “moon” line, along the edge of the nail or along will complete the creation of a noble and stylish nail design.
Required Tools
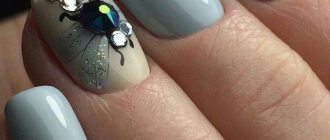
To create a manicure with a dew drop design on the tips of your nails, you don’t need a lot of complex professional equipment. Most simple tools can be found at home:
- gel or varnish of any color as the main coating;
- transparent base for varnish;
- finishing fixer;
- dots or brush of two sizes;
- varnish remover;
- cosmetic cotton wool or discs.
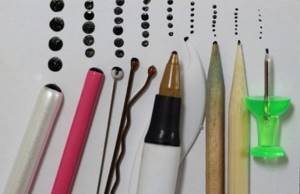
If you haven’t been able to purchase brushes or dots yet, don’t be upset. It is quite possible to make a neat drawing using available tools. This may require a match, a hairpin with a rounded end, or a regular ballpoint pen without ink.
Fur manicure
If you combine three-dimensional designs with a coating of velvet powder (flock), you can get the effect of a fur surface. This powder consists of crushed viscose thread. It holds quite firmly: you can safely do your homework.
If the threads are very finely ground, you will get a velor surface. Draw a three-dimensional design: a monogram, a heart, a rose or anything else, and then dip the nail with undried varnish into the flock. Shake and remove excess particles with a dry brush. Dry your nails, and the fur voluminous design with gel polish is ready.
If you apply a layer of varnish on top of the flock, you get this super-textured effect.
Today on the agenda is a nine-watt UV nail lamp Irisk
Today's beauty industry allows you to create absolutely amazing images. But fashionable gel polish, for example, cannot be dried without special equipment. For this you need a UV or LED lamp.
By the way, there is a real war going on between these two types of devices. On the one hand, LED dryers cope with the task faster, react less to voltage changes and are more compact. On the other hand, UV-Cs are cheaper, and used lighting elements in them are easier to replace, and besides, they are more common.
If you are, say, a beginner who wants to buy a ready-made starter kit for shellac, then most likely it will contain a UV lamp. However, this is not an axiom. Anti-everything people make so much noise about the POSSIBLY DANGEROUS radiation from this type of device that many are beginning to doubt their purchase.
However, if you are not inclined to play it safe, then the Irisk UV nail lamp may well be suitable for you. It is quite compact, designed for drying according to the 4-4-2 pattern (first the four long fingers of one hand, then the other, and then the thumbs of both hands together). This thing costs about 1000-1500 rubles, depending on the store.
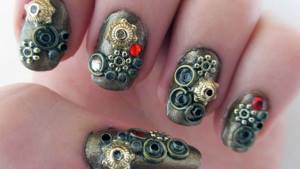
Caviar manicure, broths
This popular type of nail art by definition has volume and texture. It's very easy to do. In this case, multi-colored broths are used together with foil on a black surface, and this gives an exceptional decorative effect.