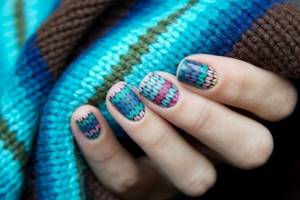
If you are looking for original ideas for simple nail designs, then manicure with a needle is what you need. On my blog I have already published 30 nail designs using a needle and even a video, so if you want to master this technique, then here you will find everything you need.
In this post I wanted to collect all my experiences - nail design patterns with a needle in one place . This is convenient for those who came to visit me for the first time and do not know where to start studying. Or are you just looking for a new manicure idea?
The advantage of needle drawings
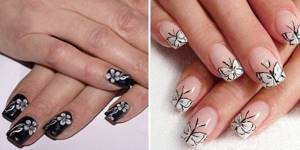
Using a needle, complex intricate patterns are created on the nails that cannot be painted with a brush, no matter how thin it is. The most popular patterns made with a needle are lace, geometric shapes, natural patterns, various lines, snowflakes, cobwebs, and hieroglyphs.
Patterns on nails with a needle
The popularity of this method of nail decoration is due to several factors:
- simplicity and accessibility of the method: you can draw with a needle at home;
- a variety of design schemes, the ability to independently come up with a plot for nail art;
- the method does not require professional equipment;
- Doesn't take a lot of time.
Adviсe
To have beautiful nails, visiting a nail salon is not necessary. Master the art of nail art at home and please yourself with beautiful and well-groomed hands regularly at no extra cost.
Just take into account a few nuances so that the resulting result never disappoints you:
- think over the design in advance, first you can recreate it on tips, and then try to transfer it to the nail; choose the colors of varnishes so that they harmonize with each other;
- movements with the needle should be light - you can damage the nail with it;
- start painting with your non-working hand so as not to leave the most difficult part for later. If this is difficult for you, then let a friend or someone else help you;
- Always seal your designs with a clear polish or top coat to ensure your manicure lasts longer.
Believe me, beautiful nails are easy! Start experimenting, use your imagination and everything will work out for you. Watch training videos or photos with a finished manicure - this will motivate and inspire you to immediately start creating masterpieces on your nails.
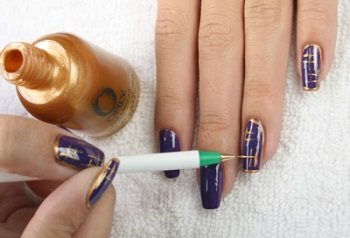
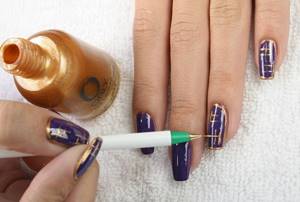
Nail painting needle
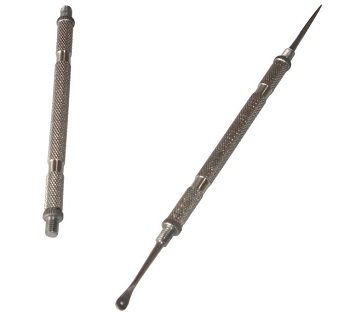
Manicure needle
Professionals use a special needle with a handle for convenience. It can be found in cosmetic stores. But a worthy alternative is a homemade sewing needle. To complete the design, you can attach a pencil or a wooden stick to it.
The length of the needle depends on personal preference. It is more convenient for some to draw while being as close to the nail as possible, while for others it is the opposite. Try different needles and find the size that works best for you.
When choosing a needle, you should pay attention to the desired line thickness. For thin needles, use a smaller needle; for thicker ones, vice versa. If the drawing is quite complex, it is better to stock up on a set of needles.
Start of the lesson
A fairly simple object at first glance is a needle. Drawing for young children should be like this. However, it is worth noting that it will be difficult for the baby to draw a straight line right away. To develop this ability, you will have to practice. A drawing lesson doesn't have to be boring. Therefore, you can draw a picture together with your baby. Let him repeat all your actions.
First you need to draw two straight lines. They should start at one point and then diverge slightly towards the edges. Then they need to be connected in a semicircle. Ask your child what this shape reminds him of. It looks like a drop, a ray, etc.
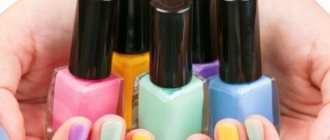
What varnishes are suitable
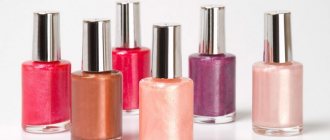
To create designs on your nails with a needle, you need to prepare varnishes in several colors. You can take contrasting colors. The main thing is that the varnishes should be fresh and not too thick . Varnishes from the same company mix well, and their designs turn out smoother.
For a complete manicure, you need to prepare both a base coat and a top coat. To correct an unsuccessful drawing, you should have nail polish remover or a corrector marker on hand.
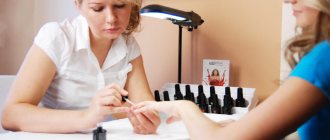
Training in using a needle in manicure
And although theoretically everything seems very simple, not everyone can create a design that will look really high quality using this method. The thing is that there are a lot of nuances and little things that become known only in the process of work. That is why below we will discuss how to draw pictures and make patterns on nail polish with a needle, consider photos, diagrams and videos about how this process is performed.
The biggest difficulty for beginners when applying nail polish with a needle is in what order to apply the dots and how to connect them. And most importantly, how to do all this so quickly that both varnishes do not dry out. In general, if the pattern is performed in the correct sequence, then there is no need to rush. The following diagrams will tell you how and in what order to draw fragments of a pattern on your nails with a needle.
https://youtu.be/56cGQcjEFPA
To conclude the topic, you can watch a video about how drawings are made on nails with a needle. In this tutorial the master performs a very simple design ideal for beginners. The whole process consists only of applying drops and “pulling” them to an imaginary line. This is where you should start your training in this technique.
In this video we draw a rather complex pattern on our nails with a needle. A beginner is unlikely to be able to repeat this. However, after repeated training, it is possible to create more complex ornaments and designs. The secret here is that very fine needles are used for the design, and both varnishes are quite liquid. In addition, the base is applied very thinly, which allows the needle to slide easily across the plate.
https://youtu.be/lazx0bwBaZ4
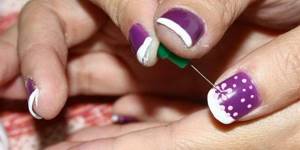
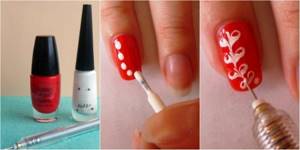
Drawing with a needle on nails: step-by-step instructions
The process of painting nails with a needle
- First you need to prepare your nails . Make a bath, remove the cuticle, treat it with special oil. Apply base coat.
- Apply the first varnish - the basis for the drawings. The layer should be quite dense.
- After the base has completely dried, you need to start creating images . Follow the pattern you choose or come up with your own design. Use different needles to draw lines of different thicknesses.
- The result should be secured with colorless varnish .
Schemes for applying patterns with a needle
Before you start painting, make sure that the base is completely dry and has sufficient density, otherwise the needle will simply get stuck in the varnish.
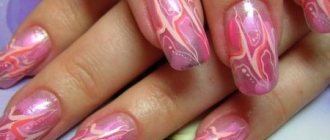
“Wet” drawing technique
Painting nails with a needle
This technique involves working with varnish that has not yet dried . With its help, you can create beautiful gradient designs.
To create patterns using this technique, it is necessary to apply a second and immediately fresh layer of varnish of a different color to the first dried layer of varnish. Then use a needle to create patterns by mixing two colors.
An example of nail design using the “wet” technique of painting nails with a needle is presented in this video tutorial:
“Dry” technique
This is a standard painting technique and involves drawing designs with a needle onto a dry base coat.
For beginners, it is advisable to draw using the “wet” technique.” It is more convenient and requires less experience.
Tips for painting with a needle on your nails
- In order not to smudge the drawing, start working with your little finger.
- You should also draw starting with the “non-working” hand (right-handed - with the left, left-handed - with the right).
- Be careful when pressing the needle: you can easily damage the nail plate.
Drawing technique
There are two main techniques for applying images with needles:
- Dry . Apply drops of varnish to the already dry varnish, creating beautiful stains on the surface using a needle.
- Wet . Apply the drops directly to the wet varnish, quickly using the needle.
Of course, the first technique is preferable for beginners due to its simplicity. But in the case of the wet version, you need to have time to create a certain pattern before the varnish dries. In the case of gel polishes, the task is simplified - they will not dry without a special lamp.
The application scheme is very simple. Apply drops of varnish of the desired color to the main background. Start moving the needle from the middle of the drop beyond it, drawing some kind of pattern. In this way you can create circles, lines, figures of eight, flowers, leaves. You can paint with several colors of varnish at once - this way the result will be more impressive.
How to decorate long nails
Long nails give complete freedom of imagination. Any pattern will look harmonious on them. The use of various decorations is encouraged, for example, nails with an original pattern and complemented by a tiny piercing on the free edge look stylish and unusual.
In any case, you shouldn’t limit yourself - constant bold experiments will help you choose the most suitable design that will maximally reveal the bright personality of the owner.
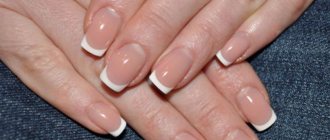
Advantages and disadvantages of acrylic French manicure extensions
To get an objective idea of modern technologies, you must understand the difference between gel and acrylic. Since our article is devoted to acrylic manicure, we will focus on this material. Let's look at the situation from the side of a client who wants to get a great one.
- First of all, acrylic has a persistent and very specific smell, which many associate with a hospital. This is a stumbling block for a number of beauty salon clients who do not want to experience discomfort during the extension procedure.
- The next major drawback is related to health aspects. Acrylic does not allow nails to breathe, which can have a detrimental effect on the condition of the nail plate. Also, due to the presence of chemicals in the material, it can cause allergies.
- The advantages of acrylic include its strength and, as a result, the durability of the manicure. In addition, acrylic French extensions will cost you less than gel ones. Some people think that they look more elegant and are as close to the natural version as possible. But this advantage is, of course, subjective.
All other features relate more to technical aspects. For a professional master, as a rule, it is not difficult to switch from acrylic to gel, and vice versa. Of course, qualified nail service specialists today prefer to work with gel. But not everyone loves and accepts new products, so some continue to do things the old fashioned way.
Let's move on to the next important point. What can be said about the visual side of the issue?
What is required for such a manicure?
For home-made creative delights in the field of nail art, you don’t need much with a needle. Firstly, endurance, patience and a focus on positive results will not hurt. Secondly, you will need the following tools and supplies:
- sewing needles of various sizes, including gypsy needles;
- toothpicks;
- a set of multi-colored nail polishes;
- fixative or clear varnish;
- napkins;
- prepared workplace - table, chair and good lighting.
Manicure is done with a needle of various sizes and toothpicks. Using the latter, you can create very interesting and quite complex patterns. To create large designs, large needles are used, and for small details, correspondingly miniature ones are used.
Varnishes are the main consumables. These are unique paints for your nail art. Wipes will help keep the skin of your hands and desktop clean, and remove varnish from the needle.
Features of French manicure
There is an opinion that acrylic significantly harms natural tissues. But it should be understood that any harm from anything is associated with improper use. Regular hand cream can be harmful, but understanding what it is for and how to use it eliminates its potential danger.
acrylic french extension
Acrylic extensions can also be done on the feet, lengthening the natural nails if they do not seem attractive enough. French manicure on the legs does not require frequent corrections, since the nail plate grows much more slowly. This modeling technology is also used to correct the defect of uneven nails. This allows you to correct the growth of the natural plate; the procedure is also useful in case of significant curvature and ingrowth of the nail into the skin.
Simple and beautiful monograms with shellac, gel, acrylic
Creating designs in the form of monograms can be the main decor for a manicure or additional on some nails, using the main elements. The work process is carried out using acrylic, shellac, gel, and goes well with sparkles and rhinestones. Monograms are drawn using a needle or brush.
Volumetric
Volumetric monograms are patterns combined with volume that give a convex effect to the design and are quite easy to reproduce. To work, you will need gel paint that does not stick - the designs are applied over the topcoat.
Each component is drawn with a thick curl and immediately dried under a lamp for 10 seconds. It will be enough for the material to dry out and not mix with subsequent curls in the composition.
With French
First, a French design is made on the nails, decorating the top with patterns of simple weaves. The difference between this nail art is the spirals painted on the sides of the nail plate, usually on one side, complemented with rhinestones.
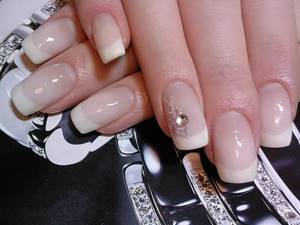
With rhinestones
Strokes with the addition of shiny stones look especially stylish and graceful on long nails. Professional craftsmen advise emphasizing the brilliance of the design by combining decorative elements and a plain background. You can use rhinestones to highlight the middle of the monogram, and also place it along the edge of the hole itself.
With acrylic powder or sand
To create monograms, you must also use acrylic powder and varnish with a sticky property:
- Cover the drawn pattern with a sticky layer of varnish.
- Using a wide brush, gently powder. The decor will be evenly distributed, the particles will be fixed without crumbling later.
- Dry the resulting manicure under a UV lamp.
This design is suitable as a DIY nail design. It should not be combined with other techniques.
With glitter
You should treat the nail surface in advance, painting it with a varnish base. Having decided on the choice of the desired sparkles, they should be applied with a hairpin or a toothpick dipped in water along the contour of the indicated pattern. The final stage of the procedure is drying and applying a bleached fixative.
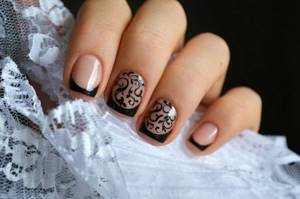
With openwork
The most complex and somewhat painstaking technology in manicure design. The finest mesh, similar to lace fabric, carefully drawn over the entire surface. To facilitate this method, there are special stencils. Working manually, with the simultaneous use of different tones, requires a clear image of the future picture.
You can diversify your nail design with drawings and decorative elements. A step-by-step brief description of the work processes for beginners and photos will help you acquire skills and learn how to combine various techniques for applying gel polish.
Selection of manicure options and design ideas
Human imagination has no limits, therefore, nail art can have millions of different patterns. But before you realize your creative potential, it is better to master the simplest drawings and learn to perform them with the precision and filigree of an experienced master. Then a manicure with a needle, the patterns of which are as varied as possible, even in complex interpretations of patterns, will not become a problem for you.
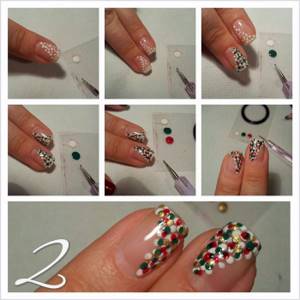
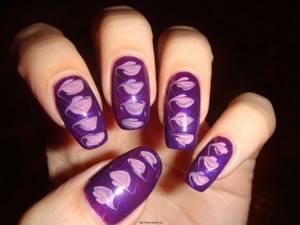
Drawing a cobweb
This is one of the simplest decoration options. It is better to choose black varnish as a base. On it “wet” with a medium needle, apply dots in any order, and immediately after that with a thin needle, connect them to each other.
Instead of dots, you can apply stripes using a brush. The main varnish must dry, but you need to work with a strip of a different color immediately. Using a needle, draw lines from the center to the corners to form a grid pattern.
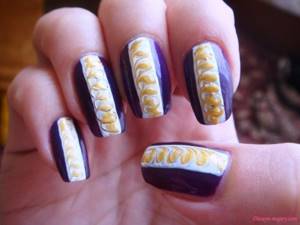
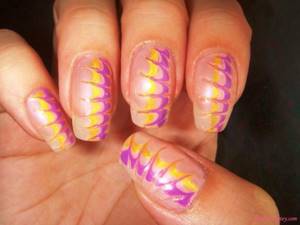
Drawing a spikelet
This manicure using a needle is also very popular and simple. As a rule, dark varnish is used as a base, and light varnish is used for the pattern. The “wet” procedure is performed: several medium-sized light drops are applied to the base coating. They should form a vertical row.
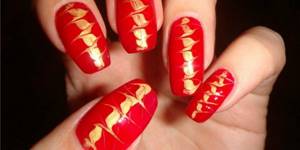
Then the bottom drop is connected with a needle to the adjacent white one on three sides - on the sides and in a straight line. The tail of the top point should be twisted into a small spiral. To enhance the effect near the base, you can finish painting the leaves of the spikelet with green varnish.
Day and night
For such a pattern, you need dark and light varnish, ideally black and white, but any other contrasting shades will do. We conditionally divide the nail plate into two equal parts with a vertical line and paint them with a brush.
Perfect accuracy is not needed. After all, then you need to mix these varnishes with a “wet” needle using zigzag movements. First we transfer the dark to the light, and then vice versa.
Skins
Another popular manicure with a needle is creating a pattern that imitates animal skins. Let's look at the example of a zebra. Before it dries, white spots are applied to a transparent or colored base with a large needle, and white droplets are applied on both sides nearby with a smaller needle. Choose your location arbitrarily. A total of three skins are enough on one nail.
Chess board
Black and gold varnish is ideal for this decor. The nail plate must be carefully divided into approximately equal parts. To do this, apply one horizontal and one vertical line to the base with a needle. Next, we paint the cells located diagonally in one color. We correct defects and irregularities with a needle.
Blots
Another very simple type of nail art. For it use 3-4 multi-colored varnishes. Drops of different colors are applied to the base coating. Then, using a toothpick, they are given an arbitrary shape of blots.
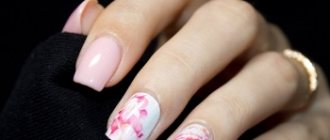
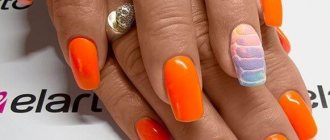
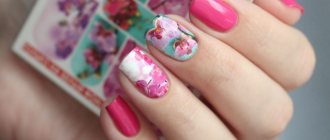
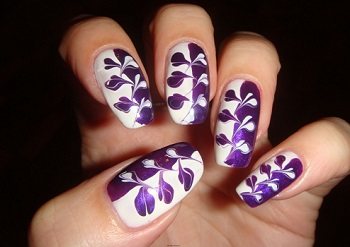
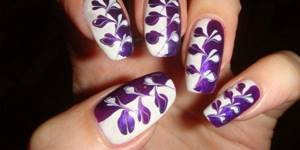
Floral motifs
Probably the most popular manicure with a needle at home is flowers. Use a thick needle to place a dot in the corner of the nail plate. There are five more around her, maybe even a different color. While the varnish has not hardened, use a thin needle to carefully draw a line from the extreme points to the central one. The flower is ready.
Feathers
When floral motifs in various variations no longer cause difficulties, you can try a manicure with feathers. On the main coating, three multi-colored dots are made diagonally. Then, using a thinner needle, they are connected into a single line. At the top of the pattern a blot with strokes is formed.
Lights
Do you want a very original manicure with a needle? Then draw flames on your nails. The base is made in two tones - the bottom of the nail plate is in one color, and the top is in another. And at the junction, lights are drawn with a needle - flames.
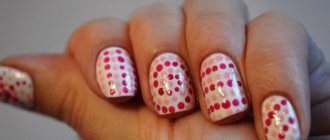
Dots and strokes
Quite simple drawings can also look very impressive. So, even from dots, strokes and stripes you can create a very interesting pattern. Show your imagination, draw a flag, a hieroglyph, a geometric figure.
Stars
Another simple but stylish design option for manicure using needles is the star. Make a large blot in the center of the nail plate. Next, use a thinner needle to draw rays from its center. The main thing is not to put too much pressure on the working tool.
- Salon treatments and traditional methods will help make your facial skin perfect.
- Laser correction is used to treat ingrown toenails and prevent recurrence, details here.
Nail trends 2022
Neat and well-groomed nails never go out of style. Short nails are trending this year. The almond shape of nails does not lose popularity, giving harmony to the image.
The color scheme is distinguished by non-standard colors, for example, turquoise shades will suit red-haired beauties, and denim style will be interesting for young girls. Shades of coral are already classics for the feminine and elegant.
Short nails are trending this year. The almond shape of nails does not lose popularity, giving harmony to the image
The color scheme is distinguished by non-standard colors, for example, turquoise shades are suitable for red-haired beauties, and denim style will be interesting for young girls. Shades of coral color are already a classic for the feminine and elegant
This season's fashionable mint color will not disappear in the fall. Flesh-colored nail polish is also popular, and the bravest girls are already using yellow vinyl, dark lavender and hot coral. The pink color, which has also become a classic, does not leave the scene. The confetti varnish is interesting. It contains an unusual combination of coral and violet particles, and there are also calm pink particles of various sizes.
How to make drawings using “wet” varnish
Drawings on “wet” varnish require speed and high precision. That is why, before starting nail art, you should carefully consider the future design . You shouldn’t limit yourself to diagrams from the Internet, because unique designs you come up with yourself can look much more interesting.
- A velvety coating can be applied to a pattern of “wet” varnish. Simply pour a special nail flock onto the coating, wait a few minutes and brush off the residue with a dry brush. As a result, the drawing will acquire an unusual texture that is pleasant to the touch.
- With “wet” varnish you can create not only floral patterns, but also small scenes - New Year’s motifs, an unusual safari design, or cute drawings of animals.
- Try to add small strokes - special painting varnishes with a long and thin brush are ideal for this. Thanks to such nuances, the drawing will look more “alive” and textured.

You need to know that for beautiful, blurry lines you should select products with a certain structure. For example, a perfect drawing will never be achieved if the varnish is too liquid.
What drawings are in fashion
Fashion trends in the world of nail art have never been consistent. Every season, completely different techniques and designs become the “favorites” of fashionistas. What drawings were awarded this title in 2022?
The undoubted leader has become the minimalist style in manicure design. Elegant and laconic designs are a wonderful decoration for the nails of a girl with impeccable taste.
Geometry in nail art continues the idea of stylish simplicity and rigor. This design can be embodied with a charming “polka dot” pattern, abstract lines and geometric shapes.
In the spring-summer season, beautiful flowers begin to bloom on the nails of all fashionistas in the country. Absolutely any floristry is trending: unopened buds, various flowers, leaves, twigs and tropical plants.
Various patterns join these trends. The top features ethnic and lace motifs.
Animal art is not far behind: the leopard familiar to you from previous seasons is joined by various animal images. They may differ in realism or be emphatically sketchy.
The most delicious and original this season will be “edible” drawings. Amazingly natural strawberries, ice cream, various fruits and sweets - this and much more can become an extraordinary accent in your manicure.
How to make an igloo out of snow with your own hands
One block must be placed tightly against the other by tapping with a knife. In this case, snow plays the role of cement. First you need to sand the horizontal seam, and then the vertical seam. Seal the chips with snow and fill the cracks that form during the construction of the igloo with your own hands with snow crumbs. It is very difficult to cut an exit without damaging the structure
In order to make a snow igloo durable, it is important to carefully approach the details.
When the process of laying snow slabs begins, a hole will form at the top. To prevent the last top slab from sliding off from above, it is placed in the form of a wedge. Such a snow brick seems to jam the ceiling hole. It is made larger than the hole so that it does not slip through.
In winter, at sub-zero temperatures, a snow igloo can last from 3 to 5 months. Eskimo housing is capable of maintaining a more or less stable temperature inside. In such a room the temperature ranges from -6° to +2°. If you light a candle, you can heat the room to +16°. But the Eskimos heated the igloos with lamps containing deer or seal fat. The temperature in such a dwelling rose to +20°, despite the fact that there was a frost of -40° all around. It was hot to sit in clothes, and they undressed. A small corridor also emerged from the snow. To protect against attacks by polar bears, the igloo was covered with a large block of snow at night.
Preparatory activities for creating patterns
Before applying patterns, you should prepare all the necessary tools and place them within accessible limits. This allows you to calmly get a manicure without being distracted by searching for them. Nail art does not involve the use of any special tools; in order to make an effective design, you will need a minimum set of materials:
- varnish base;
- a set of machine sewing needles of different sizes for creating designs;
- toothpicks to help create blots;
- non-woven napkins or cotton pads;
- a set of varnishes of different shades;
- fixative or transparent varnish;
- nail polish remover.
Lighting is of no small importance. It would be best to use a table lamp. On smooth and clean nails, the design will fit better and look neater, so do a regular manicure first. Then you should cover your nails with a special base. Experts recommend purchasing the base and varnish from the same manufacturer. In this case, it is guaranteed that all compatibility nuances are taken into account. After the base has dried, you need to cover your nails with a single-color varnish and wait until it dries completely. Only after these preparatory activities can you begin creating patterns.