Hello, dear readers! Surely you have seen unusual patterns on your nails, as if dusted with snow? This nail art looks impressively voluminous, and at the same time delicate and soft. If you also dream of having such a manicure, velvet sand is exactly what you need. This material helps create real magic on our nails.
In this article we will tell you in detail about this miracle powder, how to work with it correctly and how to use it to make your nails delightfully beautiful. We’ll also look at other ways to create a velvet manicure.
Features of manicure
Advantages of the granulated sugar effect design:
- the ability to perform it at home;
- resistance to aggressive household chemicals;
- variety of ideas.
Interesting solutions for manicure:
- velvet surface;
- marmalade records;
- subtle color transition - gradient;
- combination with familiar types of design.
Advantages
A carefully executed “sugar manicure” has many advantages compared to classic options, for example, with a French manicure:
- this design is significantly different from others - it looks incredibly stylish, unusual and more than original;
- coating particles are used both to decorate the entire nail plate and to depict individual fragments, ornaments, and designs;
- such a design solution is safe for the nail plate;
- if all the necessary rules are observed, especially if the manicure was done by a master in a salon, such a design will please the owner for a long time;
- the execution procedure, in principle, is not particularly difficult to perform and, if you have all the necessary materials at home, it is quite possible to perform a sugar manicure yourself;
- The material holds up well even when performing regular household chores, in contact with water, washing, and cleaning.
Minuses
The disadvantages include:
- when performing a similar nail design in a beauty salon, the receipt for the manicure will be quite substantial;
- a manicure that is not secured with a special finishing agent at the end of the process requires extremely careful wearing;
- housework should be done exclusively with gloves if there are voluminous decorations on the nail plates (although, in fact, manicurists always, no matter what the design, recommend working around the house in household gloves).

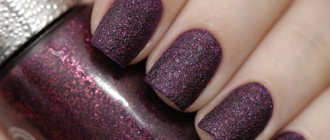
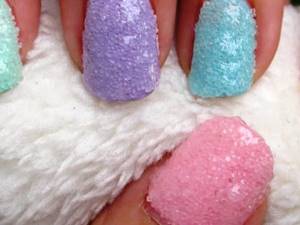
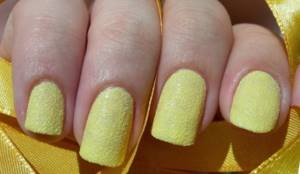
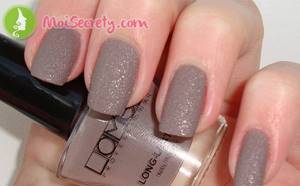
Sand effect varnish
“Sugar manicure” polish has become a real find for lovers of home design. It contains small silicone particles of different sizes, which create the roughness effect. For a subtle shimmer, small sparkles are added to the varnish.
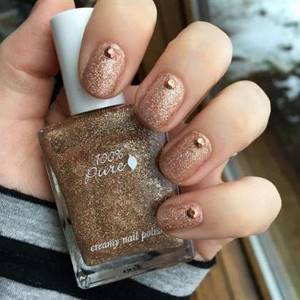
Using this varnish is as easy and simple as using a regular glossy finish. This varnish should not be applied without a base; it always protects the nail very well from chemical exposure. Before using sugar varnish, you should shake it very well so that all the grains of sand are mixed.
To make the design look very bright and rich, apply the varnish in two layers, and to smooth out the roughness of the surface, cover the manicure with a fixing varnish.
Velvet varnish application technology
Sand varnish
An alternative to velvet sand is a new product, velvet nail polish.
This is a type of regular varnish with the addition of tiny acrylic powder, creating the effect of suede or light grain.
With its help, even beginners can quickly create a uniform velor coating.
The varnish dries in air in 2-3 minutes. It must be applied in two layers and covered with the second only after the first has completely dried, so that there are no grooves or screeds. You can use a fixative, but then the suede texture will disappear, leaving only a matte effect. Velvet varnish can be found from the following manufacturers: Dance Legend, OPI, ZOYA, NUBAR. The coating lasts 2-4 days, and then chips and comes off like regular varnish.
How to choose the right varnish yourself
An unsuccessful varnish can highlight the poor condition of the skin on your hands, its dryness or a large number of wrinkles. The color of the skin may not match the shade of the nail covering and worsen the overall perception. In order for a manicure to look great, you need to adhere to certain rules when choosing it:
- Consider your color type. Golden skin and olive-colored veins slightly visible through it are best combined with orange, pink-coral, fashionable shades of burgundy, marsala and sangria, dark green, and nude.
- Light pink skin and bluish veins are complemented by cool-toned varnishes that will make your hands even whiter and softer. Gray, blue, metallic and berry colors are the best choice in this case.
- For skin of a neutral shade, on which it is difficult to distinguish even small wreaths, you can use polishes of any color.
These principles are also true for lipsticks, because quite often women very scrupulously try to choose their shades so that they completely match the color of the manicure. Sugar gel polishes are produced by many brands. They vary in price and quality. In the Jerden Color Sugar series, the color palette consists of 15 colors, which are quite unusual. They dry quickly, and with proper hand care they can remain on the nails for a long time. Dans Legend offered its fans the Sahara Cristal series. The colors of the polishes are quite interesting, but in the bottles they are slightly different from the colors and shades that are obtained when applied to the nails. This group requires a quality base or a good clear coat. Holiday from Golden Rose is, first of all, an inexpensive, budget option that allows you to get a high-quality manicure with a granulated sugar effect for a low price. The result of its use will please even the most fastidious beauties, whose nails will not only be original, but will also cause sincere admiration from others.
How to choose sand for nails
Decorative sand for nails comes in fine, fine, medium and coarse grinds. The first two are useful for drawing. The third type of product is universal; it is suitable for giving the coating any desired consistency. And even a novice master can’t go wrong with it. Large flakes are a little more difficult to work with, but the result is fluffy nails. This coating has the most unusual texture.
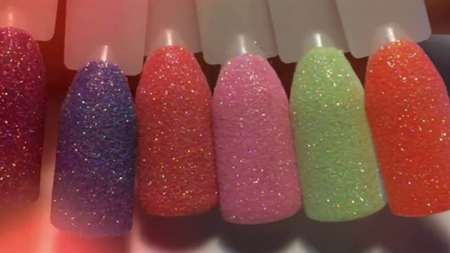
You can choose any color of granulated sugar on your nails:
- transparent gives relief to the surface, but retains the visible tone of the gel polish;
- tinted ones are of two types: consisting of pigmented particles of the same color or multi-colored (in a jar there are pink, yellow, blue, green or orange, red, lilac particles);
- silver and gold accurately imitate the appearance and shine of precious metals;
- pigmented with bright gold or silver flecks, making your nails look like marmalade.
The choice is determined by the texture and appearance you want to give to the coating.
How to do a sugar manicure at home
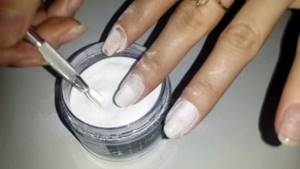
To make sugar nails with gel, you need to purchase transparent acrylic powder, which fits perfectly on any colored varnish. In the future, it can be used with a gradient, when you want to make a colored stretch strewn with sand. But before we get into complex designs, let's try a simple coat of colored varnish.
Transparent acrylic powder must be mixed with any sand. When dry, it will help absorb excess moisture and create a very durable coating on your nails. Thus, the manicure will last longer without crumbling, abrasion or chipping.
- Prepare the plate for painting with gel polish.
- Apply primer, base and send to dry in the lamp.
- Apply the selected color in two layers and dry.
- We apply the top coat and begin to generously sprinkle sugar onto the wet, undried finish.
- After drying, use a brush to remove excess acrylic powder and granulated sugar mixture.
You can perform a manicure in several ways - apply sugar material to colored varnish, base or top. In all three cases, the design is the same, but with different color saturation.
You can add different components to the loose composition: shimmer glitter, acrylic powder for strength, mix several sands to obtain the desired shade. Sand of very bright colors is diluted to obtain delicate pastel shades.
Sugar manicure

Tips from the experts
To properly do a sugar manicure with gel polish, you need to:
- Buy a textured coating from a specialty store.
- Before applying, shake the packaging so that the particles are distributed evenly. Ignoring this point will ruin the appearance of the plate.
- Texture varnish must be applied in several layers. You cannot take a lot of material at once - this will distort the result, making the surface rough and sloppy.
- At the end it is necessary to apply a fixative.
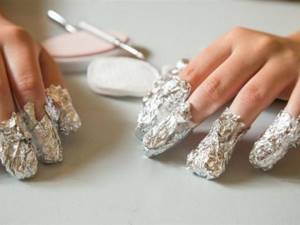
Careful removal of gel polish will have a positive effect on the condition of your hands. Withdrawal rules:
- A small amount of special liquid is applied to cotton pads.
- Apply them to the nail plates and secure with pieces of foil.
- After 5-10 minutes, the wrapper is removed, and the remaining soft varnish is removed with cotton wool.
Materials for creating velvet sand
In order for the velvet sand design to last as long as possible, it is necessary to prepare the necessary material:
- base coat;
- hybrid drying lamp;
- degreaser;
- top coating;
- powder brush or flocider;
- powder of the desired shade;
- perhaps stencils for creating ornaments.
The base tone of the nail plate can be transparent or any desired shade. The tone of the velvet pattern can be created with the main color or completely different from it, for those who want to have a bright contrast. The use of a flocider is often available to professional craftsmen, as it requires some experience in the work. This is a special device that creates an electromagnetic field, affecting the polarity of the smallest particles of powder. Thanks to this, beautiful patterns are created, and the particles themselves fit more tightly to the plate and are more reliably connected to each other.
It is not forbidden to experiment by diversifying your manicure with nail designs with rhinestones and sparkles. The main thing is that the manicure does not look pretentious. It is more important that before performing the velvet sand design, first clean the cuticle. If you are doing this type of manicure for the first time and on your own, you can use regular varnishes to master the technique. Another important point before applying varnish is treating the plate with a buff. Thus, the nail acquires a rough surface and provides a stronger adhesion to the varnish coating.
Performing a manicure at home
There are several techniques for performing such a manicure; it is worth familiarizing yourself with them all first, so that you can then choose the one that suits you best. The first method consists of the following algorithm of actions.
- Having done the simplest trimmed manicure, you should steam your hands in a herbal bath, push back and trim the cuticle, give your nails the desired shape and thoroughly dry each nail with a towel.
- Time for a protective base. When the base has completely dried, a little varnish is applied to the nail (or UV gel if the manicure is performed using a lamp). Preference is given to soft shades: cream, pink, sand, but sometimes they choose something completely opposite.
- Before the varnish dries, you need to carefully cover it with a thin layer of granulated sugar, waiting until it sets on the surface.
- Using a special brush, brush off excess particles; if necessary, you can also use this brush to form a pattern.
The second method is suitable when using gel polish and a special ultraviolet lamp.
- Paint your nails with the desired color and draw the chosen pattern. In the future it will be made sand.
- Carefully, sprinkle sand on the ornament in a thin stream using a bamboo stick, and correct any grains that do not fall on the intended parts.
- Then the nails are dried in a lamp, paying special attention to the thumbs, where the gel usually takes the longest to dry.
- Complete the manicure with a few touches of a professional topcoat to seal in any small particles.
If the classic version of sugar manicure already seems boring, manicurists suggest trying the following several options.
- It is proposed to fix the grains of sand not over the entire surface of the nail, but to highlight only the hole or apply it to the tip. There is no need to be afraid of additional decorations when choosing a manicure design.
- There is no need to save material, as the result will clearly not please you. When choosing a velvet manicure, it is worth remembering that it is better not to skimp on grains of sand in order to get a coating that will be as close as possible to the desired one. There is no need to be afraid that your fingers will get dirty - they instantly fall off from the skin of your hands.
- You can also experiment with “sugar” patterns and monograms made in several color options.
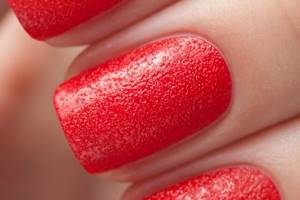
Ardent opponents of nail gels, who believe that they spoil the nail structure, will be pleased with a nail polish called “sand”. It is ideal for creating a “sugar manicure”, as it contains small silicone particles of various sizes. Due to them, a “sand effect” is created on the surface of the nail. Often the composition contains sparkles, making the manicure festive and shining.
Before using this varnish, you need to shake the bottle well so that the particles then lie evenly on the nail. For a more textured and rich manicure, apply the polish in two layers. And in order to smooth the surface, if it seems excessively rough, the nails can be coated with a finishing fixer, thereby also strengthening all the necessary shiny elements in their places.
How to apply sand varnish?
Sugar manicure is no different from the simplest glossy manicure. To create it you will need a base varnish and sand or sugar varnish itself.
1. Apply base coat to your nails.
2. Paint your nails with sugar polish, after shaking the bottle. The grains of sand should be distributed throughout the varnish. Sometimes even one layer is enough for a uniform and rich shade. Two coats will give your sandy nail polish even more richness and texture. It is not necessary to use a fixative varnish, but it will help to slightly smooth out the bumpiness of the manicure.
Sand varnish dries quickly and lasts quite a long time. As the layer dries, the grains of sand appear.
Professional set for velvet manicure
This kit contains the following materials:
- Flock or velvet sand
is a material that is applied to the nail plate. It looks like a large number of fibers of different lengths (wool, silk, viscose, cotton, acrylic, polyamide, etc.). One set contains 7 different colors. - A brush that has voluminous and long bristles
, which makes working with flock much more convenient. This brush is also used to clean the hopper or stand, as they can become very dirty during operation. - Metal stand.
It is used for more convenient work when creating nail designs, making the manicure much neater. - Flockider
is the main tool for performing velvet manicure. Thanks to its use, a unique velvet coating of the nail plate will be created. This device produces an electric field that affects the lint particles, which acquire the desired polarity. Thanks to this, the pile fits more tightly to the nail. The flocider must be used according to the instructions supplied with it.
In beauty salons, experienced manicurists create such an unusual design using a flocider and the process goes as follows:
- First, powder is poured into a special hopper of the device.
- Varnish or gel is applied to the prepared nail plate (the cuticle is removed and the nails are given the desired shape). To make your manicure more vibrant, it is recommended to use colored varnishes.
- A finger is placed under the metal stand and the device itself is turned on, placing it directly above the surface of the nail, and a key is constantly pressed. During this procedure, some particles of material will end up on the stand, but this is normal.
- Now you need to dry the nail under a UV lamp or just wait a few minutes until the coating is completely dry.
- In order for the velvet manicure to last as long as possible, it is not recommended to wet your hands for several hours after visiting the salon.
- To prevent dust from getting into your eyes and causing irritation, you should wear a special mask. This rule applies to masters; the client can simply turn away.
You can easily create such an original and stylish manicure at home; you just need to purchase high-quality materials. The main thing is to strictly adhere to the following instructions:
- First, a simple manicure is done - the cuticle is processed, the nails are trimmed and filed.
- A clean swab is moistened in a small amount of acetone and each nail is treated - degreasing is carried out.
- The flock is laid out on a sheet of paper and lightly thinned out using an orange stick. During this procedure, you need to remove all the lumps, otherwise the design will be ugly.
- Varnish of any shade is applied to the nail plate in one layer.
- You need to wait a couple of minutes until the varnish layer is completely dry.
- Then the varnish is applied again and, before it has time to dry, a layer of flock is applied. To do this, you need to dip your finger in the material and with patting, light movements, the flock is evenly distributed over the entire nail plate.
- The designs on the nails look very interesting and unusual - they are applied with varnish or acrylic paint, after which only the design is covered with flock on top.
- Using a brush, remove all excess fibers.
It must be remembered that velvet manicure does not require additional sealing with transparent varnish.
Benefits of velvet manicure
- This is an ideal choice for girls who want to attract everyone's attention.
- Focal particles can be used both to completely cover the nail plate and to create various patterns.
- This coating is completely unique and has no analogues today.
- A salon velvet manicure maintains its ideal appearance for 20 days, and sometimes more, depending on what the girl is doing.
- Creating such an original design will not take more than half an hour and does not require the acquisition of any special skills, so you can do it at home yourself.
Disadvantages of velvet manicure
- Today, this nail design is a novelty, so in salons it will have a fairly high cost (approximately 800-1000 rubles and more).
- A velvet manicure done yourself can last only a couple of days.
If it is not possible to visit beauty salons or use flock, then you can take a special varnish, after applying which the nail plate becomes like a soft velvet fabric.
This type of polish has an interesting texture and does not make the nail color too bright. By choosing even a blue shade, the manicure will not look vulgar or tasteless. It is very easy to use this varnish, since it is practically no different from a simple one. On the prepared nail plate you need to apply 2 layers of velvet varnish and a fixer. To make a brighter manicure, you can experiment a little - apply a design with velvet varnish of a different shade or with sparkles.
When it’s winter outside, and the Christmas holidays are visible ahead, thoughts increasingly arise in our heads about how we will decorate our home. And girls, among other things, are looking for ways to transfer elements of the holidays to themselves. And those who want to have a manicure for all seasons will like our article even more!
More than once we have heard fashionistas say that they don’t want glitter, colors, yes, but not glitter. Varnishes are steamed to give them a matte finish, or even become matte. The use of manicure sand has become a new breath in nail art.
Manicure sand
– special powder of various colors. Sand varnish is distinguished by the size of the grains. For example, a very fine grind can give your nails the appearance of velor, while a coarse grind can give your fingers a shade of granulated sugar.
Varnish with additives is a little thicker than usual, but differs only in the structure of the coating. It is convenient to apply, it does not tend to creep onto the cuticle during coating, and besides, one layer of varnish is almost always enough, in rare cases - two if you want to give your nails a more voluminous look.
Secrets of creation
In order for a manicure to please its owner, it is important to adhere to some recommendations.
- There is no need to ignore the base coat, as well as pre-treatment of the nails before application: the nails need to be treated and properly degreased.
- Using only quality products. It is important to pay attention to the composition, expiration dates, texture, whether the product is manufactured by a trusted company, or whether it is a dubious bottle with Chinese characters.
- When using sand, there is no need to skimp; the product is applied to the surface of the nail in a thick layer. For the best fixation, the powder is pressed with a barely noticeable touch.
There are several brands that have introduced “sugar varnishes” in their lines. Of course, it's worth starting with Color Sugar - this is a series with a very wide color palette. Jerden presented 15 magnificent saturated shades that look unusual and quite interesting. The brand did not limit itself to the advantage of color; Color Sugar dries quite quickly, and the manicure lasts an order of magnitude longer than any other polish in approximately the same price category.
Next up for consideration is Sahara Crystal from Dance Legend. Unlike the previous brand, Dance Legend occupies a niche of professional products specifically for creating manicures with a “sugar” effect. The color palette is also pleasing to the eye, but it is important to note one feature here: the nail polish looks different on the nails than in the bottle. And, of course, when using this product you cannot do without using a high-quality base before applying color.
Stylish sand nail art ideas
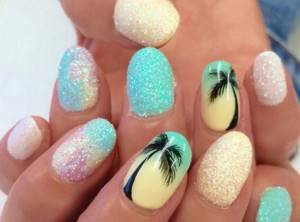
After the long-awaited purchase, you can move on to the creative part and bring your ideas to life. A colorful collection of photos will inspire you to new experiments and unleash your imagination. Try to start with a solid color, because sandy nail designs look perfect with light and delicate shades of white, pink and peach. Sugar nail art also looks very impressive in black. If you want to choose bright, variegated tones like blue, green or red, you should keep in mind that such contrast is not always beneficial for a textured manicure. To make the sand nail design look new, you can apply a top coat, and the nail art will look very mysterious and alluring. The photo shows several variations of the original manicure.
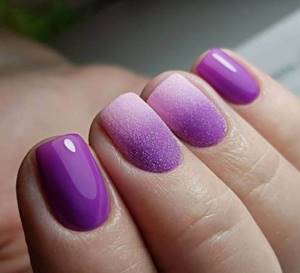
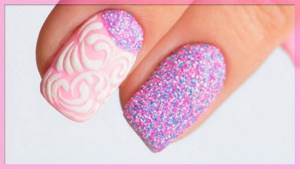
Sugar nail design is not limited to just a monotonous finish. To create patterns, you can use sand varnishes of various shades. Try, for example, painting each finger in a different tone or focusing attention on two nails by making. You can very successfully combine a sand coating of the same shade with or without glitter. In addition, sugar polish can complement the patterns and pictures of regular nail designs. Look at the photo and choose the right nail art for yourself.
Ease of use makes sand nail polishes accessible to girls with different skill levels. Thanks to its original and attractive appearance, sugar manicure is becoming increasingly popular, and manufacturers are expanding their product range every year. In the final video, beauty blogger VashaNedasha will show you 2 luxurious shades of sandy Sahara Crystal nail polishes from. Experiment and always remain beautiful!
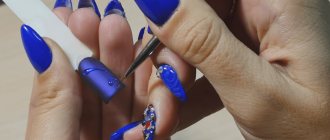
Well-groomed hands are the main calling card of every woman. To make an original manicure, special decorative jewelry can be used, but recently material such as velvet sand has become in demand.
Interesting design ideas
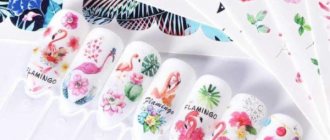
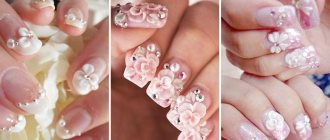
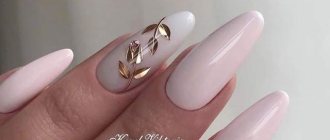
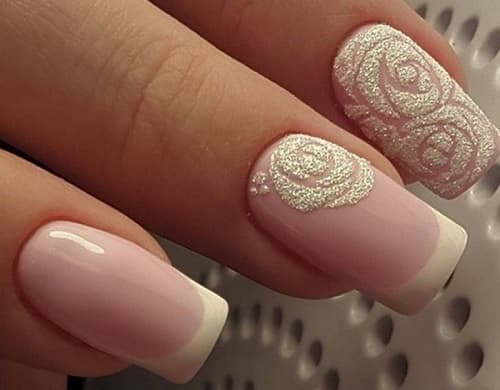
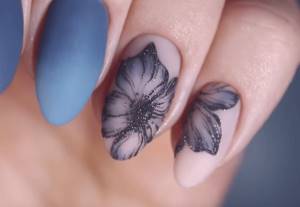
Any decorative element applied to the velvet surface of the nails adds elegance and solemnity. Various patterns, flowers, and symbols look amazing on a plush nail plate. This season it is fashionable to use floral and plant designs. Velvet roses and delicate flower buds look extraordinary.
The dew drops on the flowers, created with the help of rhinestones, add a special charm to the image. Plush floral arrangements can be seen. A white wedding sand manicure with images of flowers and gorgeous patterns looks very beautiful.
Oriental designs are trending. The print with the image of sakura branches and oriental ornament remains the most popular and fashionable design.
New this season is marmalade nail design. It is similar to a sugar manicure. The non-dried nail plate, covered with gel or varnish, is generously sprinkled with melange powder.
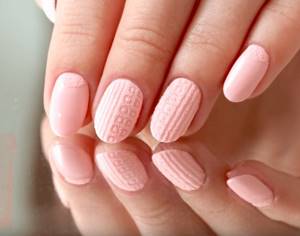
Sand manicure is perfect for creating a winter design. Frosty velvet patterns look amazing on nails. A knitted manicure imitates the weaving of a scarf or sweater. Looks great on almond-shaped and short nails. It is ideal for the winter season.
A black sand manicure is suitable for an evening celebration; inlay with white shiny stones will give the design a special shine. Velvet sand goes perfectly with any colored varnish. Red varnish against the background of sand looks bold and bright.
The use of golden sand is suitable for any clothing and is suitable for all events, including everyday life. Golden velvet always looks elegant and luxurious.
Velvet Sand Stardust
Acrylic powder with glitter is rarely found on sale. But it's not difficult to add the desired shine yourself. It is enough to mix the powder with glitter of the desired shades and fractions. This velvet sand nail design looks organic if the main tone matches the tone of the glitter. But this is not important, it all depends on personal preferences. The step-by-step instructions are almost completely identical to the previous one:
- clean the cuticles and prepare the nail plate by treating with a buff;
- degrease nails and let dry;
- apply a base coat, dry under a lamp;
- coat your nails with gel polish of the desired shade, dry the first layer, do not dry the second;
- Sprinkling evenly, cover one or all nails with glitter powder;
- remove excess with a brush;
- dry your nails under the lamp, leaving the time twice as long as usual;
- There is no need to cover with the final layer or sealer.
Just a few minutes and the stardust on your nails will sparkle with a mysterious sparkle. The manicure will last at least two weeks.
Design with acrylic powder
The method is suitable for gel polish lovers. The procedure is simple and does not take much time.
You will need:
- ultraviolet lamp;
- gel polish (color chosen at will);
- acrylic Powder;
- base and fixative;
- tassels.
The design is created in several stages:
- Upon completion of the hygienic manicure, apply a base coat, and then apply gel polish in 2 layers. Dry in a lamp between procedures.
- The last layer does not dry immediately. First, sprinkle the nail plate with acrylic powder.
- After drying, the final result is corrected with a brush, carefully removing excess grains.
- Apply a fixing layer.
Using this method of creating a sugar manicure, you can achieve a velvet effect. To do this, the patterns are first drawn with gel polish, and then the contours are sprinkled with powder, and all excess is removed with a brush.
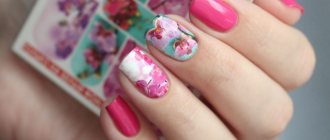
Marmalade design
We will not deny that a marmalade manicure done with a gradient looks great. A smooth transition with a beautiful change of shades is perfect for the spring-summer period. Many girls like juicy, bright combinations, especially if lemon-orange tones are used.
Ombre
An effective gradient with sand sprinkles is applied to a ready-made gradient with gel polish. The varnish transfers its color, and a smooth, beautiful transition is obtained. In detail about the technique of performing a gradient.
The second option is to use two or three shades of sprinkles in a horizontal or vertical transition. Due to the fine-grained texture of the material, the gradient is smooth and delicate.
Wedding manicure
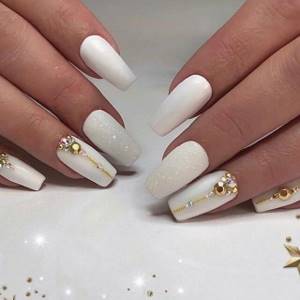
Sand with mirror or rainbow sand sparkles is indispensable in a wedding manicure. It adds a subtle shine to the base design. The classic white color acquires volume and a fascinating texture. This manicure is worthy of being included in a wedding album photo.
Sweet casting
It’s not easy to combine the two techniques, but there’s nothing complicated about it.
The result is a very unusual nail art, with gold veins in the middle of sugar hills. The main thing is to choose the right color scheme, use similar shades of varnish and sand, where there will be partial coverage. Sand casting looks impressive on French manicures, moon manicures, and as a decoration for accent nails. First, casting is performed, and then the empty areas are generously sprinkled with material.
Small confetti
A sugar effect manicure can be done using regular glitter. They are applied to the top coating in the same way as acrylic powder and melange. As a base tone, you can use any suitable color that matches the glitter.
Unfortunately, this design has one drawback - the surface of the nails is rough. After drying, it is necessary to lightly sand with a soft buff and brush away any remaining residue with a brush.
Using glitter, you can simultaneously create a sugar gradient effect on your nails. It is necessary to sprinkle a light shade of glitter on part of the nail, and a darker shade on the other.
Required materials and tools
Have you decided to experiment? Do you want to get a manicure and see the sugar effect on your nails? Prepare a three-phase system consisting of base, color, top and decorative granulated sugar.

When applying the material, craftsmen use a regular pusher, its side similar to a spatula. A brush or hard bristle brush will remove any remaining sweet sand. The remaining auxiliary tools will be superfluous, with the exception of the buff and primer, which will prepare the plate.
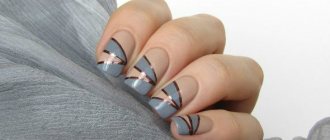
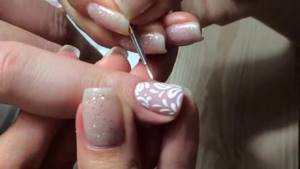
Ornaments, paintings, patterns

Another technique that makes it possible to experiment and create an unusually beautiful manicure. For this, various methods are suitable that allow you to recreate velor on the nail plate:
- patterns;
- ornaments;
- snowflakes;
- knitted patterns (fashion trend);
- flower buds;
- monograms.
The most fashionable trends of this year are knitted patterns and painting, especially Gzhel. They look especially beautiful if they look like velvet, placed in a beautiful pattern on top of the shiny surface of the nail. The application procedure is repeated. If it is difficult to draw a pattern, you can use the suggested stencils. This greatly simplifies and speeds up the process. A few repetitions and each woman will learn how to independently apply patterns to the surface of her nails. This is the most popular velvet sand nail design, loved by many women. Moreover, the pattern can be made in several shades.
What is it and how much does the service cost in the salon?
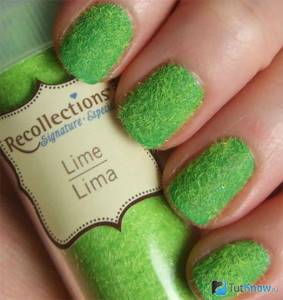
Velvet sand (pictured above) is a unique medium-grind powder.
When it comes into contact with liquid, it does not soften, unlike small sparkles. Over a long period of time it retains its density and texture, thanks to which this manicure will last a long time. This dust is translucent and can change shade depending on the base color of your nail polish. Velvet sand can be of different degrees of grinding, as well as appearance (satin and matte). Thanks to this, a different effect will be created - suede or sugar. A similar design can be done not only on artificial, but also on natural nails.
Velvet sand is sold in almost all professional stores for manicurists. A jar of this material with a volume of 5 g costs about 150 rubles. in Russia and 21 UAH. in Ukraine. In the salon, this procedure costs 800-1000 rubles. The process of creating a velvet manicure is quite simple, the material consumption is small and you can create a similar design yourself at home.
Classic French with velvet sand
The classic manicures are:
- French jacket;
- cat's eye;
- fashionable moon manicure.
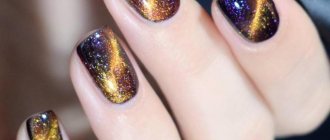
They can be realized using the velvet sand design. Various space motifs are no less popular. It's not just stardust. Heavenly bodies may appear on the surface of the nail, shining with the shine of velvet. Any idea born in the head of a modern woman can be realized on the surface of her nail plate. To create a fashionable French manicure or moon manicure, powder is applied only to the tips of the nail or at its base. The color is chosen based on personal preference. The main thing is that the shape is maintained in accordance with the design. It is quite simple to recreate such a design, but it looks very stylish and original. Working with powder is simple and pleasant. The material is pliable, which makes it possible to realize the most daring idea. The sand does not need to be dried under a lamp, it looks voluminous. Because of this, many girls worry that the manicure is not durable. This is not so and it will last no less than the usual helium manicure. The powder does not interfere with air movement, which does not harm the nail plate.
Creating an original sugar nail design
If you are bored with the traditional technology of creating velvet nail art, then use one of the tips from beauty specialists:
- The grains can be attached not to the entire nail plate, but to capture only part of it, for example, highlight the hole of the nail bed with velvet or apply it to the tip. Don’t be afraid to decorate with rhinestones - French and moon manicures require additional elegant framing.
- Saving material can lead to a result that you are clearly not happy with. When working with velvet sand, you need to understand - either sprinkle it generously, or not use it at all. Don't be afraid to get your fingers dirty - the particles can be easily rubbed off and fall off.
- Uneven lines, ornate patterns, monograms drawn using several colorful shades at once look very stylish and expensive.

Sweater design
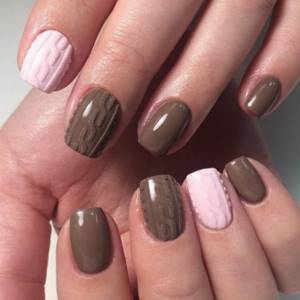
The trendy design of the autumn-winter season would not be so impressive without its voluminous velor texture. It can also be done with acrylic powder or flock. The design is applied with paint or gel polish onto the top without a dispersion layer, sprinkled with powder material, and then dried in a lamp. With sprinkles, the design becomes durable and expressive. You can choose different braid patterns for sweater designs. Read more about knitted design technology.
Melange
Melange is small sugar grains that create the effect of voluminous glitter on the nails.
To carry out the procedure at home you will need:
- gel polish;
- melange;
- brushes;
- base and fixer.
After preparing to apply the decorative coating, you can begin creating the design:
- Apply base to the nail plate. Dry.
- You can cover your nails with colored gel polish in several layers to create a specific design. Dry.
- The last, not yet dried, layer must be immediately covered with melange. Apply with a tapping motion of the brush.
- Remove excess and secure the result with topcoat.

Recommendations for use
Of course, when working with velvet sand, it is necessary to take into account some of the features of this material. This will help you avoid possible mistakes and make your velvet nails perfectly beautiful and long-lasting.
- Many masters recommend using a matte top coat as a coating for powder. The sand sticks to it better, and it will be easier to draw patterns. However, with a complete coating of the nail plate, you can also use gloss - in this case there is practically no difference.
- If you want to make patterns with velvet sand, it is best to use gel paint for these purposes. Unlike gel polish, it has a denser consistency and therefore will not spread when applying the powder. If the gel paint for your drawing is too thick, you can dilute it on the palette with the required amount of top coat or gel polish of a suitable color.
- If you are making a combined design with patterns of velvet sand and rhinestones, it is better to glue the stones before creating the patterns. Why? Yes, simply because it’s more convenient - since the fragments of the pattern are placed close to the rhinestone, there will be no need to glue them with excessive care.
- When creating patterns with velvet sand, it is important to dry them completely, otherwise the sparkles will fall off very quickly. First, find out the permissible layer thickness of the material you are working with. Secondly, add about half a minute to the usual drying time in the lamp - with powder it is always better to dry longer. When drying without a UV lamp, you will have to wait at least forty minutes.
Sugar manicure with gel polish
This design looks most attractive on gel polish. It is with it that you can not only create the cutest marmalade coating, but also draw a variety of patterns and designs using the “sugar” technique.
Follow the instructions and you will have a gorgeous sugar manicure.
- Standard cleaning is performed, a shape is given, then the gloss is removed using a buff, the nail plate is degreased and a bond is applied.
- The nail is covered with a base and dried in a lamp. Next, a base in the form of colored gel polish is applied in two layers and dried one at a time.
- Using a pusher or brush, apply melange powder to the remaining sticky layer. It is most economical to do this procedure directly over a jar of material, so the excess is poured into the container.
- The powder must be covered with a finish; to do this, pour the finish onto a piece of foil and cover the nail with it using an old or separate brush. All this is done to prevent particles of “sand” from getting into the bottle. Afterwards, the nails usually take longer to dry.
- If you want your sugar manicure to look even more natural, then cover it with another layer of top coat. Then, without putting your nails in the lamp, apply a layer of powder and, after drying in the lamp, remove the excess using a hard brush.
If most of the words in this instruction are incomprehensible, or you realize that you do not have all the tools, feel free to go to a manicurist.
Features of sand nail polish
If you look at photos of sand nail art on the Internet, you will notice that many designs are very different from each other. These differences are due to the different structure of the coating, but in general they are all similar to each other. Sand varnish is usually somewhat thicker than usual. This is due to the presence of a certain filler in the vial. Silicone grains can be the same or vary in size. Some manufacturers enrich sand varnish with fine glitter. The presence of glitter gives the manicure a shining effect.
High-quality sugar varnish is applied without streaks and lies evenly on the nails. It does not flow onto the cuticle and into the sinuses of the side rollers. Due to the high density of the coating, for high-quality nail art, as a rule, one layer is enough
. Only in rare cases will it be necessary to apply an additional layer to create a more voluminous relief.
How resistant is the varnish to various damages and chips? All girls note different times for wearing manicure: from one to five days. This factor depends on the characteristics of the nail plate and the quality of the varnish itself. Many people have the question of removing the texture coating. Clean the surface of the nails with a regular nail polish remover.
When purchasing the shade you like, pay attention to some nuances.
- Date of manufacture. The fresher the sugar varnish, the longer it will last you.
- The texture of the composition. Excessively liquid varnish will leak and form streaks on your nails. Too thick a coating can cause wrinkles and bumps to appear. If necessary, purchase an additional special varnish thinner.
- Amount of texture filler. Too few grains of sand will make your nail art sloppy and deprive you of the desired result; too many will give it an untidy, bumpy look.
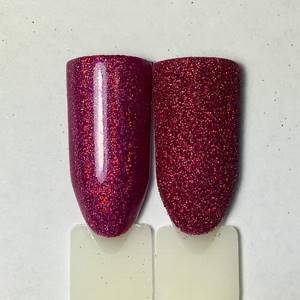
So that you can visualize a bottle of sugar nail polish, we bring to your attention the “sand” collections from global manufacturers, shown in the photo.
Useful tips on working with velvet sand from professionals
Velvet sand consists of special acrylic, reduced by grinding to a powder state. There are a variety of shades on sale, many of which are filled with glitter, the role of which is played by crushed viscose. But more often it is a monochromatic composition.
Powder applied to the surface slightly thickens the nail, but this is not reflected in its service life. According to the masters, velvet manicure lasts from a week to one month. It all depends on the skill and quality of the work performed. But there are many more advantages that professionals decided to talk about.
1. The material is easy to apply. No additional tool is required. Tools and stencils will be needed when making a complex drawing. In other cases, the surface of the plate is simply covered with powder.
2. In the absence of powder, profitable and inexpensive material can be found among sewing accessories or in stores for children's creativity. This is almost the same powder, but used for scrapbooking and embossing. But before applying it is better to test it on one nail or use an artificial plate. These are beneficial to have for those who simply train.
3. The application technique is simple. Many women cope with it on their own, having little experience in caring for their own nails.
In order to master the technique of applying velvet sand to nails, you need to take into account some secrets that professionals are familiar with:
- velvet sand ideally attaches to nails coated with matte varnish; it is easier to draw patterns on the same coating;
- for glossy surfaces it is better to use French manicure technologies, moon manicure, as well as drawing patterns and ornaments;
- use gel paints rather than gel polish as a single-color base, since paints do not spread;
- if the paint base is thick, it can be thinned with gel polish;
- the best velvet effect is created on nails covered with white, pastel shades;
- drying under a lamp extends the life of the manicure, but you need to keep your nails under the lamp longer than with a simple coating;
- If drying is carried out without a lamp, do not touch the surface of the nail for half an hour.
According to masters, manicure looks beautiful on nails of any length and shape. Today, the liquid stone technique is popular, when drops mysteriously flicker on top of sand or a pattern, similar to morning dew. The technique is not complicated, so there is no need to rush to the nail salon. In order to make sure of its simplicity and understand whether such a design suits your hands, try to master it yourself.
Expert advice
When applying such a manicure, you can use the advice of specialists.
- Flock from trusted companies should be purchased in special stores or at beauty industry fairs. You should look at the date of manufacture and expiration date.
- There is no need to skimp on velvet or acrylic powder. Sprinkle the nail surface generously. For better fixation, you need to press it lightly.
- A French coat sprinkled with sand will help add charm to your nails. Rhinestones will add a special piquancy.
- It is recommended to apply clear and bold lines. They are needed to obtain an expressive drawing.
- Matte shades of varnishes ensure good sand adhesion. It is easy to draw on such a surface, the image does not spread. When applying a design to the entire nail, it is possible to use a glossy varnish.
- It is best to use several shades of sand.
- Before applying patterns with gel paints, the nail plate must be rubbed with a sanding buffer.

- It is recommended to mix very thick paint with gel or varnish of the same color.
- Longer drying in the lamp allows the velvet powder to take on a darker color. If you want to achieve this result, you must exceed the recommended drying period.

- The sugar varnish must be completely dry before applying the finishing topcoat.
- When drying without using a lamp, nails covered with velvet sand should not be touched for 40 minutes. The drawing will definitely not be erased if an ultraviolet lamp is used.

Wear and removal
Here opinions vary somewhat. Some write that 2-3 days, others – up to 5 days. In fact, everything will depend on what you plan to do in the next week. If you don’t bother yourself with household chores and expose your hands to excessive moisture and friction, then the sand varnish will last you from 5 to 7 days. Otherwise, have the indicated 3-4. Don’t discount such factors as the structure of the nail and the quality of the varnish.
The quality of varnish should be considered based on the following points:
- Date of manufacture;
- Texture of the composition;
- Amount of filler in the bottle.
Why is all this important? The fresher the varnish, the longer and more efficiently it will serve you. The density of the content affects whether the layer will spread or, on the contrary, create folds. For these reasons, it is safer to choose thick varnishes, and additionally have a thinning agent with you. The amount of filler sometimes depends on the manufacturer. There are greedy, economical ones, and there are those who carefully monitor the satisfaction of the client’s desires, his positive feedback, so they add sand from the heart, as they say.