Sometimes we want something unusual: a special hairstyle, a manicure, in general, somehow change our usual image. As for nail design, as a rule, we turn to its non-traditional options when there is some kind of celebration at which we cannot afford not to shine. And today we will talk about volumetric manicure. We'll tell you about the materials with which it is made, as well as the correct sculpting technique.
Shining Abyss
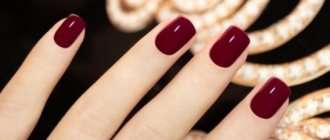
This voluminous chameleon manicure gel polish looks like space or an icy river with sparkling pebbles at the bottom. Waves of highlights in different tones shimmer on the nail at different angles. This design looks absolutely magical. You want to touch it and look at every detail. You can cover all your fingers at once or select only 1-2 on each hand. For overall balance, it is better to choose a soft pastel color for nails without a design, so that it does not look too dark and heavy.
The relief here works like a lens. In the area where there is volume, the light comes from a different angle, and we see several colors of the chameleon at once, and the pattern duplicates the drawings. The colors change constantly in dynamics, and it looks very impressive.
What you will need
- nail files and buff;
- base;
- colored gel polish with shimmer;
- gel polish pastel shade;
- thin brush;
- glitter;
- top
How to do a voluminous manicure
How to properly make a voluminous manicure with gel polish:
- First you need to degrease the plate and apply the base.
- Apply a black gel polish base to the nails that will have a 3D design.
- Apply chameleon varnish with small glitter over the dark tone.
- Dry the layer well in a lamp.
- Apply any pastel shade to the other fingers.
- Send your nails to polymerize in a lamp.
- Cover the design with topcoat and place it in the lamp to dry again.
- Using a thick rubber topcoat without a sticky layer, use a thin brush to draw uneven lines along the nail in a random direction. The volume should be maximum, but natural.
- Place your nails in the lamp for a few seconds.
- Subsequent stripes need to be drawn a little closer to those already there. But under no circumstances should they merge with each other.
- Walk along the drawn lines again with a second layer to raise the volume and make it more prominent. In addition, along with the difference in volume, the difference in the play of shades will increase. The lines of the second layer should be slightly narrower.
- It is better to keep the last couple of lines in the lamp for the full time so that they dry completely.
A quick and very stylish voluminous manicure is ready; in the photo below you can see how beautifully it shimmers. A great option to add something unusual to your everyday coverage or to complement a festive look.

General principles of nail sculpting
- Work with acrylic very quickly and accurately , because it only takes a couple of minutes to harden.
- Experienced masters create designs directly on the nail plate. However, for beginners it is better to start sculpting on foil or paper. And only after a successful result can you transfer the design to your nails.
- Modeling powder should be elastic and not subject to crystallization. Then the material will not turn yellow on the nails.
- The molding lasts for a very long time. To get rid of it, you just need to cut down the entire volume of the plate.
- Toenails are rarely decorated with sculpting because they are quite small for a three-dimensional design. This work should only be performed by an experienced craftsman.
- Sculpting can be done on both natural and extended nails .
Gel sculpting on nails
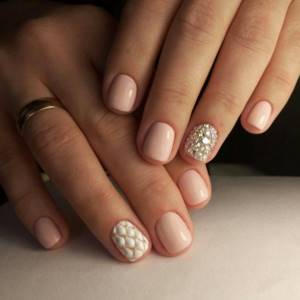
Volumetric shell design
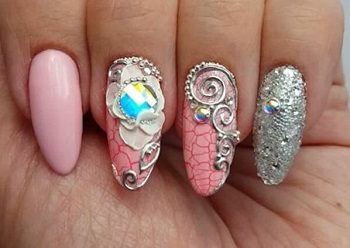
A simple and unique volumetric manicure with shell gel polish is a favorite of many girls. He, like no one else, is able to reflect the entire feminine nature with his elegant design. It is enough to decorate just one finger, and you will automatically become an ancient Greek Goddess or queen of the ocean. Voluminous manicure harmonizes well with light and flowing dresses, as well as pleated skirts. It is done quite simply at home.
Required materials and tools
- base;
- nail files and buff;
- colored gel polish;
- thin brush;
- rubber top;
- rhinestones or broths.
Execution technique
- Prepare your nails for work. It is necessary to sand the surface with a buff and cover the design with a base layer.
- Apply the main color (white or pink).
- Use a soft buff to buff out the base color.
- Using a medium-length brush, apply a strip of gel polish, creating the outline of the shell shells. You need to start from the free edge and reach the cuticle. The strip should taper towards the cuticle. Gradually release the pressure so that the line becomes thinner.
- Dry the layer well in a lamp.
- Add some volume with gel polish. But this time you need to make the lines a little thinner.
The volumetric shell design is ready. Gold, pearl, transparent rhinestones or gold gel polish with an olive tint are ideal for it.
Video instruction
A step-by-step technique for performing shell manicure can be seen in the video.
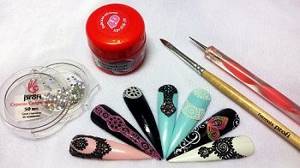
Tools and materials for modeling
To create three-dimensional patterns from acrylic powder you need:
- Acrylic powder of the desired color.
- Brushes for sculpting with acrylic. Choose tools No. 1, 2 and 3 made of natural bristles. You can also use dots.
- Monomer and a glass for it.
- Nail file
Materials for sculpting nails
For gel sculpting you need to purchase:
- Colored gels . Sold in sets.
- Brushes No. 1, 2 and 3 with synthetic bristles.
- Ultraviolet lamp .
- A special liquid for working with gel – clinser .
- 3D gel . The denser and more flexible structure of this gel allows you to create three-dimensional 3D designs on your nails.
- 4D gel . In appearance it resembles dense plasticine or clay. When using such a gel, the master sculpts all the details of the design with his hands or a stick.
When choosing a brush, look carefully at the tip. It must be completely assembled and level. Buy a lamp with closed sides so that the drawing hardens faster.
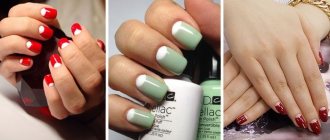
Quilted volumetric manicure
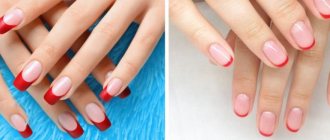
A fashionable and laconic check, decorated with rhinestones, which exudes the charm of the famous Coco Chanel. A laconic but voluminous manicure is performed with regular gel polish. The colors most often used are camouflage, ranging from light beige to dark pink. Any translucent varnish will do; it needs to be able to give a tint to the nail plate. You should not cover all your nails with this design at once. 1-2 fingers on each hand is enough. For drawing, gel paint or thick gel polish is suitable.
Tip: Diamonds can be drawn by hand or use manicure tape, which is glued with a mesh and then filled with color.
How to make a quilted voluminous nail design:
- Prepare your nails for work. File them with buff and degrease them.
- Apply one coat of base and dry it in a lamp.
- Cover your nails with a colored camouflage coating.
- On the fingers where there will be no design, draw a French smile using a thin brush and white gel polish.
- Cover the nails with the design with top coat and dry the layer in a lamp.
- Using a thin brush with white gel paint, draw three diamonds along the entire length of the nail, which are located vertically one above the other.
- Polymerize the layer in a lamp.
- Draw the same triangles on the sides. Don't forget to draw the corners of the triangles at the side bolsters for the integrity of the pattern.
- Apply a second layer of gel paint to add volume to the design.
- It is necessary to dry small areas each time after application.
- Cover your nails with camouflage color over the design.
- Remove the sticky layer from nails without a design.
- Attach small rhinestones or bouillons in the spaces between the diamonds.
The original voluminous quilted manicure, made with gel polish, in the style of “Scream Queens” looks elegant even in the photo.
Rules for placing patterns on nails
The pattern located closer to the cuticle line looks beautiful
In order for a drawing to please you with its beauty longer, it is important to know the rules for its placement. You need to create a sculpt at the highest point of the nail , because by placing the pattern at its tip, you expose the nail plate to deformation during filing.
You need to start creating a pattern as close to the cuticle as possible . Try not to create 3D images on small nails. Small patterns in the form of dots or thin lines are suitable.
It is best to decorate only one nail in an everyday manicure . It's very gentle and feminine. For a special event, you can decorate all your nails with sculpting.
Wedding manicure with sculpting
For any other holiday, you need to select the type of drawing to match your appearance and theme of the event.
In a New Year's manicure, you can paint voluminous snowflakes with gel or acrylic. If you are a beginner, then just make small dots of white color. Craftsmen can create a 3D image of Santa Claus, deer and other holiday attributes.
Wedding manicure requires beautiful floral and delicate patterns. Large and bright drawings will be superfluous here.
Unicorn horn
Nowadays everything fabulous and sweet is in fashion. Here the creator's imagination is limitless. If you look through your Instagram feed, it is filled with a huge number of things on this topic: macarons, sweet milkshakes, inflatable mattresses in the shape of pink flamingos, colored ice cream and Katy Perry songs. So why not decorate your nails with unicorns? These can be various yoghurt shades, chrome mirror surfaces and an indescribable shimmer of glitter. Volumetric unicorn manicure is a real hit of 2018.
You determine the shape of your nail yourself. It is possible to make a cone-shaped stiletto that follows the outline of the horn of this mysterious animal. Or you can choose a shortened version of a soft square to make the design look neater.
Cornucopia
The substrate in this technique can be any. And the coating itself can be diversified as follows:
- glitter gradient;
- volumetric relief with rubbing (mirror, glitter, mother-of-pearl);
- relief with melange or acrylic powder;
- if acrylic lining is used, it is recommended to add kamifubuki and various sparkles;
- broken glass;
- foil;
- filling the “horn” with decorative elements using aquarium design techniques;
- a soft gradient of bright colors to give the horn a luxurious shimmer.
Unicorn horn manicure technique
If you want to create a stiletto-shaped horn, then you will need acrylic powder and molds for laying out acrylic. To create a design on fingers of a regular shape (oval, almond-shaped or soft square), you need to degrease your nails and cover them with a base coat. If you decide to make an original relief on your own nails, then skip the first 3 points.
- Attach the acrylic molds to the nail.
- Using a flat brush, pick up acrylic powder and roll into a ball in monomer (liquid for acrylic). For convenience, you can use thick acrylic gel.
- Carefully give the desired architecture to the nail in the shape of a horn.
- For the design, you need to cover the nail with any color (it is best to choose white, pink or black).
- Dry the layer well in a lamp.
- Mix several shades of gel paint on the palette (pink, coral, fuchsia, purple). If this is not available, regular colored gel polishes can be mixed with a thick rubber topcoat.
- Using a thin brush, scoop up one color and draw smooth lines that follow the contours of the spiral-shaped edges of the unicorn's horn.
- Dry the layer in a lamp.
- To make the relief more voluminous, duplicate the lines with multi-colored gel polish.
- The coating can be left as is, add glitter on top and secure with a top coat.
- But if you need a special fabulous shimmer, then you should cover the nail with a mirror or glitter rub, gently rubbing in the mirror powder with an eyeshadow applicator or your finger.
Video instruction
A voluminous unicorn manicure looks magical and unusual. Detailed execution techniques and other ideas can be seen in the video.
Sakura gel polish
You can create delicate floral nail art by painting spring cherry blossoms.
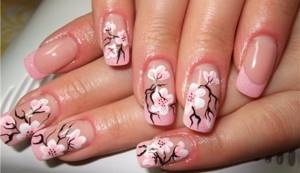
The method is easy to perform and suitable for beginners.
Required tools:
- Gel polishes are white, black, light pink and green.
- Brush, dots.
Drawing technique:
- Paint two nails white, the rest black.
- On white, paint curved branches of Japanese cherry with a thin brush in black.
- Apply 3 pink dots side by side between the dots branches. Place a white dot in their center.
- Use a green brush to carefully paint a few fresh leaves.
Don't miss the most popular article in the section: How to draw monograms on nails step by step for beginners. Instructions with photos.
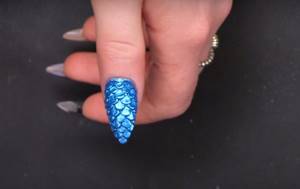
Sweet Ariel
The most complex of the three-dimensional manicure designs presented, but extremely beautiful. The voluminous manicure follows the scales of the little mermaid's tail and has a unique blue-green hue. To perform this you will need acrylic powder with monomer or acrylic structural gel.
Technique:
- Before starting work, your fingers can be coated with iridescent gel polish with shimmer for a better effect, but this is not necessary.
- Attach a mold for laying out acrylic onto the prepared nail.
- Take a small ball of structuring gel and place it on the free edge of the nail.
- Using a manicure hatchet or an orange stick, flatten the ball, creating a scale shape.
- Place another small ball next to the previous one.
- Gently press it, giving it the shape of a scale.
- In this way, lay out all the scales on the entire nail plate.
- File the resulting frame with a file, cutting off excess volume.
- Cover the design with varnish of any color with shimmer (shimmering sparkles).
- Sprinkle with glitter or acrylic powder to make the coating look even more impressive.
- Place small rhinestones on the glue near the cuticle using an orange stick.
A chic manicure with a voluminous design in the style of the beautiful little mermaid Ariel is ready.
What to remember
We can summarize:
- The “dewdrops” on the nails are a real work of art. You can create them yourself without the help of a professional. You can watch step-by-step photos or study video tutorials on the Internet.
- Drip manicure is popular among girls. It is always relevant, suitable for any time of year, any length of nails, it is easy to create an individual design for any look.
- This is a fairly budget-friendly type of nail plate decor. You just need a standard manicure set, a UV lamp, as well as dots, brushes, stickers or rhinestones - your choice.
- There are many drip design options. You can be guided by pictures on the Internet or create the decor yourself. It all depends on your creative abilities.
Have you ever worn drop-shaped decor on your nails? No? Then try it! And you will certainly see how beautiful the volumetric design is. Do you still have any questions? Then feel free to ask them in the comments. See you again in the next article!