Today, it is rare for any young lady to choose a laconic nail design; most prefer to have their fingers decorated with some kind of design. Some people focus on accenting 1-2 nails, while others decorate everything at once. This work is quite delicate and requires a certain level of skill, and therefore many people use ready-made decals - sliders.
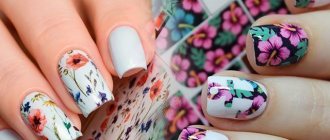
Slider design is difficult to distinguish from the work of a professional manicurist
So, our next review will be devoted to the question of how to make a slider design for nails.
Features of slider design
Before you begin to consider the procedure for using nail sliders, you should understand the concept of a design slider and its advantages.
So many people confuse slider design with a similar nail design option - photo design. Therefore, first it is worth understanding in detail what their differences are.
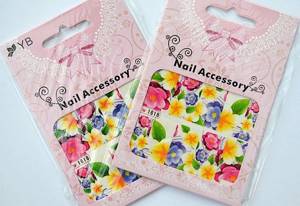
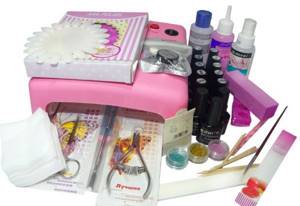
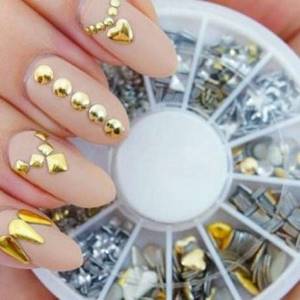
Set of sliders
So, both sliders and photo stickers are ready-made designs designed for decorating nails. The main difference lies in the nature of application and fastening. This is how photo stickers are attached to the surface of the nail due to a sticky layer, which is applied in a thin layer to the underside of the design.
This type of decor has many disadvantages: they are difficult to straighten on the nail plate, if they are accidentally bent and the edges stick to each other, then the sticker is already damaged, besides, they do not stick well, come off, curl, and air chambers often form under them. In addition, photo stickers are quite bulky, which makes it quite difficult to align the borders of the sizing, and excessive volume in the area where the sticker is located treacherously emphasizes the “original” work.
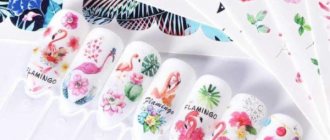
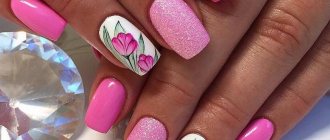
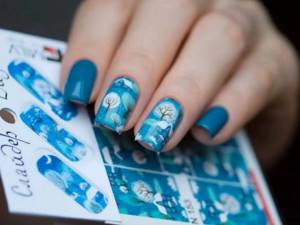
All drawings are highly accurate
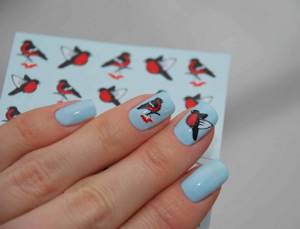
Nail sliders are stickers with a pattern on a film base. The design peels off from the backing as a result of contact with water and is then transferred to the nails, which is why sliders are sometimes also called aqua stickers. Adhesion to the surface of the nail occurs due to water, which allows the slider to take the shape of the nail. After the moisture evaporates, the sticker adheres quite tightly to the plate. The sliders are very thin, and the boundaries of their passage are completely invisible. They are easily fixed, do not fold, and are easy to correct if they are incorrectly positioned.
Step-by-step instruction
Despite the simplicity of the procedure, it is important to follow the step-by-step instructions for its implementation, since poor quality work can lead to premature separation of the stickers from the surface.
Preparatory stage
Any manicure always begins with proper treatment of the nail plate, preparing it for applying a decorative coating. It is especially important to prepare before applying decals, as applying them to an uneven surface can cause premature deterioration of the quality of the decals.
Preparation takes up to half an hour:
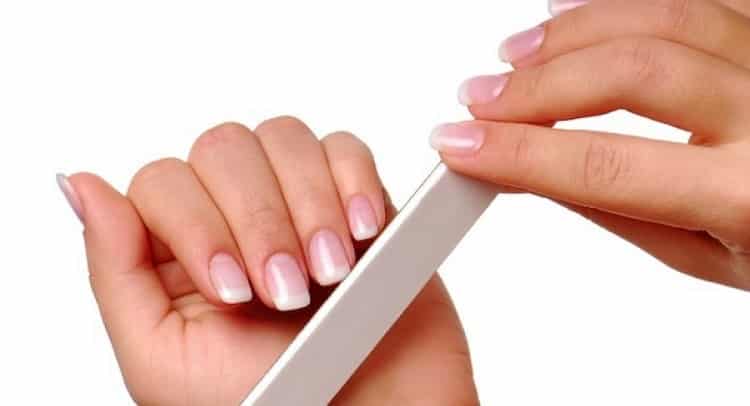
- Use a file to adjust the shape of the free edge.
- Apply remover to the cuticle area (at home you can replace it with hydrogen peroxide).
- Using an orange stick or a metal pusher, push away the keratinized epidermis and lift it.
- Cut the cuticle with cuticle cutters.
- Use a buff to polish the surface.
- Remove excess sawdust from the coating.
- Apply a dehydrator to degrease it.
This concludes the main part of the preparation, and after cleaning the workplace, the girl can begin applying gel or other decorative coating.
Main stage
First you need to apply a base layer, dry it in a lamp, and then a main layer of colored gel polish, which will serve as a substrate for the stickers.
If you plan to stick the slider over the entire surface of the plate without leaving noticeable areas of decorative coating, the base layer should be made white or flesh-pink so that it does not interrupt the sticker pattern.
After drying one or two layers of colored pigment, you can attach the decor by first removing the sticky layer from the gel; the method of fixing it depends on its type:
- When using the self-adhesive option, simply remove the paper from the base of the fragment, carefully securing it to the plate;
- Water-based stickers must first be wetted using a dry, damp cloth. After 30 seconds they can be used;
- To fix the thermal decor, you will have to use a hot stream of air from a hairdryer. Be careful not to burn your fingers while heating the piece.
Be careful when securing pieces for decoration, as you will only have one chance to secure them absolutely straight.
To make it easier to work with elements, you can use tweezers to carefully pick up decorative elements and transfer them to the plate. This will reduce the risk of accidentally damaging them with your fingers or nails.
Final stage
After finally attaching the decal to the gel, give it 20-30 seconds for the adhesive to cure and then use a topcoat to seal the work to prevent the design from coming off prematurely.
Keep in mind that when applying the last layer, be sure to seal the end of the nail, preventing damage to the decorative coating and its gradual chipping.
If the thickness of the finished nail is not too large, you can make two final layers - first apply the base, dry it in a lamp for one and a half minutes, and then fix everything with a top coat. This will increase the adhesion of the decor to the gel polish, which will increase the long-term preservation of the work in its original condition to a month or more.
Benefits of using nail sliders
Sliders have many advantages over regular nail painting, and even professionals often use ready-made drawings in their work, but for beginners and for those young ladies who do their own manicures, sliders are a real salvation. Let's figure out what is the secret of their popularity^
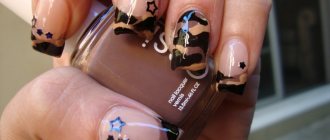
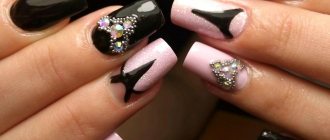
“Predatory” print is the most effective version of slider design
- Aesthetics. Sliders guarantee a clear, symmetrical design that does not need to be corrected or adjusted.
- Wide choice of designs. There is no need to think about the decor option in advance. You just need to choose a suitable design from a wide variety.
- Ease of use. Using sliders does not require any special skills. The scheme of working with them is clear even to beginners.
- Availability. The price of sliders is quite affordable, and they can be found in any store.
- Persistence. The design with sliders applied to gel polish is no different from a regular gel manicure, both in durability and longevity.
- Execution speed. Manicure using sliders significantly speeds up the decorating process.
Interesting
If you decide to decorate your nails using sliders, but later change your mind, then you can easily change the design by simply covering the old pattern with a new sticker, which is then also fixed in the lamp. However, you should not do this more than once, otherwise you will get excessively thick nail plates.
Preparing nails for applying self-adhesive stickers
Before you start decorating the nail plate, you should prepare properly, peel off the previous decor, if necessary. To do this, you should do a neat manicure, because the cleanliness and neatness of your nails determines how the manicure will ultimately look.
"Advice. Using a special device, push back or cut off the cuticles and clean any existing dirt. Use a file to file the shape and polish the surface.”
If the picture looks like a continuous film, then you will not need to apply a base varnish. If the sticker is partially attached to a certain area, then you can paint the nail with a simple varnish of the desired tone, in an even layer.
Next, you need to have a certain set of tools at hand. You will need a container of water to apply water stickers, scissors to remove excess material and cut out the shape beautifully, alcohol to degrease the plate, finishing varnish, a nail file, cotton swabs and the products themselves. Also, before starting the process, read the useful recommendations and step-by-step instructions to have an idea of how to properly glue water-based stickers, use foil, transfer and glue holographic, transparent, and roll-roll products.
How to use slider design for nails: main types and their features
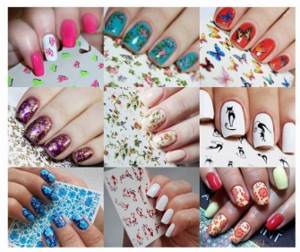
Sliders are not new in nail design, but, nevertheless, not everyone knows about their existence. In addition, they have several variations. What types of aqua stickers are used on nails under gel polish and photos of decor options are presented below.
Based on the nature of filling the nail field, sliders are divided into two types:
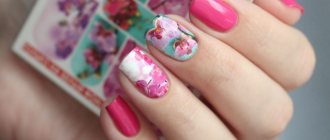
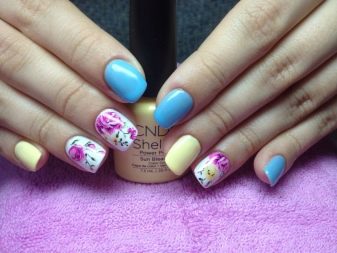
- Applications. This type of slider fills part of the nail. As a rule, they are used to accent one or two nails. In this case, a bright varnish is used, contrasting with the selected pattern. Also, applicative aqua stickers are convenient when performing a French manicure. Ideal option for doing it yourself. The lace jacket looks especially impressive.
Applicative slider design
Applicative slider design: variation of lace jacket
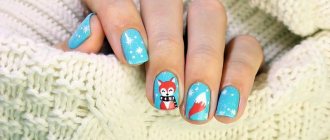
- Continuous coverage. Stickers cover the entire surface of the nail. In this case, there are two options for using stickers - to cover all the nails with the design, or to focus on 1-2 nails. In the case of a continuous design of the nail field, white varnish is used as a base, or the sticker is applied to a transparent base.
Focus on one nail
Ready-made nail slider stencils
Based on the visual effect, the following types of skinners are distinguished:
- 3D sliders. In turn, they are divided into two options:
– a regular drawing with a three-dimensional image effect. As a rule, it is a high-definition image and involves continuous coverage of the nail plate. The nature of the work is the same as with sliders that completely cover the nail.
Sliders with 3D effect
– sliders that have a special pattern, on top of which gel polish is applied pointwise, as if imitating volume.
Volume sliders
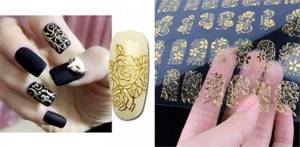
- Metalized or foil sliders (glossy or matte). They can either completely fill the nail field or occupy only part of its space. In the latter version, metallized sliders appear in the form of a jacket.
Metallized slider design with continuous filling of the nail field
Metallized slider design: original French
Each of these types of sliders has its own characteristics of application to nails, which ones we will consider below.
Important
When applying sliders, you must follow the rules of deviation from boundaries. So near the nail bed the indentation should be at least 3 mm, at the edges at the tip at least 1 mm.
Lace
Sliders with a lace pattern come in 2 types:
- A pattern created specifically for each nail.
- Ribbon with lace pattern. It can be glued to all nails, cutting out the fragment you like.
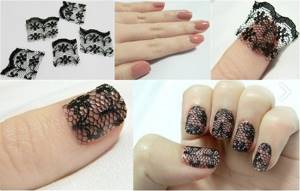
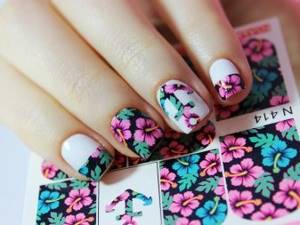
For greater effect, a sticker with a lace pattern is selected for a plain base varnish.
Easy to stick:
- The nail, which has undergone pre-treatment and sharpening, is covered with a single-color varnish of any shade.
- A fragment of the lace pattern is cut out from the palette and separated from the base.
- Apply the transparent slider to the nail using gentle movements.
- The composition is coated with a fixative varnish.
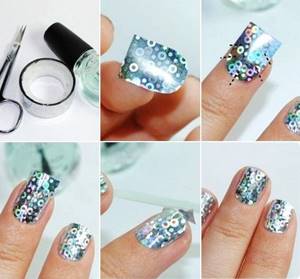
How to glue sliders on nails
The slider nail design scheme is extremely simple and in general terms has the same technology for all design options, with the exception of a number of nuances.
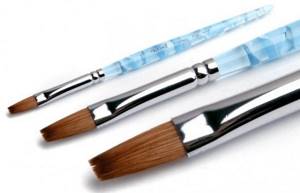
Before you start decorating your nails with sliders, you need to prepare the tools and material: a small reservoir of water, scissors, tweezers, a soft pusher or a cotton swab.
Slider design kit
Now let’s look at each option for applying sliders.
How to glue applicative stickers on gel polish
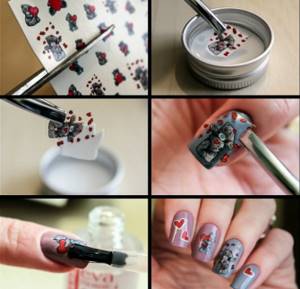
Everything is simple here. The necessary drawings are prepared in advance, which are immersed in water with tweezers for 20 - 30 seconds. Then the design is carefully moved from the substrate and transferred to nails that have already been painted in two layers of gel polish. In this case, it is not necessary to remove the sticky layer, this way the stickers are fixed better. Then the drawing is carefully distributed over the surface of the nail with your fingers or using a cotton swab or soft pusher. The drawing can be moved while the moisture has not yet evaporated. Then carefully walk over the entire surface of the drawing so that there are no bubbles left under the film. After the decor is fixed, a top coat is applied to the surface, which is then baked in a lamp.
The procedure for decorating nails with a slider design: cutting out a suitable element
The procedure for decorating nails with a slider design: immersing the workpiece in water
The procedure for decorating nails with a slider design: applying a design to the nail surface
The procedure for decorating nails with a slider design: applying a top coat
Technology of continuous coating of nails with sliders
In this case, you need to independently cut the slider sections that fit the size of your nail. Then, as in the case of applicative stickers, the prepared patterns are placed in water, and after the pattern leaves the backing, the pattern is applied to the nails. In this case, as noted earlier, the nails that will be decorated, depending on the design, are coated with white or contrasting slider colored varnish (base), or only a colorless base coat is applied. The sticky layer also does not need to be removed. The pattern is carefully distributed over the entire surface of the nail, retreating some distance from the side ridges and the nail bed. The slider is bent at the tip of the nail and then carefully filed off using a nail file, leaving a small gap. At the final stage, a base coat is applied, which is best applied in two layers (base and top). In this case, you should pay great attention to the end parts of the nail. Then the entire result is recorded in a UF lamp.
Scheme for performing a manicure with a slider design
Features of nail design with metallic sliders
It is no different from the two previous options, depending on how the nail field is designed - partially or completely - the appropriate method is taken as the basis. The only thing is that you should place the decor very carefully so as not to accidentally damage the paint.
Nail design with 3D sliders
The technology is similar to the continuous coating of nails with sliders, only sliders with a 3D pattern are used as decoration.
The most difficult option for decorating nails with sliders in 3D format is creating a three-dimensional design. In this case, the entire procedure is performed according to the same scheme as with conventional sliders, but after applying the top coat, gel polish is applied pointwise to the nail surface, simulating volume. A more detailed technology for creating a volumetric slider design for nails and how to use it correctly in practice is presented in the video:
Stickers that need to be torn off later
Tear-off stickers are usually a piece of thin foil that covers the entire nail or certain parts of it. For this purpose, special manicure glue is used.
Here is one design option:
- A base coat is applied to prepared nails.
- After drying, you need to apply glue. It is usually clear white immediately after application.
- Within 30-40 seconds. the glue becomes transparent.
- A layer of foil is glued onto a transparent base, carefully straightened and smoothed with an orange stick.
- Then the excess foil is carefully peeled off the nail.
- The final step is to apply topcoat to the nail.
For such a design, only special manicure foil is suitable. You need to work with it carefully, as it is very thin and breaks easily.
Tools and materials for work
Using slider design with gel nail polish is as easy as applying regular nail polish.
The first thing required is to prepare the necessary materials and tools:
- A special shovel-pusher that allows you to move the drawstring.
- Nail scissors.
- Wire cutters.
- File
- Manicure machine (if available).
- Acid-free primer.
- All types of coating: base, varnish, finish.
- Slider.
- Small tweezers.
- Warm water in a small container
- Wipes that do not leave lint.
- Auxiliary materials: cotton sponge, cotton swab.
- UV lamp.
All this is required to apply the water-based slider. When working with photo design, water is not needed.
Working with a picture
There are two options for preparing a slider for design. In the first case, it is cut out on one side according to the approximate shape of the base of the nail and the width, and then the protective film is removed and dipped in a container of water so that the working film is easily separated from the paper backing. However, professionals in the field of nail art note that this technique is inconvenient because it can wet the front side of the sticker. This is undesirable, as it may affect the durability of the fastening.
The best option, in their opinion, is to moisten the cut-out picture on a wet napkin for 30 seconds. This time is enough for the film with the pattern to move away from the substrate
In addition, its front side will remain dry, which is important for the durability of the design. It is pulled up with tweezers and immediately transferred to the accent nail.
You don’t have to worry that the length of the slider is longer than that of the nail, because after drying you can remove it by filing the edge of the plate with a file. When straightening the slider, it is important to remove as many wrinkles as possible that form during long-term work with the film. After this, the coating is dried in a lamp.
If the decorative layer is not completely dried, the coating will begin to chip within a couple of days from the moment of application.
In order for the slider to lie flat on the surface, you need to use a flat brush, using it to expel any air pockets that may form during transfer. A layer of undried substrate will be of great importance in this case. It is necessary not to recess the picture, but to straighten it, achieving a uniform and even coating without wrinkles.
All excess is removed with a cutter (at the base) and a file (at the edge). To avoid cutting off the edge with the picture, you need to hold the file at an angle. If small wrinkles have formed during the work, you can get rid of them with a primer. However, this composition is not so simple and can completely dissolve the sticker. To remove only wrinkles, you need to barely touch the brush with the composition of the working surface.
Kinds
Today the choice of such products is quite wide. There are many varieties of nail design stickers.
Water
Water stickers are a thin film placed on a white paper base. A special feature of decals is that they need to be based on a translucent base, so they require careful selection of the shade of varnish. The background should be in harmony with the color palette of the pattern and not merge with it into a single incomprehensible spot.
The disadvantages of this type of stickers include the likelihood of damage to the workpiece during the process of adjusting it to size and shape.
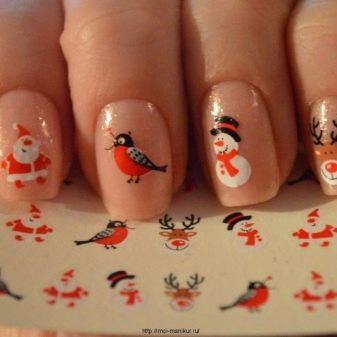
Self-adhesive
Such drawings are photodesigns (fragments with an adhesive surface located on a special substrate). Their feature is independence. In order to glue them, it is enough to separate the sticky layer and stick the fragment onto the surface of the nail.
The stickers themselves can represent individual objects of a specific design or be a full-fledged object. They come in a variety of sets of 10 plates designed specifically to cover the entire area of the nail. Sets created for French are made in the form of stripes.
3D
Stickers of this type differ in volume. They are slightly convex, unlike regular flat pictures. This type of slider can be a full-fledged decorative element or a nail accent.
These stickers are either water-based or adhesive-based. In general, they are not difficult to work with, although sometimes difficulties may arise (when designing a manicure over the entire area of the nail). The presence of a small relief (bulge) does not interfere with everyday life; it does not scratch or cling to clothes and other objects.
The advantages of 3D stickers include the ability to combine them with other decorative design elements (for example, with regular stickers). They are easy to use and often look more beautiful than their counterparts. The disadvantages include the difficulty of removing the sticker when removing the coating. Special liquids for removing gel polish are not intended for such procedures, so this sticker will have to be scraped off.
How long do stickers last?
How long the sticker will last depends on the correct execution of all stages of the manicure, the quality of the materials, and also on how correctly the woman handles the applied coating (primarily this applies to household work during which water and chemicals are used).
If the sticker does not last long, this may be because it was applied to a poorly dried layer of gel polish, or the design itself was poorly dried before being applied to the nail. Another reason could be that the sticker was of poor quality or too thick.
If the topcoat chips, this means that it was applied to a poorly dried sticker, when applying the design there was no room left for the top to adhere to the gel polish, or the sealing of the nails was done poorly. The topcoat may come off prematurely if a low-quality topcoat was applied or one that is not suitable for a design with stickers. Therefore, before purchasing, you need to clarify this point in the instructions.
Advantages and disadvantages
Nail sliders have many advantages. They can have different textures, so you can enrich your manicure design with an unusual effect. In addition, coatings can have different techniques, which allows them to create the illusion of hand painting. It is often difficult to distinguish whether a woman has a slider on her nails or a design applied with a thin brush.
The decorative elements themselves can be called a real design boon. Working with them is not difficult, and therefore every woman who has a basic manicure kit at home can create a beautiful design for her fingers. The sliders are highly appreciated by professional craftsmen. To date, they have tried all known varieties and came to a unanimous opinion about the exclusivity of this decor.
It is impossible not to note the richest assortment of such material. This fact allows you not to limit yourself in the flight of creative thought, embodying the most daring and extraordinary decisions in life. There is no need to come up with a pattern or ornament yourself: you can select ready-made pictures that will match specific clothes or existing accessories. At the same time, design solutions can be the most unexpected.
Slider colors can be very diverse. In this case, the coating does not change the color intensity as long as the sliders are on the nails. The pictures are UV resistant and have clear lines.
There is no need to undergo any special training: the fixation process takes no more than a minute. Compared to other types of decor, this is the fastest method for decorating accent nails. In addition, the price of the sliders is quite affordable. Applying such a design in a salon will cost less than artistic painting on accent nails. The aqua stickers themselves are harmless to the skin and nails. They do not provoke allergic reactions and do not destroy the nail plates.
If all the nuances of the technology are observed, such decor is held securely and firmly. It does not need adjustment if it is sealed well on all sides. It is impossible not to mention that you can apply pictures not only when creating a fresh design. Sliders can be used to decorate a laconic design without decoration, which can be worn for more than a week. For example, you can stick pictures on the nails of a classic manicure.
Despite the fact that the fixation itself is simple, you can tear the picture when spreading it over the surface of the accent nail. In addition, the roundness of the nail plates can become a problem. On convex nails, the image does not lie so smoothly, and therefore it is necessary to supplement the technology with the stage of correcting some defects.
Other disadvantages include not always high-quality film with a printed pattern. Some samples tear or even crumble when they try to stretch them, eliminating folds. Also, someone may find it a disadvantage to have to adjust the slider to the shape of a specific nail. However, you need to understand that everyone’s nail plates are different, and therefore the manufacturer offers pictures with different sizes. Some of them allow for size adjustments and adjustment to the shape of the nail.