Features of velvet sand on nails
Velvety sand on the nails makes their surface rough, opaque, and a little “soft.” The material is a loose substance consisting of small particles and reminiscent of coarse powder or fine sugar, semolina. It comes in three types:
- Translucent. Gives a velvety effect, but retains the visible shade of the gel polish.
- Color. It is applied directly to the base coat, as it has a pronounced, sometimes variegated tint.
- With sparkles. It also has color, and it is not only pigment, but also shiny particles.
Velvet manicure sand can be applied to the entire nail or used on part of the plate to highlight the design and create a voluminous texture.
Advantages
The advantages of velvet design include:
- beauty;
- unusual;
- ease of execution;
- versatility;
- availability.
It is these advantages that make it so popular.
Flaws
Despite the obvious advantages of sand nail art, many consider it not the best option. The disadvantages of the coating include:
- fragility;
- inference complexity.
In the first case, the masters argue with each other for a long time. Many of them are confident that when using high-quality materials and following the rules of wearing sand, three to four weeks are enough. Of course, if you constantly work with your hands and expose them to harmful external factors, your manicure will need to be updated in 2-3 weeks.
As for the difficulty of removal, it is enough to hold a cotton swab well moistened with nail polish remover on the nails a little longer. It is not recommended to remove the coating at home using metal files. This can lead to disruption of the integrity of the nail plate. For this reason, it is recommended to contact a specialist for a correction procedure.
How to choose sand for nails
Decorative sand for nails comes in fine, fine, medium and coarse grinds. The first two are useful for drawing. The third type of product is universal; it is suitable for giving the coating any desired consistency. And even a novice master can’t go wrong with it. Large flakes are a little more difficult to work with, but the result is fluffy nails. This coating has the most unusual texture.
You can choose any color of granulated sugar on your nails:
- transparent gives relief to the surface, but retains the visible tone of the gel polish;
- tinted ones are of two types: consisting of pigmented particles of the same color or multi-colored (in a jar there are pink, yellow, blue, green or orange, red, lilac particles);
- silver and gold accurately imitate the appearance and shine of precious metals;
- pigmented with bright gold or silver flecks, making your nails look like marmalade.
The choice is determined by the texture and appearance you want to give to the coating.
Gradient
Not very popular, but possible in beige version. Usually the chosen primary color is combined with the same one, but several shades darker (lighter).

This technique works best on long nails. It is only important not to make a mistake with their form and not to delay the removal period.

Technology of applying velvet sand to nails: step-by-step instructions
The technology for applying velvety sand to nails may differ slightly depending on whether the decoration is used on the entire plate or on part of it. In the first case, the step-by-step instructions look like this:
- A standard hygienic manicure is performed with cuticle treatment, nail shaping, filing of surfaces with a buffer, and cleaning with a degreaser.

- Then the base is applied, dried, painted with 2 layers of gel polish and both are cured.
- Then the base is applied, dried, painted with 2 layers of gel polish and both are cured.
- After removing the stickiness from the flower bed, a finishing agent is applied to the still wet nail.
- Using a spatula, pour velvety sand, trying to ensure that its layer is even.
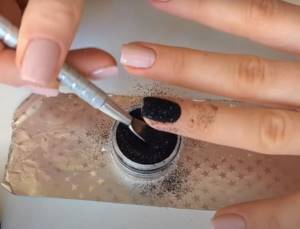
- Using a spatula, pour velvety sand, trying to ensure that its layer is even.
- Place the finger with the tip down and lightly tap it so that the excess decor falls off on the napkin lying on it.
- Then it needs to be placed in a drying lamp.
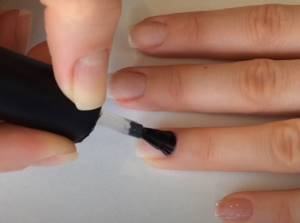
- Remove any remaining excess decor with a brush, brushing it several times over the surfaces.
In order to use spraying on nails when making drawings, the geometry, that is, partial filling of the plate with decorations, should be slightly different:
- It is better to do paintings and lines using gel polish rather than gel polish. So there is no need to apply an additional layer of topcoat.
- When the design is ready, velvety sand is poured onto the nail with a spatula. You can do this several times.
- Tap the lowered finger over the nail. This will remove excess decorative dust.
- The coating hardens in the lamp. It's best to hold your finger there a little longer than usual to secure the decor more securely.
- A brush is passed over the nails to shake off excess “sugar”. Only non-adherent particles will fall off.
Watch the video on how to do a manicure using the velvety sand technique:
Flocking technique
Flocking is a technique for decorating different surfaces using flock (tiny fibers imitating velvet fabric). Flock is applied to mobile phones and laptops, walls and car interiors, and safes.
A souvenir decorated with velvet powder takes on a completely different look and can be presented as a designer gift on the occasion of any celebration.
Skilled manicurists successfully use the technique of applying flock to nails.
Applying flock is similar to applying powder. Since the flock fibers are even more weightless and can fly apart instantly, it is recommended to use a special sprayer - a flocider, thanks to which the coating lays down evenly and is attached more firmly.
The flockider needs to be mounted on a metal stand from the kit and filled with velvet fibers of the desired color.
The undried varnish is sprinkled with flock and a magnificent velvet manicure is obtained, which needs to be dried in a lamp.
What you need to create a manicure with velvet sand
The French and any other model, both with and without sand, requires the use of certain materials and tools. Let's look at the most necessary ones.
Materials
To create a unique pattern, craftsmen select common materials:
- velvet powder;
- paint.
Flock is one of the best decoration options. Its base is an acrylic substance brought to a certain consistency. The shimmering effect is achieved by adding special viscose to the composition.
In fact, acrylic powder is considered a more durable material that allows you to create a unique image. The retainer is not used. This suggests that it is more elastic, despite its similarity to velvet sand.
It is recommended to use a varnish coating that contains sand only when the nail plate is absolutely flat. Otherwise, all the roughness, its roughness, will be visible to the naked eye.
Tools
The main tools needed to create a velvet manicure design are:
- accessories for sheet processing;
- in the shape of;
- drying lamp;
- brush to create a unique pattern.
It goes without saying that the above mentioned means must be individual. If the procedure is carried out in a salon, it is important to make sure that the specialist sterilizes and treats them before use. This will allow girls to protect themselves from unwanted diseases.
Manicure using acrylic paints
This technology will be useful for girls who can draw. To do this manicure, you need to stock up on:
- base coat;
- colored supporting varnish;
- acrylic paint (preferably white);
- thin brush for painting;
- velvet sand;
- manicure brush;
- retainer
The technique is very similar to that described above:
- Prepare your nail plate properly.
- Cover your nails with base and dry them.
- Apply the color base and wait until it dries completely.
- Using a thin brush, apply the design to the nail. It is recommended to use white acrylic paint - professionals say that it is less demanding and absorbs color better than others.
- Apply powder generously to the design. This must be done in a timely manner, since acrylic dries faster than regular paint.
- When the pattern is completely dry, carefully brush off excess sand with a manicure brush.
- Cover your nails with fixative and dry thoroughly.
Manicure with regular polishes
For this nail art you will need:
- base coat;
- colored paint;
- velvety sand for nails;
- brush to remove excess;
- retainer
The design is done as follows:
- Prepare the nail plate: remove the remnants of the old coating, move or remove the cuticle, adjust the shape of the nail, sand and degrease.
- Apply a transparent base - it will even out the structure of the nail plate, protect it from the negative effects of colored varnish and greatly simplify the removal procedure in the future. Wait until the base is completely dry.
- Paint your nails with colored nail polish. The shade can be absolutely any, but it is better to choose it so that the base is in harmony with the powder.
- Without waiting for the color to dry, generously sprinkle sand on the nails you want to decorate.
- Wait at least 10-15 minutes for the coating to dry completely.
- Use a stiff manicure brush to brush off excess powder from your nails and, if necessary, give the design the desired shape.
- Cover the finished design with a fixative and dry completely.
Sand manicure with gel polish
This design option will last much longer than one made with conventional paints, and bringing it to life is not at all difficult. You will need the following materials:
- in the shape of;
- base;
- colored gel polish as a base;
- polymerization lamp;
- orange stick;
- nail powder;
- high quality coating.
- Get a hygienic manicure and style your nails. If you prefer to steam your hands in the bath before removing cuticles, do it the day before applying the coating, otherwise your nails will release moisture and the shellac will not last long on them.
- Treat your nails with a buff and degrease with a dehydrator.
- Apply a thin layer of base coat and let dry. The duration of exposure depends on the type and power of the lamp.
- Paint your nails with one or more coats of color. Without drying the last layer of paint, carefully spread the sand over its surface, pressing lightly with an orange stick if necessary. Then dry the nails in a lamp.
- Cover your manicure with top coat and blot dry. If you have a sticky top, wipe it down with a dehydrator and enjoy your finished design.
Beautiful manicure
If you love and know how to create patterns on your nails, you can mix velvet sand with gel polish and paint with a thin brush with this mixture. In this case, after applying the colored base, you will need to dry it in a lamp, and then draw the desired pattern on the nails. The structure is also dried in a lamp and covered with a top layer.
There are countless variations of manicure with sand - it all depends on your imagination and skill. With a little experience, you can create real masterpieces on your nails.
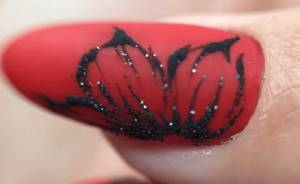
Sand patterns on nails
It’s quite simple to create voluminous patterns on your nails using a velvet solution. As a basis, you should use gel polish with a sticky layer, since it is very difficult to draw lines with shellac, especially for beginners, because it spreads.
- Firstly, it is important to dry the base thoroughly.
- Then use a brush and paint to apply the design.
- After they have been doused with the product. If desired, you can press on the surface, but the volume will be less noticeable.
- The pattern must be dried thoroughly, only then carefully remove the excess with a brush.
Is it necessary to topcoat velvet sand?
A velvet manicure never ends with a top coat. Firstly, this is not necessary: grains of sand and fibers adhere tightly to the previous paint layer. Secondly, due to the finishing treatment the surface will lose its hairiness.
Useful tips from professionals
To add some zest to your manicure, you can first make a French manicure and then sprinkle it with sand. Rhinestones will also not look superfluous;
Don't skimp when using sand during your manicure. You need to spray your nails, as they say, from the heart. You can apply a little pressure to help the sand adhere better.
To prevent your design from being erased immediately, it is better to dry it under a lamp for a longer time. After waiting for the sand to be completely absorbed, you can begin drying. Good fixation depends on this device, that is, if the lamp is old and does not work properly, it must be replaced.
When using gel polish, you can dry your nails for about two to four minutes.
The drying speed depends on what kind of lamp you use and what exactly you covered your nails with: gel polish or gel polish.
Don't settle on one design. It all depends only on your imagination. Create and bring to life your unique sand nail design by following our step-by-step instructions.
Rainbow velvet sand design
The price of sand varies from fifty rubles per five grams. Sand under the Amy brand is now quite popular, belonging to special (professional)
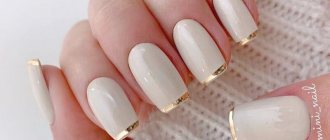
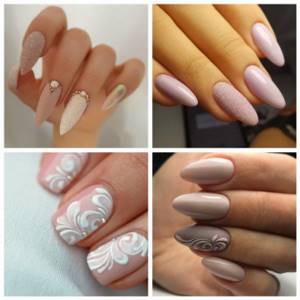
Features of beige manicure
The less emphasis is placed on decorations and bright pictures, the more attention will be focused on the hands themselves. Therefore, when choosing nude coatings, the skin, cuticles, and nail plates must be in perfect condition.

An even, uniform layer of varnish will reveal all defects during its application. Therefore, a fashionable beige manicure should only be done by professionals with high-quality materials and sufficient experience.
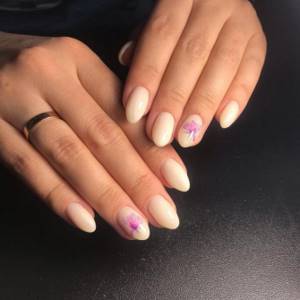
Damage, chips, scratches are very noticeable on a smooth surface. An aristocratic style will require careful treatment and regular updating.

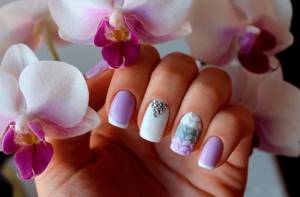
Velvet manicure options
Velvet sand often serves as an element of decoration for the overall design. In this case, you can use different shades, creating a truly original design. In such situations, tweezers, a toothpick or a needle are added to the tools already mentioned.
Professionals use stencils to create patterns. This speeds up the process significantly. Don't think that these patterns won't last or will look awkward. After all, their creation is painstaking work, which indicates the high professionalism of the master.
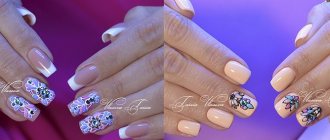
French
French with sand can be done in several ways:
- Complements classic French design. Cover 1 nail completely with transparent decor on one side, and shade the cuticle on the other.
- Choose a nude shade of gel polish as your main one. The “smile” should be made with colored velvety sand. You can take 2 different shades and apply them both to the free edge of each nail: one from the left roller, the other from the right, so that they meet in the center.
- Make a traditional French design. But on 1 nail of each hand, make a manicure completely speckled. It can be white or pink, that is, it can be combined with primary colors. Or they acquire a bright shade that stands out against the background of the classic French tones.
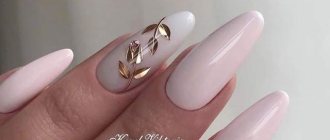
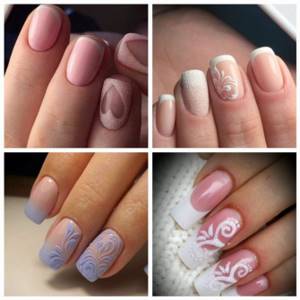
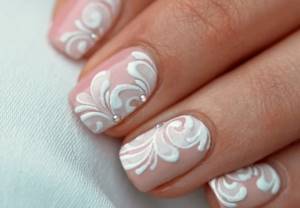
Delicate wedding manicure
A gentle manicure for the bride is:
- A combination of a classic jacket and the moon. But a transparent bandage is applied to 1-2 nails, and flowers are made on them with plasticine gel.
- Multi-colored design, when each nail is painted in its own tone, but only light ones are used - soft pink, peach, beige, milky, blue, lemon, lilac. On 2-3 fingers they are completely decorated with transparent “sugar”, and on the rest you need to rub pearls.
- Use soft lilac gel polish as a base. On the right hand, a branched ornament with white “sugar” is drawn on the middle and ring fingers. You can choose milk as the main color. Draw lace on 2 nails with lilac, pink or blue velvet sand. 2-3 transparent rhinestones are used on decorated plates.
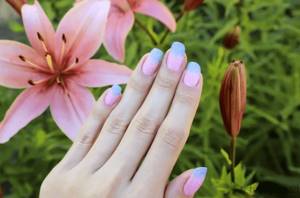
Ombre colored sand in the picture
Semi-permanent nail polish using the gradient technique can be used differently than in previous cases if you make a drawing:
- Hygienic manicure and color coating are performed as usual, but without finishing agent.
- The drawing is made with gel polish so that it consists of separate lines and occupies the entire nail.
- Take the first pigment and sprinkle it over the top third of the plate, tapping off the excess with your finger.
- “Sugar” of a different color is poured onto the central part, but so that it reaches the border of the previous shade.
- The excess also needs to be shaken off, as in the previous case.
- For the last third of the nail, use the third tone of Velvety Sand as in step 4.
- Repeat steps 3-6 for more juiciness.
- After a short pause, during which the decor “settles,” the coating will harden.
- Nails are combed.
From this video you will learn what velvety sand is and how to work with it:
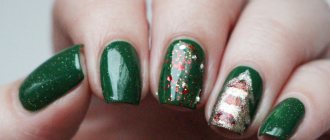
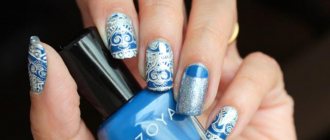
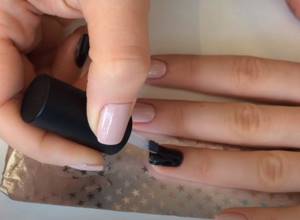
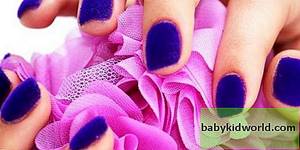
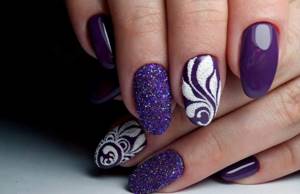
With black powder
The following designs look impressive with black powder:
- Any light shade of gel polish was chosen as the main one. But 1 marigold is completely covered with black “sugar”. And on the neighboring one, with the same decor, they draw an ornament in the form of branches with leaves.
- The nails of the thumb, index and little fingers are covered with black gel polish and a shiny top. For the rest, use a camouflage base. And black “sugar” is applied on top, but there remains a negative space in the form of a hole. The border between the shades is decorated with small transparent rhinestones.
- For the thumb, index and little finger nails, choose a dark blue nail polish with a sandy effect, that is, a slight shimmer, and a glossy finish. In the center, the plate is almost completely covered with black “sugar”, but the hole is highlighted with rhinestones of the main shade. The ring nail is made completely velvety.
For a wedding
Light manicures with sweaters, monograms, roses and other patterns are very popular among brides. Velvety sand will help make this nail art even more appetizing.
"Sweater"
Nail art with sweaters is very popular, especially in winter.
Sand harmonizes perfectly with rich colors and goes well with almost any design and a wide variety of decorative elements. For example, see how unusual and colorful a sand-colored knitted manicure looks in combination with a French manicure and decorated with rhinestones.
Regular Full Coverage
The simplest but most elegant option. Of course, it’s not at all necessary to make every nail sandy.
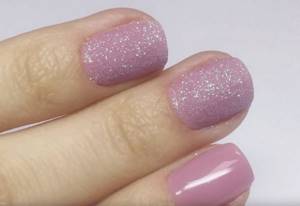
It is also worth noting that such a coating is not only beautiful, but also practical - it strengthens the nail plate, so breaking such a nail will not be so easy. This velvet design brings out the beauty of any color and the soft pastel colors make it even more subtle.
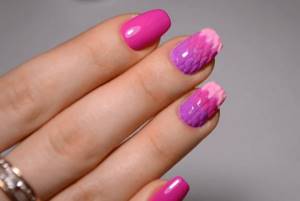
Sugar Gradient
Velvety sand looks great paired with shade. Of course, such an effect can only be created with the help of universal white sand, which can take on any color.
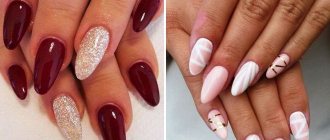
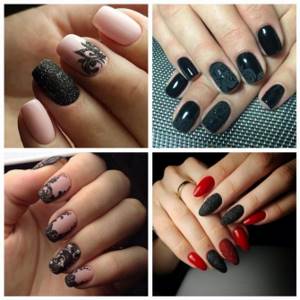
Red nails with sprinkles
You can smooth out the aggressiveness of a red manicure with the help of inclusions. Velvet coating is applied to all or only some nail plates. The scarlet design looks feminine, gentle and elegant.
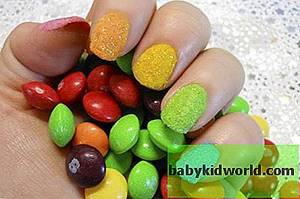
Manicure with colored sand
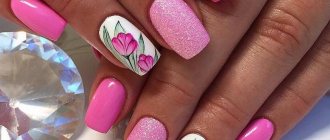
Sand manicure can be done in any color scheme. And some girls cover each nail plate with velvet of different shades. This design looks bright, elegant and playful.
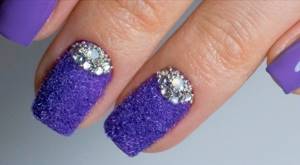
Manicure with sand and rhinestones
A festive manicure with specks on the nails can be decorated with rhinestones. But you shouldn’t cover them in large quantities - just highlight the hole with arched or triangular pebbles. This option will be very harmonious.
Spectacular gold
Gold decor can be used in the following ways:
- Choose yellow as the main color, but cover 2 nails with white gel polish or milk base. On one of the last ones, place diamonds with velvety sand. On the second, draw a square and print a gold transfer sheet next to it so that the color of the gel polish is not hidden under the decor.
- Cover all your nails with a beige flower bed. On the ring and little fingers, draw wide, curvy lines using golden “sugar.” Cover the rest of these nails with a matte topcoat. Cover all other fingers with a glossy coating.
- Create a baby boom. But on the little finger of one hand and the ring finger of the other, completely cover the nails with gold jewelry.
Black on red
The subtle contrast of black and red velvet sand with glitter will make it even more elegant.
Combination with red

There are also many design options with red gel polish:
- Cover all nails with the base color, but on 1-2 nails use a lighter shade for a gradient. And apply transparent velvet sand on them.
- Use purple or scarlet gel polish and the same decor. Finally, on 1 nail, place a wide strip in the center, from the base to the free edge. And on the next plate, draw two triangles - a thin and a thick line.
- Paint all your nails red except your middle or ring finger. Use white or pink gel polish for this. And on the same nail, draw tongues of fire or other patterns with red sand.
Knitted
Quite an original idea. Experts recommend using this model in the winter, but it will be very relevant both in spring and autumn. With it, the image becomes truly friendly and familiar.
Plain
This option will create a bright and attractive image. You can choose pastel colors for subtle, eye-catching looks to add accents to your look. You can create a special manicure for every season.
Pros and cons of this type of manicure
All types of decorative nail coatings have pros and cons, velvet sand is no exception.
Among the advantages:
- simple technology
- minimum material
- time saving
- Suitable for your own and artificial nails
- originality and solemnity
- for different age categories
- durability (salon procedure)
- interchangeability
Even a beginner can master the technique of applying velvet powder after watching the instructional video and following the sequence of actions. The procedure is quite quick if you don’t get carried away with a complex pattern and cover your nails with one color. The sand lasts for a long time if you cover not the entire nail, but part of it in the form of a pattern.
If velvet sand is not enough, it can be successfully replaced with acrylic powder with large granules, powder for scrapbooking or embossing.
Flaws:
- the pleasure is not cheap (salon procedure)
- vulnerability, instability (home manicure)
- not suitable for daily wear
- difficult to remove tea and coffee stains
Velvet manicure looks very solemn and will not always be appropriate in everyday life. The fibers are quite fragile and can wear off unevenly, leaving unsightly bald spots. Not everyone likes “hairy” nails; reality does not always correspond to expectations. This mainly concerns home manicure in the hands of an amateur. If we are talking about a master with a capital letter in a trusted salon, then believe me, the velvet nail coating cannot be compared with anything. It is truly original, luxurious and sophisticated.
Velvet, also called cashmere or velor, the coating looks most advantageous in tandem with another coating.
The combination of several types of design looks extremely beautiful and elegant, but at the same time natural. This is because sand creates a natural velvet-velor impression, and in combination with rhinestones and decorative painting it looks noble and very aesthetically pleasing.