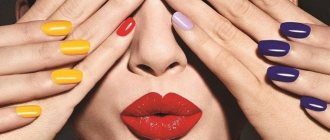
What girls don’t do to be the center of attention! Fashionable haircuts, branded perfumes, stylish clothes - you can go on and on. And how much money flows into the pockets of manicurists when you once again go to the salon. We will tell you how to attract admiring glances to your fingers without spending a lot of money and time. Interested? Today we will talk about manicure with the British flag.
Where does the fashion trend come from?
In recent years, the British flag has often been found in the decoration of clothing, accessories, home interiors and, of course, in manicure. To use this fashionable symbol in your image, you don’t have to love oatmeal or be a fan of Sherlock Holmes!
By placing the British flag on your nails, you will not go unnoticed. A bright nail design in the English style is perfect for both a party and an everyday look. The manicure looks very stylish and original, it is simple to perform, which is why it has earned incredible popularity among girls.
How to do a British flag manicure (VIDEO)
how to do a British flag manicure
Do you want to look fashionable and be the center of attention? Or perhaps you have been invited to an English-style party? Are you having England days at school or university? Or did you just buy a T-shirt with an English flag design? In this case, it is necessary to fully match the image. So a British flag manicure is just for you.
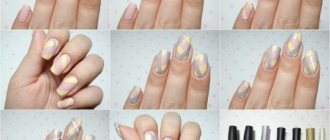
Step-by-step instruction
To make sure everything works out for you, we have prepared a step-by-step guide on how to do a manicure, with photos that will help you recreate a stylish British design on your nails.
Step 1
Prepare your nails for a manicure: push back the cuticles, remove hangnails, and adjust the shape of your nails. You can choose the method of hand care that is preferable to you. It doesn’t matter whether it’s a classic, European or Brazilian manicure. The main thing is neat and well-groomed nails as the final result.
Step 2
Apply a base coat: it will not only protect the nail plate from yellowing, but will also smooth out the surface of the nail. Due to this, the future drawing will lie smoother and the color of the varnish will be richer.
Step 3
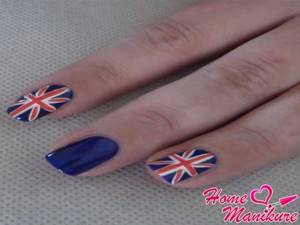
Take a blue shade of polish and apply it in two layers. Start painting your nails from the center, smoothly moving to the sides - this way you will not stain the cuticle. Once the nail polish is dry, move on to the next step.
Step 4
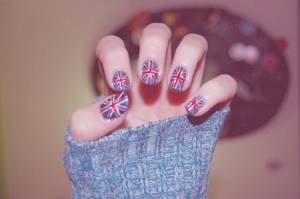
The most interesting thing is ahead - you have to draw the British flag. To do this, you will need special nail design brushes or polishes with a thin brush. Using white, draw vertical and horizontal lines - you will get four blue squares.
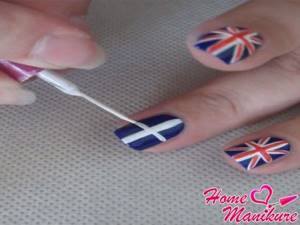
Now draw a diagonal line in each of them, forming a pattern resembling a snowflake. Try to get all the white lines the same thickness. A manicure will look impressive and stylish only if it is done carefully.
Add thin red lines on top of the white stripes. The key to success in creating such a design is confident and clear movements of your hand during the drawing process. Each time the British flag on your nails will look better and better. Therefore, you should not be upset if the picture does not come out perfect the first time - you will need a certain skill.
Step 5
Wait until the varnish is completely dry and apply the sealer. A top coat will allow the design to last longer and also give your nails a beautiful glossy shine.
British flag in manicure
The “British flag” print has not gone out of fashion for several years. It can be assumed that in the 2010s it replaced the American flag, which was popular in the 00s. Nowadays, everything is decorated with the British flag - T-shirts, bags, covers and cases for smartphones. This trend was not spared by manicures, which also began to often decorate the British flag.
- Total information
- Application
- Other implementation options
Total information
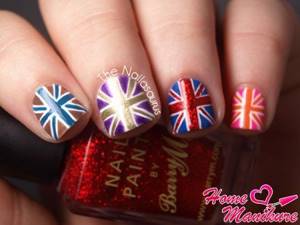
The British flag has a fairly catchy and bright combination of colors. On a blue background there is a red and white cross, the straight lines of which stretch across the entire area of the flag. Red and white diagonals also stretch from the corners to the center of the cross. Often such a print can be found in other colors, when the British flag on the nails is done either in completely different shades, or the three main shades are swapped. Thanks to the great popularity of the print, even if done in other colors, this manicure remains recognizable.
To achieve this design, it is very important to choose the right varnishes. All coatings must have good density, especially for white varnish, which is supposed to be applied over a darker blue. In addition, this manicure is usually performed with matte varnishes, since the lack of gloss dictates the grunge style from which this print came into mainstream fashion.
There are other ways to implement this design. It is not necessary to draw it by hand at all. Thanks to the simple shapes and outlines, the British flag on the nails, as in the photo, can be created using, for example, manicure tape. In addition, the most complicated design, supplemented by any elements, can be obtained by placing stickers - films - on the nails.
Decorating such a manicure can be called quite complicated, since traditional sparkles in its decor may not be entirely appropriate. As mentioned above, the grunge style does not imply glamor and shine, and therefore this manicure can be complemented, for example, with small opaque rhinestones imitating rivets, etc. A variety of blots, letters of the English alphabet, etc. look good. This manicure, in principle, is much more suitable for young girls and teenagers who prefer a casual style.
Application
An English flag manicure is easy enough to draw by hand. This can be done using a dots or a thin “one” brush. It looks more impressive on short nails, but it is more difficult to do on them due to the small area to work with. The print is applied as follows:
- The nail is covered with a protective base for varnish, which is dried;
- A layer of blue varnish is applied and also dried. If the coating is not too dense, you can apply another layer;
- After this layer has dried, two white diagonals are applied to the nail, intersecting in the center of the plate. When applying a print, pay close attention to the width of the lines, as it varies depending on the area of the design, and therefore such a manicure is not as easy to perform as, for example, a Russian flag nail design. This can be done with a thin brush;
- After the white varnish has dried, a thin red stripe is applied on top of it, for example, using a dots. Wait for the red coating to dry;
- We proceed to drawing a central cross, which should overlap the diagonals. First, draw a cross with white varnish and wait for it to dry;
- Now we apply a red cross on top of the white one, dry it and the manicure is ready.
It seems that to obtain such a design you have to purchase quite a lot of varnishes, and therefore it is easier to buy, for example, stickers. However, these shades can be used to create many prints, including manicures with the flag of the USA, Russia, Serbia, Japan and many other countries. The combination of red and white looks good in New Year's nail art, and white and blue - in marine nail art.
Other implementation options
If it is difficult for you to draw a flag by hand, then you can make it using manicure tape. This method is only suitable for the British flag; you cannot create a Russian or American flag manicure with it. The first - due to the large width of the stripes, the second - due to the great complexity of the design and the presence of stars. This is not to say that this method is easier than drawing by hand, but for many it is easier to stick tape than to draw a straight line. The design is made using tape as follows:
- As in the previous version, a protective base is applied to the nail and dried. After which blue varnish is applied as the first layer and also dried;
- Then the differences begin. Apply a second coat of blue polish and let it dry for a few seconds;
- Cut two strips of red and white tape and place one of them on the sticky polish. The length of the strip should be sufficient so that you can stretch it by pressing it on both sides of the nail;
- Immediately place a stripe of the second color next to it, forming one of the diagonals. The strips should be adjacent to each other closely, but without overlaps, since it is in these areas that peeling usually begins. The order in which the color bars are applied is also not important, since they are of equal width;
- Ideally, you need to have time to form a second diagonal before the varnish dries, but if this does not work out, then apply a thin layer of transparent varnish to the nail and form a second one. If you are lucky enough to purchase manicure tape with a sticky base, then all work should be done on a dry coating;
- After this, form the central cross in the same way;
- After the flag is formed, cut off the excess parts and cover the nail with a top coat.
This design has a significant disadvantage - all the strips turn out to be almost the same width, because it will not be possible to overlap them. Therefore, such a flag will not look realistic enough. However, it will remain quite recognizable due to the high popularity of the print and color combination.
In addition, the flag of Russia or Britain on nails, like almost any other, can be created using stickers - films. When ordering online, you can find a fairly large selection of flags from a variety of countries, as well as flags of communities and subcultures, for example, the rainbow one. Their application cannot be called simple, since they are heated under a lamp, and then placed on the nail and, as they cool, they shrink, adjacent to the plate. The difficulty is that they often produce bubbles and detachments, and cutting them to size is not very easy.
Stencils are only good for creating a Russian flag manicure, like in the photo, on your nails. The complex pattern of the British flag in this case involves the use of a huge number of stencils and their constant re-gluing. So it will not speed up the process at all.
Useful information to consider
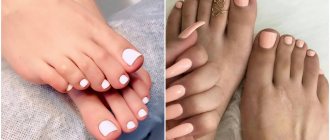
It is very important that the design on the nails is appropriate. British manicure is more suitable for young people - the design is quite bright, flashy and bold . It cannot be combined with office style or an evening velvet dress.
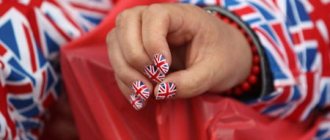
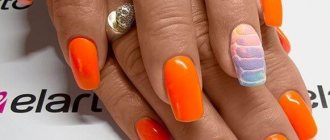
You can paint the British flag on each nail or just decorate a few fingers with it. The emphasis on the ring finger and thumb looks stylish and daring. To appreciate the originality of this manicure, take a look at the photo.
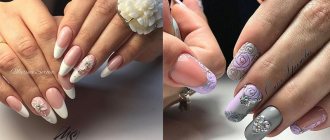
You can make a creative mix on your nails by placing on them not only the English flag, but also the state symbols of Russia, the USA, Italy, Spain, France, Germany and other countries. What comes out of this is shown in the photo. Girls who are not afraid to experiment may like this option.
British design goes well with rhinestones. You can decorate several nails with them to add shimmer and shine to the look. The main thing is not to overdo it, as this will make the manicure heavier. Pay attention to the photo - how impressive this decoration looks!
Dear girls, try to implement this design on your nails and you will be satisfied. A manicure with a British flag design is quite easy to do at home. You will probably find nail polishes in the right shades in your collection. The final video lesson will help you consolidate your knowledge, which will clearly tell you about all the intricacies of British manicure.
There are different options for drawing the British flag, and it doesn't really matter which method you choose. The desire to make a stylish manicure, self-confidence and a little skill - that's all you need. We have no doubt that you will succeed. Be beautiful and do not deny yourself anything!
Notes in the margins...
And a few more important tips to think about. Firstly, keep in mind that this type of manicure has a bright and bold design that will not be appropriate for a business event or office atmosphere. Secondly, a British design can be created by applying the flag image not to all nails, but only to some. Thirdly, quite often the imagination of fashionistas goes far beyond the boundaries of one flag, and the flags of other countries of your choice can be depicted on the nails. Fourthly, you can confidently complement the image of the British flag with rhinestones in red or another color to your taste and discretion.
At the end of our conversation, I would like to say the following to all fashionistas: try something new and interesting in your life. Be it a new hairstyle, or a new manicure with a British design. The main thing is that you are happy and thereby fill your life with new colors!
- Author: Author: Alena
Rate this article:
- 5
- 4
- 3
- 2
- 1
(0 votes, average: 0 out of 5)
Share with your friends!
Applying the background
You should use white varnish as a background. If it has already been applied in one coat as a base coat, then simply coat the nail with it again. You need to achieve a monochromatic effect. Many will decide that the background is not so important, since a drawing will be applied to it one way or another. But in the case of the “American Flag”, it is imperative to ensure that no dark spots appear under the varnish, there are no streaks, etc. Otherwise, the manicure will look cheap and sloppy.
It is important to note
Choose rich matte colors, and glitter for bright accents; you can decorate your nails with rhinestones or other decorative elements.
A manicure on extended nails in a patriotic style is not so difficult to do, especially if the nails are long. A small painted flag will be a great idea for a French manicure. Decorate with the flag only and cover the rest with contrasting varnish.
What to use for manicure with flags:
- stencils for French manicure;
- brush for nail design;
- varnishes of several colors;
- good fixative varnish;
- manicure tape;
- ornaments for decoration.
Bright flags will help you create a very stylish nail design for a party or for every day. Everything will depend on how you decorate the main theme. By the way, for patriotic evenings, City Day or the victory of your favorite football team, this will be the ideal solution. Do all the prep work - give your nails the desired shape, apply a base polish.