Varnishes with a craquelure effect once made a lot of noise in nail art, and now craquelure is also available in the form of gel polish.
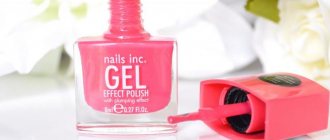
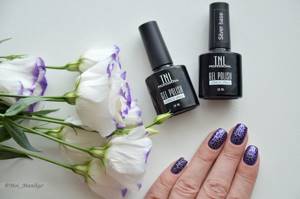
This new product was presented by the TNL (Tatnail) trademark. To create a cracking effect using gel polish, a special collection of colors and bases for them has been released. Below I will show an example of use and some nuances. By the way, the craquelure effect on gel polish can be created without special gel polish. I wrote about this and showed it in a video lesson here.
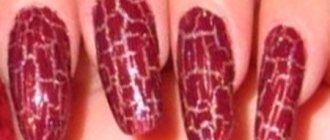
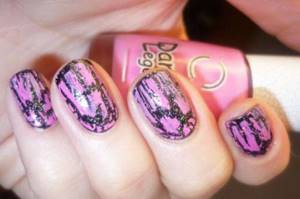
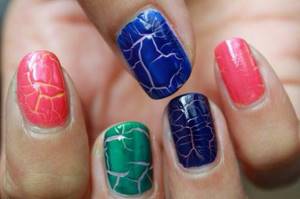
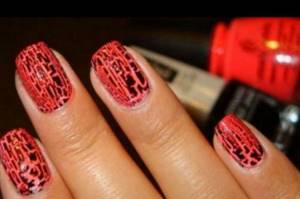
Craquelure gel polish works in the same way as varnish with a similar property. The cracking effect appears thanks to the use of a special colored substrate for craquelure and the Crack Effect gel polish itself. As the nail dries, cracks form on the surface, and each nail is unique! The thicker the craquelure layer, the larger the cracks will be, and vice versa, the thinner it is, the smaller they will be.
What is craquelure?
More and more new trends are appearing in such an area of art as manicure. Yes, yes, you were not mistaken, manicure has long ceased to be a severe necessity for a well-groomed woman and has become a part of fine art! Volumetric design, extensions, drawings using acrylic paints and gel polish, decoration with rhinestones - all this can turn tiny ladies’ nails into real masterpieces.
What is craquelure? A manicure with this name may be associated with something magical. However, there is no magic in this technique; you only need two products to apply the color to your nails.
Artificial aging of manicure became fashionable at the beginning of 2011 and still remains relevant. This technique is chosen by both young fashionistas and serious adult ladies. Still would! According to the women themselves, craquelure looks stylish, unusual and relevant.
Nail polish with a craquelure effect, as soon as it appeared on the market, was immediately loved by many girls. “Crackelure” is not a Russian word, this term is borrowed from French. True, it was initially used not in nail design, but in furniture decor. Translated, the word means “giving the effect of an antique, cracked surface.” The craquelure effect is used to decorate mirror frames, furniture surfaces, and for some time now has been a worthy and effective decoration for the nails of beautiful ladies.
One-step craquelure in decoupage
Application to different surfaces occurs using different methods. The most popular method is one-step craquelure. It is used to produce effective contrasting color cracks on objects. For this you will need:
- product for decoupage;
- water-based or acrylic paint in two colors;
- PVA glue;
- drawings;
- acrylic and finishing varnish;
- hair dryer;
- synthetic brush;
- primer.
Decoupage of the product is carried out in stages:
- The surface is cleaned of dirt and dust, then degreased with alcohol.
- Apply a layer of primer to a clean surface with a brush. It must dry completely.
- Paint is applied to the primer, which will later show through the cracks.
- The surface is covered with a craquelure composition.
- Contrasting paint is applied to the item.
- The last layer is dried with a hairdryer. When drying, the paint begins to crack. The previous layer shows through the cracks.
If there are no drawings on the product, they need to be cut out of paper and glued after cleaning and degreasing the object. The design is secured with PVA glue. One-step decoupage with craquelure performed according to these instructions looks good on vases and flower pots, on trays and plates. The finishing is completed by applying the finishing coat. This method can be used to decorate photo frames, wooden boxes, and porcelain items.
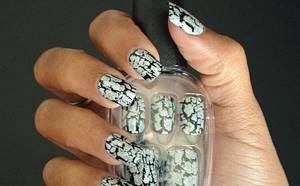
What is craquelure nail polish?
Craquelure varnish, or “python” (it received this name because of its characteristic pattern), is sold in packaging typical for such products, but is applied somewhat differently. Before moving on to recommendations for applying craquelure varnish, let’s look at the varieties of this product.
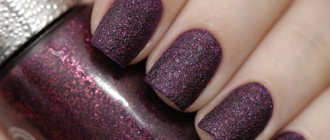
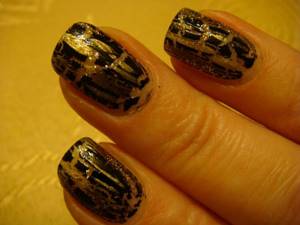
There are thread (also called varnish) products for craquelure. The girls note that they create the effect of the finest cobwebs. To imagine what a similar effect looks like, think of finely crafted Chinese boxes or expensive, exquisite porcelain. The second type of varnish is called fence varnish, or crack varnish. Even the name sounds so that you can imagine the effect - rough cracks through which the lower layer is visible. It is fence craquelure, judging by reviews, that is most often used in manicure.
How much does craquelure effect varnish cost?
It all depends on the manufacturer and brand popularity, but in general these varnishes cost the same as regular ones. You can purchase nail polish with a craquelure effect at any women's cosmetics store or order it online. Customers speak most highly of products produced under the brands OPi, China Glaze, EVA, Essence. The varnishes from these manufacturers adhere well to the nails and look bright. But you can safely purchase the product from any trading company, both well-known and not so well-known.
What to pay attention to
When applying the top coat of paint, you must adhere to the following rules:
- You cannot paint twice in the same place, as cracks begin to form immediately, and it is possible to paint over them.
- At one time, the paint should be applied as evenly as possible, covering the layer so that the underlying paint does not show through.
- The consistency of the main color paint is very important - not liquid, but not thick, so that the craquelure varnish allows it to crack.
- It is important to apply this paint evenly, with equal pressure on the brush. If the pressure is stronger, the paint layer will be thin, the cracks will be long and elongated, thin (when applied with a brush) or small and “scaly” (when applied with a sponge).
To recreate beautiful natural cracks, you need to correctly combine a sponge, a brush, layers of paint and drying the craquelure varnish. And, naturally, the selection of the optimal craquelure composition is no less important. Therefore, the nature of the cracks depends entirely on:
- Craquelure composition.
- The thickness of the varnish layer.
- Drying conditions.
- Consistency of top coat paint.
- Thickness of the top layer of paint.
We invite you to familiarize yourself with Rosa Cordana: care at home
What do you need to create a manicure?
Let’s say right away that the technique of applying craquelure varnish is simple and does not require artistic skills or any special skills.
However, you will need skill and following some rules that will help you make your manicure perfect. Prepare the following products in advance: a base varnish (it is best if it is a caring “smart” enamel), a colored base (black and white colors are considered the most successful and suitable for other shades), a craquelure product, a finish (fixer coating). The coating is optional, but with it the manicure will take on a finished, varnish-shiny look.
How to apply craquelure varnish?
Take these recommendations into account and you will end up with the perfect manicure:
- Get a manicure and lubricate your hands with cream.
- Buff clean, oil-free nails and coat them with a care product like smart enamel. This preparation of the nail plate will allow the manicure to last for at least a week.
- Apply a second coat of varnish. This is the base layer that will show through the cracks of the craquelure. Attention! This varnish must dry well before applying the craquelure directly. Also, be responsible when choosing the color of the base varnish. If you apply the color base carelessly, the cracks will not turn out beautiful.
- Let's apply craquelure. Shake the bottle with the product thoroughly before doing this - craquelure contains heavy particles that settle to the bottom of the container. Apply the varnish in one stroke, as the product begins to crack literally immediately after application. If you apply craquelure in two or three layers, then cracks will not form or will be unsightly. The product is best applied with a dry brush. To do this, wipe it with a sponge after each application of varnish.
- After applying the craquelure effect varnish, let it dry and coat the top with a fixative.
Technique for applying cracking gel polish step by step
- We prepare the nails for the coating: push back the cuticle, remove the natural gloss from the nails with a file and degrease the nail plate with a special product.
- Apply the base for the gel polish and let it polymerize in a lamp for 2 minutes.
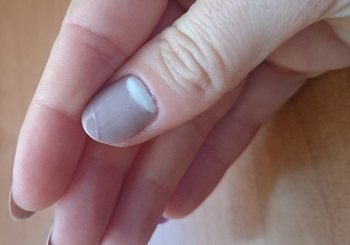
- We cover the nails with colored gel polish - a craquelure base, which we also dry in ultraviolet for 2 minutes. I applied my silver color in two coats as one seemed too dull.
- Now comes the fun part. Without removing the sticky layer (required!), apply Crack Effect gel polish to the substrate and air dry it for about 3 minutes. At this time you can watch how it cracks beautifully!
- Next, apply the gel polish topcoat and dry it in a lamp for 2 minutes. Remove the sticky layer and contemplate the beauty on your nails!
This design is very simple to make and looks incredible at the same time!
What mistakes can happen when applying craquelure?
The most common mistake is applying the wrong or incompatible colors. For example, craftsmen say that if you choose colors of the same range, you can get the effect of not antique cracking, but sloppiness.
For example, a completely unsuitable option is to use a transparent base color.
The second mistake is applying craquelure in two or three layers. According to experts, if you want to get deep cracks, apply a thicker layer of the product at once, and then the varnish will crack more severely.
Don't neglect the final stage of creating a manicure. If you don't cover your manicure with a fixative, you will feel uncomfortable - the craquelure feels rough to the touch. Many women say that this is not very pleasant. In addition, the fixative will help you “wear” your manicure longer. In general, it is worth noting that craquelure is famous for its durability. If ordinary varnish begins to “peele” after 4-6 days, then this one, as satisfied customers report, lasts from 7 to 10 days even without a fixer.
Applying acrylic paint
This is perhaps the most subtle moment in the whole work. The final appearance of the work on creating cracks depends on the timing of this stage, the accuracy and uniformity of paint application.
Typical mistakes:
- The paint is applied too early, that is, when the craquelure varnish has not yet dried enough (it sticks and gets dirty).
- The paint is applied too late. This is a different period for different compositions (you need to look at the description).
- The paint is applied in random directions (if not intended).
- The paint is not applied “in one pass”, but is applied to the still wet layer again or “fiddled” back and forth with a brush.
- A rough or, conversely, too soft (not elastic) brush is used.
We suggest you familiarize yourself with How to properly prepare fresh honey mushrooms
Rules:
- The paint is applied at the moment when the craquelure varnish stops staining your finger when you touch it, but still sticks.
- To obtain large and rough cracks, the paint can be applied a little ahead of time, making confident impasto strokes.
- To speed up the drying of the product, you can use a warm stream from a hair dryer.
- All areas with craquelure varnish must be covered with paint.
- The paint must be applied strictly in one layer (do not move the brush over the same place).
- The movements of the brush are directed in the same direction as when applying the medium (unless otherwise provided by the design).
- The composition is applied with a flat synthetic brush (for an even, “grooved” coating).
- A thin layer of paint will give thinner and more graceful cracks, a thick layer will produce larger and deeper ones. An uneven layer will produce cracks of different sizes and types.
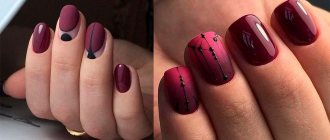
Unusual color solutions
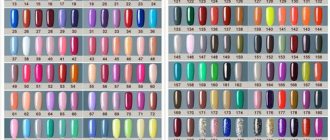
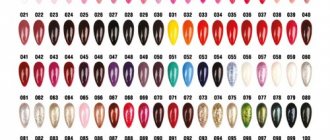
The most universal base colors are considered to be white and black. Nail polish with a craquelure effect of any shade, both matte and pearlescent, will look great on this polish.
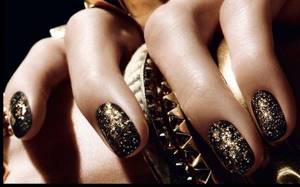
In summer, experts advise giving preference to rich and bright colors, and in cold weather to prefer pastel colors. Gold on black or pearlescent turquoise and green colors look luxurious - the resulting craquelure effect will resemble snakeskin.

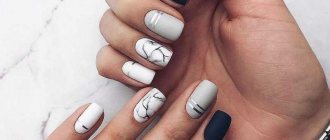
Colors that are located opposite each other on the color wheel will also go well together. For example, try combining blue and red, orange and lilac, light green and purple. The use of two and three shades of craquelure looks very unusual. For example, try this scheme: apply pink and blue craquelure varnish or yellow and light green varnish on a black base.
Another secret to a beautiful manicure is applying the product in various ways. So, you can apply craquelure horizontally, vertically, with a stroke, and you will get completely different results, since the cracks will have different directions.
Choose craquelure to your liking
Craquelure can be either bright and festive, or neat.
So, if you use a colored base and craquelure of various colors, your nails will look catchy. On the contrary, if both varnishes are in the same range, then you will get a manicure that is restrained in color. Experiment and try to create your own craquelure effect on your nails. Photos of the most interesting and successful color solutions can be seen in the article.
Cracking of varnish due to external influences
Women often notice that the polish on the surface of their nails tends to crack. It is a mistaken opinion that the applied gel polish has an exclusively strengthening effect, is highly durable and reliable, and no external factors will contribute to the destruction of the layer.
High temperatures
Cracking of gel polish due to simultaneous exposure to moisture and high temperatures
The impact of high temperature conditions on the structure of gel polishes, and especially in combination with high humidity, leads to a deterioration in the quality of manicure. And after a short period of time, these factors will undoubtedly lead to the destruction of the varnish structure itself.
You must be careful when staying in places with high humidity. For example, you should exclude frequent stays in the sauna or solarium , otherwise be prepared for the nail polish to crack.
Exposure to low temperatures
Exposure to low temperatures is another significant factor that can destroy the structure of gel polish. As a result of exposure to cold on the nail coating, you can observe not only cracks, but also peeling of the gel polish itself or significant fading of the color. After some time, gel polish will no longer be so perfect and practical.
In winter, it is necessary to actively wear hand protection in the form of gloves and mittens and prevent the varnish from being exposed to cold.
Exposure to moisture
Water destroys manicure very quickly, for this reason it is important to protect your hands from frequent contact with water with rubber gloves . It is also worth analyzing the specifics of your work. For example, if you work in an area where you need to wash your hands frequently, you shouldn’t expect the stated durability from your manicure and you can prepare for cracks in the gel polish.
Impacts and damage
Crack in gel polish due to impact
A fairly relevant cause of cracking of gel polish can be called heavy mechanical loads, which have a negative impact on the condition of the nail coating.
Household chemicals
Household cleaning and laundry products have a strong destructive effect on manicure. When doing housework, your hands must be protected with rubber gloves.