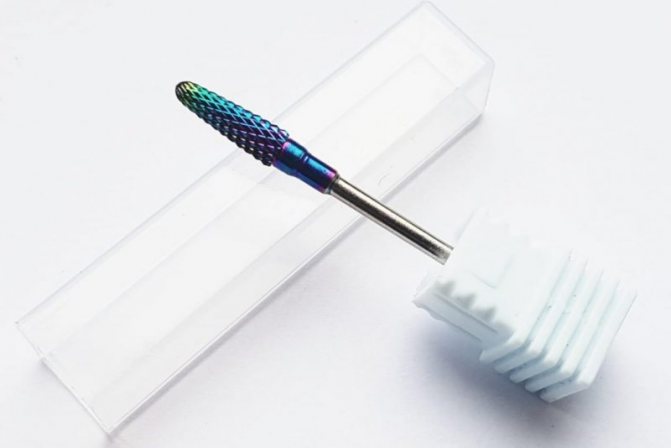
The cutter for removing gel polish can be spherical, cone-shaped, metal, ceramic and other types. Each of them has an individual purpose, but they are all needed to perform a high-quality manicure.
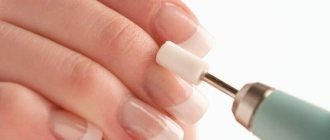
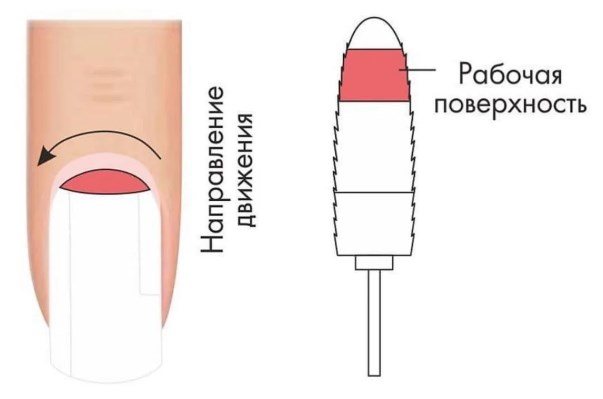
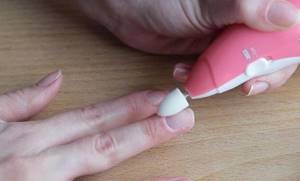
The technique of removing decorative coating involves making light, stroking movements from the cuticle to the end of the nail. The middle of the nail is treated with wide nozzles, the sides of the plate with narrow ones. Silicone tips are used only for polishing the surface of the nail (base layer) before applying a new layer of gel polish or shellac.
The cost of cutters is variable, ranging from 150-450 rubles and depends on the materials, shapes, sizes and reputation of the manufacturer.
What is a cutter for removing gel polish?
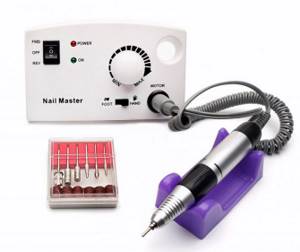
A cutter for removing gel polish is a rotating tool that is equipped with a sharp tip. It works in a machine that is designed to perform standard hardware manicure. The cutter changes depending on the tasks assigned (it is available with different notches and degrees of abrasiveness), and rotates at high speed.
If an experienced professional uses the machine, then it takes a minimum of time to remove gel polish with a cutter - no more than 15 minutes for both hands. The procedure cannot be carried out in this way if:
- severe dystrophy and excessive sensitivity of the nail plates;
- existing allergy to dust in the master or female client.
Another disadvantage of using a cutter to remove gel polish is the high cost of the machine for hardware manicure and the actual rotating attachments, and using cheap equipment for this manipulation is strictly not recommended.
Which cutter is better? Criterias of choice
Each manicurist has his own favorite cutters, which he chose after trying many attachments.
To choose the right tool, you need to pay attention to the following nuances:
- decide on the purpose : cutters are purchased for manicure and pedicure or for one job. If a master works in a salon and serves many clients, you should pay attention to expensive cutters and equipment; as a rule, their service life is much longer;
- decide on the scope of work . If a cutter and manicure apparatus are purchased for individual use, then inexpensive attachments are suitable. For salon use, it is worth choosing a device with overheating protection and those cutters that will not heat up at high speeds;
- pay attention to the length of the tip of the cutter . The length of the end that is not coated with abrasive must be suitable for the size of the handle clamping mechanism. The nozzle should be held firmly inside and inserted until it stops. Typically the tail has a diameter of 2.35 mm. If the size is larger or smaller, it will increase vibration and create inconvenience during operation;
- cutters with black markings are not suitable for home use . At low speeds - less than 30,000 rpm. – you can damage the nail plate;
- Some cutters are marked with a “T”. This means they are coated with titanium alloy and will last longer.
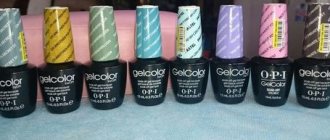
Among the manufacturers that produce high-quality manicure attachments are the following:
- "Irisk Professional" (Russia);
Cutters for removing gel polish produced by Irisk Professional (Russia). - "TNL" (South Korea).
- "JessNail" (China);
- "Naomi24" (China);
- Planet Nails (Germany);
- "HDFreza" (Russia).
What are the advantages of removing gel polish with a machine?
The advantages of removing gel polish with a device include:
- maintaining the density and structure of the nail plate - gel polish removers dry out the nails greatly, which leads to their rapid delamination;
- no contact of the cutter with the surface of the nail, so damage is excluded;
- complete preservation of the base layer of the coating, which prevents the negative impact of external factors on the nail.
The main advantage of the method is the refusal to use removers, which aggressively affect not only the gel polish, but also directly on the natural nail plate. Experts say that thinning, separation and brittleness of nails after a manicure with gel polish do not appear after the use of such specific materials for decorative coating, but against the background of the use of liquids to remove it.
Important aspects of the process
Working with the device requires skills, so it is better to remove the coating from an experienced professional.
If you want to learn the process yourself, you should pay attention to the following nuances:
- For the first time, it is better to carry out the procedure on your own nails. This way you can understand the sensations, the level of vibration and the complexity of the process;
- it is necessary to fix the position of the working hand - the elbow should be supported on the table. If the hand is in a hanging position, then it or the client may tremble, move, sneeze and the nail plate will be injured;
- filing occurs from the cuticle to the free edge. The cutter should move in the direction opposite to its rotation;
- movements to remove gel polish are performed smoothly but confidently. Filing occurs with stroking movements.
For practice, you can use artificial nails.
What types of machines are there for removing gel polish and shellac?
Depending on the purpose for which the machine for removing gel polish and shellac will be used, you can purchase home or professional equipment. The first option has the following characteristics:
- compact dimensions;
- low power;
- minimum set of cutters (no more than 10 pieces);
- The quality of the attachments is average.
It will be problematic to quickly and efficiently remove gel polish or shellac with home machines, because their cutters wear out a lot.
Professional gel polish remover machines have:
- high power;
- automatic tip ventilation;
- reverse and direct rotation of cutters;
- a large set of attachments (more than 10 pieces);
- the ability to work in different modes and independently adjust the speed of rotation of the nozzle.
It is professional equipment that allows you to work in “emergency” mode and cope with any type of decorative coating.
Watch this video about which manicure machine to choose:
Are there any for left-handed people?
For left-handers, manufacturers introduce special cone-shaped or cylindrical cutters, which are distinguished by a cross cut. Carbide cutters are optimal for left-handers - they are universal and work equally effectively in both forward and reverse rotation.
If it is necessary to treat areas of the lateral skin folds and cuticles, left-handed people will benefit from streamlined ceramic attachments.
Useful tips
To obtain an effective result, you must consider the following recommendations:
- the procedure must be performed slowly, carefully and carefully;
- the hand with the cutter must be firmly fixed in a stationary position;
- Do not put pressure on the nails with the nozzle, only touch and slide over the surface so as not to damage the plate;
- the rotating cutter cannot be kept in one place; it must be constantly moved along the surface of the nail;
- You should be careful when touching areas close to the skin;
- It is advisable to work with the cutter wearing a mask, otherwise dust may get into your lungs.
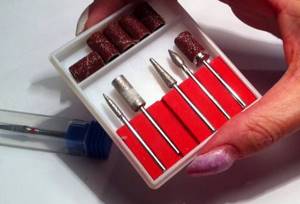
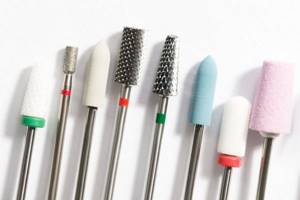
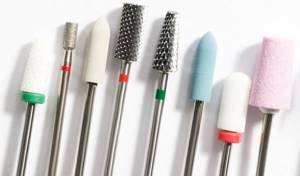
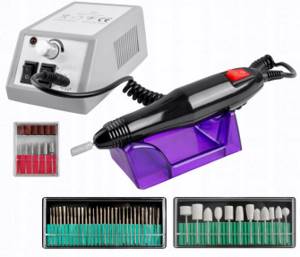
Set of nozzles
Which cutter to remove gel polish with, their main types
You can remove gel polish with different cutters; masters distinguish three main types of them, which differ in shape:
- Globular . Used for processing cuticles, the diameter ranges from 1-2-3 mm. A spherical cutter ideally processes the cuticle and the nail near it; it can also be used to level the surface of the plate and get rid of tubercles and roughness. Disadvantages of this type of attachment: it cannot be used to remove gel polish from the entire nail; if you press hard while working, it is easy to make a cut.
- Kidney-shaped . Used to treat the nail plate and lateral skin folds, remove pterygium and cuticle. This type of cutter has three subtypes - “flame” (used exclusively for removing the cuticle and removing pterygium), “willow” (allows you to easily process the nail folds), and “lentil” (rough skin near the nail folds is processed). You can remove gel polish with a kidney-shaped cutter, but only with the lower part of the nozzle.
- Conical . It can be truncated, regular, with a rounded end, or needle-shaped. All varieties are suitable for removing gel polish; they also allow the master to level the surface of the nail plate and correct its shape. A conical cutter makes it possible to treat ingrown nails.

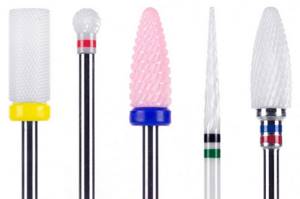
Ceramic
A ceramic cutter has several notches of different depths, can be soft, medium and hard, and is available in oval and/or cylindrical shapes. Advantages of using this type of gel polish remover:
- long service life - they can work 3-4 times longer than all others;
- low vibration - there are no shavings during sawing, only the smallest dust is formed, there is no discomfort for the master and the client;
- minimal heating of the plate - you can remove the decorative coating without braking or reducing speed.
The rotation speed is 20 thousand revolutions per minute, the service life of one cutter with maximum active use is 2 months, and these parameters compensate for the high cost of the nozzle.
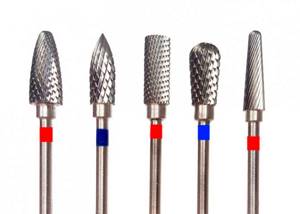
Metal, steel
Metal cutters are made of tungsten or carbide, but they are never used to remove gel polish. These cutters are suitable for processing rough cuticles and pterygium when performing pedicures. Advantages of a metal cutter:
- effective against calluses (relevant for pedicures);
- do not corrode even with active use;
- respond adequately to disinfection even with aggressive agents;
- remove a layer of 1 mm in one pass over the problem area.
The only drawback of a metal cutter is the high risk of exceeding the permissible rotation speed of the product. Service life is six months, maximum speed is 15 thousand per minute.
Carbide
A carbide cutter is made of metal and has several notches on its surface - their depth depends on the hardness of the nozzle. Notches can be straight, oblique and spiral. "Pros" of using a carbide cutter:
- The hardest layer of gel polish is quickly and efficiently removed;
- makes it possible to make recesses for installing rhinestones;
- effectively files the end of the nail.

The technician must carefully monitor the speed of the nozzle in the device, because exceeding the permissible values increases the likelihood of injury to the nail plate and skin significantly. The service life of the carbide nozzle is a maximum of 4 months, the rotation speed is no more than 15 thousand revolutions per minute.
Diamond
Such cutters have a base on which diamond coating is applied with microparticles - the larger they are, the harder the attachment will be. There are two subtypes of diamond cutters:
- sintered - diamond shavings are applied to the base of the nozzle and then baked in an oven, resulting in a solid tool that has a long service life;
- monolithic - diamond particles are applied to the base using glue in several rows and only after that the tool is placed in the oven, a round-shaped attachment is obtained.
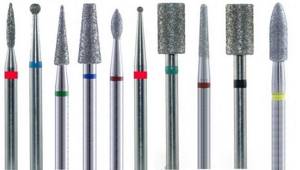
The advantages of using diamond cutters include:
- the ability to remove not only gel polish, but also acrylic decorative coating;
- optimal for cleaning side rollers;
- There are different shapes and sizes of diamond bits available in the market.
The only drawback of a diamond-coated cutter is the need for frequent and thorough cleaning, because the notches are heavily contaminated with dust from gel polish/acrylic/shellac. Rotation speed – maximum 26 revolutions per minute (minimum 18), cutter service life – no more than 4 months.
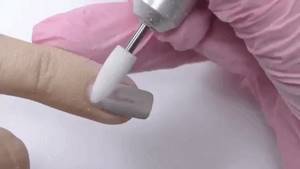
Cotton or silicone
Such attachments are optimal for beginners - they are soft and can be used for delicate treatment of the nail plate. You won't be able to remove gel polish or shellac with a cotton or silicone attachment, but you can use them to properly treat the surface of the nail and get rid of roughness, bumps, stripes and any irregularities.
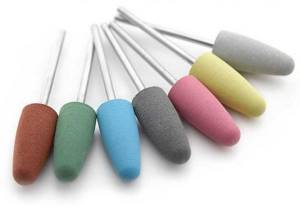
Cutters of this type can be spherical or cone-shaped. Experienced professionals recommend purchasing several types of silicone and cotton attachments at once.
Corundum
Made from a synthetic material resembling ceramic chips. A distinctive feature of a corundum cutter is that it does not overheat during operation, which significantly reduces the likelihood of injury to the skin and nail plate. Such attachments are available with coarse and fine abrasive surfaces - the former are necessary for treating wide areas of nails, the latter for cleaning rollers and cuticles.
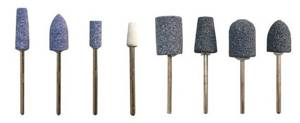
Advantages of using corundum cutters when removing gel polish:
- You can carefully treat even thin cuticles;
- multifunctionality - you can remove the decorative coating and clean the skin around the nail;
- high strength of the nozzle - does not deform even at high temperatures;
- the material is classified as hypoallergenic.
The disadvantage of the corundum nozzle is the need for frequent washing, since the notches on the surface are tightly clogged with dust from the sawed-off gel polish. Small cutters (with low abrasiveness) are used at a speed of 26 thousand per minute, medium and large (with high abrasiveness) - 12 thousand per minute. Service life under active loads is 3 months maximum.
Corn
Corn is a cutter with many notches over the entire surface. It can be made of ceramics; there are also carbide tips of this type. This type of cutter quickly and efficiently removes gel polish and shellac of any hardness, but can also be used for processing the nail plate (leveling), stripping the cuticle and skin side ridges.
The cutter has a streamlined shape, and if the coating is finely abrasive, then it can process both the cuticle and skin ridges, but at a speed of no more than 15 thousand per minute.
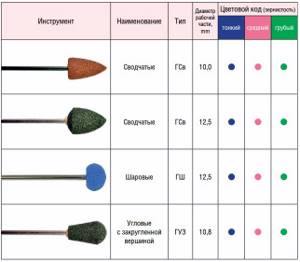
Green and other colors
It is important to know other parameters of the nozzles, which differ in color:
- green;
- yellow;
- red;
- blue;
- black.
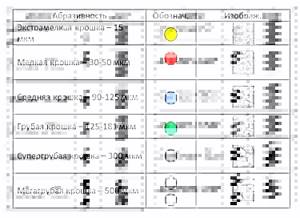
The darker the color, the harder the cutter and the higher the abrasiveness of its surface. For example, black will be the hardest, but green will be universal, its hardness/abrasiveness indicator is average. When choosing, professionals recommend paying attention to the labeling of a specific manufacturer, because their indicators may differ.
The color does not mean the entire cutter, but the strip located directly at the nozzle, at its wide edge, on the rod.
Watch this video about the types and purposes of manicure cutters:
Which attachments to choose to get started
To avoid rough cuts, it is recommended to use medium-hard cutters with blue and red rims to get started.
If you are going to take a hardware manicure course (and without them, starting to work with the device on your own is fraught with consequences for your nails), then it is better to immediately check with the teacher which cutters he recommends for a beginner. Your list might look something like this:
• Diamond cutters “bullet” or “flame”. With them you will lift the cuticle and clean the lateral sinuses of the nails. This also includes the diamond “cone”.
• Ball-shaped diamond tip for cutting cuticles. The size of the boron to begin with can be purchased in a small or medium size.
• “Cylinder” made of carbide or “corn” made of ceramic for removing old coating.
• Diamond “cone” to remove pterygium from the nail.
• Grinders and polishers for final nail processing.
If you plan to work with the apparatus and toenails, then this list, of course, will be large.
Cutters for manicure and pedicure – the same or different?
Hardware pedicure consists of two main stages: treatment of the nails themselves and foot care. When working with nails, there are no significant differences in the use of cutters, since all stages are similar. The only difference is that you may need stiffer cutters for the skin on your legs: it is still rougher.
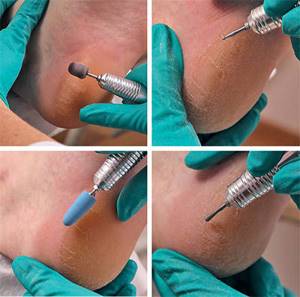
The skin of the feet is also treated with several types of shapes and materials of attachments. This, again, is determined by the problems being solved:
• The “needle” attachment copes well with cracks,
• Silicon carbide cap cutters will help with corns,
• Polishers polish and sand the leather.
How to remove gel polish with a manicure machine: technique
To avoid damage to the nails when removing gel polish with a manicure machine, the manipulation technique must “obey” the following rules:
- The master's elbow must be securely fixed. It is better to rest it on the table/work surface, then the risk of the cutter slipping off the nail is eliminated.
- Remove the gel polish with gentle smooth movements, stroking - first the nozzle approaches the nail, then it is removed. This technique significantly reduces the likelihood of plate overheating.
- The process of removing the decorative coating begins from the middle of the nail, movements are performed slowly. When processing the outer sides of the nail, the movements should imitate sawing.
- The router is never held strictly vertically; it is slightly tilted for safe operation. You should work not with the tip of the nozzle, but with its middle part.
- All movements are performed strictly according to the movement of the cutter. Otherwise, the tool may slip off the nail plate, and this leads to chips of the base and cuts.

- You cannot use manicure attachments as a cutter for removing gel polish, as well as vice versa. Each tool is used for its intended purpose.
- Rhinestones can be cut only with a diamond-coated cutter.
- If the gel polish is removed with a ceramic tool, the technician must wear a mask - this will protect the respiratory tract from the penetration of the smallest dust particles.
- As soon as the layer of decorative coating is removed and the base becomes clearly visible, work with hard cutters should be stopped. The next stage is grinding and polishing the plate with a silicone or cotton nozzle.
Watch this video on how to remove gel polish with a machine:
Which cutter to use for manicure
For manicure, without removing gel polish, you can use the following types of cutter attachments:
- ceramic – you can work with hard nails and cuticles;
- diamond – remove pterygium (a thin layer of skin on the nail near the cuticle);
- metal – excellent for cleaning side rollers;
- silicone, cotton, combined - can be used from the beginning to the end of the process.
The craftsman should have a wide variety of cutters; their various shapes are also useful - cone/reverse cone, needle/ball, bur.
Cuticle and pterygium
Why does the cuticle and pterygium quickly grow after a hardware manicure?
Answer:
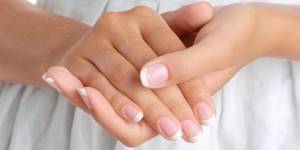
The rate of growth of the cuticle and pterygium is individual for everyone. After a good hardware manicure, your nails will remain in perfect condition for 5-7 days, and then you need to maintain the effect at home.
If, after a hardware manicure, the skin around the nail and pterygium began to grow faster than usual, most likely the master did not do enough work and did not completely remove the rough tissue around the perimeter of the nail, which additionally stimulated their growth.
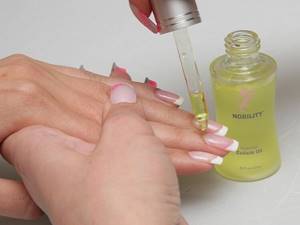
To maintain the cuticle in perfect condition, every 5-7 days after a hardware manicure, apply oil or remover to the cuticle and gently push it away with a pusher or an orange stick.
Applying wax also gives good results. It nourishes the cuticle and prevents drying both during normal wear and after contact with water.
Why does the cuticle hurt after a hardware manicure and what is best to do?
Answer:
If you have sensitive skin and nearby blood vessels, then after a hardware manicure your cuticle may hurt. Warn the specialist in advance about skin sensitivity, speak during the procedure if any discomfort or burning occurs.
Hardware manicure completely removes the cuticle, the nails are left without protection, and if the skin and nails are sensitive, or the master removed the rough skin very intensively, painful sensations may appear.
Intensive nourishment of the cuticle with oil, application of wax to protect and seal the tissues around the nail, as well as ointments with a slight anesthetic and healing effect, for example, silver ointment, Sudocrem or Rescue balm, will help remove the symptoms.
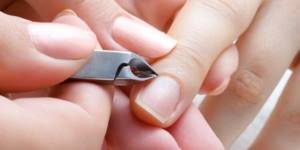
Many professionals with dry, creeping cuticles recommend not removing them with attachments, but cutting them off with scissors or tongs, so as not to tear the skin and avoid injuries in this area.
How many days after a hardware manicure should the cuticle appear?
Answer:
This process is individual for each client and, of course, the accuracy and thoroughness of the master’s work matters. You should aim for a period of 3 to 7 days. After this time, the skin will begin to grow again. If this happens faster than usual before the procedure, the master either removed the skin too intensively, triggering active processes of regeneration and growth, or the cuticle was not completely removed.
How long does it take for a pterygium to grow back?
Answer:
The pterygium is a continuation of the cuticle. This is a thin layer of skin that adheres to the nail and grows further along with it. Accordingly, if the cuticle begins to appear 5-7 days after a hardware manicure in the absence of intense hydration, then plus another 2-3 days, and thin layers of pterygium will also begin to grow along with the nail. This is a natural process. The timing may vary slightly, by 2-5 days, depending on the individual characteristics of nail and cuticle growth.
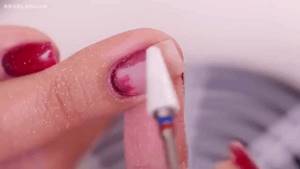
How to stop bleeding from the cuticle?
Answer:
If during a manicure the cuticle is damaged with scissors or forceps until it bleeds slightly, you must:
- disinfect the area
- stop the bleeding
You can disinfect with any disinfectant approved for contact with skin, or with an antiseptic. Sterillium, Chlorhexidine, iodine, hydrogen peroxide will do.
Hydrogen peroxide will help stop bleeding. Soak a cotton pad in it and apply it to the wounded area. The blood turns into foam, further clearing the injury area of caked particles. After 3-5 minutes you can continue the procedure.
In case of intense bleeding, when a vessel is damaged and the blood does not stop for a long time, it is better to apply a disc soaked in peroxide to the area, complete the manicure on the remaining nails, and treat the injured one the next day.
Of course, the client will have to come again, but it’s better than possible detachments and poor-quality coverage for fear of further injuring the bleeding cuticle.
How to dry the cuticle before a hardware manicure?
Answer:
The operation of the device and the choice of cutters for dry and wet cuticles are slightly different. It is necessary to focus on the client’s hands every time.
If your hand skin and cuticles are damp, you can dry it before the procedure:
- An alcohol-based cleaner or dehydrator or alcohol. It evaporates quickly and in a minute you can start working.
- Regular baby powder. Apply it to the cuticle area and brush off the residue with a soft brush. During the processing process, application can be repeated several times if the previous layer is moistened. The moistened powder can be removed with a cleaner.
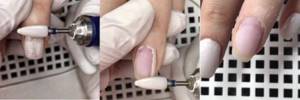
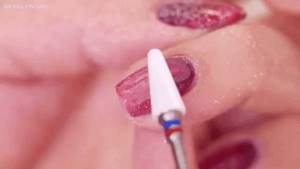
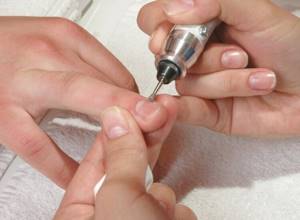
How to remove gel polish with a machine yourself at home
You should remove gel polish yourself at home using a device according to a clear algorithm:
- Remove topcoat and decorative/color coating. The movements are performed long, longitudinally, in the direction from the cuticle to the end of the nail. The speed is optimal, only the middle part of the plate is processed, the middle part of the cutter is used in the work (the most convex part - the “belly”).
- Move to the side parts of the nail and remove the gel polish here with the tip of the cutter. The rotation speed of the tool does not decrease; you need to monitor the pressure - it should be uniform, without applying any effort.
- The end of the nail (free edge) is processed with the middle of the cutter; it should not be positioned vertically in relation to the plate, but at an angle of 10-15 degrees. This completes part of the work of removing the decorative coating.
- Clean the base layer with a cone-shaped corundum cutter. The speed should be reduced to 10 thousand per minute.
- The final stage is to walk over the surface of the plate with a buffer with an abrasiveness of 240 grit without applying any effort (without pressure).
Watch this video on how to remove gel polish with a machine at home:
How to remove a cutter from a manicure machine
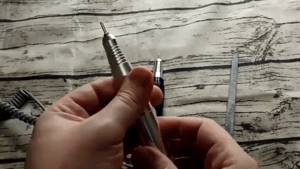
The cutter is removed from the manicure apparatus using different methods, which differ depending on the type of attachment clamp in the apparatus.
Manual clamp
Typical for cheap equipment intended for home use without active use. The mechanism consists of a button and a washer. To remove the cutter, you need to press the button (it is located on the handle body) and unscrew the washer - the attachment will easily come out. To install a new one, you need to press the button again, insert the desired tool and tighten the washer.
The manual clamp is not intended for frequent use; if you constantly change attachments, the equipment will simply break.
Semi-automatic clamping
A special feature of this type of fastening is the presence of a collet, which is a split sleeve (the nozzle is clamped in it). In order to remove the cutter, you need:
- Make a half turn with the ring (upper part of the handle) until a characteristic click appears.
- Remove the cutter without changing the position of the ring.
If you need to insert a new nozzle, then to clamp it you need to turn the ring half a turn in a counterclockwise direction.
Semi-automatic clamps are the most common in manicure machines.
Automatic clamp
The nozzle is clamped in its working position automatically when the device is turned on, so to remove the cutter you just need to disconnect the equipment from the power supply and pull the cutter towards you.
This clamp provides the easiest way to change manicure attachments and get rid of decorative coatings such as gel polish or shellac. It is installed on expensive equipment.
Watch this video on how to insert a router bit into the router handle:
Auxiliary tool for removing gel polish
It is quite possible to remove gel polish only with a cutter, but to carry out the entire manipulation efficiently and properly prepare the nail plate for applying a new decorative coating, you will need other tools:
- orange stick – cleans the inner surface of the nail, moves the cuticle, removes too thin cuticles;
- nail scissors - cut the cuticle and side skin ridges (if they are especially rough);
- metal spatula - pushes back the cuticle, cleans the subungual space from dirt, cleanses the pterygium.

It is highly desirable that the master’s workbench is equipped with an extractor/vacuum cleaner - when removing gel polish with cutters, a lot of dust is generated, which can cause coughing, shortness of breath and allergies. Its instant removal is a comfort for both the master and the client.
Discomfort
What to do if your nails burn during a hardware manicure?
Answer:
Do not remain silent and immediately tell the master about it. He will slow down the speed of the cutters and work in longer, smoother strokes without stopping too long on sensitive areas. Usually this is enough to remove the unpleasant burning sensation from a hardware manicure.
There are several causes of burning:
- High rotation speed of cutters;
- Prolonged treatment of one area, which causes heating of the skin or nail;
- Increased sensitivity of the skin to mechanical impact from cutters;
- An allergic reaction to any of the cosmetics used in manicure.
Consider them all as options to understand what is going on in your situation.
What to do if hardware manicure makes your hands rough?
Answer:
Often, when an inexperienced master works, excess layers of skin in the area of the cuticle and side ridges are removed, which leads to a more intense regeneration process in these areas and to more intense coarsening. What to do?
Additional hydration and protection of these areas from drying out and exposure to external factors will help.
- Use nourishing and protective cream every morning and evening, and every time after contact with water;
- Do your homework with gloves;
- Apply nourishing masks to your hands at night under plastic or silicone mittens. Do this 2 times a week.
- Try cold or hot paraffin therapy at home or in the salon - 1-2 times a week for a month.
Paraffin therapy: everything you need to know about this useful procedure
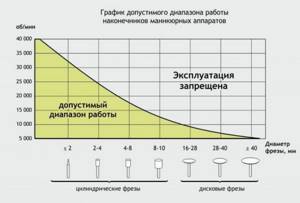
At what speed should you remove gel polish with the machine?
It is imperative to monitor the speed when removing gel polish with the device: 12 thousand revolutions per minute is considered optimal for ceramic attachments, and 20 thousand per minute for carbide, metal and others. Professionals recommend using a speed of 30-40 thousand revolutions per minute, which will prevent the nail plate from heating up.
Beginners can stop at 30 thousand revolutions per minute to avoid damaging the client's nail plate or skin.
Forms
The shape of the cutters also varies: the corn shape is usually found in ceramic bits, while cylindrical or cone-shaped ones are found among metal ones. There are other forms, but manicurists give greater preference to the above. In accordance with the degree of rigidity, it is necessary to determine the scope of work. The type of cutter you will need depends on which nails the master will work with. The degree of hardness is indicated at the base of the tool: the hardest are green or black.
After the gel polish has been filed off, the remainder of the manicure is removed with a soft buff. That is, removing old manicure with a machine and treating nails with a buff is much safer compared to other outdated methods.
How to clean a cutter from gel polish
You need to clean the cutter from gel polish after each use; the process is performed in the following order:
- Wipe the attachments with a napkin or small brush to remove dust and skin flakes. This is done “dry”, without the use of water or any antiseptic solutions.
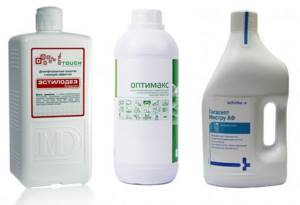
- Disinfect cutters with special solutions Estilodez, Gigasept, Optimax. They are certified, contain anti-corrosion additives, and have antimicrobial, antiviral and antibacterial effects.
- Wash the cutters in a solution with detergent. Dry with cloth or thick paper napkins by blotting.
- Sterilize the attachments. This can be done in an autoclave, glasperlene apparatus or dry-heat oven, but these options are only suitable for salons. At home, you can use the oven as a sterilizer, after first cleaning it of grease and dirt.
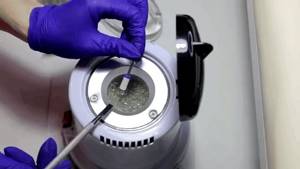
Glasperlene apparatus for sterilizing cutters
The cutters are kept in disinfectant solutions for no more than 20 minutes. When sterilizing in the oven, the attachments are laid out on a baking sheet covered with foil. The oven is heated to 180-200 degrees, the holding time of the attachments is 20 minutes, after which everything is turned off, and the cutters remain in the oven for another 20 minutes.
For home processing of attachments, you can use special craft bags: the instrument is placed in them, they are sealed, and only after that they are sent for sterilization. There is a strip on the surface of the craft bag that changes color at a certain temperature - this indicates the sterility of the cutters.
How to choose a gel polish remover
When choosing a gel polish remover, you need to consider the following nuances:
- weight of the device - 100-200 g is considered optimal, which makes the handle of the router almost weightless and greatly facilitates the work of the master;
- vibration level - the lower it is, the less the master’s hand will get tired, the less noise there will be from the equipment;
- number of revolutions (power) – 30-35 thousand per minute is considered optimal;
- type of cutter clamp - can be manual (suitable for home use), automatic and semi-automatic;
- a set of attachments - a novice master can use a minimal set, an experienced one will probably buy them individually, focusing on his own needs.
Cost of cutters
The cost of cutters depends on the material from which they are made, the “name” of the manufacturer and retail outlet, but the average values are as follows:
- diamond cylindrical with a round tip – 150 rubles;
- ceramic type “corn” with a blue stripe – 450 rubles;
- silicone polishing – 150 rubles (size 15 mm);
- carbide “needle” – 200 rubles;
- “corn” carbide with red or blue markings – 300 rubles;
- felt (cotton) nozzles, set of 6 pieces – 200 rubles.
We recommend reading about what you need to know when choosing a gel polish lamp. From the article you will learn why you need a lamp for gel polish, how it works, and how to choose a lamp for drying gel polish. And here is more information about how to remove shellac at home.
Removing gel polish with cutters is considered a safe, quick way to remove decorative coating before a new manicure. A competent choice of attachments and the correct technique for performing manipulations allow even beginners in the nail industry to do a high-quality manicure. And subsequent disinfection of the cutters and their sterilization makes the process safe even when serving numerous clients.
Side bolsters
Why do the side ridges quickly become rough after a hardware manicure?
Answer:
The side ridges can become rougher faster or due to too intense and deep skin removal with a cutter in this area, when the process of growth of new cells to protect the tissue is activated. This usually causes the skin to become more sensitive.
Active moisturizing, nourishing and protecting the rollers with wax immediately after a manicure and during the first week after the procedure helps.
During hardware manicure, the side rollers are processed with a diamond fissure cutter and a cone with a rounded end with a blue or red notch at a speed of 18,000 - 20,000 revolutions. The cutter lies parallel to the finger in a position either above or below, whichever is more convenient for you to work with. Rotation mode – from the finger.