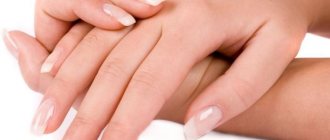
What is nail powder
Crushed acrylic, which instantly hardens upon contact with gel or varnish, is powder for manicure. The material is produced in jars and sold in professional stores for nail artists, although given its popularity, you can try looking for the product in regular household chemicals stores. Previously (and still) the powder was used in dentistry to strengthen tooth enamel. Nowadays they also get unusual manicure designs.
The material thickens the nail, protecting it from cracks, breaks and other damage, which is why it is used to build up and strengthen plates. In addition, manicure powder has the following beneficial properties:
- Hypoallergenic. Can be used harmlessly.
- Wear resistance. Extended or strengthened nails do not break, chip or flake.
- Elasticity. A thin layer of material does not deform the nail plate.
- Strength. Due to this, the substance is also used for artistic modeling.
- Closer to natural nails. If you choose a natural shade, the plates will not look like extensions.
The advantage of using powder for design is the fast speed of the procedure - the material hardens instantly. Flaws:
- Difficulty of processing. It takes practice to learn how to quickly and accurately apply the product.
- Smell. Acrylic nail powder does not contain the most fragrant fluids. They are not dangerous (if you do not inhale the vapors of the material that has not yet hardened), but because of this feature, it is recommended to work with the substance in a mask.
- No therapeutic effect. Keep in mind that strengthening occurs only at the physical level. The powder will hide the delamination and prevent the plate from breaking, but if fragility appears due to vitamin deficiency or some kind of disease, it should be treated, so consult a doctor.
Reviews
Natalya, 28 years old, Nizhny Novgorod: It was impossible to grow long nails; constant household chores reduced all efforts to nothing. And I wanted it so much! So I decided to build up acrylic ones, my master recommended this option. And I was not disappointed for a second. I chose the right length - and there was no feeling of discomfort, only advantages.
Anya, 31 years old, Saratov: If you need something original for a special event, then you don’t even have to buy a new thing. You can please yourself and surprise others with voluminous decor on your nails. Every time the master surprises with something unusual, the last time she used sparkles, the result was such a shimmer that it was a pity to part with such beauty.
Olga, 23 years old, St. Petersburg: I was irritated by white dots on my nails, I painted it over with regular varnish, but it didn’t last long. I was looking for a way to solve the problem and settled on applying acrylic powder. We selected a base so that the shade was pink and matched mine, I also did a French coat - everything is perfect, my nails always look well-groomed.
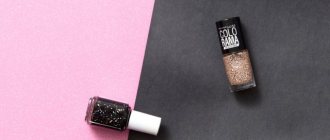
Types of acrylic powder for nails
The product is sold in powder form, supplied in jars, but varies in structure, degree of grinding, color and purposes of use. Highlight:
- transparent;
- colored;
- in the form of sparkles;
- neon;
- camouflage;
- finishing powder.

Transparent
The smallest, matte, when applied is no different from natural nails. Used to create a base layer during extensions. Transparent acrylic powder hides defects and irregularities well, so it is used to form a free edge. In addition, this type of material can be used for three-dimensional artistic modeling to create interesting designs. Transparent powder for French and aquarium extensions is especially popular.
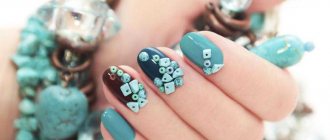
Colored
This is acrylic powder for nail design. The material is supplemented with a coloring pigment. They can be used for single-color coating, independent design, and drawings. Unlike ordinary varnish, colored acrylic powder adheres well to the nail plates without a fixing layer, so the manicure turns out to be light, but at the same time durable. Widely used for nail art, mother-of-pearl base for festive (for example, wedding) designs.
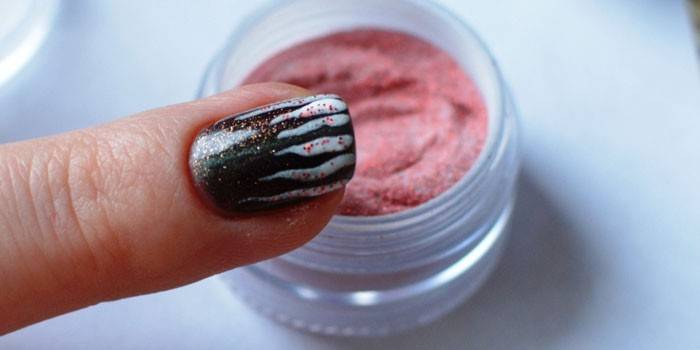
Sequins
A type of clear or colored powder. In the first case, no coloring pigments are added to the material, but the components include reflective components, due to which a mirror coating is formed upon application. In the second, the substance is given a certain shade. Glitter powder for nails is used independently or as a design element.
Neon
This is a colored powder, but so bright that it seems to glow from within. The texture of the material is denser than previous options. Thanks to this feature, neon powder is convenient to use for sculpture. Due to its bright colors, it is also more often used for youth designs. Interesting nail art is created using neon on long extended nails.
Camouflage
Powder for manicure has a dense structure, has a shade close to the natural color of the nail plate, but is not transparent. Used as a base for correction purposes. It hides defects well, evens out, eliminates delamination, and masks yellowness. In addition, camouflage powder is used to lengthen the nail plate. Distinctive feature: texture, due to which the properties of the material are manifested even when applied in a thin layer.
Finish
The variety that is used for the top, final, coating. Depending on the type, the result may be a smooth surface (glitter) or a velvet coating effect. The grinding also varies – large sparkles or fine powder. It is laid out on the nail plate in the thinnest layer, but has the same strength and elasticity as other types.
Master class from a blogger
Of course, the easiest way to do a mirror manicure is after a video with a master class. After all, even the most complete text will not tell you about all the nuances that are so important for perfect nails!
In this video, Yulia Kotova (blogger MixStyleCappuccino) will talk about the most trendy version of nail art for this summer - mirror manicure with a holographic effect. The trendy “hello from the 80s” is a hit on all beaches and festival grounds this season. Experts say that spring and summer 2022 will also be the peak of popularity for mirror manicure.
Be sure to try it again! To do this, watch the video tutorial:
Flock
This is a separate type of powder for manicure, not related to acrylic in any way. It is a fine fiber made from viscose, cotton or wool. Flock fibers differ not only in the material they are made of, but also in length, so using it you can create different effects on your nails: plush, velor, or soft velvet. A distinctive feature of flock is its fragility, but it is a myth that the coating can be damaged by contact with water. The appearance of wet nails with this design will deteriorate, but to restore it you just need to dry the surface.
Strengthening nails with biogel under gel polish in stages. Strengthening nails with gel. Instructions
Strengthening nails under gel polish using gel can be done with a single-phase or three-phase agent. If the product is single-phase, then only this gel is applied to the prepared nail plates; if it is three-phase, then three different products are used: base, constructor and finish.
Experts also pay attention to other necessary conditions:
- In order for the gel coating to last longer, it is not recommended to use any moisturizer on the skin of the hands before the procedure;
- if a bath was made before processing the plates, then it is better to carry out the strengthening procedure the next day;
- An additional product – a rubber base – will help achieve a perfectly flat surface;
- To avoid chips and cracks, at each stage of strengthening it is necessary to carefully seal the end of the marigold.
The most important thing is that for the result to be pleasing to the eye, and for the manicure to last at least 3 weeks, you should complete the following three mandatory steps.
Step 1: base
Base is a transparent material from which the strengthening procedure begins. Apply the product with a thick synthetic brush in a thin layer. Dry the base in a lamp, the exposure time is from 30 s to 1 min (this depends on the quality of the lamps used and the manufacturer of the material).
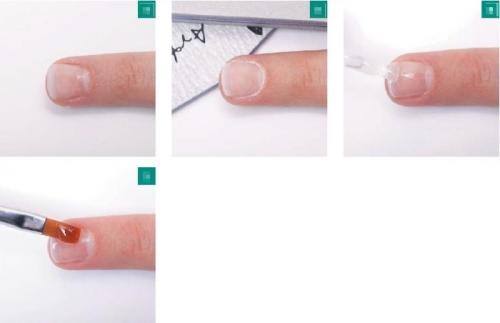
If a single-phase product is used, then the gel is also applied in a thin layer and dried in a lamp.
Step 2: Base Layer
When the base has dried, they begin to work with the main layer, it is also called construction or sculpture. Since strengthening does not involve the process of changing the shape and length of the nail, the product is applied quite densely, but not in a greasy layer.
Instructions for strengthening nails with gel under gel polish in photo
In this case, the gel should not be attached to the cuticle and side ridges, which can subsequently lead to peeling and chipping of the material. If the product does get on areas close to the nail, it should be removed with a cotton swab dipped in a degreaser. Drying the sculpture layer in a lamp.
Step 3: Finish
Top Coat is the last, final layer. Before applying it, you need to make sure that the previous layers lay flat; if this is not the case, then you should make a sawdust of the unevenly distributed material with a soft buffer. The finish is applied with the same dense synthetic brush and polymerized in a lamp. The final touch is to remove the sticky layer (if there is one) with a special napkin.
The procedure is completed by applying gel polish or other coating. When choosing gel polish, do not forget about the top coat, which will allow the product to last much longer.
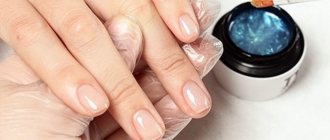
How to work with acrylic powder
Using acrylic powder is challenging because to get a quality result, you need to act quickly, which requires practice. To understand how to work with the material, it is recommended that you not only carefully read the instructions described below, but also watch the video (preferably several times). Keep in mind that it is better to allocate 1.5-2 hours of free time for extensions, and if you are going to do a design, expect that the procedure may drag on for an indefinite period, especially if you have no previous experience.
For nail design
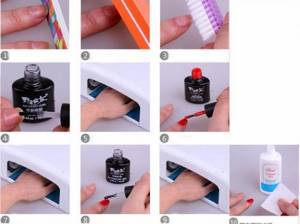
Acrylic powder is ideal for matte designs, which have recently become more popular than gloss. Instructions for the simplest single-color powder coating:
- Degrease the nail plate with a primer. If there is no special liquid, use alcohol or salicylic acid.
- Apply manicure base.
- Depending on the base chosen, dry the coating under a lamp (several seconds) or in air (up to one minute).
- Apply gel polish on top that matches the color of the selected powder.
- Open the jar of material and dip the edge of your nail into it. Ideally you should "seal" it.
- Take a special spatula and sprinkle powder on top so that it covers the entire nail plate.
- Dry the coating in a UV lamp for 30-40 seconds.
- Shake off any remaining powder with a stiff brush. It can also correct unevenness and remove other flaws.
- Repeat for each finger.
If you want to make a design, at stage 4, dry the nail in a lamp, and then use transparent shellac to depict the selected design on the plate. Next, repeat all steps, starting from step 6. The powder will remain only in those places where the undried varnish was. If you want to get a more complex design or cannot draw the design you like on your own, use special stencils (sold in online stores for nail artists).
- Buckwheat soup - recipes with photos. How to cook delicious buckwheat soup with broth or milk step by step
- Nevus - what is it with the photo. Causes and surgical removal of nevus from the body or face
- Helicobacter pylori - what kind of bacterium is it? How to identify and how to treat Helicobacter pylori infection in the stomach
For extension
Acrylic powder is ideal for nail extensions - the result is natural, durable, but elastic. Before the procedure, the fingers must be treated: the old coating is removed, disinfected, degreased, and the cuticle is removed or pushed back. In addition, the nails need to be filed a little on top (don’t overdo it!) to ensure good adhesion of the material to the plate. Complete instructions on how to do extensions with acrylic powder:
- Place a mold or tip on each finger.
- Mix the powder with the monomer (another name is liquid) until a thick consistency is obtained.
- Take a small ball of the resulting mixture with a brush.
- Distribute it over the nail plate, starting from the cuticle and towards the free edge.
- Wait for the acrylic mixture to harden. This happens very quickly: from 45 to 60 seconds.
- Remove tips or forms.
- Apply a special activator on top of the treated nail plate. This will ensure strength.
- Take a nail file and file the free edge to the desired shape.
- Treat the coating on top if it is too thick or there are uneven spots.
- The last step is to polish the nail plate with a buff (a special rectangle, on each side of which there is a file, different in degree of abrasiveness from others).
Remember that you need to act quickly. After all, if you do something wrong, then before you build it up again, you will have to remove the old coating, and this is also time-consuming (see full instructions in the section just below). After the procedure is completed and you are satisfied with the result, you can apply regular or gel polish on top, draw an interesting design, or perform artistic sculpting, also with powder.
To strengthen
This procedure can be carried out in two ways. The first is simpler and less costly in terms of time and materials, the second imitates a similar manipulation in a salon. Which one to choose depends on the degree of weakening of the nails. Instructions for the first one:
- Apply base coat.
- Gently sprinkle the nail plate with powder.
- Dry your fingers in a UV lamp for 20-30 seconds.
- Remove any remaining substance with a brush.
- Apply a special base on top.
- Dry your nails in the lamp again.
- Ready! You can paint the top with a plain varnish, make a design, or leave everything as is.
For the second method, you will need a strengthening kit and additional tools: a brush and a sanding file. How to treat your nail:
- Apply manicure base.
- Dry the nail in a lamp.
- Open the jar of monomer.
- Dip your brush into it and then dip it into the powder.
- Distribute the resulting drop over the nail plate in the direction from the cuticle to the free edge.
- Wait for the acrylic to dry (45-60 seconds).
- Sand the surface with a nail file, eliminating any unevenness.
- Cover your nail with polish.
- Repeat steps 3-8 one more time.
- Apply medicated oil to the cuticle.
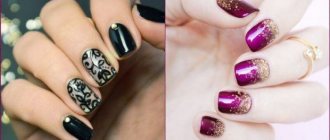
Mirror manicure trends 2022
Especially for you, we have compiled a selection of the most stylish beauty ideas for mirror nail designs. Take note and experiment!
Read also:
Black manicure: 20 of the coolest and most fashionable options
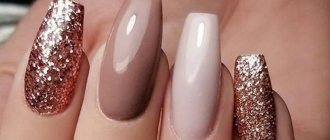
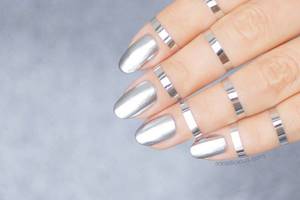
Classic - mirror manicure
Gold and silver mirror manicure looks beautiful and versatile. This design will suit any outfit - to school, to the office or to a social event.
By the way, a very interesting solution is to combine a mirror manicure with jewelry and accessories. For example, with rings.
Mirror French
An unusual, but more discreet option is a French manicure with mirror elements.
Read also:
Red manicure: photos, ideas and examples
A mirror moon manicure looks no less advantageous.
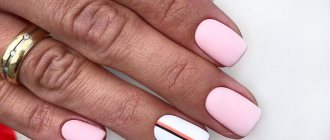
A riot of colors
If you want your nails to look really vibrant, choose bold colors.
Read also:
Fashionable manicure for summer 2022: photos and ideas, photo gallery
Mirror manicure with decor
You can also dilute the plain coating with decor.
How to delete
The procedure for removing acrylic powder from nails is simpler than applying it itself. The main thing: follow the instructions, do not try to simply file off the powder and gel polish. Aggressive mechanical action is fraught with deterioration of the condition of the nails. Also, keep in mind that the removal procedure depends on how the material was applied. Steps to remove acrylic powder used for reinforcement or design:
- Remove the glossy finish with a nail file.
- Dip a cotton pad in nail polish remover.
- Place it on the nail plate and wrap it with foil on top.
- Leave for about 10 minutes, during which time the product will cause the coating to soften.
- Remove the covers.
- Remove any remaining powder and shellac with a nail file and an orange stick.
Nails extended with acrylic powder are a little more difficult to remove. For this procedure you need to purchase a special remover. Ideally, the special liquid will be produced by the same brand as the powder. If purchasing a remover is for some reason impossible or problematic, you can use nail polish remover, but it must contain acetone. Instructions for removing acrylic powder:
- Soak a cotton pad with remover.
- Apply to your nails so that it completely covers the plate.
- Wrap it in foil so that no air gets inside.
- Leave on for 30-40 minutes (you may feel a burning sensation).
- Remove the foil.
- Very quickly, before the acrylic hardens again, remove the coating from the nails with some sharp object.
- After all residues have been removed, be sure to treat your fingers with oil or rich cream.
Alternative removal methods are also carried out using a remover. They must be used carefully so as not to damage the delicate skin of your fingertips:
- First alternative method. Pour the remover into a container and place your marigolds in it. It is important that the product acts on the plate, but not on the skin. Cover your hands with a towel and wait half an hour. Then quickly remove the acrylic with a sharp tool.
- Second alternative method. Pour the remover into the vessel, and place a smaller container with hot water there. This will allow the product to work more effectively. Then do the same as in the first option.
Disadvantages of the material
There are not too many disadvantages of acrylic powder, but you need to know about them when deciding whether or not to use this material for manicure:
- When working with some types of acrylic powder, a sharp, very unpleasant odor may arise, which can even be intoxicating. Therefore, this substance should only be used in a well-ventilated area and using a medical mask. However, today such products are becoming less and less common on sale; they are being actively replaced by acrylic powders, which have a neutral odor.
- This substance is quite expensive, which often discourages those who want to get an acrylic manicure. However, it is worth considering that one jar of powder lasts a long time, especially when it comes to manicure at home.