Summer is the most wonderful time of the year, which pleases with its pleasant, carefree mood. On warm summer days you really want something bright and juicy, so a manicure with a fruit print would be a great idea. Today there is a large selection of fruit manicure options available. But what fruit will be depicted on your nails depends only on your choice. Even in gray, cool weather, a manicure with bright fruits will give your look a summer, positive and bright mood. What fruits are popular in manicures?
Stunning manicure gel polish with bright fruits
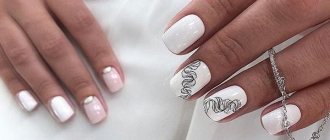
The most important feature of fruit manicure using gel polish is that it uses the brightest and most saturated colors of varnish. A manicure with images of slices of watermelon, kiwi, orange or juicy strawberry looks very relevant and attractive. Such a manicure will guarantee a good mood in any weather.
Watermelon mix: manicure with berries
A modern girl should always be well-groomed in any weather and under any circumstances, and a stylish manicure is one of the main conditions for a neat and well-groomed look. One of the most fashionable and stylish fruit options is a manicure with a picture of a juicy watermelon. For watermelon manicure, black varnishes are usually used (to depict the seeds), a couple of shades of green (to depict the peel) and, of course, red or scarlet (to depict the pulp). The pulp of summer watermelon looks great on nails of any length. The design is relevant not only on extended, but also on natural nails. This berry manicure is cheerful, bright and will definitely attract the attention of others.
How is the drawing done?
Before you start painting on your nails, you should practice using plastic tips of the appropriate length. You can try on the finished overlays, this will help determine the desired size and location of the pattern. Manicure is done in stages.
- First, a harmonizing varnish is applied to the little finger and ring finger. Gray-beige colors go well with fruity greens. The varnish is applied in 2 or 3 layers, drying each one well.
- A little green varnish is poured onto a plastic palette. They paint the thumb, index and middle fingers on each hand. The design will be located only on 2 nails, the plate of the thumb will remain monochromatic.
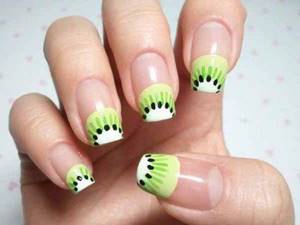
- In the center of the nail, draw an elongated white oval - the middle of a kiwi. Using a thin round brush dipped in white varnish, thin strokes are drawn from the oval to the edges of the nail. Small black dots are placed in the spaces between the white rays. They are easy to draw with a manicure dot.
- You can draw half a kiwi slice on your thumbnail. A white oval is drawn at the very edge of the nail, white rays and black dots imitating bones are located only on one side. This decor looks casual and fun, it will perfectly complement summer outfits.
- The finished manicure is covered with a thick layer of transparent coating with a drying effect. To keep the design bright, the top is updated every 2 days. A drawing applied according to all the rules can last a whole week.
Popular manicure with fruits: pineapple mood
Very often you want to please yourself with an unusual, refreshing and bright manicure. If you decide to move away from the usual classic manicure, give your look a fresh and bright look - paint a sunny and unique pineapple on your nails. This tropical manicure is universal and suitable for any time of year. Your pineapple nails will cheer up not only you, but also the people around you. Yellow, bright, original pineapples with cheerful green feathers look fun, cheerful and relaxed in any weather. But how the exotic fruit will be applied will depend on your imagination and desire. This could be a drawing of one juicy fruit on one or two nails. Or you might decide to put three or four small pineapples on one finger and add a little gold. There are many options for pineapple manicure.
More kiwi
If you want to make more than one fruit, you can use stickers. Or carefully paint them with a thin brush. This manicure option looks more aesthetically pleasing on long nails.
- For the background, you can use either a clear varnish or a soothing pastel shade. This will make the kiwi pattern more vibrant.
- On the side, at the base of the nail plate and at the top, you can draw half a fruit. Only now paint the skin of the kiwi with brown varnish.
- Use green to draw a circle, then use light to draw the middle. And use dots to make small black dots. Draw the skin of the fruit on top with brown color.
- Draw a few more kiwis in this way.
- Apply top coat over the design.
It will be especially impressive if you paint a lot of kiwi on one or a couple of nails, and leave the rest with a monochromatic coating made in soothing shades.
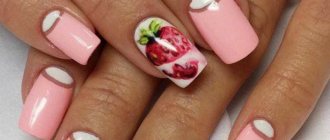
Manicure with fruits: photo of ripe strawberries on nails
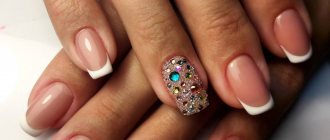
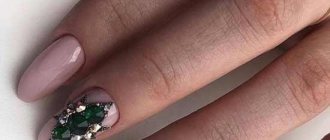
What would a fruit manicure be without delicious, juicy strawberries? The strawberry design option is a wonderful opportunity to add variety to an ordinary classic manicure. Modern elements of nail art will make your manicure attractive and irresistible. The “strawberry” design can be complemented with rhinestones, stones or sparkles. A beautiful strawberry manicure will easily become the highlight of your beach manicure. The tandem of strawberries and cream looks great on nails.
Manicure with kiwi fruit on nails
We are accustomed to the fact that fruits and berries are table decorations. Today, fruits can be everywhere: in clothes, in bright prints, in hairstyles in the form of beautiful hairpins and, of course, in manicures as designer stylish designs on nails. And what would a fashionable manicure be without a beautiful green color. Therefore, fruit manicure with a kiwi image is the trend of the season. By choosing this manicure option for yourself, you get an excellent and modern look. When depicting a fruit like kiwi, you will use shades of green, white and black, and this combination looks very unusual on nails of any length. By decorating the nail plate with a small amount of rhinestones, beads or stones, you will get a unique and charming nail art.
Nail preparation
To make the drawing look perfect, you need to do a hygienic manicure. The designs are suitable for nails of moderate length, oval or rectangular, with rounded tips. The length is carefully leveled using a coarse file. To make the surface smooth, it is polished with a buff or a machine with various attachments.
The cuticle is removed using a liquid containing mild acids. It dissolves dead cells and softens the skin. The roller is pushed away with an orange wood stick, and the excess is cut off with pliers. The nail plate should be free of cuticle residue and absolutely smooth.
The surface of the nails is degreased with a special product or nail polish remover. After drying, a protective coating with vitamins, calcium, and silk fibers is applied to them. It levels the surface and prevents the varnish from chipping.
Manicure ideas with raspberries
Raspberry on your nails is a simple, but very beautiful and refreshing summer manicure option. But its simplicity does not detract from its dignity. The raspberry color itself will give your manicure an attractive look. And the most important thing is that it doesn’t matter whether your nails are short or long. Raspberries look advantageous in all variants due to their visual lengthening. Bright and juicy raspberries will always lift your spirits. In addition, raspberry manicure has a great advantage - such a manicure can be done in light, pastel colors, and at the same time it remains bright, rich and juicy. Raspberry manicure is a great field for design solutions and artistic creativity.
"Fruit" French
One of the original versions of the “Kiwi” manicure is a combination of fruit design and French manicure. The result is an unusual, bright and effective version of the French jacket.
- The background coating should be made either transparent or a nude shade.
- Instead of the classic “smile” line, make a kiwi drawing. To do this, use a semicircular stencil to make your manicure neat.
- Use a light green shade as the background for the smile line.
- Highlight the very top of the protruding edge of the nail with white or another light shade.
- From this middle, draw thin green lines.
- Use dots to make small black dots.
- Apply top coat over the design.
You have created an unusual, stylish “Kiwi” nail design. Of course, this manicure option is not suitable for an official business style. But for some beach party or vacation it is ideal.
Bright manicure with fruits: apple design
Another of the most popular and fashionable fruit manicures is apple. Depending on your mood, the background of the main manicure can be varied. Apples can be made in red, green, orange or yellow. An apple painted on the tip of the nail will create the look of a French manicure. Or you can even perform a French manicure yourself, and decorate one or two nails with juicy apples.
Combined with pastel shades
Kiwi on nails will look even more impressive in combination with a plain coating made in pastel shades.
- On several nail plates, apply a light-colored background coat.
- Other nails have a light green or yellow background.
- Then apply a brighter shade of green on top. Just don’t need to paint over the entire plate with it.
- On one side, paint the center of the fruit with light varnish. There are thin white stripes around it.
- Use dots to make black dots.
- Apply top coat on top.
You have a stylish design that combines the main fashion trends - pastel shades and fruit themes.
Lemon and lime are excellent fruit options for a beautiful manicure.
What would a fruit manicure be without lemon or lime? The image on the marigold of a whole lemon with green leaves on a plain background is a particularly relevant option for a fruity modern design. Choose a base in mint or soft pink tones, and you will get a stylish and original manicure. You can also draw a lemon tree or a lemon twig on one nail.
Step-by-step instructions for creating a design
How to draw kiwi on nails? This can be done with a thin brush, or you can use a stencil or stickers.
- Apply base coat to your nails.
- You can paint the fruit on all or just a couple of nails. Choose green as your background.
- Take a thin brush and paint the middle of the kiwi with white varnish. Then draw thin white lines around the middle.
- Once this design is dry, use a dot or brush to make small black dots.
- Apply top coat over the design.
This is a simple option for creating kiwi on your nails. But there are various variations that make this manicure even more spectacular and original.
The most beautiful photos of manicure with fruits and berries
If you want to give yourself a calm manicure, but you want a fruit theme to be present on your nails, fruits and berries such as peach, banana, pomegranate, plum, blackberry, cherry, sweet cherry, made on soft pink, white or beige background. This design will make your manicure moderately juicy and at the same time not flashy. We bring to your attention an unusual selection of photographs of a beautiful manicure with fruits and berries. Appreciate how varied, attractive and charming a fruit manicure can be.