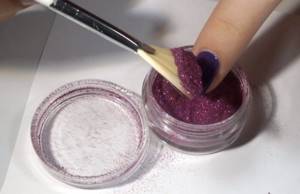
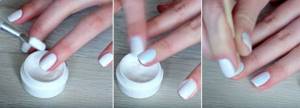
You should apply glitter to the gel polish along its sticky surface after drying or use a damp top coat for decoration. This is how the finest shimmering powder, loose glitter, and kamifubuki are fixed. The first two products are applied with a brush or spread with a spatula. For kamifubuki, an orange stick, tweezers or a magnetic pencil are more convenient.
Liquid glitter is fixed onto dried gel polish using a brush from a bottle or a thinner tool. The decor must be secured with a top; it should not stick out or get in the way.
How to properly apply glitter to gel polish
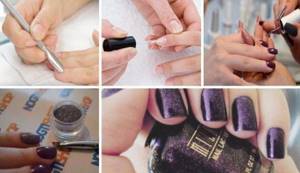
You can correctly apply glitter to gel polish in the following order:
- After performing a manicure, wipe the nails and the skin around them with a degreaser.
- Then the plates are coated with primer and wait until it dries.
- Apply the base, first in a thin layer, then leveling.
- The coating must be dried in a UV lamp or LED.
- Nails are painted with gel polish, if necessary, 2-3 times.
- Each time the hand is placed in a lamp for polymerization.
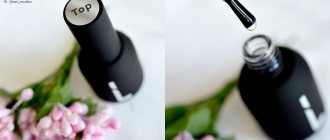
- Apply a topcoat to the flower bed, do not dry it.
- The decor is transferred to the damp surface and waited a few seconds until it “settles down”.
- The hand is placed in a drying lamp.
- Fan the surface of the plate with a fan brush.
- The end should be filed so that rough particles do not stick out from the edge.
- The nails are covered with top coat and the finishing agent is dried.
Required tools and materials
Gel polish is a cosmetic material that requires careful preparation. Before you learn how to apply it at home, you should become familiar with all the tools needed for the process.
Lamps
Creating a beautiful, even manicure is impossible without the use of a special lamp. Cosmetologists call LED lamps the best of them, since they do not contain mercury, which is harmful to the body. The price range is quite wide, as is the choice.
This device is used to dry gel polish using light from LEDs. For home use, small, compact lamps are best suited for reasons of practicality and space saving.
Napkins
The presence of this simple item in a woman’s manicure set is really necessary, because it will be difficult to achieve a perfectly even finish without them.
It is recommended to use “lint-free” wipes to help quickly remove the oily shine of the nail plate, preparing it for painting, as well as for convenience in the process of removing nail polish and cleaning the tools used.
Files
One nail file is not enough for such a manicure. You will need files made of different materials that serve different purposes:
- For filing a natural layer (soft file, 240 grit, any material).
- To create a shape (a glass, ceramic or file with sandpaper will do).
- For grinding (400 grit).
- To prepare for removing gel polish (the main purpose of the file in this situation is to destroy the integrity of the varnish, therefore hardness is not important, however, you should not use a tool with a value of less than 180 grit, so as not to injure the nail structure).
The shape of the files is selected individually from the point of view of convenience.
Buffs
A buff is a type of manicure file designed for polishing and polishing.
Its distinctive features are its shape (usually presented in the form of a block) and the delicacy of its impact due to the softness of the materials used.
Used to prepare for applying varnish, gives nails smoothness and shine.
Manicure scissors
The purpose of this tool does not raise any questions: scissors are needed to shape the nails from the free edge by removing excess areas. Also used to remove cuticles.
There are scissors with straight, curved tips and universal scissors with a narrowed, pointed edge.
It is preferable to purchase a tool in professional stores, because it must be made of durable steel and be of high quality.
Tweezers
Removing cuticles with cuticles is much safer and more accurate, unlike the same procedure using scissors
You need to use the device carefully, smoothly, cutting the skin in an arc. After each procedure, it is necessary to disinfect the instrument
Dehydrator
Degreasing and removing dirt with a dehydrator is necessary to create conditions for high strength and durability of manicure with gel polish. The liquid is also used as a disinfectant to help maintain hygiene at home.
It is quite simple to apply: with a brush, like a simple varnish.
Primer
The role of a primer in creating beautiful nails is similar to the action of a dehydrator. The difference is a deeper effect on the nail plates and ensuring their thorough protection.
A pre-primer is used to maintain water balance; it serves as a good base for the coloring element.
Gel polishes
The attached instructions should contain data on the preservation of the varnish after application. A good option is a coating that can stay on the nails without changes for 3 weeks, and polymerization for a quality product should last no more than 30 seconds.
Care products
Nail care after manicure procedures must be performed. Even absolutely correct, safe technologies have a destructive effect on the structure of the nail plates and require proper restoration procedures afterwards.
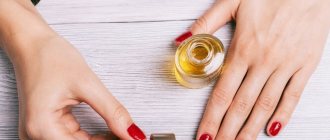
All care methods can be divided into 2 groups: using chemical or natural products. Natural methods include applying various fats such as olive oil, castor oil. Sea salt and melted paraffin are also used.
It is more profitable to use restoration techniques at home than in the salon, since the restoration process takes a lot of time, and one short procedure will not be enough to obtain the desired effect.
How to make glitter on gel polish
You should apply liquid glitter to gel polish differently than powder or glitter:
- Remove dust and grease from treated nails using a napkin and a special product.
- They are coated with primer and allowed to dry.
- Then follow 2 layers of base and dry each of them in turn.
- Nails are painted with gel polish of the desired shade and polymerized.
- Using a thin brush, take a portion of glitter from the jar and place it on the plate.
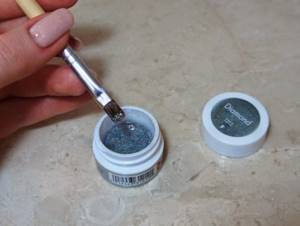
- You should try to distribute it so that the product lays down in an even layer.
- Next comes another drying.
- The ends of the nails must be slightly filed to remove small particles of glitter.
- Top coat is applied to the plates.
- And it should be polymerized.
Liquid glitter can be applied in 2 layers if there are bald spots left after the first one. Instead of using a base at the 3rd stage, you can use acrygel to strengthen your nails.
How to glue glitter onto gel polish
Gluing large glitter onto gel polish is also easy if you know how to do it:
- Once tidied up, the surfaces of the nails are treated with a buff.
- Now they need to be wiped with a degreaser.
- Next, apply the base using rubbing movements.
- It is polymerized in a lamp.
- A flower bed of the chosen shade is applied to the base, preferably in 2 layers.
- Both times the hand is placed in the lamp.
- The next layer is the top, it is applied very thinly.
- Using a dot or orange stick, large glitter is placed onto the wet finish on the nails.
- The hand is placed in the lamp.
- The nails are covered with the last layer of top coat and polymerized.
As an adhesive base for kamifubuki and other types of large glitter, you can use a transparent base rather than a finishing agent.
Watch the video on how to glue glitter onto gel polish:
Some nuances
Before carrying out this procedure, you need to find out exactly how to apply shellac correctly. If the process is carried out in the wrong sequence or any mistakes are made, the gel coating may become deformed, as a result of which it will not adhere properly to the nails. The procedure itself is conventionally divided into three stages: applying the base, the coating itself and the finishing fixer. We also immediately note that you can achieve a different color effect using shellac varnish. How to apply is one thing, but how many layers you get will affect the intensity of the tone. If you apply the coating in one layer, then only a mysterious shade will remain on your nails, translucent and very delicate. Two coats will give a more saturated color. Also important is the use of oils and creams. Even one drop of such a substance can reduce all the qualities of the gel coating to zero. Therefore, the day before applying shellac, you should not treat your hands and nails with similar substances.
How to use glitter for gel polish
It is more convenient to use sparkles for medium-sized gel polish, which are also called sequins, as follows:
- Prepared nails are painted with a flower bed over a dried base.
- The coating is dried in a lamp.
- Then a topcoat is used on the nails.
- Shiny sequins are transferred to a damp surface with a brush and placed in random order.
- Use an orange stick to remove shiny particles from the skin around the nails.
- The coating is dried under a lamp.
- To secure the decor, another layer of finishing agent is applied.
- It is also polymerized.
- It is necessary to remove the sticky layer by moistening the napkin with a cleanser.
- The surfaces of the nails and ends are treated with a buff.
- Now they should be wiped with a degreaser.
- Then use the last layer of topcoat and dry it in a lamp.
How to Apply Glitter to Shellac
Applying glitter to shellac is no more difficult than applying glitter to gel coating, but you need to be careful when shaking off excess decor. To do this, it is better to use a fan brush rather than a brush or buff. Shellac is a more delicate coating than gel. And it is easy to scratch it with hard tools.
Here's how to use glitter nails with shellac:
- Apply a base to the treated plates and polymerize the layer.
- Paint your nails with a flower garden, also dry, but shortening the time your hand spends in the lamp by 2 times.
- Take a small brush, pick up glitter with it and place it on the plate.
- Use the same tool to distribute the decor more evenly.
- Dry the coating completely.
- Apply a buff to the ends of the nails and fan the surfaces with a fan brush.
- Use finishing agent.
- Dry it.
Nail preparation
For a perfect manicure, nail preparation is required:
- Hands should be placed in a bath with a decoction of herbs, sea salt or essential oils.
- Removal of cuticles and application of moisturizer is required.
- Excess skin is carefully removed with tweezers or nail scissors.
- Use a file to give your nails the desired shape.
- The first layer is applied with base varnish. It covers the entire plate.
- Sequins and tools should be placed nearby.
- Excess glitter is removed with a brush after the varnish has dried.
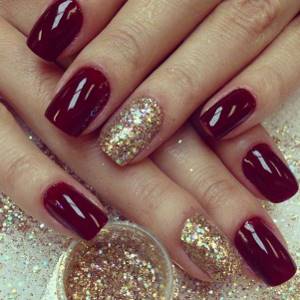
It is important not only to decorate your nails with sparkles, but also to choose them correctly, as well as perform a high-quality manicure. Judging by the photo, the result is beautiful.
The main thing is to carefully apply jewelry, following all the rules of manicure.
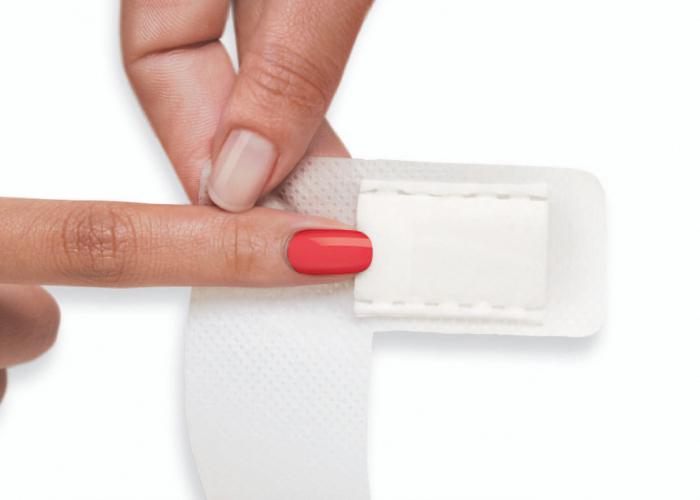
How to sprinkle glitter on gel polish
You can sprinkle glitter on the gel polish if they are dry, that is, powder or glitter are suitable for this method:
- A coated manicure is done on the nails.
- A layer of top coat is applied to the dried gel polish.
- Using a pusher or a plastic spatula, take portions of glitter and pour the product onto the wet surface of the nail until it is completely covered.
- You need to wait a few seconds until the glitter penetrates the top and “sits.”
- You need to lower your finger and tap on it so that the excess glitter falls off.
- The coating is dried in a lamp.
- The surface of the nail is treated with a brush to remove excess glitter.
- All that remains is to apply the top coat and cure it.
While sprinkling the plate with sparkles, your finger should be held over the container in which they are stored. And you should put a large napkin under it, as the decor easily scatters around.
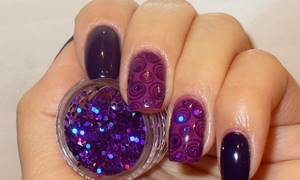
Interesting ideas for shimmering manicure
Modern fashionistas are constantly striving to diversify their nail design, and even already elegant nail art with iridescent particles is also being improved all the time.
Gradient design
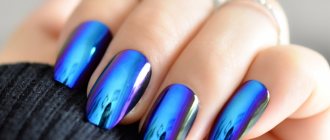
The transition from one shade to another is always interesting, because it gives the manicure a certain mystery. And glitter based on this enhances this effect.
Gallery: gradient transition options with glitter
Stylish French
By covering not the entire surface of the nail plate, but only its tip, with shimmering pollen, it is easy to create a kind of jacket that can have clear or blurred boundaries.
Gallery: shiny French
Lunar option
Glitter can only be used to decorate the nail holes. This will give the manicure femininity and at the same time luxury.
Gallery: moon manicure options
And one warrior in the field
The nail design looks original and unconventional when only one nail on the hand is decorated with glitter.
He is the one who will attract attention
Decorating one nail with glitter is a popular trend in manicure.
Matte manicure
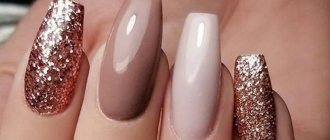
Shiny elements will look especially bright on a matte base. In this case, shimmering elements will favorably emphasize the depth of the color of the varnish and make the manicure luxurious.
Gallery: matte varnish and glitter
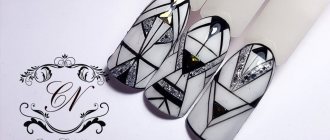
Glitter designs
Using glitter of different colors, shapes and sizes, you can create unique patterns on your nails. To do this, you need to apply a little imagination, and then the design gallery will be replenished with countless options.
Video: design ideas with glitter
Manicure with glitter has been, will be and will remain popular, because it makes nail design festive and elegant. It’s easy to make it yourself at home, and there are a large number of options.
How to apply dust to gel polish
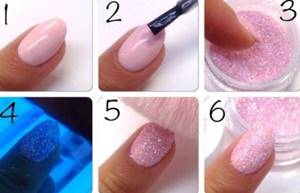
There are several ways to apply dust to gel polish, the first one should be:
- Prepare your nails, apply primer, apply base, and dry.
- Paint your nails with a flower garden and polymerize the coating.
- Apply another layer of base or top, do not dry.
- Dip your finger into the jar of glitter powder several times.
- Remove it, lower it down and knock so that the excess powder falls off.
- After a few seconds of waiting, the finger is placed in the lamp.
- Fan the nail with a fan brush or brush to get rid of any remaining excess powder.
In the second method, shining dust is sprinkled onto the wet coating several times until it completely covers the nail. Excess amount of product should be shaken off by lowering your finger and tapping it with the applicator. Then the coating is dried, after which the nail is lightly brushed. And a top coat is applied on top, which is also polymerized.
The third method involves mixing glitter powder with a finish or transparent base. The proportions are chosen independently. And the product is applied like a gel polish, that is, on a dried base, possibly in 2-3 layers. This method is more convenient than others if you need to highlight a design with sparkles or draw patterns.
How to mix gel polish with glitter
To mix gel polish with glitter, you need to place a few drops of it on the palette. A pinch of decor is poured nearby. And mix both components with a thin brush or spatula. After this, the varnish must be applied to the nails so that the glitter does not sink to the bottom of the liquid. But you should prepare such a quantity of the mixture that there is enough for everything, otherwise it will be difficult to achieve uniform coating on each plate. This method is suitable for powder and glitter.
You should not pour glitter directly into a bottle of gel polish. They will quickly settle to the bottom. And in order to distribute the decor evenly, you will have to shake the bottle before use. And this will lead to bubbles on the nails when applying gel polish.
It is best to add sparkles not to the flower bed, but to the top. Finishing agents have greater adhesion than gel polish. And the decor will not prevent the top from adhering tightly to the previous coating. And gel polish with glitter can fly off your nails faster than they grow back.
What are the advantages of nail designs with shimmering elements?
- This manicure can be used for any festive event (birthday, bright party, wedding, dinner party, etc.), as well as for everyday life, with the difference that in the second version there should be fewer shiny elements.
- Shimmering nail art is distinguished by its versatility, because it can be used on nails of any length and shape, and in all cases it will look luxurious.
- Shiny manicure is characterized by many variations.
- Even a beginner can master the technology of decorating nails with such glitter.
Even a beginner can do a glitter manicure.
How to apply dry glitter to gel polish
There are several ways to apply dry glitter to gel polish:
- Mix them on the palette with a transparent top or base. The resulting product is applied to the dried colored coating, polymerized, then the ends are treated with a buffer. And on top the nails are protected with a finish.
- On the sticky layer of the flower bed. Nails are painted with gel polish; after drying in a lamp, the surface is not wiped. A portion of dry glitter is poured onto it and carefully distributed over the plate with a flat brush. After a couple of seconds, you need to work on the surface with a clean fan brush so that the excess particles fly off. Then you need to apply topcoat and dry.
- For a wet finish. The product is applied over dried polymerizing varnish. Decor is poured onto it, controlling the density of the layer. The hand is placed under the lamp. Then the excess shimmering particles are brushed off, and the ends of the nails are treated with a file for the same purpose. You need to cover everything with one more layer of finish, dry it, and the design is ready.
How to rub glitter into gel polish
You can also rub glitter into gel polish if you use finely ground decor:
- The nails are painted over a dried base with a flower bed with a sticky layer.
- It needs to be dried in a lamp.
- The shiny powder is scooped up with a brush and applied to the plate with patting movements.
- The same tool is used to distribute the decor more evenly.
- You need to wait a few seconds for the shining particles to connect more tightly with the sticky layer of varnish.
- Use a soft fan brush to fan your nails to remove excess shiny particles.
- The next layer is the top.
- It needs to be polymerized.
Glitter powder, glitter or kamifubuki, as well as liquid shining compositions, make the design catchy and original. The decor looks good with bright lacquer colors and pastels. Just don’t use it in abundance so that your nails don’t look like Christmas tree decorations. However, if you want just such an effect, a manicure will not cost you much. After all, a jar of glitter costs only 25-60 rubles.
What is needed for the procedure
Before you start applying glitter, you need to know what they are and what you will need to do such a chic manicure.
Depending on their size, you will also need certain tools:
- If you have chosen a small size of such decor, or dust as they are also called, then to apply this beauty you will need a special spatula and a flat, fan-like brush.
- To apply the medium ones, you will need a container to mix them and a brush to make it convenient to apply the decor to the nails.
- If your choice fell on large sparkles or sequins, then you simply need a special design tool - a dots or a magnetic pencil.