The most formal look can become a little more fun and casual if you add a little sparkle, which is why glitter is being used more often in both makeup and manicure. We'll tell you what glitter is, what it comes in, and how to properly decorate your nails with it, complementing different design options.
© gossip_nails
Types of glitter for nails
Translated from English, Glitter means “bright shine, sparkle.”
There are three main categories of glitters in nail design:
- liquid
- gel
- dry crumbly of varying degrees of grinding and sizes.
Liquid can be purchased ready-made in the form of varnish or gel polish, or you can prepare it by mixing dry particles with a base, top or clear varnish.
Depending on the type of glitter, the methods of applying them, as well as attaching them to the nails, differ. Let's consider each of the options separately.
Reviews
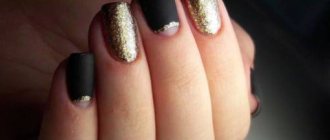
- Olga, 34 years old: “I love the moon manicure with silver sparkles. This is more interesting than the usual "French". They look especially good on gel polish. Also, the combination of black matte varnish and gold “moon” looks interesting. It looks more unusual than glossy varnish"
- Vasilisa, 28 years old: “A friend gave me a set of glitters for manicure, but they sat idle for a long time. Finally, I decided to try it and diversify my manicure. Small silver sparkles can simply be sprinkled onto wet varnish and the excess can be brushed off with a brush. The “finish” is applied on top. It turns out “with a twist” and not at all vulgar.”
- Kira, 33 years old: “I love the Golden Glitter manicure; I do it by rubbing in tiny sparkles. For this I use two shades, gold and silver. Before applying them to your nails, first mix them in the lid. The nails look like they are covered with a shimmering haze, very beautiful.”
Liquid glitter and how to apply it

In its finished form, it is a regular varnish or gel polish with large fractions. It can be chosen in color or transparent with colored particles.
- The first application option is to simply paint your nails with polish or gel polish in two or three layers, depending on the density of the texture. The disadvantage of this method is that the beautiful effect in the jar is not conveyed in the finished nail design. Shimmering particles are scattered fluidly around the perimeter of the nail, especially in the case of large details. What is the way out?
- You can catch the glitter with a brush and lay it on the surface with the desired density.
- Another application method proposed by Western nail bloggers will help - using a sponge.
You will need any sponge with a uniform fine texture. It should absorb the transparent base of the varnish well, leaving only glitter on the surface. Before use, you can clean the surface of the sponge with a piece of tape to remove dust or small lint.
- We cover the cuticle and side ridges around the perimeter of the nail with special protection, PVA glue, fatty cream, without going onto the nail;
- We paint the nails with the base and one layer of the same varnish, dry each one in a lamp;
- Apply a few drops of varnish to the sponge, wait until the clear liquid is absorbed and only glitter remains;
- Using a sponge, drive it into the surface of the varnish;
- This step must be repeated 2 or 3 times to obtain an even coating;
- Using a thin brush, remove the residue around the perimeter of the nail, correct the shape of the design at the cuticle and side ridges so that the coating has smooth edges;
- We cover the glitter with two layers of top coat, drying each one in a lamp.
It is recommended that after the first hardened layer of top coat, you slightly file the free edge of the nail to remove protruding particles and remove roughness. We seal the even ends with a second layer of finish.
How to choose the right gel polish: we analyze all its types and top brands
How to remove glitter from eyelids - expert advice
Glitter is a spectacular, but capricious product that is difficult not only to apply beautifully, but also to completely wash off. If plain water doesn't help remove your makeup, try these expert tips:
- Wash off your makeup with micellar water
. Most products in this group do a good job of removing all types of cosmetics.
- Remove makeup with a two-phase makeup remover.
You can also try using hydrophilic oil or regular vegetable oil - sunflower, olive.
If you have used eyelid primer, these products will definitely help you get rid of glitter. Just don’t forget to change cotton pads contaminated with glitter more often so as not to smear the product on your eyelids and facial skin.
Gel texture
Glitter gel became available relatively recently. It is a mixture of extension gel and glitter of different sizes. Apply in the following way:
- The nail is covered with a gel polish base and dried in a lamp;
- Using a brush for laying out the gel, the material is applied and distributed in a thin layer, polymerized;
- The finished coating is fixed with a finish and dried in a lamp;
- The sticky layer is removed and the design is ready.
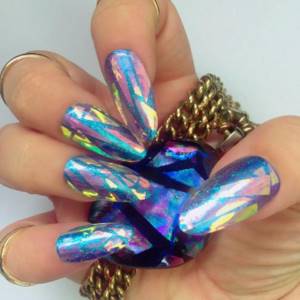
Foil
In addition to colored sand, glitter also includes foil. The thinnest pieces of multi-colored, iridescent foil are glued to wet varnish and covered with a top coat.
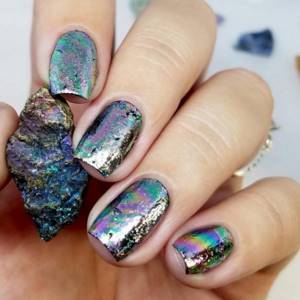
Using foil, a very original “broken glass” design is created; the foil is cut into triangles and glued at a distance from each other, imitating broken multi-colored pieces of glass.
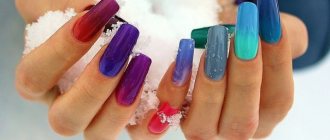
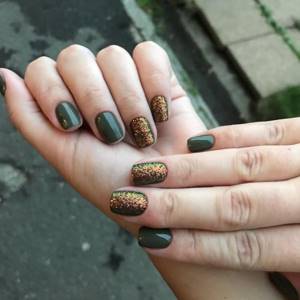
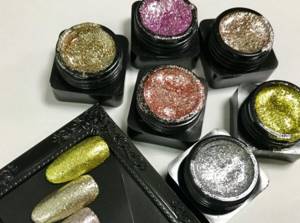
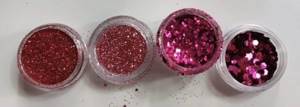
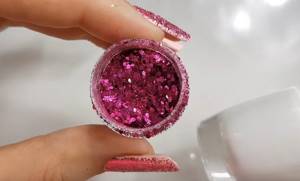
Dry or loose glitter

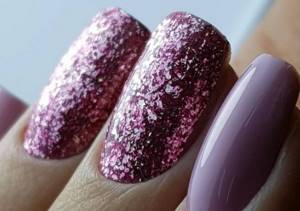
One of the most popular options, as it allows you to select the size of the particles and their color. There is colored glitter, as well as translucent glitter with a metallic bluish, golden or silver tint. The last translucent option looks very beautiful on a colored varnish base of any shade, while colored glitter will have to be selected taking into account the compatibility of tones.
Dry glitter comes in different sizes and shapes:
- small
- extra fine
- average
- large foil of different geometric shapes - round, square, stars, ovals, etc.
- mix of different fraction sizes in one solution.
The penultimate option can be considered as an alternative to cut foil and small rhinestones without volume.
About dry glitter:
Glitter - features of the material and its use
Geometric patterns
In 2022, strict geometric patterns inspired by ethnic motifs are at the peak of popularity. Glitter is great for creating them. Moreover, both in finished and dry form. Glossy and shimmering textures will create contrast and highlight the design, even if you use a nude-colored varnish as a base.
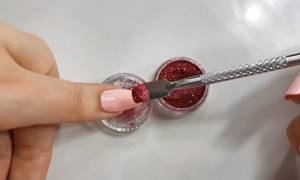
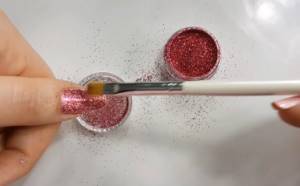
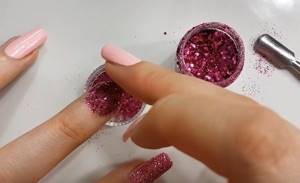
Applying a fine crumbly texture
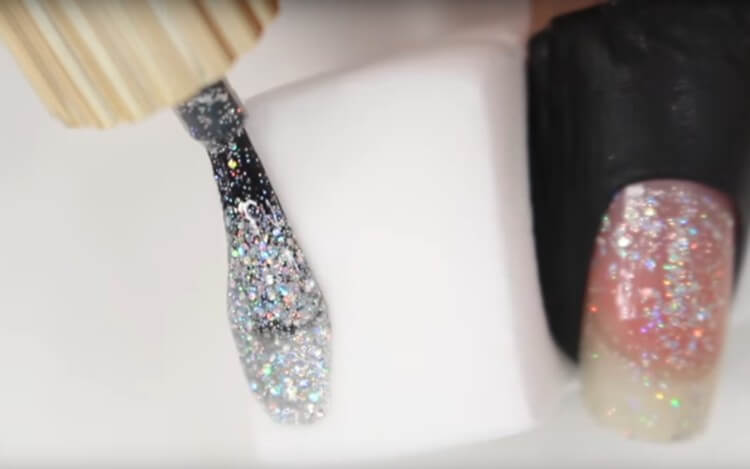
It is convenient to apply fine glitter on top of a layer of varnish or gel polish that has not yet dried, or on top of a layer of top coat that has not yet dried. Be sure to seal the layer of glitter again with topcoat in this case.
Glitter is poured onto the coated nail using a pusher, an inverted training tip with a pen or brush. The simplest option is to simply dip the polished nail into the texture. Next, using a brush, it is convenient to remove the remaining glitter around the perimeter of the nail, from the surface of the plate, while gently distributing the excess in the “bald patch” areas.
When working with a pusher, it is important to periodically tap the nail to immediately remove excess material. This will ensure that the shiny material is distributed evenly.
Types of pushers - comparison, characteristics, operating rules
Manicure brushes - types, purpose, how to choose and care
What brushes can be used to remove residue from the side ridges and surface of the nail? It can be any flat and soft nail art brush, fan brush or cosmetic lipstick brush. It also has a flat shape and is soft enough not to stretch the material along with the base.
- Choose a base varnish in the same color scheme as the glitter, and paint the nail in two layers over the base. Using a pusher or brush, sprinkle small crumbly glitter onto the second undried layer;
- We distribute them evenly with a soft flat brush, while removing the remaining material from the side rollers.
- If there are bald spots on the surface of the plate, fill them in again and smooth them with a brush until a uniform coating is obtained;
- For larger glitters, the technique of patting or driving the material with a flat brush into undried varnish or top coat is suitable;
- Seal the glitter with a top coat without a sticky layer;
- If a fine material is used, you can apply it in two layers, sealing each one under the finish.
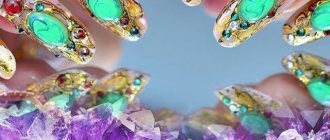
To attach large material, as in the photo, you will need a dense base. You can use for this:
- Thick base for gel polish
Base coats: types, selection criteria, review of the best - Glue for tips or artificial nails
- Gel for extensions
- Biogel.
Biogel and its properties for strengthening, building, health and growth of nails
The nail is covered with two layers of gel polish and sealed with a top coat with or without dispersion at the preparation stage.
- Next, apply a thin layer of base, glue, gel or biogel to the nail, wait until the coating is leveled;
- Using a pusher, tip or brush, sprinkle large glitter onto the undried product. We try to cover the entire surface of the plate evenly;
- At this stage, you can help yourself with your finger, lightly slapping the glitter, driving it into the sticky surface, as in the photo;
- When the layer of glitter is evenly distributed, you need to wait 30 seconds for it to self-level, for the dry material to be saturated with the liquid base, and only then brush off the residue with a brush and dry it in a lamp;
- We seal the result with topcoat and dry it again in the lamp. Immediately after applying the finish, it is important to give the coating a few seconds so that the liquid layer is evenly distributed between the particles and the nails do not then cling to clothing and surfaces.
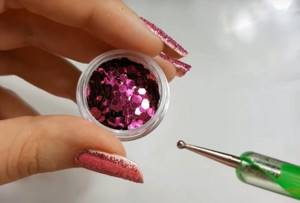
The largest dry foil glitter requires appropriate secure attachment to the nails. It is convenient to apply it individually, like rhinestones or foil. To do this, you can use a dots, a toothpick or an orange stick.
- Preparatory stage – applying gel polish in two layers;
- Glitter particles can be placed on the undried top layer of gel polish, or on the top undried finish layer. It is more convenient to do this for the finish, since varnish of saturated shades can accumulate in drops and create areas of uneven color, and the transparent top does not change the structure and evens out again when the glitter particles are placed in the desired place;
- After distributing the glitter, we polymerize the gel polish or top in a lamp, and then cover it with top for surface attachment and creating an even coating;
- We polymerize in a lamp.
French manicure with glitter
This is for fans of the classics, but if you are already tired of the traditional French jacket or want to add some festivity for some occasion.
A French manicure can be decorated with glitter in any way you like, the main thing, again, is not to overdo it too much with the abundance of sparkling decor. A good option is a classic French coat with a nude or transparent base, with a white “smile” and light shimmer on top. For this, choose transparent coatings with silver shimmer - it will look best on white. Large sequins and sparkles can be used to decorate the nail near the cuticle. In this case, you should apply them only to one or two fingers on your hand, carefully placing them at the base of the nail plate. An option for the bold and bright is a “smile” at the tip of the nail, completely made with glitter. It can be with a clear outline drawn with a thin brush, or in the form of an ombre. In the second case, the glitter will create a gradient, smoothly moving onto the base of the nail plate.