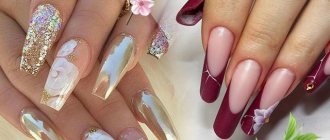
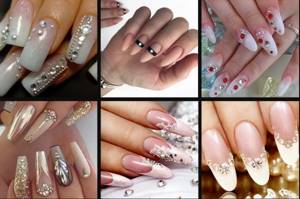
Beautiful nails are the key to a good mood for the owner of a manicure. Currently, rhinestones on nails are a trendy decoration and it is firmly rooted in the field of nail art. Nail technicians draw inspiration from fashion shows and famous designers. The podiums sparkle with various crystals and sequins. Why not adapt this beauty to your nails and sparkle every day? Let's talk about what types of rhinestones there are and how to use them in manicure and pedicure.
What it is
For several years in a row, these tiny jewelry have been a wonderful addition to any woman. Rhinestones on nails look equally good in a gentle romantic look, in a Gothic style or with a strict office look. Small stones can elevate any design and give it a special shine.
Rhinestones can be made from glass, crystal, plastic, ceramics and acrylic. They imitate a filigree processed gemstone, the edges of which shimmer in the light. The price for them can start from 50 rubles and end in several thousand. The famous rhinestones from Swarowski have a huge range of colors and sparkle luxuriously on ladies' fingers. Colored rhinestones have one primary color, while transparent ones take on the shade of the substrate applied to the fingers. Other crystals coated on the top surface create an iridescent glow and change their hue when exposed to sunlight.
Varieties
The variety of rhinestone shapes is sometimes amazing and knows no bounds. There are hundreds of varieties of small nail accessories. For you, we have collected the most popular representatives of nail decor:
| Variety | Image | Peculiarity |
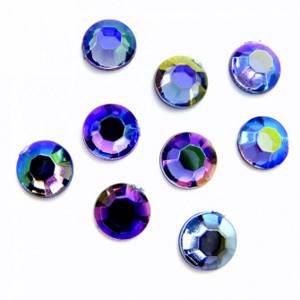
| flat round |
| Round pieces of glass with edges that, at different angles, shimmer in all sorts of shades and give off a glare of light. |
| conical (edge) | The crystals follow the shape of a peak and have a pointed tip. Quite often it can cause discomfort when worn because it clings to clothes, tights and other surfaces. It is better to glue them quite tightly to each other. And it is best to use them pointwise in a large composition of rhinestones. Typically, rhinestones are 2 times larger than classic ones and reach sizes of 1.5 mm. With them you can create a voluminous but spiky manicure. | |
| curly | Stones can take the shape of a rectangle, diamond, oval, square, triangle, heart, star, crown, drop and other shapes. This option is suitable for a New Year's manicure with rhinestones. | |
| pearl | Semicircular sphere with mother-of-pearl coating. A great option to decorate a pearl manicure with them. | |
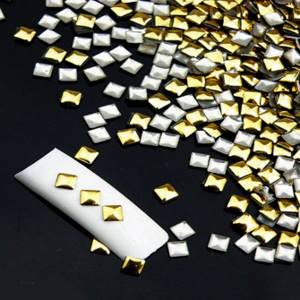
| rivets |
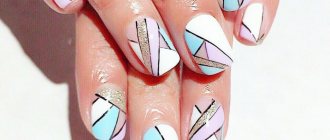
| Metal figured rhinestones in the form of rivets. Most often I take the shape of a rhombus, square, circle or triangle. Rivets are a small but stylish accent in a geometric manicure. |
| Crystal Pixie (Pixie crystals) |
| Crystal fine and colored chips. You can get a wide variety of colors from crystals by applying them to multi-colored substrates. |
| Swarovski crystals |
| Swarovski sets offer a huge number of decorative rhinestones of different shades and shapes. These can be circles, hemispheres, pearls, hearts, stars, bows, three-dimensional cubes. Sizes start from 1.3 mm (ss3) and end at 8.7 mm (ss40). |
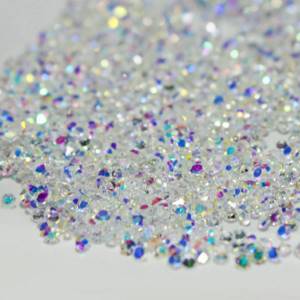

One jar of Pixie crystals is enough to cover 20-25 nails in an even layer.
Secrets of specialists
We have put together a few tips for you that will help make your nails with rhinestones perfect:
- Large rhinestones visually reduce the length of the nail and are not suitable for short nails;
- You shouldn’t create the effect of a Christmas tree and glue everything on your nails at once; it’s enough to encrust one finger with dense rhinestones or decorate each nail with several small things;
- translucent crystals can be used on colored substrates, creating a new design each time;
- colored glass should match the chosen color of your nails;
- 1 large rhinestone on one hand is enough;
- The best quality ones are glass and crystal jewelry.
Manicure with rhinestones by color
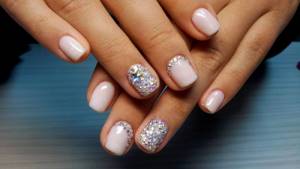
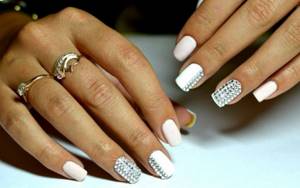
White manicure with rhinestones
Use gloss or matte white paint. Choose a finger to decorate so that the design looks neat.
Cover the plates with a clear color and align the pixie cut across the entire nail. To design, you don’t even need to look for an example from photographs - the main thing in the layout is to fill the plate with crystals.
Black manicure with rhinestones
A white gold necklace with a little black dress is a reliable option that will make you look elegant and feminine in any situation. The same rule works with black and silver manicure - see for yourself.
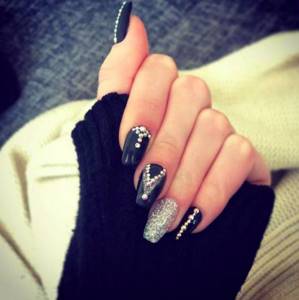
Feel free to combine black shiny polish and nail art in one look. To create a harmonious manicure, use these photo ideas.
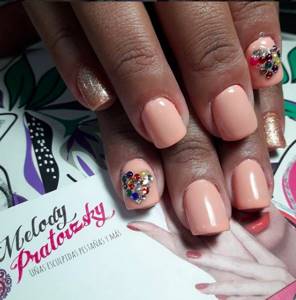
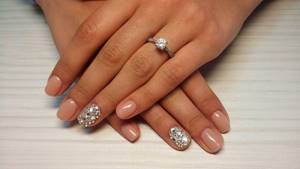
Peach manicure with rhinestones
A delicate peach manicure is the case when rhinestones are not only not prohibited, but also desirable. A little sparkle accent will instantly transform the entire look and will not look faded.
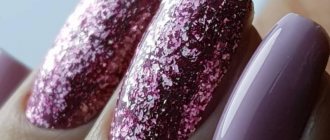
Pink nail design
The delicate pink manicure is complemented by a handful of pixies, individual elements and frames made of small stones. If you are using the elements as a frame for a plate, you can paint the backing along the outline in a bright shade.
Yellow manicure with rhinestones
Yellow manicure with rhinestones is not very common, but in vain - it turns out very beautiful. To enhance the effect, complete the look with a delicate lemon or gold ombre.
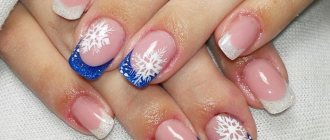
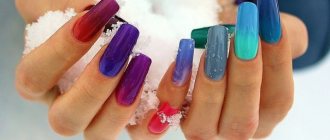
Blue manicure with rhinestones
Most importantly, cold blue colors are combined with classic silver rhinestones - cornflower blue, blue, turquoise. But if the paint is a warm shade of blue (for example, light blue), then the theme will be encrusted with gold sparkles.
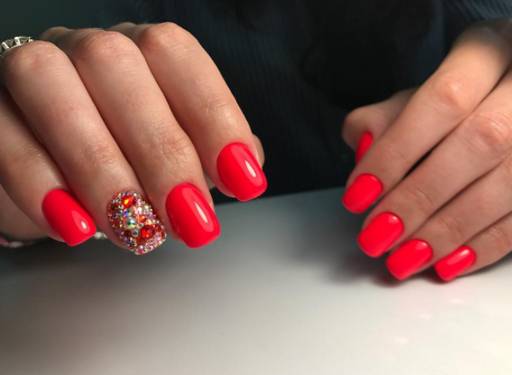
Red manicure with rhinestones
Find a free red nail polish that matches your skin tone and act accordingly. If you have short nails, a vertical strip of rhinestones will help visually lengthen them. If you have uneven nails, paint your nails with a thin, shimmery polish that will visually hide imperfections, and add rhinestones (the key word here is a little!). Look for even more beautiful images of manicure with red polish and rhinestones in the photo gallery.
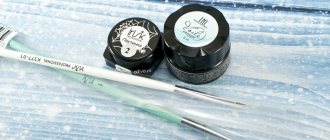
What to plant rhinestones on
Rhinestones stay on nails best thanks to a material that has adhesive (viscous) properties. This allows the decorations not to crumble and stick well. Let's look at several options that will help firmly fix the crystals.
Base or top
Among nail art masters, there is an opinion that the base holds rhinestones better than the top. This is true, but it’s all about technique and the work of the base and top coat tandem. The lion's share of strong inlay belongs to a high-quality finishing coating. Among all the variety for securing jewelry, it is worth choosing a rubber base and top. Materials should not float or slide down the nail. This advantage can be especially felt when working with large rhinestones. Liquid material simply will not hold heavy jewelry on the nail until it dries.
Figured rhinestones need the thickest possible material so that they do not fall.
Among the thick bases and tops, the following companies can be distinguished:
- FOX Rubber;
- Bluesky;
- Kodi;
- TNL;
- VOGUE;
- RIO Profi;
- Crattol;
- UNO;
- RuNail.
Special glue
If you do not have suitable means for fixing the crystals, then you can purchase special glue for rhinestones in the store. Superglue or two-component glue will do. You can find them on the Internet or in cosmetic stores in the department where all manicure accessories are located. Remember that if you have transparent rhinestones, then the glue should be transparent.
Superglue will literally help your jewelry grow to your nails. Fast drying guarantees long service life. But you need to be careful with it, because fixing your manicure will be problematic. But with two-component glue it is easy to adjust the position of the rhinestones and change something in the design, because it does not dry so quickly.
Gel for extensions
As the rhinestones grow larger, you can switch from gel polish to gel extensions. This option will appeal to those who like to decorate their nails with large crystals. It has normal viscosity and is able to hold any large decoration. But using gel with small rhinestones can lead to some problems. Unfortunately, this method has one significant drawback - it will require too much extension gel to fix the rhinestones.
Video instruction
How to properly plant and glue rhinestones on nails can be seen in the video.
Sticky plasticine
As we said earlier, each nail design with rhinestones requires a huge amount of extension gel, and it is not very cheap. But there is a way out! It is recommended to mix the thick gel with a small amount of acrylic powder. And on the resulting sticky plasticine you can plant crystals of any shape and size. This composition is not very plastic, but it is very convenient when working with large stones over 2 mm in size. An analogue of such a mixture is a gel-jelly for extensions.
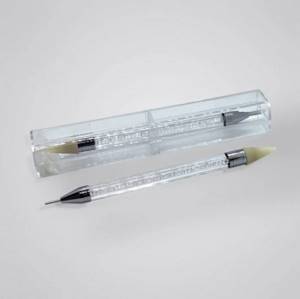
Tools
There are several ways to attach rhinestones to nails. If you do not have special tools, you can use improvised means. It is advisable to choose something from the list:
- wax pencil;
- toothpick dipped in water;
- thin brush;
- orange stick;
- dots;
- tweezers (for large rhinestones).
Where to buy good rhinestones for nail art?
There are a lot of online stores on the market where you can buy rhinestones for nail designs. The only problem is that many people sell both sewn-on rhinestones for clothing and manicure rhinestones. And there are not so many stores specializing exclusively in manicure products. The most famous online stores for rhinestones are Imkosmetik and KrasotkaPro. Krasotkipro has a huge number of pick-up points throughout Russia, you can save on delivery to your city. But the most interesting option in terms of price is buying rhinestones on AliExpress . Small sets, large packages, one size or a mixed mix, any shape and color - we have it all. Prices are in rubles, everything is in Russian, you can pay either from a card or from electronic wallets or even with a receipt through Sberbank, but the main thing is a huge selection and cheap prices. Buy rhinestones and other manicure products on the official website of A liexpress . (Clicking on the link will take you directly to the Aliexpress website)
Manufacturers of rhinestones for nails.
The following manufacturers of rhinestones (trademarks) are most famous in the market of manicure materials: TNL, Lianail, In'Garden, NelTes, NailTes, Swarovski, MILV, CrystalLized (Hong Kong), IM (China), Bluesky, RIO Profi, RuNail (Russia) , Severina (Severina), Konad (Korea), Preciosa (Czech Republic), Patrisa nail (Germany).
How to properly attach rhinestones
It is recommended to attach rhinestones to nails with a top coat. Additionally, they can be fixed with whatever they were planted on, but the final layer should still be a top layer. How to choose the right topcoat? Let's look into this issue.
Top coating
It is better to fix small rhinestones and bouillons with liquid topcoat. Your material should flow into all the spaces between the stones. It is important to choose topcoats that do not spread when applied in 2 layers, otherwise the rhinestones will flow down along with the topcoat. When working with such mini-decorations, a top coat without a dispersion layer works well. There are a number of advantages: the stickiness does not need to be removed from the nails, it does not remain in small folds, and the design does not become clogged with dust. In order to secure larger rhinestones, it is necessary to make a special edge around the stone. For this case, a thicker rubber top is suitable.
Acrylic Powder
Top coat and acrylic powder can only work in tandem. If in your nail design with rhinestones you use stone inlay with the indescribable sparkle of small grains of sand, then this little life hack is especially for you. The technique is quite simple:
- Cover the prepared nails with the design with top coat.
- Place several rhinestones on the wet layer.
- Cover the glass and the rest of the space with a thick layer of acrylic powder. The rhinestones should sit deep in it.
- After drying, the stones on your nails will stick very tightly!
Gel paste
Another alternative method of “planting” rhinestones on a nail is a gel paste. The peculiarity of this material is that it has a fairly thick consistency, does not self-level and dries well in volume. Attaching rhinestones for nails is quite simple:
- Apply the gel paste pointwise onto the prepared colored surface with a thin brush.
- Place the beads on the gel paste and drown them well in it to form a small side.
- After drying, the rhinestones will adhere firmly to the nails.
If the edge is not formed on all sides, then the glass pieces can additionally be treated with a finishing topcoat.
Broths
This effective and original way of attaching rhinestones to nails will appeal more to those girls who like to lay out entire compositions. It is recommended to frame one large stone with several broths. This can be 4 small bouillons that imitate expensive jewelry or a cut around the entire perimeter of the stone. All that remains is to walk with the top around the large rhinestone and completely coat the area around it with the top.
Video - rhinestone sizes
Friends, I will be glad if you vote for the article with stars and by clicking the social buttons, it is important for me to know your opinion! Join the group Your Zest on VKontakte, where all news announcements from the site are published. Best regards, Love.
More articles on this topic:
DIY necklace collar made of beads, seed beads, rhinestones: description of models with photos Unusual Japanese handicraft - temari balls
How to glue rhinestones correctly
Let's see in practice how to properly glue rhinestones on nails. The algorithm of actions is quite simple, you just need to find all the necessary components and be extremely careful. Working with small jewelry requires special perseverance and patience.
Procedure
Before this important procedure, you should prepare the pens for work: treat them with a nail file, apply a base and colored gel polish, drying all layers well in a lamp. Step-by-step instruction:
- On the finished nail, use a thin brush (or any other tool) to place a drop of material onto which the rhinestone will be glued. The droplet size should be such that a small edge is formed around the glass.
- Dry the layer for your lamp in the standard time.
- Using a thin brush, fix the rhinestones with any top, building a border around them. The stones should not cling to anything.
Many nail art masters and home hobbyists quite often plant rhinestones on an undried layer. This is a gross violation when creating a design. The rhinestones will stick, but the surface of the nail will lose the perfect highlight that all the girls are chasing. An inlay on a finished nail with a luminous and even highlight looks more aesthetically pleasing and more expensive.
But even from this situation there is a way out. The most beautiful way to fix this nail design with rhinestones is to use a matte top coat. It is enough to apply it with a thin brush as the very last thing on a ready-made nail with attached crystals. An ideal option that looks quite presentable and fresh. And it’s not fussy to wear.
Do not try to secure the rhinestones with a matte topcoat. It acts only as a decorative coating. The top is quite fragile and will not hold stones.
Auxiliary materials
Before work, let's prepare the necessary materials and tools:
- rhinestones you have chosen;
- glue for fixing rhinestones (when used on regular varnish);
- thin brush for glue;
- rhinestone applicator, rhinestone magic wand, toothpick;
- colored varnishes;
- primer, base, topcoat (for gel polishes).
How and with what to remove rhinestones
Rhinestones on nails are not so easy to remove; usually this process takes a long time. The areas of gel polish that were under the stones and the jewelry themselves are removed very reluctantly. They have to be cut down and soaked again. What tools will help with this difficult issue?
Hatchet
This is the fastest way to remove small rhinestones. It is enough to pry the base of the rhinestone with the tip of a hatchet and lightly pick it. Small stones usually fly off the first time and do not require much force. This option is good for removing 2-3 rhinestones, which are located at a short distance from each other. But you shouldn’t use a hatchet in large compositions; it can scratch the surface of the nail plate. If the glass does not come off, then there is no need to pull it further; you should use another tool.
Tweezers and cutter
When it's time to change your manicure, you can remove nail rhinestones using nail clippers. It is necessary to bring the tool to the glass at the very base, and then press. This method helps to quickly fly off rhinestones that are quite firmly attached to the nail. Small rhinestones can be removed with a milling cutter with a sharp tip. Here you need to gently tap them from below so that they jump.
The most popular size of rhinestones in manicure is size ss3 (1.3 - 1.4 mm).
Remover
First of all, it is recommended to treat the nail cuticle with oil. Then everything is simple:
- Cut the cotton pad into 4 parts.
- Soak the disc pieces with nail polish remover or remover.
- Place the disc pieces on your nails and put on the caps (or foil).
- Wait 10 minutes.
- Remove the caps and use an orange stick to carefully remove the remaining manicure and stones.
- You need to repeat the soaking if you were unable to remove all the decorative elements the first time.
Nail preparation
Before performing nail art, you will need to prepare a brush for applying the pattern, glue, varnish, tweezers, a toothpick, a fixative and, of course, rhinestones. When designing, you should not put more than two large stones on one nail. Next, you should prepare your nails for a manicure.
Using a regular nail file, give the nail plate the desired shape. To soften the cuticle, baths of sea salt, liquid soap, medicinal herbs, etc. are well suited. After the bath, you need to remove or push back the cuticle, polish and clean the nails. Next, you need to apply a transparent varnish - the base - this will give the manicure strength and durability. Apply two layers of polish to your nails and place the required amount of rhinestones nearby in advance. At the stage of choosing a design, you need to take into account the color and shade of the varnish, as well as the technique of applying the pattern.
Design for a special occasion
Which design should I choose so that the rhinestones on my nails would only emphasize all its elegance? For you, we have collected several simple options that are very easy to repeat at home yourself. Choose any option, experiment and come up with something of your own.
Charming shine
The sparkle of the small particles of Pixie crystals amazes with its magnificence. One or two decorated fingers are in perfect harmony with any monochromatic manicure and go with any outfit, especially an evening dress. These rhinestone nails have become one of the popular and frequently requested ideas in 2022.
What you will need:
- manicure file;
- base;
- colored gel polish;
- top without sticky layer;
- rhinestones;
- tool for rhinestones
How to do:
- Use a manicure file to remove excess gloss from your nails and cover them with a base for better adhesion of materials.
- After drying, apply colored gel polish in 2 layers.
- Send your nails to polymerize in a lamp.
- Apply top coat.
- Pour the rhinestones onto the wet layer of topcoat and gently press them down a little with a brush, compacting them into an even layer.
- If there are any bald spots, then you can carefully add a few beads and arrange the rhinestones around the perimeter of the nail.
- Make a small edge with a thin brush with a top coat around the perimeter of the nail so that the glass does not cling to clothes.
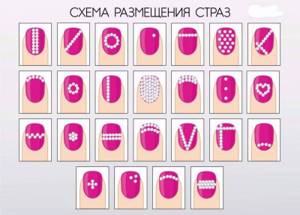
The photo below shows a diagram of the placement of rhinestones on the nails.
Dear finger
What could be better than inlaying the entire nail with rhinestones? Only a sparkling inlay of hundreds of halftones! You can dot your nails with small rhinestones in a linear or chaotic order.
What you will need:
- manicure file;
- base;
- colored gel polish as a base;
- rhinestones;
- tool for attaching rhinestones;
- top
How to do:
- Treat your nails with a manicure file and apply one coat of base, drying it well in a lamp.
- Cover the nail plate with colored gel polish in 2 layers.
- Let your nails polymerize.
- Cover the nail plate with a thick base or top.
- Place crystals on your nails. In the linear version, it is recommended to place stones from the tip to the cuticle.
- If you choose a chaotic placement, then you need to select several areas on the nail where the largest crystals will be located. And after drying, you can already fill the space with small pieces of glass and broth.
- After drying, coat between the rhinestones so that all the space between them is filled with topcoat.
- It is important to create a border around the top without a sticky layer around the perimeter of the entire nail.
- Check the design with your nails to see if all the stones are in place and if they are holding well.
If in a linear placement the rhinestones float a little, then you need to lay out the central row first. Next, you need to coat the strip with topcoat and send it to polymerize in a lamp. And then add one row on each side, alternating them. Each of them individually needs to be coated with a finishing coat and sent to dry. Rhinestones on nails look great even in photos.
Volumetric compositions
Design with volumetric elements should be simple. If you decide to decorate your finger with several large rhinestones, then this will be quite enough. Make sure that there are no bald spots or gaps between the crystals and figures.
What you will need:
- base;
- colored gel polish;
- boat rhinestones;
- small rhinestones;
- broths;
- top
How to do:
- Apply a layer of base coat to prepared nails, drying it well in a lamp.
- Paint your nails with colored gel polish in 2 layers, each of them must be sent to polymerize in a lamp.
- Using a thin brush, apply a rubber topcoat or any material for attaching rhinestones for nails.
- Place the crystal on the material, without embedding it under the stone, and use a thin brush to apply a little extra strong gel or rubber topcoat.
- Dry the design in a lamp.
- Use a thin brush with topcoat to fill in all the voids under the stone, if any.
- Form a small border around the rhinestone, framing it with a thick top.
- After drying the largest stone, add one tier of small rhinestones and bouillons, surrounding the main one.
- Use top coat to coat the spaces between the stones and the circumference of the brooch.
Large rhinestones need to dry a little longer than small ones.
3D inlay
Large conical rhinestones can create an unusual shimmer and add extra shine to a relief manicure. For a voluminous design with rhinestones for nails, it is recommended to use very voluminous materials: very thick extension gel, gel jelly, or a mixture of acrylic and gel. The consistency should be very thick so that during the design process the stones do not scatter and do not have to be caught.
What you will need:
- base;
- colored gel polish;
- rhinestones;
- broths;
- tweezers;
- top
How to do:
- Apply base and colored gel polish to the nails, drying each layer well in the lamp.
- Place a small ball of thick material on the nail.
- Using tweezers, place 3 conical stones close to each other so that their outlines resemble the shape of a circle.
- Add a few broths in between. The design can be supplemented with a bunch of rhinestones to your liking.
- Apply topcoat to the stones around and the spaces between the decorations until the inlay does not cling to anything.
3D inlays can be multi-tiered. Before creating a design, it is recommended to plan your decoration using 2-sided tape, which will hold glass of different sizes well.
You can create a voluminous manicure using flat rhinestones for nails. For this purpose, large conical rhinestones are suitable, which need to be installed on the nail with their sides, pressed tightly against each other.
Nail designs with rhinestones: new items 2022
I am glad that there is now a huge range of rhinestones on the market.
They come in different shapes, colors and sizes. Rhinestones can be combined with paint of any shade. Therefore, they can be used not only in evening manicure, but also in everyday manicure. An elegant manicure that shines day and night always captivates and fascinates. In the new season, the classic jacket is relevant. But stylists recommend diluting it with a beautiful shine. Pebbles of any color and size can be used in the work. Experienced craftsmen recommend decorating only the ring finger. In this case, the nail design turns out to be laconic and not pretentious.

French jacket with rhinestones on the ring finger, photo
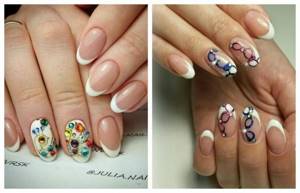
French with rhinestones, photo
White jacket with rhinestones, photo
The red jacket looks incredibly impressive. A smile painted on the tip of your nails can be duplicated with small sparkling stones.
Marigolds painted in mint and yellow colors look natural. To add expressiveness, you can place a pattern of colored rhinestones in the corner of any finger.
Mint-turquoise gel polish design with rhinestones, photo
New this season is the “cat eye”. The color of gel polish can be absolutely any. The whole highlight is in the pattern that appears under the influence of a magnet. In combination with shiny pebbles, such a manicure will look very impressive.
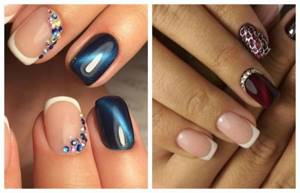
Cat eye design with rhinestones, photo
Cat eye design with rhinestones, photo