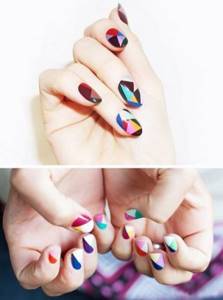
Geometric manicure designs have appeared quite recently, but have already become quite popular. Many girls appreciated these unusual designs, especially this manicure emphasizes the strict style of clothing, and also complements the image as a whole.
Even professional masters were not immediately able to create geometry on their nails. They needed time to learn. To do this, they used many additional tools to ensure that the lines were smooth and clear. But before you start drawing, you need to make the correct shape of your nails.
Rules for giving shape
You may be interested in:Black manicure with gold: nail design ideas
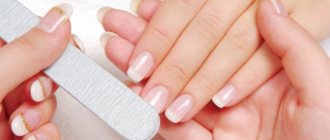
All nails should be the same length. This is very important, because a beautiful manicure will depend on it. There are several nail shapes that can suit both natural and extended nails: square, triangular and oval. All others are based on variations of these. It’s very easy to create the perfect shape at home, the main thing is to stock up on the following tools:
- File. You may need three of them, with different degrees of grain. The rough one is needed for grinding, and the soft buff is needed for polishing the nails.
- A brush or brush to remove dust that will form after sawing.
- Tweezers or scissors for removing cuticles.
- Orange sticks. With their help, you can push back cuticles and remove dirt from under your nails.
- Nail polish remover. Needed to remove old polish and degrease the nail plate before the next application.
- Cuticle softener.
You may be interested in:Minimalism in manicure: fashionable design options, technique, photo
So, let's proceed to the main procedure:
- If there is any old polish left, remove it with nail polish remover. This will degrease the surface.
- Push back and remove excess cuticle.
- Treat your hands and nails with a disinfectant.
- Next comes the stage in which you need to give the nails a certain shape. Choose it at your discretion, the main thing is that the nails are the same shape and length.
- Sand the nail until the surface is smooth.
- Finally, clean your nails from dust and lubricate your hands with moisturizer.
This season, just like in the past, there is a fashionable manicure with a geometric pattern, which is made in minimalism. Various stripes, squares and rectangles drawn in a scattered order are welcome here, and they should not occupy the entire area of the nail plate. For these purposes, brushes with thin and long bristles are used. To make the lines beautiful and thin, you don’t need to press hard on the nail plate, the movements should be smooth.
Geometry gel polish: the top design ideas
The geometry design with gel polish does not lose popularity, as it is beautiful in all possible options and shades:
- on black main color;
- for red;
- on white;
- with pink;
- on a nude background;
- with all the bright, acidic tones.
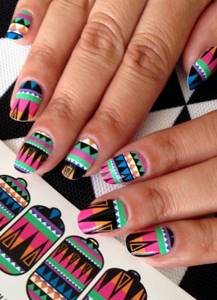
It can be made with thin lines in a minimalist style or a luxurious ethnic style, where several shades are combined at once.
Black

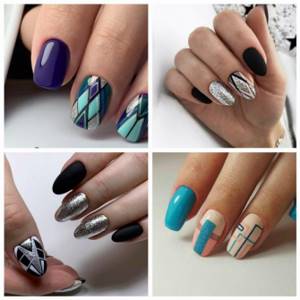
Black color in a geometric design looks elegant, but it must be diluted with light or bright shades:
- For the index and ring fingers, use the main tone in its pure form and with a matte top. Cover the little finger with silver. On the middle finger, the main background is made with a camouflage base and thin and wide intersecting lines are drawn on it in black. You can also add silver ones.
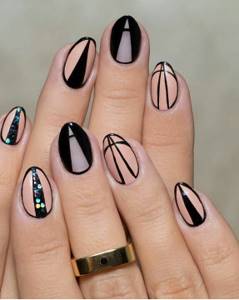
- Cover three nails completely with black and use a glossy finish. On the ring finger, on the main dark background, draw thin white lines in the form of diamonds and highlight one of the figures in bright pink. For the little finger, use a top with shimmer.
Red

Red in a geometric style can also be basic:
- They cover all nails except the plate of the index finger. The free edge is highlighted in red, and the rest is painted nude. On the latter, a wide white “belt” is drawn in the middle. And from it, triangles are made with thin black lines. Use a glossy finish.
- The nails of the thumb, ring and index fingers are completely red. A tiny black triangle is drawn on the cuticles and everything is covered with a matte topcoat. A red “belt” is made on the nail of the middle finger along the camouflage base, and a diamond is made from it to the free edge. On the little finger, on the same background, draw a large triangle from the center to the end.
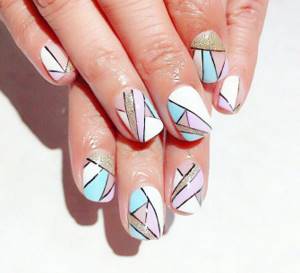
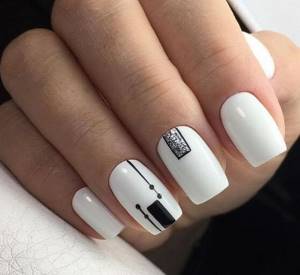
White
White color is used as a base color, but it can also be used to draw geometric lines against a different background:
- The snowy shade is taken as the main one for all nails. On the middle, draw a thin black line from the cuticle to the edge. It starts from a fatty spot located close to the skin. Two more are placed a little higher, but smaller.
On the ring finger there are two triangles connected in the middle by sharp corners. Use black and gold gel polishes. On the little finger the same image is repeated as on the middle nail.
- All plates, except one, are coated with white gel polish and a glossy topcoat. The nail of the ring finger is painted in a nude tone. Thin intersecting lines are drawn along it in white. You need to trace the plate along the contour with it. A wide V is drawn in the center in silver.
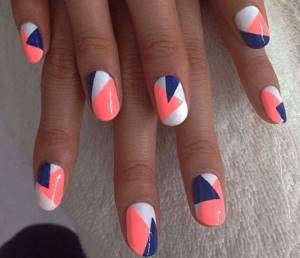
Pink
Geometry with pink is good in the following options:
- On 3 nails of each hand it is used as the main color. A blue background is made on the index and middle right. And along it in the center they draw a thin black line, on which pink triangles are “seated” on opposite sides. The same is repeated on the little finger and ring finger of the left hand.
- 3 nails are painted a bright shade of pink, the ring finger and little finger are painted light. On the latter, triangles and diamonds superimposed on each other are drawn in the center, using red, black and white colors. The images on both fingers should be slightly different.
Bright with sparkles
Geometric design can be catchy, but without frills:
- Purple and lilac gel polishes are used as base polishes. Using a lighter shade, intersecting lines are drawn across the entire plate in black to create a pyramid directed towards the end. Several of its scale details are decorated with silver glitter. The image is performed on 1-2 plates.
- All nails are covered with any neutral shade (beige, light blue, white, peach, etc.). For the little finger, use bright blue glitter on the entire plate. On the nail of the ring finger, from the cuticle, draw the outlines of triangles in black - up to the middle and to the free edge. They are not painted over. The tip of the nail and the sides are covered with blue sparkles, like on the little finger. They also mark out the hole on the middle finger.
- Pink should be used for the thumb and green for the index and little fingers. A white covering is made on the nameless one. The geometry on it is made in the form of triangles near the hole in silver, pink colors with a black outline. The same is done on the nail of the middle finger, but the geometric image is changed to 2 large rhombuses covering the entire plate. And they use green in addition to pink and silver.
On a nude finish
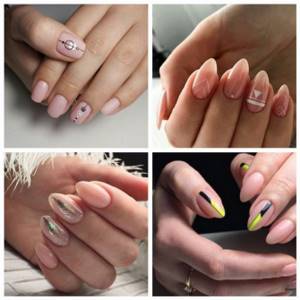
Geometry on a nude base color is usually made unobtrusive for everyday wear, but there are also bright options:
- A light beige flower bed is used as the base. The nails of the thumb and ring finger are outlined along the contour with thin black lines. A narrow strip is made in the center from the cuticle to the end. Wide descending lines are drawn from it in lemon yellow and red.
- Nails are covered with a peach camouflage base. On 1-2 plates, thin and wide lines are drawn in white so that they form geometric shapes. Some of them are set off by a golden flower bed. This version of the gel polish geometry is especially suitable for short nails.
- The main coating is made into a camouflage base. Geometry is done on all nails in black, with wide lines, but the images are made different. For example, on the ring finger there is a large letter L and a small triangle. On the middle one there is a wide stripe in the center. On the index nail there are 2 triangles with their vertices converging in the middle. And everything is covered with a matte topcoat
Instructions for applying a geometric pattern using tape
There are several ways to create geometry on your nails. You can make stripes using additional tools. One of these is paper tape; if you don’t have it, you can use regular tape. To do this, follow these steps:
- Cover your nails with the main color, which is where the patterns will be applied.
- Cut the tape into strips and glue them onto the nail plate in the order you want the design to be.
- Cover your nails with white or any contrasting polish.
- Remove the strips, it is important to do this carefully.
- If you use gel polish, dry your nails in an ultraviolet lamp.
- The final step is to apply sealer or topcoat.
Coating for geometric manicure
To successfully implement this design, it is not necessary to purchase a special coating.
- The democratic nature of manicure with lines and shapes explains its incredible popularity: you can use ordinary varnishes.
- For a clearer drawing, it is recommended to use acrylic paints .
They are quite easy to apply, and the color is rich. - Professionals can offer Shellac or gel polish , and this is quite justified: after all, gel and shellac last much longer than usual.
True, each color of such a coating is applied and dried under a lamp separately.
Drawings with a brush
If you don't want to use tape, you can use a brush to make the lines. The advantage of using it is that the lines can be made not only straight, but also zigzag. When applying them, consider the following points: lines that are drawn across shorten the nail plate, and if done the other way around, they visually lengthen it. To create geometry on your nails with a pattern, do the following:
- Cover your nails with the base color and then dry in a lamp.
- For ease of application, use a marker to draw small dots where the line will begin and end.
- Draw clear lines with the brush, whether they are straight or not.
- Dry in a lamp and cover with a fixative.
Useful tips
When starting to transfer your intended design to your nails yourself, do not forget about several important points:
- Before starting work, thoroughly clean the surface of the nail plate;
- use fresh varnishes ;
- wait until the varnish or paint dries before removing the tape and applying the next layer;
- You can design all your nails in the same style or focus on one or two fingers.
Manicure using the “geometry” technique is an option that can be adapted to both everyday and evening looks. Relatively simple to perform and not requiring special skills, nail art looks great on your hands. Experiment with shapes and color combinations to create your own unique design.
More interesting articles:
Manicure with triangle elements
The geometry on the nails has no restrictions in the use of colors. The main thing is that they must be harmonious. It also directly depends on the lady’s preference, but the figures painted on the nails are often done in black. The triangle is the most frequently used shape; it is quite simple to make, but if you combine it with different colors, then a professional hand is needed.
Volumetric figures
This year, this type of design, according to some experts, is the most frequently used. In manicure, the geometry on short nails can be decorated with additional elements, for example, rhinestones and stones. Volumetric designs look gorgeous at this length, but will also look beautiful on long nails. There are no particular rules in these designs, which allows you to combine different colors and geometric patterns.
Delightful gradient manicure “geometry” 2022-2023
A gradient manicure certainly evokes admiration, especially when done in deep and beautiful colors, decorated with patterns, stripes, bouillons and stones.
A lovely ombre manicure can be performed in several versions, and one of them is a geometric gradient manicure, which consists of small diamonds with a color gradient, as well as gradient stripes.
It is this magical ombre in a geometric style that will allow you to create a memorable and stylish nail design for the 2022-2023 season for a special occasion and an unrivaled look.
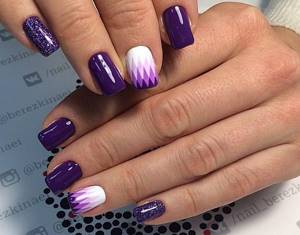
Manicurists demonstrated the best geometric ombre ideas in a magical purple shade of polish, complemented by a white tone, stones and sparkles.
Stamping
Stamping can be used to make various designs on the nails; it is applied using a plate on which the desired design is depicted. If you want to make geometry on your nails, then stamping will help you with this, as the design turns out smooth, clear and beautiful. This type of template is often used in salons; it significantly reduces the time of the manicure procedure itself; the designs on the nails are the same.
Fashionable manicure - popular options
In a geometric manicure, a lot depends on the color: how the shades are selected, how they combine with each other. In this design, you can fulfill any desires, make a unique manicure that will delight the owner herself. At the same time, it can be made universal and individual. To reproduce beautiful patterns, you need to practice a lot.
According to manicurists, geometry on nails will be in trend for several more seasons. After all, it can be modified and decorated with various additional decorations.
What geometry gel is needed?
It is better to choose a gel for geometry that has a thick consistency and is well pigmented. Ideally, it should be such that the lines do not need to be drawn in 2 layers, one would be enough.
Masters also use gel paint, which is designed for painting on gel polish. It meets all the requirements, but these products usually have fewer shades than standard flower beds. But the design with paint is completed faster.
The geometric style is no less diverse than hand painting. But you can learn how to do it much faster. Moreover, geometry is suitable for both the feast and the world, suitable for all ages.
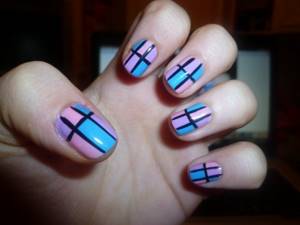
Stripes on nails
The most popular geometric design includes stripes. Usually they are painted in several colors, but they can also be found in one, it depends on the coating, whether it is glossy or matte. Stripes can also be combined with other patterns, for example, monograms. Most often, this design is made in pastel colors; it can be classified as a summer manicure with geometry. Stripes can be painted not only with a brush, they can also be done with sand, which also gives a delightful result.
This design is suitable for any nail length. When combined with rhinestones, the design can be suitable for an important evening. For those girls who cannot grow their nails, but really want to make this particular design, you can safely do geometry on short nails. This type of manicure is suitable for both work and everyday life.
Symmetry, asymmetry, abstraction
One of the powerful directions for generating geometric nail art ideas is abstraction combined with asymmetry. Just take a brush, a few shades of polish and combine different shapes to suit your mood. You can make this design on one nail, or several.
Consider several paintings by cubist artists - you will have many ideas for experiments in nail art, not only in terms of shapes, but also in combinations of shades.
Please note that simple patterns and combinations look more impressive. An abundance of shades and strokes can ruin the picture. Choose the most impressive elements and combine them in a balanced manner in the drawing.