- 1 How to use a magnet?
- 2 How to do a manicure with magnetic polish
- 3 What is it?
- 4 Stages of applying varnish
- 5 Secrets of magnetic manicure with gel polish 5.1 When is it time to remove a cat's eye?
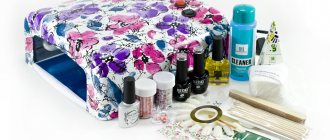
- 7.1 Selecting materials
- 10.1 How to keep your manicure longer
How to use a magnet?
Using a magnet to create a volume effect on your nails is quite simple. Most often, the packaging in which the set or the accessory itself was sold contains detailed instructions. The main thing is to bring it to the nail correctly, without touching the gel polish, but also without holding it too far. The entire process of creating such a spectacular manicure includes the following steps.
Nail preparation. Before applying the gel, you need to do a regular manicure: trim or push back the cuticle, trim the edge of the nail, treat the top layer with a buff so that the gel fits better on the surface of the nail plate. Apply a layer of base gel and bake it in a lamp.
- Decor. If desired, you can decorate the magnetic gel polish with additional rhinestones, foil, lace, drawings and many other decorative elements. This is best done after baking the coating in ultraviolet light, but before removing the sticky layer. In this case, the pattern of metal particles will not be disturbed, and the element will be well fixed on the nail.
- Finish coating. Apply a finishing coat to the finished manicure to secure the result for a longer period, bake it in a lamp and remove the sticky layer. Manicure is ready.
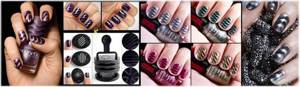
On sale you can find a large number of magnets of various types.
Most often they come in the form of thin plates of various shapes:
- round;
- rectangular;
- polygonal.
Such plates may contain only one magnet or be double-sided. Then each side gives the coating a certain pattern. In addition, they can be made in the form of volumetric cubes, washers, balls, and even in the form of pens or pencils. Unlike the large area of a regular magnet, the magnetic tip of the pen is quite small. By moving it over the coating, you can draw any patterns made from metallic dust of gel polish.
Many manufacturers claim that the brand of gel polish and magnetic accessory must be the same. In fact, the same magnet will work perfectly with all magnetic gels that can be found on the market. Moreover, the special accessory can be replaced with any magnet purchased in a store or obtained from dismantling old household appliances. Although they are not intended for creating patterns on nails.
New for the season
The imagination of masters has no limits. And this season, another interesting way to apply gel polish called “tiger eye” has appeared. It is done as follows:
- black gel polish is applied to the base and dried well;
- A line of cat gel polish is drawn from the center of one side of the nail and dried in a lamp;
- chaotically horizontal lines are drawn, each of which is fixed in the lamp.
The result is a bright nail that shimmers in the light with a super fashionable design.
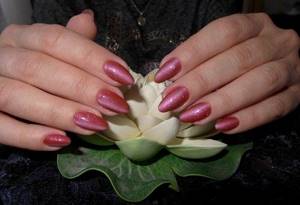
Pink cat eye
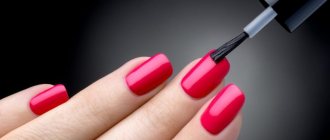
How to do a manicure with magnetic polish
The industry currently produces both regular varnishes with a magnetic effect and gel ones. In both cases, the effect of the spatulas is identical, for this reason here we will talk in detail about how to use shellac.
First of all, you need to prepare your nails:
- old varnish is removed;
- the edge of the plate is treated with a buff;
- cuticles are cleaned.
If an LED lamp is used, drying takes no more than half a minute. Ultraviolet will take exactly four times as long.
The nail is treated with a base compound, and after it dries, a special varnish with metallic inclusions is applied. Then a magnetic device is brought to the plate exactly parallel to it. After a few seconds (15-30) it is removed. Do the same with each nail in turn. After this they should be dried.
The procedure is repeated with the second layer.
The result is secured with a topcoat, and after it has hardened, the nails are treated with a de-sticking liquid.
Actually, this is the whole process. As you can see, it doesn’t take very much time, and in all cases, with proper care, it guarantees an excellent result.
If you wish, you can additionally decorate your nail plates with rhinestones, both white and multi-colored. It would be better to place them according to the resulting pattern, so the effectiveness will noticeably increase.
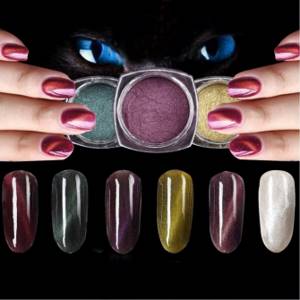
What is it like?
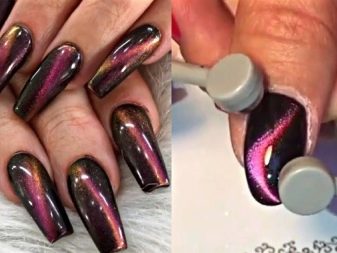
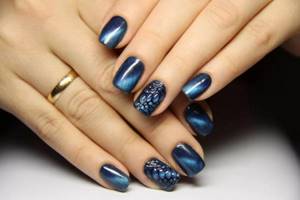
Magnetic varnish is a decorative coating that contains small metal particles. When exposed to a magnet, metal shavings move. The result is a drawing with a 3D effect. It’s not difficult to create nail art yourself. There is no need to acquire special skills.
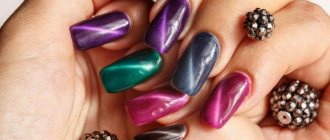
Using varnish with metal shavings, different designs are obtained. The result depends on the magnet, or more precisely on its shape. The principle of creating a manicure is practically no different from using a regular coating. Only immediately after applying it, you need to bring the magnetic block to the nail plate and hold it for a few seconds. No UV lamp is required for drying.
In addition to magnetic varnishes, gel varnishes are produced that contain metal particles. This coating can only be dried with a UV lamp. Polymerization without it is impossible. They last longer than regular formulations.
Varnish manufacturers offer magnetic varnishes in a wide range of colors. Among the popular ones this season: burgundy, silver, deep blue. Magnets are included and sold separately. For one polish, you can purchase several magnetic blocks and your nails will not look monotonous. Magnets have a specific pattern:
- rays emanating from the center;
- longitudinal stripes;
- transverse lines;
- waves, etc.
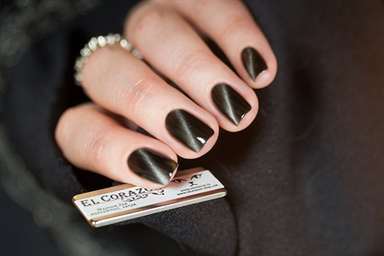
The 3D effect can be appreciated by moving your hand. At different angles, the drawing takes on a new shade, shimmers, and blurs. The coating looks like natural stones, for example, tiger's eye, cat's eye.
Top 5 popular brands
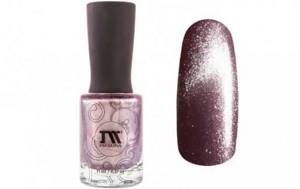
Masura Polish Magnetic Pearl, 11 ml
A delicate caramel shade combined with small metal particles creates the effect of a natural pearl after exposure to a magnetic block. The coating is stable, applied in 1-2 layers. Without waiting for the varnish to dry, bring the magnet closer to the nail and hold it at a distance of 1.0-0.8 cm for about 10 seconds.
- consistency – viscous, dense;
- presence of a base layer - yes;
- applying top coat for varnish - yes;
- drying method - in air;
- The peculiarity of the product is that it contains components of natural origin.
The cost of the bottle is 439 rubles.

Gel polish “TNL – magnet lux” No. 01 – sapphire with glitter (10 ml.)
The coating has a liquid texture, but even one layer is enough to obtain a dense color. This is achieved thanks to the rich pigment. After exposure to a magnet, it forms the effect of a natural precious stone - sapphire. The surface of the marigold shimmers with blue, blue and green shades.
- the product has increased resistance to external influences;
- manicure remains intact for 2-4 weeks;
- the effect is magnetic sapphire.
The cost of the bottle is 189 rubles.
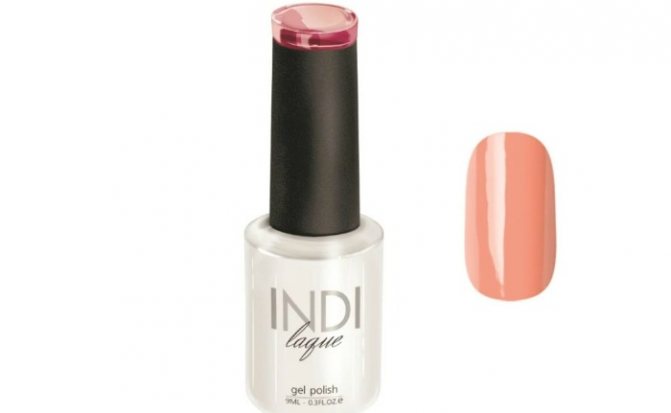
Gel polish Runail INDI laque classic shades, 9 ml
The coating is applied to the nail in a thin layer, creating a dense, color-rich and glossy surface. The varnish has the ability to self-level without running around the edges during application. Thanks to this viscosity, you can make manicures of different designs and realize the most daring decisions regarding combining the product with other nail art decor.
- type – gel polish;
- manicure durability – 3-4 weeks;
- compatibility with other coatings - with all top and base coatings, including Lasting gel, Laque, Shaper, VitaBase;
- polymerization time – LED lamp – 60 seconds, UV lamp – 120 seconds;
- coating removal time – 15 minutes.
The cost of the bottle is 122 rubles.

Gel polish PNB Meteorites 9D, 8 ml
A special feature of the coating is a long light flare, which moves at different angles when you move your hand. The effect of the varnish is cat's eye. The color is rich monochromatic purple. Manicure retains its original appearance for more than 3 weeks. Another advantage of the product is its ideal consistency, thanks to which it is possible to avoid smudges and a thick layer.
- type – gel polish;
- texture – dense, medium viscosity;
- the need for polymerization with a special lamp - yes;
- drying time – LED lamp – 60 sec., UV lamp – 120 sec.
The cost of the bottle is 480 rubles.
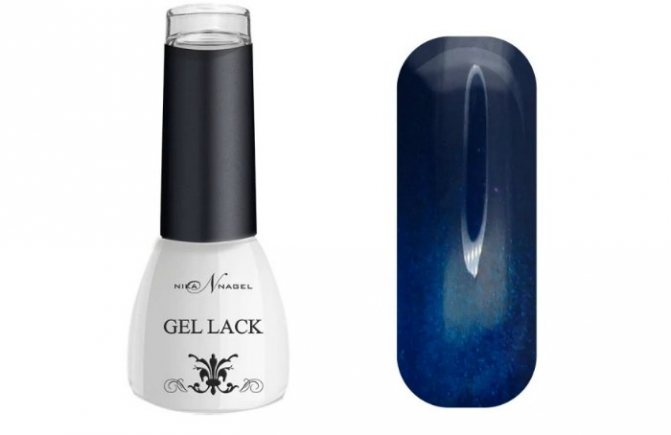
Gel polish Nika Nagel LUNA, 5 g
The product is part of the collection of super new magnetic coatings from the famous Nika Nagel brand. The rich tonality is maintained even when applying one layer due to its dense texture. The magnet provides the effect of a lunar path. The three-dimensional drawing will not go unnoticed by the environment.
- type – gel polish;
- effect - lunar path;
- texture – medium viscosity, dense;
- drying time – LED lamp – 60 sec., UV lamp – 240 sec.
The cost of the bottle is 440 rubles.
Stages of applying varnish
This type of design can be done not only in the salon; it is also very easy to do at home. The main thing is to follow a few rules:
- Do a basic manicure. Use a nail file to give your nails the desired shape, and after a relaxing bath, push back and remove the cuticles. Sand the nail plate so that its surface becomes perfectly smooth; if this is not done, the design may turn out ugly, there is a possibility that it will not have a smooth surface, but with tubercles.
- Apply base coat to nail plate. It is advisable to do this in a thin layer, evenly distributing it over the entire nail. After this, dry in an ultraviolet lamp for about two minutes.
- Having completed the previous stage, you can directly apply the magnetic gel polish itself. Shake the bottle before use. This is done so that the metal particles from the bottom are evenly distributed throughout the entire volume. If you have a question about how to apply magnetic gel polish, then a wide and comfortable brush will come to the rescue. When you have painted the first layer, place a magnet close to the nail itself. The distance should be no more than five millimeters; hold it or move it in different directions until you get the desired pattern. Then dry it again in an ultraviolet lamp. If you don't really like the result, this procedure can be repeated.
- The last final step will be applying the topcoat. After this, use a special liquid to remove the sticky layer. It can be applied to a napkin.
- Treat your cuticles with an emollient and lubricate your hands with moisturizer.
To ensure that the pattern on each nail is approximately the same, place the magnet on the same side. If it turns out that the drawing has shifted, then it can be easily corrected by bringing a magnet to it from the right side. A rich “Cat Eye” design with magnetic gel polish can be created by painting your nails black before applying, preferably a glossy shade. After this they will have a stunning view with an incredible shimmer. Depending on the consistency of the polish, the nail drying procedure differs. So, if it is too liquid, dry it separately. In this case, the drawing will not spread.
The result will undoubtedly please you, because you should get a unique design that will only be on your nails.
How else can you create the “Cat Eye” effect?
This effect can be created not only with the help of a special gel polish. You can use cat eye pigments.
This option helps to diversify the designs with gel polishes that you already have. With the help of pigment and a magnet, you can add a stunning effect to your manicure at any time and give your manicure a special twist.
How to use pigment?
To do this, you need to mix it with a small amount of gel polish, gel paint or top coat, and then apply it like a regular “Cat Eye” gel polish on the nail plate.
Experienced masters apply the “Cat's Eye” pigment directly to the undried layer of gel polish on the nail plate, mix it with a thin brush, and then create the desired pattern with a magnet. This option saves time and allows you to combine several pigment options in different parts of the nail plate.
Thanks to gel polishes and pigments with the “Cat Eye” effect and imagination, you get a manicure with an interesting design! Don't be afraid to experiment! Create unique patterns and show your individuality!
Secrets of magnetic manicure with gel polish
After completing the preliminary work and applying the main layers - primer, base, gel polish as a color base - you can begin to create magnetic patterns. What do you need to know?
- The magnet only works on liquid varnish. During the polymerization process, metal dust is rigidly fixed, and it is almost impossible to change the pattern. The time under the lamp is standard: under UV – 2-3 minutes, under LED – 30-60 seconds.
- One layer is enough. The second is needed to create the depth of a 3D effect or complex patterned design.
- The magnet should be kept at a distance of 3-5 mm from the surface of the nail plate.
- The pattern formation time is 5-10 seconds. There is no point in waiting 1-2 minutes to get a brighter decor.
VIDEO INSTRUCTION
This is basic information, and now some practical advice:
- The best magnetic patterns are created on dark substrates, so as the first layer it is better to use gel polish in rich colors - black, dark blue, cherry.
- The work should be carried out sequentially on each nail and immediately bake the finished design.
- The matte top gives a cat eye manicure an exceptional look. The lack of gloss does not spoil the 3D effect, but makes it more interesting and expressive.
- The speed of the magnet depends on the reaction of the gel polish. If the pattern is formed quickly, then the magnet must be moved in the same way. For “slow” varnishes, a sedate decoration mode is recommended.
- Any mistake can be easily corrected before polymerization. To do this, you just need to move the magnet from the wrong position to the right one. The gel polish particles will move on their own.
How to hold the cat eye gel polish magnet determines the type of design you want:
- perpendicular to the surface of the nail - the pattern will spread out to the edges;
- parallel to the nail plate - a bright, slightly blurred line will appear;
- at the edge of the nail or base - an ombre effect will be created.
By experimenting with the position and inclination of the blade, you can create original and effective decors. But if you want to achieve exclusivity in nail art, you will need to master a magnetic pen.
A magnetic pen for gel polish is both a special tool for manicure and a children's assistant for drawing on a magnetic board. Accessories give the same effect, so you can use any of the options.
Main advantages of the pen:
- thin tip - for complex patterns in any direction, even small magnetic patterns will be manageable;
- convenience - the magnet can be tilted in any direction, changing the intensity of magnetization and the depth of the decor.
It is with the help of a pen that you can create the most complex trendy designs: kaleidoscopes, Galaxy Nails and others.
When is it time to remove your cat's eye?
"Cat's eye" - long-lasting manicure. It lasts well for up to 3-4 weeks, but still there comes a time when it needs to be removed.
There is nothing difficult about this procedure. Despite its complex composition with metal particles, this shellac is removed in the same way as other similar products.
The wizard has three options:
- cut with a hard nail file -100-180 grit;
- dissolve with remover in a “bath” made of foil or with clothespins;
- use a manicure machine and carbide cutters.
After removal, you need to degrease the nail, shake off the fine dust, and you can again bring fresh manicure ideas to life with gel polish.
Preparing nails for manicure
Pre-prepare your nails. Make a hand bath based on salt, essential and natural oils or medicinal plants. Steam the skin for a quarter of an hour. Using an orange stylus, push the cuticle to the base of the nail, cut it off with thin nail scissors or tongs. You can also use a special liquid if you have it on hand. Next, give your nails the same length and shape, and file the free edge with a glass file. Ladies who have uneven nails should use a polishing buff. Give the surface a matte and rough finish, eliminating defects. Wipe your nails with nail polish remover without acetone or a special degreaser. After this, wait 10 minutes for the product to evaporate from the plate structure. Apply the first protective layer - the base for the varnish, and dry. If your nails are not naturally smooth, use a “smoothing” base (base). It will fill in the gaps, allowing you to apply the base coat as efficiently as possible.
It is important to understand that the more thoroughly the preparation is carried out, the better the final result will be.
Of course, the application of magnetic varnish differs from the technique of using other coatings. The procedure requires attention to detail, a steady hand and perseverance. You will spend more time, but the result is worth the effort and time.
- In a stagnant bottle, magnetized particles settle to the bottom of the bottle. Therefore, the tube needs to be turned over and rolled between your palms for 1-2 minutes. Do not shake the bottle under any circumstances, otherwise bubbles will form, which will ruin all your efforts.
- After preparing your nails, start applying the composition. Cover the plates one at a time, starting with the little finger. Remove the brush from the bottle and wipe off excess from the back. Place the brush in the middle of the nail, lightly push the polish towards the cuticle, drawing a semicircle.
- Next, go down to the base of the nail, do not allow the polish to flow onto the side cavities. Seal the tip of the nail by brushing along the edge. There is no need to apply several layers of varnish; one is enough. This is what distinguishes magnetic coating from all others.
- After applying the composition to the little finger, start creating the ornament. Don’t hesitate, the pattern is drawn exclusively on a fresh surface. Bring the magnet as close to the plate as possible, but do not touch the nail so as not to smear the polish.
- Keep the magnet strictly parallel, no need to twist or tilt it. Wait 60-80 seconds, then remove the accessory. You will see a beautiful pattern, after 3 seconds the saturation will partially go away.
- After treating your little finger, start applying polish to your ring finger. The technology is identical to the previous one. If you use a magnetic platform, your finger is placed on it. The exposure time remains the same 1-1.5 minutes. Remove the nail carefully so as not to smudge the polish.
- Magnetic coating does not require a final layer. For this reason, do not use a special dryer, top varnish, gloss, fixative, etc. Such compositions will make the drawing cloudy and dull, and all efforts will be in vain.
- If during the manicure process you accidentally smeared the polish and as a result it remained on your finger, act carefully. Soak a cotton swab or manicure pencil in liquid without acetone and remove excess. Manipulations are carried out strictly after the creation of the drawing.
The technology of using magnetic nail polish is not difficult if you follow the step-by-step instructions. Prepare the cuticle and plate in advance, give your nails a shape. Roll the bottle of coating between your palms, then spread over the surface of the nail in one layer. Keep the magnet parallel to ensure an even pattern. Experiment with shades and create your ideal look.
Which company is better to buy varnishes?
You can buy magnetic nail polish at any store specializing in manicure coatings; the price will directly depend on the company you choose. Let's talk a little about varnishes, their types, color trends and the companies that produce them.
Magnetic varnish colors
To begin with, let’s highlight the most popular manufacturing companies and their pricing policy:
| Company name | Price |
| Magnet | Set from 200 rub., individual copies – 100 rub. |
| Golden Rose | 150 rub. (there are many patterns, including Python). |
| Borjois | 250 rub. (you will find the catalog from your official representative or on the Internet). |
| Pupa | 100 rub. |
| Planet Nails | 200 rub. (many shades and easy to buy at any cosmetic store). |
| Nogtika | 150 rub. |
| Ruby Rous | 150 rub. |
| Legend Dance | 200 rub. |
| >Gelish | 100 rub. |
| Severina | 110 rub. (magnet included). |
| Limoni | 200 rub. |
| Leila | 220 rub. |
Patterns of magnetic varnishes
Now you need to look at the availability of these varnishes in certain cities. As usual, in large regional centers there is no problem with purchasing magnetic nail polish.
- In Moscow, Minsk, Nizhny Novgorod, Krasnoyarsk, Voronezh and St. Petersburg, many of the above brands even have official stores;
- In Ukraine (as well as in Moldova) all brands can be found in any big city: Kyiv, Lugansk, Crimea, and Donetsk;
- For those living in more remote towns (Volgograd, Novosibirsk, Izhevsk, Yekaterinburg, Novosibirsk) it is better to order these products on the Internet, since there are now dozens of resources that provide the opportunity to buy nail polish with a magnet.
You should not completely limit yourself to the information obtained on our resource; although we use reliable information, it can be changed by manufacturing companies without approval, so be sure to read the reviews about magnetic nail polishes on the forums. In many cities you can also find salons that provide magnetic manicures.
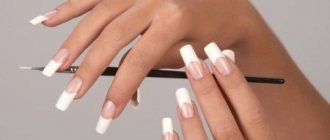
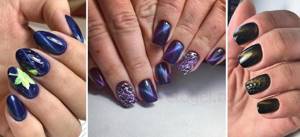
How to do a cat eye manicure
You can make a “Cat Eye” with a magnet both in the salon and at home. If you decide on the second option, then first select the right materials, and only then get down to business. We will tell you which varnishes and magnets are of the highest quality, and then give instructions for use.
We select materials
Choosing the right Cat Eye polish so you can actually use it is extremely important. No one is safe from fakes and low-quality products
Here we will talk about the brands that produce the best paints for this manicure.
- This is an excellent quality gel polish. It is made in the USA. The product is able to distribute itself over the nail plate; the technician doesn’t even need to touch it up. There will be no bald spots left.
- Bluesky Shellac. Despite the fact that this is a Chinese brand, it still produces quite high-quality products. This “Cat's Eye” shellac will last about three weeks. The manufacturer promises that the product will also protect nails from brittleness.
- This is a German brand that has already been appreciated by many craftsmen and amateurs. Very durable gel polishes are produced under it. They apply evenly even in one layer. In addition, the color scheme is well thought out.
- TNL Magnet. A good option for making a cat eye on your nails. The products from this South Korean brand are thick and well pigmented. They fit well with bases from other companies.
The above gel polishes are best used, but not necessary. You can use something else, as long as you like it.
It is best to buy varnish and magnet from the same manufacturer. This way they will fit together well, which will ensure the best effect.
It is worth noting that the pattern you get depends only on the magnet. It is he who determines what will form on the gel polish: stripes or intricate stains.
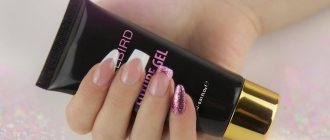
How to make a cat eye with gel polish
At the very beginning, you should prepare your nails for the procedure. To do this, you need to follow standard measures:
- Wash the hands;
- shape the nail plates with a nail file;
- remove or push back the cuticle;
- degrease the surface of the nail.
When all this is already done, you can get to work and apply the Cat's Eye shellac.
Step 1
Apply the base coat. This is a required step. This layer will even out the nail plate, smoothing out any unevenness that may be on it. In addition, this provides better adhesion to the varnish and increases the durability of the manicure.
The base layer must be dried under ultraviolet light. This item is also required.
Step 2
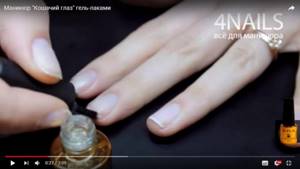
Let's start painting. How to apply Cat's Eye gel polish correctly? To do this, shake off the bottle of product so that the metal particles are evenly distributed. You want them on your nails, not at the bottom of the bottle.
After this you can paint your nails. Do this in one or two steps. The number of applications depends on the color you want to achieve and the thickness of the shellac.
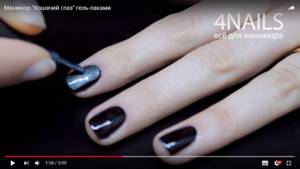
Dry the first layer (if there are two) under ultraviolet light.
Step 3

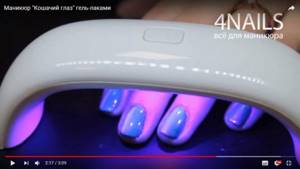
It's time to use the special tool. How to apply cat eyes with a magnet? We apply it while the gel polish is liquid. Place the device over the nail and hold for 15 seconds. Exposure of this duration will be enough for a pattern to form on the manicure.
After the procedure, be sure to dry your nails under ultraviolet light.
Step 4
Use a top product. With its help you can fix the varnish and the design. This layer should also be dried.
Step 5
Finally, you need to remove the sticky part of the top product. This can be done using a degreaser.
This is how you need to do a cat eye with gel polish. There is nothing complicated about the procedure.
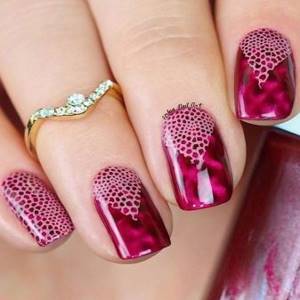
What goes with Cat's Eye?
You can decorate your manicure additionally. Use rhinestones, decorative sands and other elements for this. The decor should not be too bright, because “Cat’s Eye” itself is already eye-catching. You can glue rhinestones, lace and other things just on a few nails, not on all of them. This way the composition will not be weighted down.
You can create a beautiful manicure by making some nails matte and some with shimmer. Sometimes they even make magnetic stripes on a non-shiny surface.
You can decorate a cat eye manicure with a regular top coat. Apply a few times and dew will appear on your nails.
Painting on an iridescent surface will also not be superfluous. But remember that it should be moderate.
Secrets and tips
A few more things to consider:
- Gel polishes with this effect are usually very dense. This makes it possible to apply in one layer, which will dry well and be sufficiently accentuated.
- To enhance the effect, magnetic gel polish can be painted in 2 layers, and it doesn’t matter so much whether you magnetize each layer or not.
- The design looks beautiful when the design is located on all nails in one area.
- It happens that the highlight is not located in the middle, but seems to have moved to the side (that is, it is not where we would like it to be). You just need to tilt the magnet in the desired direction and pull up the metal particles.
- It will be even more impressive if you add it with an image of a cat. Her eyes can be made of little green stones. It is better to paint a cat with acrylic black or white paint.
A manicure with this effect looks good in a matte finish: apply a matte top coat to a glossy top and let it dry. But it suits the mood, since the matte version looks more restrained.
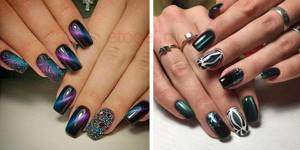
Magnetic gel polishes cat eyes
The peculiarity of varnish with the “cat's eye” effect lies in its density, depth and ability to change shades when light falls on the surface of the nail from different angles. In addition, under certain conditions, the varnish can last up to three weeks on the nail. It is applied in the same way as regular magnetic varnish, but there are some nuances:
- if the pattern slides to the side, adjustments are made using a magnet;
- expensive varnishes have a dense structure; applying them in one layer is sufficient; cheaper ones require repeated application;
- when there is a desire to enhance the “cat’s eye” effect, before using magnetic varnish, apply a regular black, glossy coating, and then the main coating;
- To prevent too liquid varnish from spreading over the surface of the nail, you need to dry each finger separately.
In addition to magnets, you can purchase a magnetic pen. Its operating principle is the same as that of magnets, but it is used to make inscriptions or more subtle ornaments on the nails. In order for the varnish to last longer, it is necessary to carry out housework with gloves, for two days after application, try not to get hot water on your hands, and do not visit the sauna or bathhouse.
How to behave after coating
In order for your nail design to last for a long time, you must adhere to a number of rules. If you do not do them, the likelihood of chipping or peeling of the coating will increase many times over.
Nail care rules:
- For 24 hours after the procedure, refrain from doing housework using household chemicals. After 24 hours, it is better to wash dishes and clean with gloves.
- In the first two days you should not take a hot bath, steam in a bathhouse or sauna. During this period, the polymerization process is not yet completely completed, so it is better to avoid high temperatures.
- You should absolutely not try to pick out the coating, as this can damage the nail plates.
- Do not wear the covering for longer than 4 weeks. This is due not only to nail growth, but also to the fact that the polish ages, cracks and can damage the nail.
- It is not recommended to file or even trim nails coated with gel polish yourself. Incorrect actions can lead to damage to the plates.
It is very useful to regularly lubricate the cuticle with nourishing oil. This will help keep your hands looking attractive until your next visit to the manicurist.
Recommendations
Helpful tips will help you get the perfect manicure with Cat's Eye shellac just like in a salon.
Secrets of creating a “precious” manicure:
- For good magnet performance, you need to choose shellac with a liquid texture, where metal dust moves easily. Polymerization firmly fixes the result, which cannot be corrected. Before drying, you can easily correct any mistake by simply moving the magnet in the desired direction.
- Drying time in an LED lamp is 30-60 seconds, and in an ultraviolet lamp it is 2-3 minutes.
- For simple designs, one coat is enough, but a double coat is necessary when creating complex designs and 3D effects.
If a highlight has shifted, this can be corrected by bringing a magnet to it and “pulling” it to the desired location. To obtain a clear pattern and volumetric effect, a magnet is brought to a fresh layer of varnish.
An unusual effect, when the highlights are located along the edges of the nail, and only the pigment is visible in the middle, is obtained if you hold the magnet with the end part perpendicular to the nail plate.
The ombre effect is achieved by holding a magnet to the outer edge of the nail. In this case, the metal particles move to the tip of the plate, as a result the color smoothly flows from dark to light shades.
More complex designs can be obtained by using 2 to 4 magnets. The manicure looks elegant and harmonious if the design is symmetrically located on all nails.
How to keep your manicure longer
The life of your manicure will be long if you follow simple rules.
Recommendations:
- protect from contact with detergents with aggressive components, do all housework with gloves;
- never pick up anything with your fingernail - chips and scratches may appear;
- In the first days, do not keep your hands in the water for too long and avoid temperature changes.
Some leave the holes at the base of the nail unpainted so that the coating lasts much longer.
Nail preparation
Before applying the varnish, it is necessary to spend 15 minutes in a bath consisting of salt, infusion of medicinal herbs and essential oils. Once the hands are prepared, several procedures are undertaken to prepare the nails.
- The nail plates are given a long shape, the edges are processed with a glass file, all irregularities on the surface are buffed, since it should be without irregularities and outwardly matte.
- The nails are wiped with a degreasing liquid, which must be allowed to dry for 10 minutes. After this, a base coat is applied.
- In cases where there are natural unevenness on the nails, you need to use a special base that smoothes out all the unevenness.
The more carefully the preparatory work is done, the better the final result will be.