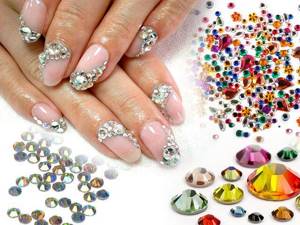
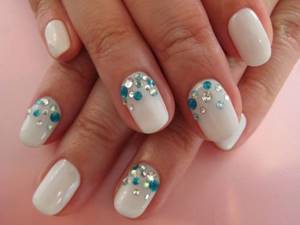
When going to a party, corporate event or wanting to diversify their manicure, women prefer designs with rhinestones. Imitation of precious stones looks stylish and expensive, especially if done carefully and tastefully. The correct placement of rhinestones on the nails will make the manicure elegant, and errors in the configuration of decorative elements can ruin even the most beautiful design. How to work with stones that imitate precious ones, what are the features of their use on various surfaces - this and much more in the article below.
Types of rhinestones for nails
Rhinestones for nails are a decorative element that imitates precious stones. The cosmetics industry today offers nail art masters and their clients many types of products made from different materials, different configurations, colors, and textures.
Based on the material from which the pebbles are made, they are classified as follows:
- plastic. Inexpensive, easy to use. Disadvantages: unpresentable appearance, fragility to wear;
- glass. They shimmer better than those described above, but cost a little more;
- zirconium. Decor made from cubic zirconium (not to be confused with natural stone - zircon). Expensive, they look as impressive as possible due to their reflective properties: many facets of the stone allow the manicure to shine;
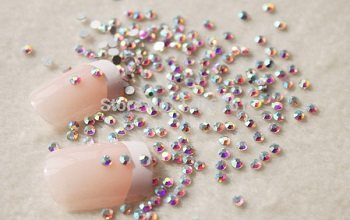
- faceted artificial crystal. The most famous jewelry made using this technique are Swarovski Kristal Pixie crystals. Crystal chips will decorate a monochromatic, colorless design and will become an effective addition to the gradient;
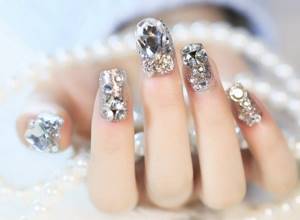
- natural rock crystal. The most expensive material, used for inlaying marigolds in elite salons, decorates the manicures of show business stars and high-ranking persons.
Comment! Choosing the most expensive product is not always clearly beneficial.
In the case of artificial and natural crystal chips, no one will distinguish a natural creation on the nails from a well-cut synthetic analogue.
Nail pebbles are heterogeneous in shape, which affects the ease of working with decorative elements and the practicality of wearing. The decor is available in the following configurations:
- round form. Classic broths are a component of Kristal Pixie crystal chips from Swarovski;
- flat-round. Visually they resemble half of a small ball: the convex side shines with small edges, the flat side allows you to firmly attach the pebble to the nail plate;
- fully faceted. Small elements, tightly seated by the master on the adhesive material.
In addition to the types described above, there are marigold stones that have the outline of a rhombus, square, circle, polygon, etc. in a planar projection. Many craftsmen consider cone-shaped stones that repeat the shape of a peak with a pointed tip to be the most effective.
Comment! A beautiful arrangement of rhinestones on nails is determined by the artistic abilities and taste of the artist, the shape, size, and material used to make the decor.
Fastening technique
An original and spectacular manicure with rhinestones invariably emphasizes your individuality and, of course, cannot help but attract the attention of others. True, it is not particularly comfortable to wear: pebbles cling to hair and various surfaces. But there’s nothing you can do about it, you have to choose - either beauty or convenience!

For beginners, it often happens that rhinestones, after sticking, lose their shine or simply come off. To avoid these troubles, you need to attach the crystals to your nails correctly, following a few simple rules.
General recommendations
How to glue rhinestones so that they don’t fly off - you need to follow all the details of fixation. First, you should do a classic manicure, prepare the nail plate and coat your nails with varnish. Then you can move on to the creative process... To securely attach rhinestones, craftsmen use two different methods:
- with special glue;
- straight to gel polish.
Before moving on to a detailed consideration of each of them, let's focus on general recommendations. So, in order to glue rhinestones, you need to do the following:
- mark the place where the rhinestone is attached, leaving a drop on the nail with glue or colorless varnish;
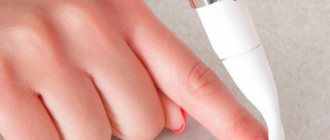
- hook the pebble and place it on the droplet - you can use tweezers, a magnetic or wet pointed stick, a needle or a toothpick as a tool.
- press lightly and let it stick;
- Cover its base (but not the surface!) with a sealing layer of topcoat.
On glue
There are two ways to attach decorative elements to the nail plate using glue.

The first is to apply it pointwise and then fix the rhinestones. The second is to lubricate each pebble with an adhesive. You can also combine them. It’s up to you to decide which is best; it all depends on personal preference.
Attention! There is no need to experiment by trying to glue rhinestones with regular “Moment” type glue. Nothing good will come of this - most likely, the outer shell of the crystal will dissolve and it will lose its shine. Special glue is quite inexpensive and can be bought at any specialty store.
Professionals recommend thinking through the future design in advance and preparing all the necessary tools and materials. There is no need to list them here - you will need the same thing as for a regular design using gel polish plus rhinestones and a topcoat without a sticky layer.
So, we have everything ready, now we can get started. It is important to follow the entire process step by step:
- Wash your hands thoroughly, then dry and disinfect them (for example, with alcohol).
- Carry out the necessary hygiene procedures: push back the cuticle and clean the nail plates with a buff, carefully removing the glossy layer.
- Remove dust with a brush and wipe your nails with a napkin (lint-free!)
- Degrease your nails with a dehydrator or other product you usually use.
- Apply the base in a thin layer over the entire surface of the nails (including the ends), then dry in a UV lamp for 2 minutes.
- Now you can proceed directly to the chosen design: If this is a manicure with gel polish, apply it in two or three thin layers (the thinner the better), not forgetting the ends of the nails. Dry each layer slowly (at least 3 minutes) in a UV lamp.
- Nails where there are no rhinestones can be immediately wiped with a degreaser, applied topcoat, dried and removed the sticky layer - we have them already ready.
- Now let's move on directly to gluing the rhinestones. You need to act carefully and quickly enough - the glue hardens in a matter of seconds and there will be no opportunity to correct anything later.
- Gently press the rhinestones onto the nail plate. Which method and tool is up to you to choose. I use tweezers to pick up the pebble and use a toothpick to make dots of glue on the nail. But in general, there cannot be exact instructions here - whatever is more convenient for you.
- Wait for the glue to dry. The drying time is indicated by the manufacturer on the bottle; Usually 1 minute is enough.
- Take the topcoat without a sticky layer and use a brush to apply it to the free areas of the nail plate. It is convenient to apply the top around the base of the rhinestones with a toothpick.
- Dry the entire manicure in a UV lamp.
Ready!

Attention! There is no need to cover the surface of the rhinestones themselves with topcoat! The finishing coat will hide their shine and the stones will become dull and cloudy.
As you can see, there is nothing particularly complicated in this procedure. However, when laying out a pattern, you need to be extremely precise, because the glue instantly attaches the decorative elements, preventing the pattern from being adjusted.
For gel polish
This method has one undeniable advantage - you will have time to adjust or correct something.
So, you have already done a manicure with gel polish (if not, see points 1 - 7 in the previous block) and have completely finished working with your fingers, which will not have rhinestones on them. Let's move on to the next stage:
- Apply top coat to the nails where you will be gluing the rhinestones, but do not let it dry.
- Place the pebbles on the top with a magnetic stick or tweezers. In this case, each element must be pressed in a little so that it seems to get stuck in the coating.
- Apply the decor sequentially, starting from the middle of the nail to the edge. The arrangement of elements can be easily adjusted.
- If the rhinestones float away from the desired place, you can add a little acrylic powder to the coating (the easiest way to do this is on a palette) - it will become thicker.
- After finishing with one finger, dry it and move on to the next nail.
- After drying, you need to take a thin brush and fill all the gaps between the rhinestones with the top coat, tracing each decorative element at the base, but without touching its front surface. This way we will securely attach each pebble to the nail plate and their shine will not fade.
- Finally, dry the entire manicure in a UV lamp.
The shining decor is ready!
Important! After gluing the rhinestones, it is better to use a finishing coating without a sticky layer - otherwise, when removing it, you can move the stones or damage their surface.
Video instruction
Of course, the methods for gluing rhinestones described above can be supplemented or modified, for example, using a base instead of a top. I suggest watching the following video, in which the master shows how to glue rhinestones onto gel polish in four different ways:
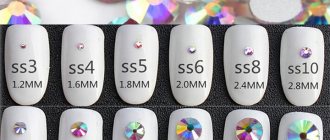
Sizes of rhinestones for nails
Lines of stones from different manufacturers offer decor of various sizes.
Swarovski crystals have the widest possible range of decoration diameters: from 0.8 mm to 9 mm, but the latter are usually used not by nail studio artists, but by textile decorators.
The average size of rhinestones for gel polish, which are most popular among visitors to nail studios, is about 3 mm. The arrangement of small decorative particles is easy to vary; large ones are usually placed in the center of the plate.
Attention! Large decor visually makes the nail smaller and draws attention to the shortcomings in the structure of the plate. Small pebbles are suitable for those with marigolds of any length.
Common Mistakes
It will not be possible to completely avoid shortcomings and mistakes, especially during the first attempts to create a manicure with rhinestones, but it is possible to minimize their number if you take into account the mistakes of your predecessors and try not to repeat them.
Style errors
How to glue rhinestones onto gel polish so that the manicure on which the effort was spent lives up to expectations depends on maintaining a sense of proportion.
The main thing is not to overdo it with the number of rhinestones, following the general rule - the larger the rhinestones, the fewer there should be on the nails.
In particular:
- Only 1, maximum 2 nails on different hands are decorated with large samples;
- this rule also applies when medium-sized rhinestones cover the entire area of the nail plate;
- to decorate all 10 nails, you need to select medium or small rhinestones, and the design made from them should occupy only a small part of the nail;
- if you want to completely decorate the surface of all nails, then minimally sized rhinestones or crystal chips are suitable for this purpose.
Nails decorated with rhinestones impose restrictions on all other jewelry present in the girl’s image.
Prohibited:
- rings, since rhinestones are their full replacement;
- jewelry with natural precious stones: it is recommended to use costume jewelry;
- the number of decorations should not be excessive: for example, if one nail is decorated with rhinestones, the look can be complemented with earrings and a pendant, selected according to the style and color scheme; if you have 2 inlaid nails, the pendant will have to be abandoned.
Another common style mistake is using gel polish with a shiny surface as a base for rhinestones. In this case, a clear excess of shine is created, making the image vulgar. If you plan to decorate your nails with rhinestones, you should opt for gel polish with a matte or satin texture.
Cheap plastic rhinestones look good on the fingers of a young girl, but are absolutely inappropriate on the image of a respectable woman.
Errors in material selection
Maximum attention should be paid to the selection of rhinestones and other materials, taking into account the following:
- if you plan to decorate your nails with rhinestones for a long time, you cannot use impractical plastic samples;
- When buying large, voluminous rhinestones, you must take into account that doing housework with such a manicure on your hands will be inconvenient;
- you should carefully select the top: if it is too liquid, it will not be possible to perform the inlay accurately;
- no need to buy cheap gel polish: it can crack or swell with bubbles when drying;
- in the absence of experience, the use of special glue is undesirable due to its short drying time: it will be difficult to correct the position of an incorrectly installed element of the design;
- When purchasing rhinestones of large and medium sizes, it is important to carefully check them for chips and correctness of shape: any defect will be clearly visible to others.
Errors during operation
The most important mistake is haste and attempts to reduce the drying time of the varnish: a coating in which the polymerization process has not been completed is fragile, and the manicure is short-lived.
Typical mistakes of inexperienced craftswomen that can ruin the work:
- Gluing the rhinestones too close to the tip of the nail: there should be about 1-1.5 mm left before it, otherwise chips will quickly appear on the beads located at the very edge.
- You should not glue rhinestones near the cuticle itself: let there be some free space here.
- Attempts to install the next rhinestone between the samples already glued and fixed under the lamp: the rhinestones are placed sequentially, one after the other. If necessary, their position is immediately corrected and only after that the nail is sent for drying.
- If you have little experience, you can divide the drawing into separate fragments and dry each of them sequentially. For example, when applying to the entire area of the plate, first cover only one half of the nail with rhinestones, dry it, and then proceed to the second half;
- Installing rhinestones with your fingers. You should use a magnetic pencil, sticks or toothpick.
- Applying a top coat over rhinestones: this leads to a decrease in their reflectivity and a decrease in shine: only the free areas of the nail plate and the end edges of the beads should be covered with the top coat.
- Incorrect order of applying the finishing coat after installing the rhinestones: the areas between the rhinestones are treated first, the brush moves first along the nail, then across it. On areas bordering the cuticle, the top should be applied last and dried immediately.
If you neglect this rule, the composition, flowing under the cuticle, will create a roller around the perimeter of the nail plate. This will not only make the manicure less attractive, but will also significantly reduce the strength of the varnish coating.
Care errors
How to glue rhinestones onto gel polish so that they stay strong enough and for a long time for 3-4 weeks is just as important to know as it is to know about subsequent care.
- use gloves when working with household chemicals;
- stop trying to use your nails when you need to pry or scrape something off;
- carefully file the edge of the nail;
- restore the top from time to time.
How to glue rhinestones on nails
Laying out rhinestones on nails requires that the artist has the materials to secure them. Depending on what the specialist is working with: natural or strengthened, extended nails, the means by which the nail expert attaches the pebbles vary:
- Manicure glue - pebbles are placed on this product when working with natural nails and regular varnish. Two-component adhesive takes longer to dry, but if the decorative element is placed incorrectly, it can be moved. One-component (“superglue”) dries instantly, making it impossible to correct the design if the pebble is placed incorrectly on the nail.
- Base and top coat. The properties of the base and top ensure adhesion of the products to the nail surface and decorative coating. It is advisable and convenient to use compositions for the purpose of gluing decor: you can change the arrangement of elements on the nail plate as much as you like. Rubber-based products are considered preferable for nail inlay: they are quite viscous and can hold large stones.
- Gel. It is used to secure large elements because it has a viscous texture. If rhinestones are laid out on the entire nail, no gel is used: the stones “sink” in a large amount of a high-molecular composition.
Design

Knowing the technology of how to glue rhinestones onto shellac, you can create interesting and varied manicure designs. A particularly complex and interesting design can be made if the rhinestones are glued with glue and can last a long time. If self-adhesive rhinestones are used, then whether or not to spend energy on a complex design that will only delight the day is an individual decision.
Rhinestones are most often used in the decoration of French manicure. They make it more individual, original and sophisticated. At the same time, it does not become vulgar, even if quite a lot of rhinestones are used. Simple transparent rhinestones look most organic with it, but sometimes solutions made in color seem original and unusual. It is better to stick rhinestones onto shellac, moving from large to small, as shown in the video.
What is the best glue for rhinestones on nails?
The choice of adhesive depends on the type of stones. Nail art masters recommend attaching large pebbles with one-component superglue: it will quickly adhere to the surfaces, allowing you to avoid moving the decorative element. In this case, the exact location of the rhinestone is thought out in advance, since it will not be possible to adjust the design.
By gluing many small pebbles, forming a pattern, drawing, or inscription from them, they use a two-component adhesive, which allows you to change the location of the decor.
Comment! If the decorative stones are translucent, then the glue for rhinestones on nails must be transparent, without color.
Choice of rhinestones
The modern market offers rhinestones for every taste: all kinds of sizes, colors and shapes. Often, the choice of one or another stone is a matter of taste, but keep in mind a few points:
- Higher quality stones are made of glass or crystal; they are more durable, less susceptible to chipping, and look more expensive.
- Plastic rhinestones are cheaper, but also lower in quality. On the other hand, if you need such decoration for one evening, why pay more?
- Smaller stones are easier to attach and hold better.
- Don't go for the cheapest materials. Even good glue cannot compensate for the low quality of the stone.
- If the rhinestone is not frayed or chipped, it can be safely used a second time. So for lovers of shiny manicure, it makes sense to immediately opt for high-quality pebbles.
Rhinestones made from Swarovski crystals are especially popular.
You can also glue beads (caviar manicure) and bouillons (small balls similar to beads) onto your nails.
How to take rhinestones for nails
Coating nails with gel polish with rhinestones and inlaying natural nails requires the presence of a manicure tool capable of carefully picking up one or more crystals:
- thin tweezers;
- orange stick;
- toothpick;
- moderately sharpened wax pencil;
- thin brush.
Comment! When performing an inlay manicure, wooden utensils and a brush must be wetted - dipped in water for a few seconds.
Required tools and materials
The first purchase of everything necessary to create a masterpiece from gel polish and rhinestones will require significant financial costs.
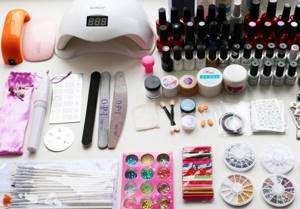
Most of the tools and materials will last a long time, so it’s better not to save money and purchase:
- lamp for drying varnish. Possible options: UV lamp - inexpensive, allowing you to dry 2 hands at once, but requires a long (more than 2 minutes) drying time; LED lamp - more expensive and faster (only 30 seconds for drying); hybrid - the most expensive, but combining the advantages of the 2 previous options;
- primer - a composition for degreasing the nail plate;
- base coat - the first layer of varnish that smoothes the surface of the nail and hides minor defects;
- colored gel polish that gives the nail the desired color;
- top is a protective finishing coating that can simultaneously be used as an adhesive. If it will be used to fix rhinestones, it is advisable to give preference to a thick composition without stickiness. You can increase the density using acrylic powder by adding it to the top in a ratio of 1:3;
- glue (optional);
- tools for pre-treatment of the cuticle and nail plate: bath, nail scissors, tweezers, orange sticks, buff;
- magnetic (wax) pencil for working with rhinestones. If it is not available, you can use an orange stick for this purpose, moistening its tip with water;
- clinser - liquid for removing the sticky layer;
- a set of brushes for applying base, varnish, top and clinser.
How to beautifully put rhinestones on your nails
Creating rhinestone designs on your nails requires concentration and skill. Nail art masters recommend that beginners first hone their skills on training tips or any substrate.
Using a thin brush dipped in an adhesive (glue, gel, top, base), draw the outline of the desired design. After this, pebbles are “placed” on the marked lines and points.
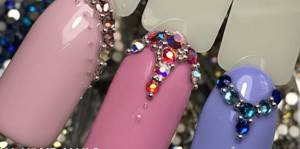
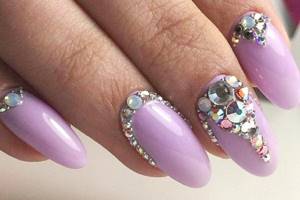
Simple designs are laid out on nails with rhinestones - geometry, abstraction, chaotic arrangement, for example, with Swarovski crystals or more elaborate patterns and complex lines.
Design options
What pattern to make depends on the imagination of the fashionista herself. You can consider the following options:
- one crystal per finger;
- along the contour of the cuticle;
- along the tip in imitation of French;
- geometric figures;
- flowers;
- pattern on a red or mint background.
The best options are presented in the photo.

How to glue rhinestones on nails
Inlay requires the master to have the following tools and means:
- adhesive (gel, top, base, glue);
- stone picking tools;
- rhinestones of the desired size and shape.
How to glue rhinestones onto gel polish
To attach decorative elements to nails coated with gel polish, you must:
- Apply sequentially, drying each layer in a lamp: base, colored gel polish (do not remove the sticky layer).
- Using a brush dipped in the base coat, mark on the nail plate the places where the rhinestones will be attached.
- Using the selected tool, place the pebbles at the desired points, slightly pressing them into the surface. Dry in a lamp.
- Using a thin brush, pick up a small amount of the base product and circle the perimeter of each pebble. Dry.
- Cover with top coat those areas of the plate that have no stones on them and place them in the lamp. After drying, remove the sticky layer.
How to glue rhinestones onto regular varnish
The decor is attached to regular varnish using glue in the following order:
- A colorless base is applied to the nail.
- After drying, the plate is coated with decorative varnish.
- On the dried surface, use a thin brush to mark with glue the places where the decor will be.
- Using a wax pencil or wooden stick, the stones are placed on the nail surface.
- To secure, apply a base layer.
How to attach rhinestones to a matte top
A matte top requires a more careful application of the adhesive, since the glue, base, top, and gel will be visible on a non-shiny coating, even if transparent.
In this case, the manicure is done according to the classic scheme: base-gel polish-matte top, after which an adhesive is applied to the dried nail, followed by pebbles.
Practical tips and tricks to become flawless

After reading the step-by-step instructions, many people think that everything is simple and no nuances need to be taken into account in the process, but this is an extremely wrong approach. Real experts give a lot of useful advice, which it wouldn’t hurt to use if you really want to look impressive and stylish, and most importantly, not to worry for a second that stones will fall off at the most inopportune moment.
Style Guide
Perhaps it’s worth starting with the fact that everything should be in moderation and an excess of stones on the nails may not only not decorate your hands, but also completely ruin the image and all your efforts will go down the drain. No need to turn yourself into a Christmas tree, it doesn't look good on any girl.
- Do not get carried away with overly large stones in your manicure, otherwise it may look provocative and not beautiful. If there is a large stone on the nail, then only one, but if there are small ones, a scattering is possible.
- Always try on rhinestones to match your nails, as well as the color and design, pattern, if any. The overall look should look harmonious, complement each other, and not just be colorful.
- For young girls, pebbles in delicate and light shades are more suitable, but older ladies can already pay attention to deep and rich tones of red, burgundy, blue, green and similar options.
- Stones of silver, golden and transparent colors will suit almost any nail shape and coating color.
- It doesn’t hurt to always follow the rule that says that for short nails you need to select small rhinestones, and for long nails you can use larger ones.
The simplest, but at the same time stylish design for a manicure with stones can be considered the French French, when the stones are carefully laid out along the edge of the nail. This manicure is suitable for every day and for going out, it will look great on short and long nails, and the right colors of gel polish will make it unique.
Recommendations for rhinestone stickers
Many experts claim that if you handle rhinestones carefully when installing them, then after removal they can be used again, which is very beneficial and convenient. However, this will require effort and it will be difficult for non-professionals to clean the rhinestones from the remnants of dried topcoat. But there are still many nuances that it wouldn’t hurt to take into account when planning to learn how to properly glue rhinestones onto glue or directly onto gel polish.
- Carefully choose the gel polish that will serve as the basis for decorating with rhinestones; it must be of high quality, and after drying it must not bubble or crack.
- The most convenient way, according to professionals, is to arrange rhinestones using an orange stick dipped in water. However, some prefer to use tweezers, toothpicks and even a special pencil for rhinestones, although not everyone has one.
- The topcoat that you will use to coat the distance between the rhinestones should not be too liquid, especially if you are working without glue. Otherwise, the pebbles may “float away”, shift and move out of the right place.
- You should not cover the rhinestones with a top coat, as this can make them either completely invisible or dull and unsightly. They will not shine and sparkle, so the expected gloss will not be achieved.
If you want to cover the entire nail with stones, start from the top edge exactly in the middle, since this is the place that will be most noticeable to others. Try not to rush and do everything very carefully, laying out the rhinestones in even rows and adjusting as necessary. Always try to keep your work area clean to prevent dust and debris from getting on your nails, which can completely ruin the appearance of your manicure.
How to remove rhinestones from gel polish
The first step in removing old manicure with pebbles is removing the decor.
Beginning self-taught artists sometimes refuse rhinestone patterns on their nails due to fear of difficulties when removing the decor. Stones are removed:
- wire cutters, if we are talking about large elements;
- file;
- cutters.
Nippers (tweezers) are not used by workers, but by dull ones that cannot be repaired. The new tool will quickly lose its sharpness due to the aggressive material of the stones. Use tweezers to carefully pry up the decorative element, removing it from the nail surface, after which the layer of gel polish is filed off with a file.
If you don’t have unnecessary pliers, you can pry off decorative elements with a hatchet tool. No effort is needed to avoid injuring the nails.
Using a manicure cutter, at low speed, pry up the pebbles from the side or file them off from above, after which the nail is filed down using a nail file.
More detailed techniques for removing decorative elements from nails are described in the videos below.
Nail design with rhinestones - video
You can watch the whole process briefly in my short video tutorial. Don't forget to subscribe to the channel if you haven't already :)
Practical advice
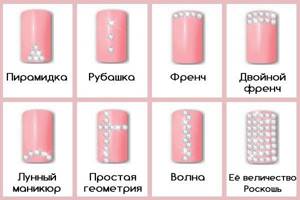
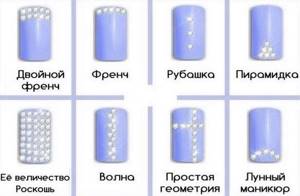
- Firstly, you need rhinestones know a sense of proportion: Decorating all your nails this way would be overkill. You can inlay one nail completely and make patterns on the rest. Here's a cheat sheet for rhinestone patterns:
- Think about the jewelry you will have on this hand and in your overall look: it should also be in harmony with the design. If you decorated your entire nail with rhinestones, then it is better not to wear jewelry on this hand at all. If gold rhinestones were used, then your jewelry should be made of gold, if silver rhinestones, then silver, for other colors, pay attention to cold/warm tones. Here I can recommend reading color theory.
- Once removed, these rhinestones can be reused – you won’t even be able to tell from them that they have already been used before.
- Think carefully before combining the color of rhinestones and the color of gel polish - they should also look organic. Silver and gold will suit almost any color, but you need to know how to choose multi-colored rhinestones.
- Gel polish for rhinestones is also not suitable for everyone : you should not use pearlescent colors, colors with sparkles and the like for this - this will be too much. In this case, the number of gel polish colors should not exceed two.
- You can arrange them with an orange stick (that’s exactly what I do), a cosmetic pencil, or whatever is convenient for you. There is even a special pencil for rhinestones.
- Under no circumstances should you cover the rhinestones with a top coat, otherwise they will not shimmer and play colors so beautifully in the light, but will turn into an ordinary drop of glass.
- The top should not be liquid so that the rhinestones on it do not float away in different directions, breaking the pattern. Tops with a sticky layer are best suited for this purpose - they are, by definition, thicker.
- When inlaying the entire nail, start from the center line and the tip of the nail and make sure that the lines are even and parallel to the side bead. When placing the remaining rows, try not to touch the already placed rhinestones, so as not to break the symmetry, so as not to have to align everything all over again. At the same time, you should not try to place the rhinestones between each other; it is better to let them run parallel. In this case, the number of rhinestones in symmetrical lines should also ideally match.
Step-by-step manicure with rhinestones at home
Drawings with rhinestones on nails at home are much easier to do than images drawn with a brush: you don’t need any artistic skills for this.
For a design with inlay you will need:
- black and red varnishes;
- manicure tapes;
- nail glue;
- thin brushes;
- rhinestones;
- fixative
Instructions for creating a nail design with rhinestones are presented step by step below:
- Cover your nails with red varnish and dry.
- Glue the manicure tapes into a triangle so that its base coincides with the base of the nail.
- Use a thin brush to fill the space limited by the ribbons with black varnish. Dry.
- Apply a small amount of glue with a brush (the area of the applied product should not exceed the area of the stone).
- Place the rhinestone on the nail, pressing it slightly with a wooden stick.
- Cover the plate around the rhinestone with a transparent fixative.
What are rhinestones
Rhinestones are imitations of precious stones , which shimmer very beautifully on the nails, emphasizing the beauty of the manicure. Can be made of glass , crystal or plastic . They vary in color and size. The back is flat so that the decoration sticks more firmly. And on the front there is a sparkling pebble in relief. It is thanks to this convexity that light is refracted and the product shines beautifully.
Rhinestones for nails
To stick crystals on your nails, you need the following tools :
- tweezers, dots, toothpick or any other handy tool to pick up and stick the accessory;
- glue for gluing shiny decorations;
- nail polish remover for manicure correction.
A sketch of a nail design or a scheme for laying out rhinestones should be thought out and prepared in advance.
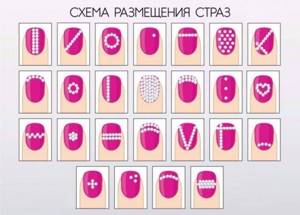
Schemes for laying out rhinestones
The location of the stones on the nails can be anything. If you do not have the necessary dexterity, experience and artistic abilities, you can use one of the standard schemes for laying out decor:
- Location at the base of the nail. This design is decorated with one or more rhinestones, a crescent is highlighted in a lunar manicure, and laid out in a “pyramid” - a triangle.
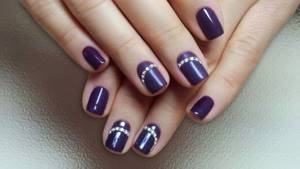
- Longitudinal lines: one or several (“shirt” - an arrangement of three or four stones at a distance from each other, like shirt buttons).
- Transverse lines: single or several.
- Diagonal.
- Simple geometry - shapes: rhombus, oval, triangle, heart.
- French manicure with rhinestone inlay.
Below are the simplest schemes that even a novice master can master.
Useful tips
Finally, we have collected useful tips and life hacks for you that will help you create a beautiful and high-quality manicure with rhinestones:
- Be responsible when choosing materials. Quality stones will look better, last longer and can be reused a second time. Choose a good gel polish so that it does not crack or bubble after drying.
- When gluing rhinestones, it is better to use topcoats without a sticky layer, and the topcoat should not be too liquid.
- Manicurists prefer to apply the nails using an orange stick dipped in water.
- Try not to get the top coat on the surface of the rhinestones. This causes them to lose their attractive shine.
- Small pebbles hold better.
- It's better not to get carried away with large rhinestones. A large number of large decorations can make a manicure not only uncomfortable, but also vulgar.
There are a great many options for displaying rhinestones. With their help, you can do a French manicure, a moon manicure, lay out a graphic design, add rhinestones to an artistic painting (for example, put a rhinestone in the center of a flower), cover the entire surface with rhinestones, etc. Try, experiment, but follow moderation.
How and how to lay out a design with rhinestones: three mounting options
To perfectly fix the decor, it is best to use a plastic, flexible base with high adhesive properties. It should be thick, not spread during the process, not crumble or crack after hardening. The ideal option is rubber bases or thick gels.
Mount to base, top or epoxy glue
Liquid material is applied to the finished smooth surface of the nail with a brush, design elements are laid out, and dried in a lamp. In the case of glue: it dries in air for up to 5 minutes, but you won’t be able to move such a pattern while creating the design later.
When laying out, a light edge should form around the crystal. The stone should not sink in the adhesive, otherwise it will lose its shine. After hardening, you can additionally carefully walk between the stones with a brush dipped in a topcoat without a sticky layer. Due to the absence of a dispersion layer of topcoat, dust will not get clogged between the stones, and the bright shine will remain for the entire period of wear.
Gel mount, gel jelly
Thanks to their thick, viscous texture, extension gels hold medium-sized stones better. They are convenient for laying out not one, but several elements, a composition that occupies more than half or a third of the nail. They do not blur and hold their shape well. Even so, it is better to additionally secure the gaps between crystals or pearls with a brush and topcoat.
Gel mount mixed with acrylic powder
The composition turns out dense and viscous, like plasticine. Recommended for fixing large elements. After drying, it is not as flexible and elastic as a base or gel, but it does its job perfectly. To knead, pour a pinch of powder onto a sheet of paper, put gel on a brush and mix until smooth.
View this post on Instagram
Posted by Manicure | Novoaltaysk (@zlodeeva_nails_studio)
It is worth noting
In order to fix the rhinestones, you do not need to use glue - this is a common mistake that can ultimately ruin the entire manicure.
You need to glue the rhinestones after you have applied the top coat of shellac and the base tone - there is no point in painting over the rhinestones, so the procedure should be done when nothing else will be applied to the nail except the rhinestones. If, in addition to the stones themselves, additional patterns and lines are used on the nail, then they must also be drawn before the rhinestones are applied.
So, in order to properly make shellac with rhinestones, immediately after applying the base, you should place shiny decorations on the nail plate in the required order, and only after that send everything together to a UV lamp for drying. At the end, when the nails are dry, it is enough to simply fix the stones with a finish. To make it easy to take rhinestones and place them neatly on the nail, you can use a regular toothpick. To do this, just wet its tip a little and touch it to the outer faceted side of the rhinestone. As a result of this manipulation, the pebble can be easily transferred to the nail and placed in the right place.
In order for the rhinestones to stay on your nails for a long time, you should take some precautions - do your homework with protective gloves, handle your own hands carefully and, most importantly, try not to constantly touch everything around with protruding rhinestones! It is the latter that most often leads to rhinestones peeling off ahead of time and spoiling the presentable appearance of the manicure.
Application process
Now we will apply gel polish with rhinestones on the fingers that we did not cover with gel polish in the previous process. We will need small rhinestones, an orange stick, and colored gel polish that will be used in the nail design.
If you decide to decorate one nail on both hands, then first, for convenience, we decorate the nails not simultaneously, but one by one. We file the nail plate with a soft file and degrease it with alcohol.
Cover with primer and dry. Apply the first layer of colored gel polish and dry. Then we dry the second one too.
We apply it with a top coat, do not dry it, and start laying out the rhinestones. We attach the first one at the very top of the nail in the middle, then clearly down one by one in a straight line, pebble by pebble. Then the next row, then the third on the other side of the first and so on to the edges of the nail on both sides of the center line. If you need to adjust the rhinestones, do it with something thin, a toothpick, for example. After finishing laying out the pebbles, dry the resulting layer in a lamp for two minutes.
Then dry in a lamp for two minutes. If you are not sure of a good result, repeat again and dry. Wipe with alcohol and your manicure is complete. See what the gel polish with stasis looks like in the photo.
It turned out just great! For a New Year's party, wedding, going to the theater, pair with the appropriate outfit and you are simply irresistible! What other patterns you can make with rhinestones depends on your imagination. We'll give you some tips so that the pebbles hold tight and don't fall off and your manicure is flawless.
- It is not recommended to cover the rhinestones completely with topcoat; it is enough that they are applied to the topcoat and the gaps are painted over;
- The top on which the pebbles are applied must be thick, otherwise the pattern will not work out and may blur even before it is polarized;
- If you want to lay out the entire surface of the nail, then start from the center, as we described in the “chainmail” pattern. If the pebbles are of different sizes, then lay out the larger ones first and again start from the center;
- If you decide to apply pebbles with glue, you must be confident in your skill, since you can correct a pattern that has not yet hardened on the top, and the glue “sets” instantly and you have no room for error;
- To design nails with stones, it is better to use glass ones, but plastic ones are also possible, although they are duller and do not look as beautiful as rhinestones;
- pebbles measuring 1.5-2 mm will look good even on short nails. Do not use very large pebbles;
- If you want to use rectangular, square or other stones rather than round ones, remember that they should be in harmony with the pattern on the clothing or jewelry. Therefore, it is still better to use round rhinestones;
- Such a manicure with nail design will last from 15 to 20 days, if the technology was followed during application, and care was taken when wearing it. There is no need to file the nail plate, thereby disrupting the “sealing”. For household work, use gloves and do not use hot water;
- remove the stones with a manicure pusher one by one. If the pebble cannot be removed, then it is cut off with a nail file.
If you follow all the advice of manicurists, then even at home, you will be able to design your nails with ease.
The task of gluing rhinestones on nails is not difficult. But in order to cope with it at home, you need to find out the step-by-step sequence of this procedure and detailed information about the technology. In some cases, you will need a special adhesive and additional tools.
Step-by-step layout procedure
If you have completed the main manicure and secured the main background with a top coat, then you can proceed to gluing the decor. It is better to apply them on two nails - no more. The pattern can be symmetrical - it will turn out both beautiful and practical. In addition to the rhinestones, prepare thin pliers. You can apply rhinestones using an orange stick, but this requires some skill.
You can immediately buy a ready-made kit for gluing pebbles. It already contains rhinestones of different colors and sizes, special glue, and orange sticks. The shelf life of the finished manicure will directly depend on how you care for your hands. For example, after creating this beauty
It is advisable to have as little contact with water as possible during the day.
It is worth listening to other tips that will help your manicure last more than three weeks. Although masters do not recommend wearing the same coating for more than two weeks, the natural nail grows back and the manicure no longer looks so aesthetically pleasing. In addition, the coating begins to overload the nail, you can break it.
- Wear protective gloves when performing any household chores.
- Hot water will steam your nails, and rhinestones may fall off quite quickly if they were poorly glued.
- Rhinestones can come off along with the coating if you applied the main layers of varnish poorly: the free ends were poorly sealed, or went beyond the nail.
If you handle your manicure carefully, it will delight you with its appearance for a long time. When you need to remove pebbles, it is better to go to the salon. There they will be removed for you with a special pusher; in particularly difficult cases they will be cut off with a file.
It is worth remembering that if you do not give natural nails
grow and take a break from gel polish, then their top layer will thin out, they will become brittle and will constantly flake off. Even if you have strong nails, you don’t need to constantly overload them with rhinestone designs.