Most girls regularly get their nails done. The fashion for this type of manicure continues for a long period of time. With such nails, your hands always look well-groomed, and the polish lasts much longer. However, it should be understood that such nails require regular correction. Once every 2 weeks you need to regularly visit the salon to have your nails corrected. This process takes not only too much time, but also a decent amount of money, so more and more often girls began to wonder whether it is possible to grow their nails while at home?
Any girl can do these nails on her own. Today, there are a huge number of video tutorials on the Internet that clearly show all the nuances of extensions with tips in step-by-step instructions.
Nail extension on tips with acrylic
The technology of nail extension with acrylic tips is considered accessible to everyone and does not require any skills at all.
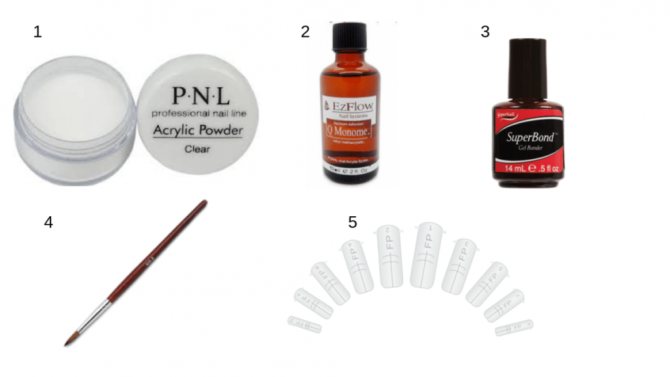
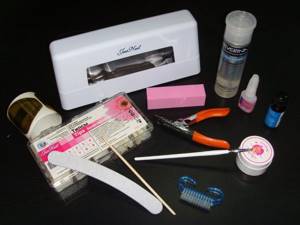
We will need:
- tips;
- nail file;
- glue for gluing tips;
- tip cutter for correcting the shape of the tip;
- brush for applying acrylic;
- primer - a means for preparing the nail before directly applying acrylic;
- acrylic and acrylic powder;
- fixative
Nail extension process:
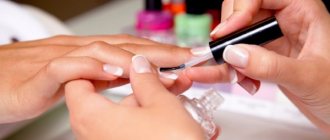
- We treat the surface of the natural nail with a nail file, polish it and degrease it. This procedure helps to better bond the tips to natural nails.
- We select tips that match the width of the natural nail and use glue to glue them to the nail surface: apply glue to the part of the tip where it will stick to the nail, then press it to the nail surface and hold it in this position for 8-10 seconds. Remove excess glue with a napkin. If the length of the nail does not satisfy you, you can adjust its length with a tip cutter.
- Using a brush, cover each nail with a thin layer of primer.
- We carefully apply acrylic to the prepared nail: in the center of the nail we apply a larger amount of acrylic, then, moving towards the edge of the nail, we reduce the layer of material applied.
- After the acrylic has completely dried, we remove all errors and inaccuracies using a nail file.
- Finally, we seal the resulting result with a topcoat - a fixer.
How to extend nails with acrylic on top forms
Acrylic has several advantages over gel.
Firstly, you don’t need a special lamp to polymerize acrylic: it hardens in air.
Secondly, it is much stronger than gel. The disadvantage is an unpleasant pungent odor.
Acrylic extensions can also be done on lower forms or tips, similar to gel extensions. But, since these methods have already been described above, let’s consider extensions using upper forms.
What is it: the top forms are very similar in appearance to tips. The only difference is that they do not have a recess for gluing at the tip, and they have small “antennae” on the sides.
The technology is as follows: a small amount of material is placed inside the mold and leveled with a brush. This design is then applied to the nail.
After the acrylic hardens, the mold is removed and can be reused. The result is an extended nail with a perfectly smooth surface. This technique is quite simple, and even a beginner can handle it.
What is required for nail extensions on the upper forms
- Acrylic Powder;
- Monomer (liquid) is a special liquid that starts the hardening process at the moment of mixing with acrylic powder;
- Primer;
- Brush;
- Set of top forms for extensions.
To apply nail extensions on top forms you will need: acrylic powder, monomer, primer, brush, a set of top forms for extensions.
Preparing nails for extensions
- Use nail polish remover to remove old manicure from nails.
- Wash your hands thoroughly with scented soap or gel and rinse off the foam with tap water.
- We dip our fingers into a bath of hot water - this will allow us to painlessly remove cuticles and hangnails.
- After six to ten minutes, remove your hands from the water and dry them with a towel.
- Using nail scissors with rounded ends, carefully remove cuticles and hangnails. If you feel your cuticles hardening again, dip your fingers in warm water for a short time.
- After treating your fingers, rub a few drops of essential oil into the areas where you cleaned. In addition, I advise you to additionally use a moisturizer, which will make your hands soft and give them a pleasant smell.
- Finally, use a nail file to trim your nails and give them the desired shape.
Care
Artificial plates do not exempt you from daily care. For long-term wear, you will need not only high-quality extensions, but also careful care. Although there are no particular difficulties in this matter.
It is enough to adhere to the following recommendations:
- Rub a special nourishing oil into the cuticle area every day.
- Periodically apply a colorless coating to the plates to add freshness to the manicure.
- Carry out the correction procedure in a timely manner (once every 3 weeks).
- Contact a professional immediately if a plastic piece comes off or breaks.
- Do not allow air or moisture to get under the plate, this will lead to infection.
- Remove only according to the instructions by gentle pressure on the nails.
- For gel and acrylic coatings, use nail polish remover without acetone.
- When making corrections, do not use scissors or nippers; processing only with nail files is allowed.
- Do not use baths, replace them with softening oils.
- Do not cover the plates with a thick layer of varnish.
- Avoid sudden changes in temperature, this can lead to breakage of the nails (for example, diving into a cool pool after a bath).
Extended manicure is very easy to use and does not require much attention and maintenance. However, it is worth remembering that between procedures it takes time to restore the nail structure. If it is not damaged, then in any case it weakens. And frequent treatments with chemical compounds literally deplete the armor layer. It is easier to prevent any problem than to waste time and money on treatment.
Acrylic
Acrylic is a durable, quick-drying material. Acrylic nails are elastic; after extensions, the nails turn out thin and look natural. When using acrylic at home, you need to choose a well-ventilated room, as the substance has a specific aroma.
Extension tools
Before you move on to creating an artificial nail using tips, you should check if you have all the tools at hand.
List of materials:
- extension material – acrylic;
- primer or degreaser;
- liquid for dissolving acrylic - monomer, volume of at least 50 ml;
- set of tips;
- brush for applying acrylic powder;
- nippers for cutting tips;
- file with abrasiveness from 100 to 180 grit;
- lint-free wipes;
- buff;
- alcohol or other disinfectant;
- a jar with a lid will be needed for the monomer;
- dust removal brush;
- glue for tips;
- oil or cuticle softener.
After purchasing all the necessary materials, you can start creating beautiful nails.
Instructions
Before you start doing any manicure, you should wash your hands well with antibacterial soap. If this is not possible, then the skin of the hands is treated with a disinfectant, alcohol or antiseptic.
Extension process:
- File the free edge of the natural nail.
- Remove cuticles using an orange stick.
- Use a nail file to remove oily shine from nails.
- Choose the right tip for each nail; the contact area should cover less than half of the nail plate.
- The numbering of tips starts with the number 1 and ends with the number 10, the first size is the widest, then the width decreases.
- Arrange the tips after selection in order.
- File down the edge of the contact area on each frame.
- Degrease the nail plate.
- Apply glue to the contact area and distribute it evenly.
- The tips should be held at an angle of 45 degrees to prevent the glue from spreading.
- Apply the tip so that the stop line is in contact with the tip of the natural nail.
- Press the frame onto the nail plate and hold until it holds firmly.
- Adjust the length of the free edge using a cutter.
- Using a file, give the frame the desired shape.
- Use a buff to reduce the boundary between the tip and the natural nail, so that when you run your finger along the plate you don’t feel the bumps.
- Mix acrylic powder with monomer until a plastic mass is obtained.
- Using a brush, evenly distribute the acrylic mass along the entire length of the nail.
- You can remove excess thickness with a nail file.
- Apply a fixative to the nail.
After the fixative has completely dried, the nails can be covered with a single-color varnish or a special design can be created. For beginners, it is better to use colorless acrylic for nail extensions with tips, and a light pink color is suitable for French manicure. Extending nails with tips using acrylic is a very easy and simple procedure.
Performing French

After modeling the nail, you can proceed to doing French nail art directly, as the video tutorials show.
The advantage of the technology, which will be described below, is that a variety of materials can be used to paint the free edge. However, traditionally a gel is used for this purpose. https://www.youtube.com/watch?v=HVETYFF-lTg

Using a thin brush, draw a smile line, that is, the border from which painting with white will begin. Its ends should gravitate toward the places where the plate grows into the finger. For long nails it is made significantly curved, while for shorter nails it is only slightly curved; Paint the area from the smile to the end of the nail with white gel. It is important not to forget to cover the end of the nail with it. After this, put your nails under the lamp for two minutes;
If you were going to do nail extensions with a pattern, as in the video, then after removing the sticky layer, apply a sticker or design to the nail. If you applied the design with gel, then dry it under the lamp and remove the sticky layer; Now apply a thin layer of fixative gel. This can be a pearlescent or glossy top that will give your nails a finished look. Dry your nails under the lamp and remove the sticky layer.
Now the manicure and gel extensions, as in the video, can be considered complete. However, you can apply additional cuticle oil, massage your brushes and rub a little moisturizer into them. There may also be slight pain in the nail plate for some time after extensions, which goes away after a couple of days.
Video tutorials on nail extensions using tips
In the modern world, manicure can safely be called an integral part of a complete elegant look. It often happens that our nails are so brittle that this does not allow us to grow them to the desired length and give them the required shape. To solve all these and many other problems comes nail extensions using tips. Extended nails not only protect the natural plates from external harmful influences, but also allow you to create a deep design without any damage.
It's no secret that the French nail design is at the top of popularity among all nail designs. Extended nails for French manicure can be of various shapes. I bring to your attention videos with step-by-step instructions for nail extensions using French style tips.
Video tutorial “Gel extension technique”
Video tutorial “Acrylic extension technique”
Tips extension methods
Extension with tips is much simpler than extension with forms, so beginners are recommended to start with it. There are two ways to add extensions to tips: using gel and using acrylic. Both techniques are in demand and have advantages and disadvantages. When applying gel extensions, you will need a manicure lamp: UV, LED or combined. The gel on the nail is adjusted with a brush before going to dry, and will not dry without a lamp. Accordingly, you can take your time to shape your nails. When building with acrylic, there is little time, as it dries quickly. Therefore, there is no room for error. But a lamp is not needed for this procedure - the acrylic dries on its own. Tip extensions in a salon cost an average of 1,500 rubles. Private craftsmen at home are cheaper - from 800 rubles. But the technology does not require special education, so it is quite possible to carry out the procedure at home.
How to choose tips
Tips are easier to use and are recommended for use by beginners.
When purchasing material, the following criteria are taken into account:
- A thin base (tip) will give the nail sophistication and naturalness.
- High-quality tips are soft to the touch, but not brittle. If, when squeezing the tip with your fingers (so that it bends), white stripes appear, it means it is not strong enough and it is possible that it will quickly become unusable.
- It is important to choose a safe material. When purchasing, it is impossible to do this without special equipment, so it is better to choose manufacturers that have proven themselves on the positive side.
- Women's nails have different shapes; when buying a base, you should choose one that follows the shape of the nail.
- Externally, all substrates are different: transparent, colored and with a white tip. If the nail design is not defined, it is better to buy transparent material, it is universal. Tips with a white tip are used in French manicure.
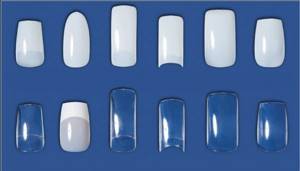
Small size substrates are common on sale. This material is used by manicurists for nail design; it is not recommended for beginners.
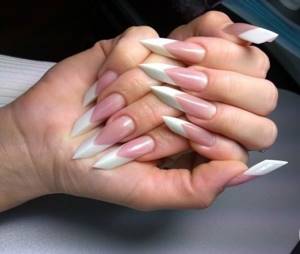
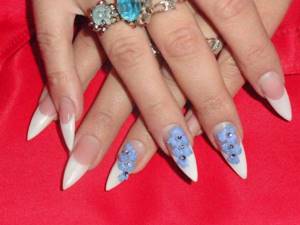
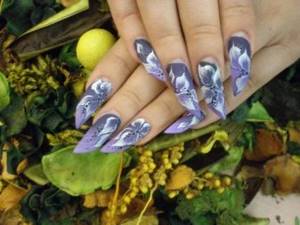
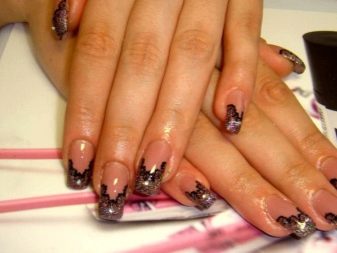
Collection of photos of nails extended using tips
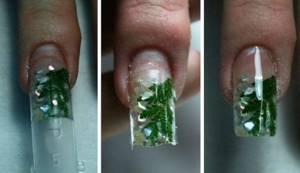
Neat and durable tips, modeled with tips and strengthened with gel, look great if decorated with a beautiful design. An experienced specialist, having done the extensions, will intuitively select for you the appropriate nail art that will give you elegance. The laconicism of a lunar manicure or the classic severity of a French manicure are not inferior in beauty to an aquarium nail design coated with transparent gel. Volumetric compositions, abstract drawings or a simple monochromatic coating on tips - the choice is yours. Our photo gallery will give you creative inspiration and help you decide on a design.
Continuing your training, watch another video lesson on how to extend nails using liquid tips. This unique innovative technology opens up more possibilities, allowing you to save time on the nail modeling procedure. Enjoy watching, dear girls. Don't forget that a beautiful manicure is the highlight of your look!
Fiberglass
Masha will share her personal experiment in the field of a new type of elongation using fiberglass. The technique appeared relatively recently and is distinguished by its simplicity and ease of execution. The main advantage is the maximum similarity to natural nails. The blogger shares his first experience with the technique - viewers can see the result of the experiment. Fiberglass bundles are convenient to use, but are not suitable for correcting deformations - they only lengthen them, repeating the original configuration. Those who want to try can take advantage of Masha’s master class, where she shares her observations and recommendations.
French manicure extension technology with gel
What you will need:
- gels (basic, several modeling),
- Ultraviolet lamp,
- cuticle remover,
- polishing file,
- tips or forms for extensions,
- stencil for forming the edge of the nail,
- gel polishes for French manicure,
- primer
- degreaser.
- Nails must be prepared for the procedure; to do this, they must be wiped with a degreaser. It is also necessary to work with the cuticle, using a special stick, it needs to be pushed back.
- Further preparation for extension involves grinding the plate. To ensure that the tips are firmly attached to the nail, you need to carefully treat the top layer by removing it.
Do not sand the plate too hard, as this can cause serious damage. After this, you need to remove all accumulated dust using a special brush.
Apply degreaser to the nail surface again. If the liquid dries quickly, then subsequently you should not keep it under the lamp for too long. After this, a base coat is applied to the nails.
Now you can start directly building up. If you are doing French nail extensions on forms, then take it and attach it tightly to the nail. Then apply the base coat to the nail and place your finger under the lamp for 2 minutes. Many people prefer to do nail extensions using French style tips, as this material makes the nail more natural in appearance.
Apply the base color to the nail using gel polish, starting from the base and working towards the tip of the nail. Try to apply the gel carefully; if it gets smeared, correct the problem. Then you will need to put your painted nail under the UV lamp again.
If the color is not intense enough, you can apply a second layer and dry it again under the lamp.
After this, you will need to form a smile zone. Take the nail polish of the desired color, apply a stencil and draw a smile. You can also use special paints or permanent gel for this.
- Use a file to give your nail a beautiful shape. Use a special buff to polish the smile areas so that it looks even.
- Apply fixing gel to the nail and dry it in a lamp.
- Work again with the degreaser, remove the sticky layer from the surface of the nail.
Over time, the nail plate will grow and you will need to adjust it to make the French manicure look attractive.
If you do French helium nail extensions correctly, this manicure will last for a long time. In fact, it is quite difficult to do French-style gel nail extensions at home, especially if you are new to this business. It is better to entrust it to an experienced master; this will provide you with a beautiful manicure for a long time.
Article on the topic:
Modeling on the natural nail area
Camouflage is applied to the natural nail area in two layers. The first layer models the smile line and the bevel to the base of the nail. It is polymerized for about 4 minutes. The second layer is applied after the first has polymerized over the entire area of the natural nail. When laying out the gel around the cuticle, you need to back off a little. There should be a small gap left. “Pushing” the material into the cuticle skin can injure it. In addition, if the coating is too close to the cuticle, it will not be possible to file it down thoroughly. If you do not remove the “step” of the gel, the material may peel off over time. The worse the condition of the cuticle, the greater the distance should be. If everything is carefully filed and polished, this distance will not be visible later.
Shape or tip – what to choose
There are two types of nail extensions, each with obvious pros and cons. In a beauty salon you will be offered the right to free choice, but if you are doing extensions at home, you should decide in advance which technology suits you best.
- Extension on forms.
Lengthening the natural nail plate. As a rule, it looks more natural and requires less time. This extension is not recommended for girls with short nail plates, otherwise the gel will not hold. The recommended length for gel extensions is at least two millimeters. This extension method should be performed by experienced craftswomen, since beginners most likely will not be able to work with the gel without outside help. - Extension on tips.
Lengthening the nail plate by gluing plastic tips. Ideal for girls with short nail plates. As a rule, extensions using tips are more durable. This method is recommended for beginners, since it is much easier with glued tips. They have a static shape, and it will not be difficult to lay out the gel on them.
Watch this video, it will complement your knowledge!
note
Unlike gel, working with acrylic is more difficult. This is a less plastic material and you need to work with it with clear movements and quickly. Another disadvantage of acrylic extensions is its pungent odor and the possibility of allergic reactions. However, there are also advantages over gel: a harder coating, easy to remove, you can model complex shapes and designs of artificial nails.
In addition to tips, you can perform gel nail extensions on forms. These are special templates made of different materials, which are removed after extension.
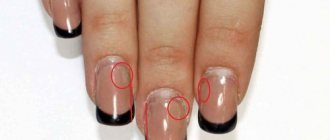
Tips for nail extensions are conventionally divided into three zones:
- contact (the area where the template is glued to the nail);
- stop line (located on the inside and aligned with the natural nail when gluing);
- free edge (varies in length and shape).
We recommend: Gray-pink manicure: how to choose the shade of colors for a winning combination
When choosing tips, you should take into account the thickness and elasticity of the material from which they are made. Among the most popular materials are nylon and ABS plastic.
How to do French nail extensions
Gel nail extensions are the most convenient and therefore this method is often used not only in a salon, but also at home.
Instructions for French nail extensions:
- Disinfect your hands.
- Treat your nails. To do this, you need to clean them of varnish, push back the cuticle, trim the free edge with a file and sand it.
- Degrease your nails with a lint-free cloth and remove excess moisture by applying a dehydrator. The entire nail, including the end, is coated with primer.
- Nail extension begins with fixing a special template form. It needs to be slightly squeezed and placed under the edge of the nail, leaving no gap. The end of the form should match the width of the base of the nail plate. Next, the nail is carefully covered with a base layer of gel, and the desired length and shape of the edge is formed. After preparing the base substrate, you need to carry out the polymerization process with an ultraviolet lamp for 2 minutes.
- Apply a natural-colored camouflage gel to the base of the nail plate and distribute it over the entire surface of the nail with smooth movements. After the gel is carefully distributed and all defects have been eliminated, repeat drying under an ultraviolet lamp for 2 minutes.
- After drying the base layer, you need to make sure again that there are no unevenness or other flaws. If there are any, then a second layer of camouflage is applied and dried again at the same time.
- When the defects have been eliminated, it is necessary to remove the sticky dispersion layer using a special lint-free cloth and get rid of the template form.
- The surface, bottom and sides of the nail are sawed off, giving it the desired shape. In order for the “smile” area to be smooth and clear, and the paint not to spread, the free edge of the nail must be sanded with a buff with 180-240 abrasiveness.
- Draw a “smile” line. This can be done with any material - gel polish, special paint or permanent gel. First, you need to use a thin brush to draw the outline of the “smile” line, which determines its shape. Its ends should fit into the ingrown nails. Then carefully paint over the outlined edge and end of the nail with strokes and dry it under a lamp for 2 minutes.
- A layer of pearlescent gel is applied to give a glossy shine, if necessary.
- Wear the finishing gel from the tip to the cuticle, avoiding contact with the skin and be sure to treat the end of the nail. Dry under an ultraviolet lamp for 2 minutes.
- Remove the sticky layer with a degreaser or a lint-free cloth. Apply oil to strengthen the cuticle.
Gel extensions on forms: master class
Gel extensions on forms are great because they can be done very quickly by experienced craftswomen. Depending on the length of the base, you can extend your nails to any length and shape: these can be delicate short nails or daring stilettos. By looking at the step-by-step photo, you can see how easy it is to do form extensions at home.
Prepare your nails for extensions. Polish them with a nail file, give them the desired shape and push back the cuticle. The gel will stick to a length of 2mm. Nails that are too short are not suitable for extensions, and nails that are too long may show through. Cover sanded nails with degreaser.
Before doing this, it is important to remove all dust with a brush or towel. Apply primer. Cover the top of the nail plate with bonder and air dry for a few minutes. This is the junction between the natural nail and the gel. Apply a base coat to the natural nail plate and place your hands in a UV lamp
Remove the sticky layer after each drying. Make a backing from extension tape. It should fit snugly to the back of the nail. Using gel, lay out a shape of any length. Keep in mind that a certain part will be cut down, so the length should be generous. Place your nails under a UV lamp. Apply a natural colored gel to the stock. Otherwise it is called camouflage. Dry your nails and remove the sticky layer, sand with a buff.
The final procedure before nail design is shaping. Make sure your nails are thick enough and very strong, as you will be wearing them for several weeks.
The step-by-step diagram is described so clearly that you should not have any questions. The only difficulty you may encounter is working with gel, which can spread and get under the nail. When the drying process is carried out, you may feel a strong burning sensation. If you still have questions, you can always watch the video tutorial, which will tell you step by step about gel extensions.
Which video should I watch first?
- materials for nail extensions - what they are, which ones are best for beginners to use;
- how to prepare nails for extensions;
- how to choose tips;
- formation of extended nails and their decor.
To get started, a standard set will be enough for you, which includes tips, several files with different characteristics (one 180 and the other 100/100), several brushes, a primer, special glue, nippers, a buff, a 9 W ultraviolet lamp for nail extension, a tip cutter , transparent gel, brush for removing filed nails.
Of course, depending on the extension method you choose, this list may vary slightly.
Therefore, special attention should be paid to studying information about the selection of materials.
The process of preparing nails for extensions is no less important. If this process is disrupted, the nails will not hold well. And the most interesting stage is decoration. Here you can fully express your imagination.
What you will need
It is impossible to start practicing without having tools and materials at hand. The modern market offers a huge number of them, making it difficult to choose. Helen's introductory lesson will be a real find at the first stage of learning. The author will briefly talk about the types of lamps (ultraviolet and LED lamps), the types of gels, highlighting the necessary and replaceable ones, the differences between single-phase and three-phase, for which camouflage is needed. Beginners will learn the main criterion for choosing a forming sticker, the purpose of the primer, types of files and their characteristics, the difference between liquid layer remover and alcohol, lint-free wipes from cotton pads, and why a pusher is needed.
We must not forget about a number of contraindications that should be taken into account when contacting a specialist or practicing independently. It is necessary to make sure that the client does not suffer from disorders of the digestive and endocrine systems, fungal diseases, or have allergic reactions to the components used. During pregnancy, lactation, chemotherapy, or undergoing antibiotic treatment, extensions are contraindicated.
January 31, 2020
Rating of the best funds
A detailed table will help the artist decide on the appropriate polygel for nail extensions. It contains the best modern means.

Grattol
Texture – enamel, dense on 1-2 layers. On sale you can find 5 shade options at once. Among them: beige in different tones, camouflage, peach. There is an option with glitter. Sold in miniature packages of 30 ml. Very economical to use.
Bluesky
Texture: enamel. You can select different density levels. Coral and purple shades are also found in a wide color palette. The minimum volume of the tube is 8 ml. But you can also find 60 ml packages on sale. This polygel does not stick to the brush, so it does not require treating the accessory with a special liquid.
Tnl
The thermoplastic product is thick and very easy to work with. Available in 11 different shades. Texture: enamel. Density – translucent. With a sticky layer. Sold in 18 ml tubes. The coating needs to dry for 1 to 2 minutes, depending on the lamp chosen.
Patrisa Nail
The texture of the composition is enamel. You can choose the density - translucent or dense composition. Various shades to choose from. There are also camouflage and beige in different tones. This is a high-quality, but expensive product. Sold in tubes ranging from 30 to 60 ml.
Tertio
Texture: enamel. The product is sold in 3 density options - translucent, dense in 3-4 layers, dense in 1-2 layers. Another inexpensive remedy. Sold in tubes of 30 ml. You can purchase different shades: white, camouflage, milky pink. The material is not picky about the bristles of brushes.
All of the listed compositions differ from each other not only in their basic properties, but also in price. So, both budget and very high-quality options include, for example, Tnl, the cost of a tube is 350-400 rubles. But for a small tube of Patrisa Nail you will have to pay about 1 thousand rubles. Today, if you wish, you can grow your nails even at home.
The main thing is that it does not have an unpleasant odor, and the particles that are cut off are heavy and quickly settle on the table without flying through the air. Step-by-step detailed instructions will help you understand the features of the process.
Minimum required set of tools and materials for gel extensions
Today, manufacturers of nail care products regularly supply products to the market, which makes it easier for you to find the necessary materials and tools for extensions. Among them are the following:
- UV lamp. Used to dry the gel. If possible, choose a lamp with a built-in timer so that you can adjust the time for the gel to cure.
- Gel. Most often, extensions are made with transparent or camouflage gel, but if necessary, you can purchase colored ones.
- Application brush made of artificial bristles. As a rule, it should be flat.
- Sticky layer remover. Must be used after irradiation in a UV lamp.
- Primer (degreaser). With its help, the nail plate adheres to the gel.
- Forms for laying out the gel. Used as a substrate.
- Tips. Glue over natural nails. Recommended for use in extensions by beginning craftswomen.
- Glue. Used for gluing tips or any decorative details on extended nails.
- Tip cutter. Allows you to get rid of unwanted length.
- Gel coating (finish or top coat). A transparent coating that is applied at the end of the extension. Adds shine and ensures design fixation.
- A set of files of different hardness.
- Polishing file (buff).
- Disinfectant.
Materials and tools in the photo.
Care Tips
To ensure that your manicure pleases you and those around you for as long as possible, follow these tips:
- Regularly apply cream to the skin of your hands, thoroughly rubbing it into the cuticle area.
- Always use gloves when handling household chemicals.
- Avoid steaming your palms too often.
- During the cold season, do not go outside without gloves.
- Do not hit your nails on hard surfaces or try to pick anything out with them.
These are the basic tips for caring for extended manicure, which every self-respecting girl should adhere to.
@ [email protected] [email protected] _rokcsi
Design ideas
You can perform a manicure on extended nails using different techniques. One of the best solutions would be French, be it traditional or reverse. You can combine the colors of the buildable materials, thereby creating a ready-made design right away. If you don’t like this option, you can turn to various nail design techniques. For example, you can paint your nails with matte varnish, and paint lace motifs on the accents with a glossy material of the same color. The play of texture always captivates the eye; this design is in trend today.
If you want something different, you can change the texture of the classic manicure coating. An excellent solution for this would be acrylic powders and rubs. At the same time, powders can not only cover the entire area of the extended nails: they are good for creating voluminous curls, monograms, lace, and flowers. As for the rubs, they look great on elongated nails of the “chafer bug”, “mermaid” and “holographic” variety.

You can also highlight the accents of your manicure using hand painting in various themes and techniques, including watercolor, stained glass and the spreading effect. When choosing the watercolor option, the substrate created by the base, pigment and top is buffed so that it is rough. After this, the working background is painted with water-based artistic watercolors. Acrylic paints, which are diluted to the desired consistency with topcoat, are also good for this technique.
Yuki glitters, which are a type of rub in the form of flakes, look great on extended nails. Today this is one of the hits of modern design, which allows you to give your nails a unique texture. It is very popular to decorate artificial nails with a dotted pattern, which is created using dots with different attachments. These can be various ornaments; this is how a Frenchman’s smile is drawn. Sometimes extensions are performed with a variety of sparkles, mixing modeling gel with various glitters. For more shine, you can use two layers of shimmer.
Types of tips and tips for choosing
Tips translated means “tip”. These are plastic blanks in the shape of a nail, which differ in size and shape. In essence, these are peculiar templates that will give the desired shape to the modeling agent in the process of increasing the length. They will also correct the convexity of the nail plate, preventing the effect of pecking nails and excessively large convexity.
By purpose
It is a mistake to believe that all tips are the same. In fact, they may differ in color and purpose, because they are selected in accordance with what the final manicure technique will be. Transparent options and templates of natural color are intended for building up and further covering the created base with gel polish. If a French design is planned, they differ in thickness. Compared to other varieties, they are thinner.
The line also includes varieties with colored backgrounds and ready-made designs. These are, in fact, ready-made solutions, although if desired, the former can be decorated with some kind of print, and the latter can simply be coated with transparent varnish. In addition, the options can be universal, with sufficient bending and large bend. The bending of the frame is necessary to ensure that the extended nails look beautiful and natural.
By shape
The shape of modern tips is variable. On the shelves of brands you can find different options for every taste. Today there are 5 types of tip shapes.
- In the classic version, these are blanks with a natural and smooth bending shape. As a rule, they are sold in sets at affordable prices. Such varieties are often used by nail service professionals when performing nail extensions on clients.
- Other options include straight tips that do not have a contract zone. For this feature they are called non-contact, they are extremely convenient for performing French. These varieties are also inexpensive, and buying them today is not difficult. On average, a package of one hundred pieces will cost 150 rubles.
- When you need to create a special narrowed shape, you buy tapered tips. They can be used in building and shaping stilettos, bridgette shapes and cat nails.
- Many people want to make an “American” uniform. In this case, you need to buy curved tips.
- The last variety is tips for the shape of almonds. These products allow you to build the correct almond shape in a short time. They are characterized by different lengths and may or may not have a contact zone. Their cost is approximately the same as the cost of blanks for stilettos (about 150 rubles for 50 pieces).
According to manufacturing materials
Nail extension tips are made from different materials. For example, one of the quite popular solutions today are the so-called liquid varieties. These are reusable options that are made from special polymer raw materials and are characterized by a flexible structure. For beginners, this is the most convenient and easiest way to do nail extensions. It does not require a large number of tools and materials, although it does not do without a special drying lamp, which is usually used when working with gel polish and gel.
Tips are made from plastic, nylon and polyflex. Each type of material has its own nuances. For example, plastic products are considered quite durable and preferable for work. Plastic is temperature resistant, easy to clean, and convenient during the extension process. If you need to extend your nails with gel, then it is better to choose options from polyflex. Such solutions are quite flexible and resistant to acetone. As for nylon varieties, they are not suitable for beginners, since they can be problematic in fixation, but it is worth noting that nylon holds its shape well.
Types of tips
Tips are plastic overlays or template forms that are used by masters as a substrate or as a stencil for forming an artificial nail plate.

This is the most convenient and popular extension option for beginners. It is also popular among experienced craftsmen, especially if it is necessary to reduce time and simplify the procedure. There are several varieties of tips, each with its own peculiarity in operation and design nuances.
To form an artificial nail plate, acrylic, gel, biogel and acrylic acrygel, which is a combination of gel and acrylic, can be used. Acrylic dries in air, and gels dry in a lamp.
Tips-tips
These are plastic nail tips with a convenient transition zone for high-quality adhesion along the smile line. Disposable. They are attached using a special glue that comes with them or can be purchased separately.
They come in different sizes within one set. It is necessary to select it individually for each nail, and, if necessary, pre-file it in width so that it perfectly matches the width of its plate. After gluing, the length is cut and filed. Next, everything is covered with camouflage extension material to create an outwardly complete nail plate.
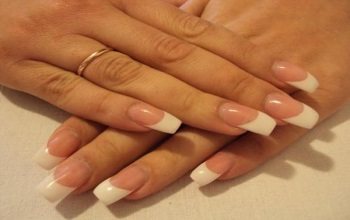
White tips are very convenient for extending French manicure. This is a ready-made perfect smile line; you just need to cover the nail with a thin layer of base or camouflage gel or acrylic, and then with a top coat to add shine.
Camouflage nail gel - let’s figure out what it is and how to use it correctly
Upper forms
Upper forms - used for working with acrylic, gel, acrylic and biogel. The material is applied to the form, pressed against the prepared nail along the entire length under the cuticle or from the middle of the plate, then dried in a lamp and filed.
The top molds are made of a dense material compared to the more flexible liquid molds, and have a more curved design. Thanks to this, they allow already from the first layer to form a convex stress zone or fold zone, which is subject to the greatest loads when worn. The top forms are reusable. On average, they are enough for 100-250 extensions.
Liquid tips

They are used for extensions with all liquid materials, hence their name. Often opaque, with a matte surface. They have short “removal handles” at the ends. Unlike top forms, liquid patterns are more flexible and flat. They do not immediately form a stress zone, but only create the first base layer. Then you need to paint the architecture manually - with camouflage gel or acrylic using a brush.
When working with liquid tips, the material is applied to a mold and pressed against the nail plate. Smile lines are already drawn in the form, which is very convenient for beginners when laying out a French jacket. After drying in a UV or LED lamp, the tip is removed and the plate is filed down. Liquid tips are also reusable, like the top forms.
Depending on the desired result, you can work with any of the three types of tips. Try everything one by one to choose the most convenient and practical for yourself.
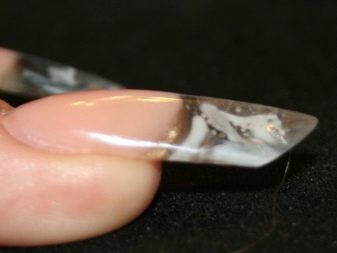
Fashion ideas
Liquid
Using a special blank and product, the base of an artificial nail plate is created. The plastic form is reusable and can last for about two years. An aquarium manicure is often created this way. Colors and patterns can be very diverse. Liquid tips for nail extensions can be used by women who have problem nails.
Acute
Sharp tips for nail extensions can be purchased ready-made or made yourself. They visually lengthen the fingers, making them more sophisticated and feminine. If you have thin fingers, then it is better to avoid this shape, because it will not look very good. The edges of sharp forms are weak and prone to brittleness, so you should be extremely careful with them. If damaged, this design cannot be corrected.
Square
Square shapes look more natural. If you choose a medium length, it will be difficult to distinguish them from natural marigolds. But if your nail plates are small and your fingers are chubby, then it’s better to avoid this shape. If you have very thin, long fingers, it is also better to avoid them. Square ones are less prone to damage, very comfortable, and practical to wear.
Oval
The oval shape has become the most popular. It looks impressive with any length, shape, thickness of fingers. It is convenient to wear such nails because they do not have sharp corners that will cling or break.
Almond-shaped
The almond shape is different from the oval shape because it actually resembles an almond. It looks very elegant and feminine on the fingers. This manicure attracts the attention of others, so take care of its perfect appearance.
More detailed instructions for extensions
First stage
- After disinfecting the palms and fingers with an antiseptic, we treat the nail plates.
- Use a wooden stick to push back the cuticle. It is advisable to trim off the excess using special nippers or sharpened nail scissors.
- Carefully file the nails, leaving approximately 1-5 mm. Use an orange stick to remove dirt under your nails.
- The top glossy layer is removed with a buff and unevenness is removed. Use a brush or brush to shake off the dust.
- We degrease the nail plate using a special product. At home, you can use alcohol to soak a napkin.
- A primer is applied, it ensures adhesion of the material to the nail plate and protects against microbes.
Second phase
After the nails are processed, we select the upper forms of a suitable size, one by one applying them to the nail plate.
The nail is covered with a thin base layer of gel. It should not be dried out. The inside of the workpiece is carefully filled with a denser layer of material in the area of the free edge, which should be dried after application (20 seconds). The gel is then applied to the area intended to adhere to the nail plate. The procedure can be simplified. A thin layer of gel covers the part of the plate that comes into contact with the nails. The free edge of the workpiece is compacted more tightly (0.5-1mm)
At this stage of modeling, you can also determine the approximate desired length of the nail. The gel-filled blank is carefully pressed against the nail. There is no need to put pressure on the plate.
Turning your palm over, you need to see how the gel lays down; its excess is removed with a pusher. Fingers with applied tips are placed under a UV lamp for about five minutes and wait for the material to polymerize. Manufacturers indicate on the packaging how long it takes for the material to harden. Once the gel has hardened, the top molds are carefully removed. We wipe the tip and put it back in the box. The nail is degreased. The free edge is processed with a file, which is given a neat appearance. To consolidate the result, this extension technology provides the possibility of applying a finishing coating. It is advisable to do this, but there is no particular need. This layer is polymerized for about two minutes. Degrease the nail plate. Lubricate the cuticle with special oil.
How to extend nails with gel at home: step-by-step instructions
Perhaps we are ready to tell you how to extend your nails with gel at home: step-by-step instructions will help you do everything efficiently, quickly and without errors. First, you should list what you need to carry out this procedure at home:
• Manicure accessories: cuticle blade and nail file, 100 grit.
• Forms or types.
• Glue.
• Artificial flat brush.
• Tweezers.
• Bonder or starter.
• Construction gel.
Before proceeding with the extension procedure, you should prepare your nails, and we will tell you how to do it correctly.
- We clean the nail plate and cut off the cuticle.
- Remove shine from the nail using a sanding file and level the surface. Remove dust with a brush.
- Degrease the nail.
And now, you can proceed directly to the extension procedure itself. In our example, we will use the tip extension method because it is the simplest.
- We glue the finished tips onto the nails.
- After the glue has dried, remove the excess with a tip cutter. Leave the length with a margin - it will still be adjusted.
- Using a nail file, we level the surface of the nail and make an even line of transition from the natural nail to the artificial one. Let's give shape.
- Degrease the nail and apply gel.
- Next, keep your finger under the UV lamp for 1-3 minutes.
- A new layer of gel - and already for 3-6 minutes the nail goes under the lamp.
- Remove the sticky layer from the nail, apply the gel and keep the nail under the lamp for 6-12 minutes.
- When the gel is completely dry, adjust the shape and apply sealant.
Perhaps you have already learned enough about how to grow your nails in 1 day. You can move on to practical implementation. Choose the method that suits you best. And if you still think that this procedure can harm you, try to grow your nails, your own and natural ones, do a regular manicure or put on false nails for a few days.
Remember that you can’t do nail extensions for children, and even for the artist herself, if she is in an “interesting situation” and suffers from toxicosis, this procedure will be unpleasant. Acrylic releases volatile substances that can cause dizziness and allergic reactions. So it’s better for expectant mothers to wait until the baby is born, while they can watch interesting and useful videos about extensions.