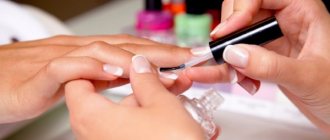
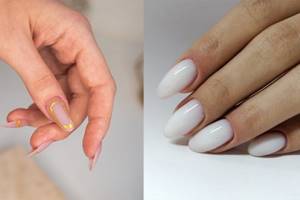
Long, well-groomed nails are a wonderful attribute of a beautiful and feminine look. Unfortunately, not every girl can grow her natural nails to the desired length, but sometimes you want it that way! It's good that there are nail extensions. This procedure requires accuracy, but at the same time anyone can learn how to do extensions. You can create a gorgeous manicure with long, flawlessly shaped nails at home. Are you ready to gain new knowledge and save on trips to the salon? In this article we will tell you how to make your nails longer at home and what materials you will need.
There are several ways to build up. You can lengthen your nails using acrylic, fiberglass in combination with other materials, or extend them onto forms or tips; in this case, gel is usually used. The last method is one of the simplest and most popular. This is what we will talk about today.
The choice of material depends on your individual characteristics and preferences. Both forms and types have their own advantages and disadvantages. Let's take a closer look at them.
Features of nail extensions on forms
Modeling the nail plate with gel nail extensions is performed in two ways:
- using tips;
- using forms.
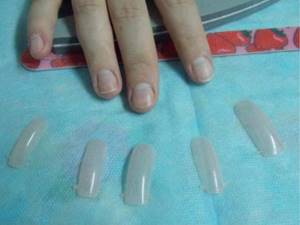
Tips are thin plates that are glued to the tips of your own nails. In this case, the width of the contact zone must be minimized. Gel is applied to the surface thus lengthened, creating a new nail shape. This easy extension method is only suitable for girls with a standard nail arch.
In addition, nails with tips are fragile, short-lived and quickly lose their attractiveness as they grow.
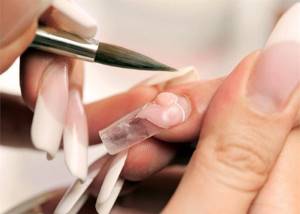
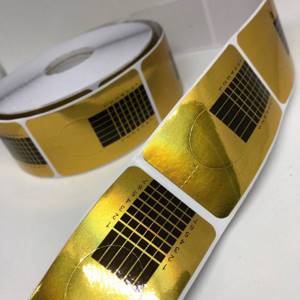
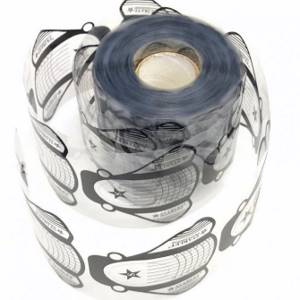
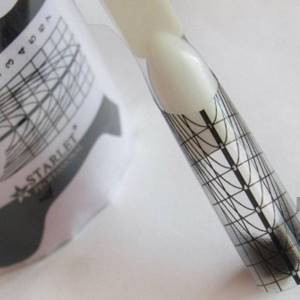
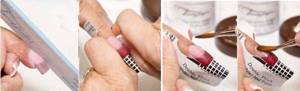
When applying extensions on forms, a template made of thick cardboard or plastic is taken as a basis, on which the gel is laid out. After polymerization, the template is removed and the resulting gel tip is given the desired look and shape.
Compared to tips, this method has many advantages:
- does not require the use of glue that dries out nails;
- suitable for girls with non-standard nail shapes;
- there are no restrictions on the length and shape created;
- the result looks natural due to the absence of an extra layer of plastic inside;
- During the process of growing, nails look aesthetically pleasing.
Features of the method
With the help of artificial lengthening of the nail plates, almost any external defects are corrected. Usually, forms or tips are used for nail extensions. The latter of them are becoming less and less relevant, as they do not look very natural.
The plates on the forms are enlarged using special devices that act as a substrate for future nails. This product is covered with gel or acrylic, making it easy to extend the edge of the plate. To make it convenient to create the length, the forms have graph paper. A distinctive feature of the technique is that after the varnish has hardened, the structures are removed, leaving the ends free.
Types of extension gel
Gels used for extensions differ in brands and components in the composition, as well as other important characteristics:
- by polymerization method: sensitive to UV rays and not photosensitive;
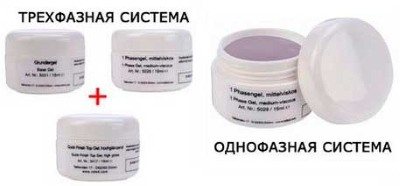
- by application technology: single-, two- and three-phase;
- by color: transparent, colored, camouflage;
- by purpose: gel-chewing gum, gel-jelly, stained glass.
It is usually difficult to choose a gel according to the application technology.
The extension process consists of three major stages:
- Preparation,
- modeling,
- consolidation
Accordingly, a single-phase gel - the most universal - is used at each of the three stages. Using a two-phase gel, you can only perform modeling and fixing, and for the base layer you will have to buy an additional coating. Three-phase gel consists of three packages with different products for each stage of extension.
Single-phase products are more liquid, easier to work with, and are most often chosen to strengthen nails or slightly lengthen them. However, the highest quality result: durability, minimal risk of detachment, hardness is achieved only using three-phase technology. It is also the most complex and requires a high level of skill.
Don't miss the most popular article in the section: How to extend nails with gel polish. Nail extension instructions for beginners. Photo.
Shape selection
First of all, plate extension products are divided into disposable and reusable. Each of the masters chooses the most convenient option depending on the number of clients and personal preference.
Disposable templates have a very soft base, as they are made of paper or thin plastic. Due to their flexibility, these products can be easily adjusted to different shapes. At the same time, many note some difficulty in the work at the very moment of extension. If you fix the paper template incorrectly or insufficiently, it can wrinkle and deform the artificial layer.
@assorti.com.ua
@nailmagazin_05_
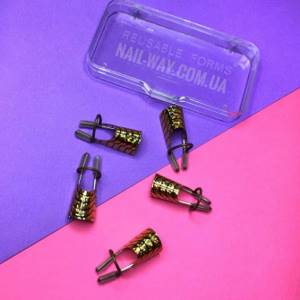
Reusable molds can be used an unlimited number of times due to their durable metal or thick plastic composition. Such products are not subject to mechanical stress and are securely fastened. They must be stored in sterile containers and processed after each procedure.
@nails_way_ukraine
Forms for extensions are also divided according to the method of fastening the structure - from below or from above. Bottom templates are the standard option when the product is used as a guide attached under the natural nail.
@nailmagazin_05_
The upper structures are ready-made plastic forms with different sizes. They are filled with polygel and placed on top of the nail, and after hardening they are easily removed.
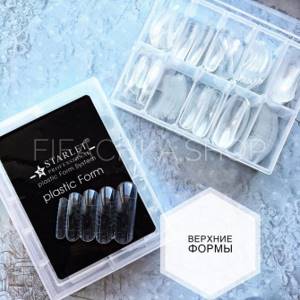
@fifachka.shop
All forms vary in size from the smallest to three centimeters. They come in the form of halves or whole. Half templates are attached to long nails, while full ones are best used on short ones.
Shapes and colors vary. Transparent products are considered a classic option. Many people like colored designs, but they are a little more difficult to work with due to their density.

@mila_nails_shop_ua_
Required materials and tools
Extension on forms takes place in three enlarged stages: preparing your own nail plate, working with gel, design.
Tools for the initial stage can be found in the arsenal of any girl who is accustomed to doing her own manicure:
- disinfectant for hands and tools;
- file for natural nails (240 grit);
- pusher, wire cutters, scissors, orange stick;
- anti-dust brush.
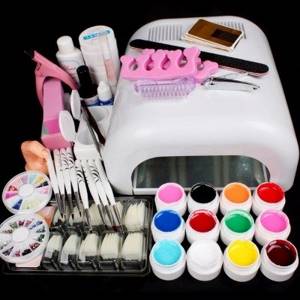
Materials and tools for working with gel must be purchased at a professional store:
- buff coated 120 grit;
- nail degreaser;
- paper towels;
- cardboard or plastic forms;
- brushes for working with gel (artificial bristles);
- primer (bond, ultrabond), base (if a two-phase gel is used);
- modeling gel;
- UV lamp with a power of 36 W or more (preferably with a timer);
- liquid remover (or rubbing alcohol) and lint-free wipes;
- file for artificial nails (100 and 180 grit);
- top gel (finish coating).
These materials are enough to create classic transparent gel nails with a varnish finish.
For design, French manicure, color coating you will additionally need:
- gel camouflage;
- colored gels (especially white);
- acrylic paints;
- brushes for painting on nails;
- mica, foil, pigments, broths and other design elements.
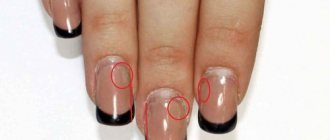
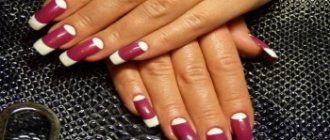
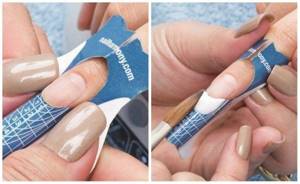
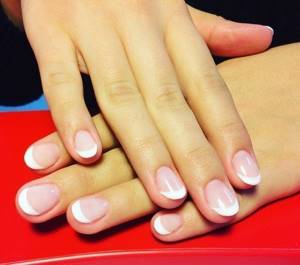
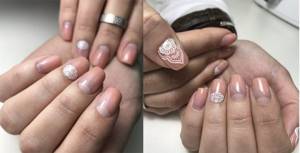
French lay-out
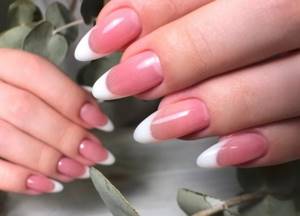
In order not to draw the smile line and not suffer with a clear joint, use the lay-out technique. In this case, everyone can get a French manicure.
- Carry out standard preparation - manicure, polishing, degreasing and primer coating;
- Place camouflage polygel into the mold and form a curved smile line. This part will be pink, so leave an imaginary margin for the white tip;

- Stamp a camouflage shape onto your nail. Look at the structure from above - if the gel shows through, pull the workpiece off and start over. The layer should not be too thick, but it should not be visible either.
- After installing the form with polygel on the nail, send it to the lamp for 10-13 seconds;
- Reach out with your hand, pinch the free edge, remove the workpiece and put on the clothespin;
- Dry the polygel in a lamp;
- Take the mold again and put white polygel there. Stretch it as much as the length of the future nail should increase. Don’t pay attention to the smile line - the joint with the camouflage will be smooth in any case;
- Secure the blank on the nail, moving it from the free edge to the junction with the camouflage;
- Check the antennae. The lines going to the lateral sinuses should be smooth and filled. If you find any gaps, fill them with white polygel;
- Place your hands in the lamp for 15-20 seconds;
- Pinch the nail, but only where the white color is completed. Attach a clothespin and send your nails to dry;
- File the form, check for empty cavities and polish the nail plate to remove excess streaks of white polygel onto the camouflage;
- Cover your nails with top coat.
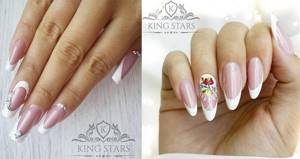
Design options for a French jacket - a selection of ideas
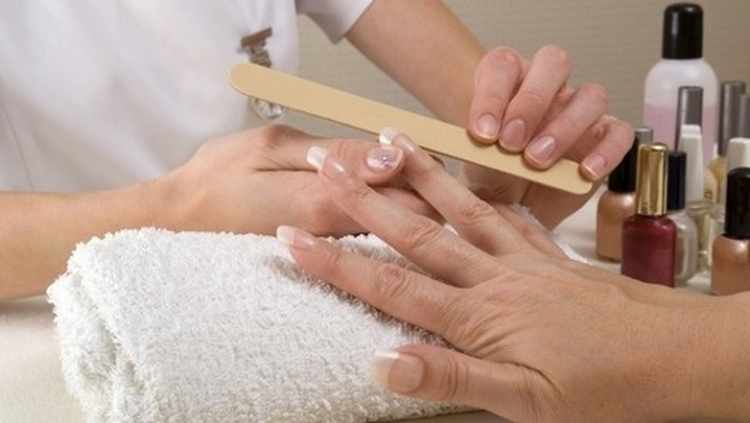
Nail preparation
On the day of extensions, it is advisable not to use hand creams, not to do baths and masks, and not to visit swimming pools and saunas. If you are undergoing treatment with antibiotics, hormonal changes, fungal infections, or damage to the cuticle, extensions should be postponed until complete recovery.
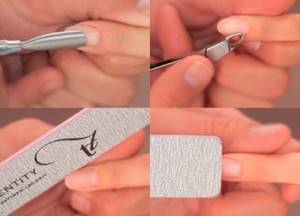
At the initial stage, a manicure is performed and the nail plate is prepared for laying out the gel:
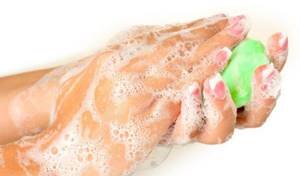
- Wash and dry your hands thoroughly and treat with antiseptic gel.
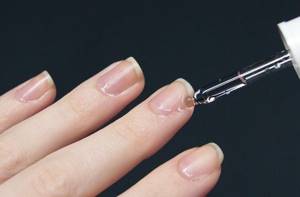
- Treat the cuticle in the usual way, push it back with a stick or pusher. It is recommended to do a trim manicure no earlier than 3-4 days before the extension procedure.
- Cut off the entire free length of the nails and file them, giving them a pre-selected shape.
- Remove the glossy layer using a buff: with light movements that do not damage the nail plates, file off the top layer of the nail, making it rough. Remove dust from nails with a small brush.
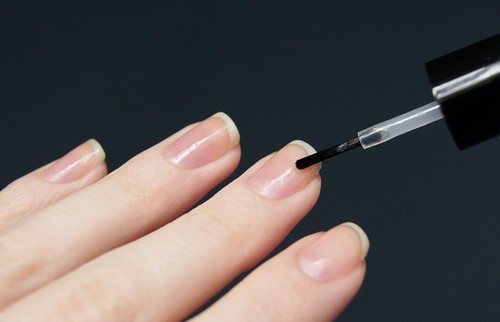
- Remove the fat layer and moisture from the nails using a degreaser.
- Prime your nails with a primer (bond), being careful not to get the product on the skin of your fingers. After applying the primer, you should not touch your nails, as this will undo all the preparation work.
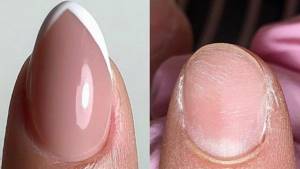
Advantages and disadvantages
Nails coated with a gel substance not only look natural, but also become stronger and more durable. The polymer does not spoil the nail plate, but thickens and evens it out.
Helium coating has a number of other advantages that speak in favor of this technology:
- The polymer base contains natural resins that strengthen fragile plates.
- Nails do not break on impact and do not peel off.
- The manicure lasts a long time (about 20-25 days).
- There is no need to remove the old material, just make a correction.
- The nail plates have the correct shape, look attractive, and shine.
- At the same time, the cuticle is processed; as a result, it grows back more slowly than with a regular manicure.
- It is possible to form any shape of the plate.
- Large selection of different shades of material.
- The base contains no allergens.
The main disadvantage of this method is the need for periodic correction. All other disadvantages depend on the correctness of the procedure and use of the nails.
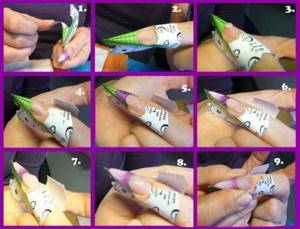
Extension technique step by step
Gel nail extensions on forms, step-by-step instructions for which are presented below, can be done using two technologies. They differ depending on which forms are used - upper or lower. The lower forms are fixed under the nail plate, lengthening it; the gel is laid out on top. The gel is first applied to the upper forms, and then the workpiece is pressed onto the nail.
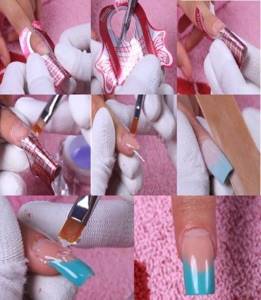
Working with lower forms
Step-by-step instructions for gel nail extensions on lower forms:
- Prepare for extension.
- Squeeze the template into an oval and insert your finger into the resulting hole. In this case, the inner edge of the form should extend slightly under the nail, being its continuation and coinciding with the smile line. Disposable forms made of foil and paper are given the necessary parameters, cutting off the excess with nail scissors.
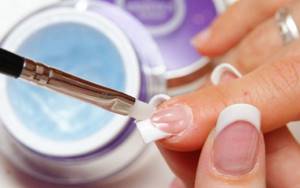
You can do gel nail extensions on forms yourself if you follow the step-by-step instructions. - Apply gel to the entire surface of the shaped nail plate using a flat synthetic brush (for example, No. 6), starting from the base. When working with liquid types of gel (most often single-phase), turn your finger with the nail down to distribute the product evenly. Dry in a UV lamp for 2-3 minutes according to the gel manufacturer's recommendations.
- To form a natural bend of the nail plate, repeat step 2 again. This stage is more important the longer the extended nail.
- Remove the sticky layer with a degreaser or alcohol and lint-free wipes, carefully lift the form and separate it from the finished nail. If the mold is poorly removed, then it is necessary to increase the exposure time in the lamp.
- Using an artificial nail file, give the desired shape and adjust the length. Use a buff to level the entire surface, filing and sanding it. Remove dust with a brush.
- Apply the finishing coat, dry, degrease.
Working with upper forms
Step-by-step instructions for gel nail extensions using top forms:
- Select top shapes for each nail. Place a couple of gel balls into an inverted form and distribute them evenly with a synthetic brush. Dry in a lamp for 10-20 seconds.
- Repeat step 1, but dry for a few seconds longer the second time.
- Apply the gel at the base of the natural nail and, without polymerizing it, apply the upper form to the nail. Press the mold, squeezing out and removing excess gel. Dry for the time recommended by the gel manufacturer (usually 2-3 minutes).
- Remove the top forms, remove the sticky layer from the inside of the resulting nails
- File your nails to shape, apply top coat, dry, and degrease.
Modeling using the Ombre technique
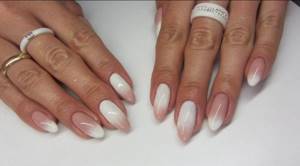
Thanks to the unique technology and simplicity, extensions can be done immediately with the design. One of the common varieties is ombre modeling.
To work you will need:
- Polygel: white and camouflage;
- Orange stick and brush;
- File and buff;
- Top.
- Prepare for extensions: do a manicure, apply primer;
- Place a small amount of camouflage in the center of the workpiece with an orange stick and spread it with a brush in a thin layer. When distributing the polygel, “smooth” it to a thin, almost imperceptible layer;
- Place the form in the lamp for 7 seconds so that the camouflage “sets” slightly;
- Using an orange stick, place white polygel in the place where the white color is planned for ombre;
- Distribute the polygel, carefully blending it onto the camouflage where the color transitions;
- Dry for 7 seconds in a lamp;
- Lay out a little more camouflage - this layer will become the main thickness of the future nail;
- Distribute the gel, forming a thickened stress zone, a free edge with its future shape, a cuticle zone and side ridges;
- Print the form with the material onto the nail, remove the excess, complete the missing pieces with camouflage;
- Place your hand in the lamp for 10 seconds;
- Using a clamp, pinch the distal edge and growing points, remove the workpiece and install a clothespin;
- Dry the material in a lamp;
- File down the free edge, remove any imperfections and polish the surface of the nail with a buff. When polishing, avoid the color transition area so as not to simply file it off;
- Wipe your nails with degreaser and apply top coat.
Gradient manicure: preparation, ideas, materials, 6 methods of execution
What shape can you give your nail?
The shape of the nail is selected based on the size of the hands and the length of the fingers, as well as the preferred style of clothing and lifestyle:
- square and oval-square (“soft square”) are suitable for long fingers, graceful hands, and are appropriate in a modern and office style;
- oval and round – for large hands with short, full fingers, they will complement a calm, classic and business style;
- almond-shaped - for fragile hands with narrow fingers, as part of a romantic feminine or glamorous style;
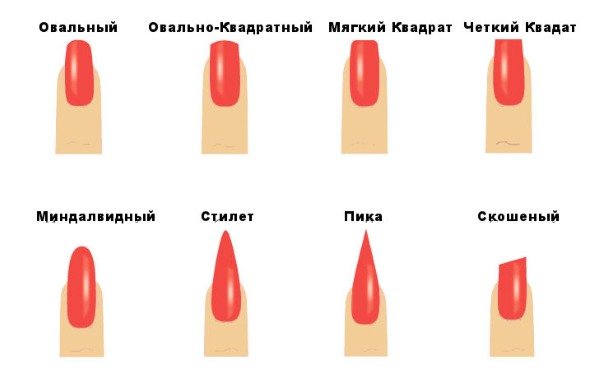
- sharp (stiletto, cat's nails, peaks) - long fingers with a strong nail plate and extended nails will emphasize courage, love of risk and sexuality;
- “ballerina” (sharp nails with a cut tip) – any shape of hands and fingers will adorn young lovers of new products and fashion trends;
- beveled, beveled-twisted, fantasy - more often presented at competitions for hair extension artists; in everyday life they are chosen by creative people who love to challenge society.
Home care rules
The durability of a manicure largely depends on the individual characteristics of the nails and the quality of the procedure performed. Taking proper care of your manicure will help you maintain your manicure for a long time.
How long does the coating last?
The preservation of the gel coating for a long time without deformation depends on the material used.
Single-phase systems are stable for no more than a week. But the gel lasts much longer on the feet, so they can be used for pedicures. Three-phase polymers are more stable; gel manicure lasts about 3-4 weeks. The service life of biogel is about a month.
Manufacturers of cosmetic products offer a large number of different materials. Many of them described themselves positively.
The largest number of positive reviews were given to the brands presented in the table:
| Type of gel | Model name | pros | Minuses |
| Single phase | Jessnail | self-leveling; with a liquid consistency; low price | takes a long time to dry; possible irritation |
| Single-phase Three-phase | Runail | medium viscosity camouflage agent; disguises small defects | not very durable; Doesn't dry without a UV lamp. |
| Single phase | Global | average wear resistance; hypoallergenic | high price |
| Three-phase | Formula Profi | high adhesion of the base and absence of odor; viscous structure of the construction gel; no sticky layer in the top composition | high price |
| Three-phase | All season | high wear resistance; transparent structure with glitter; easy to apply | high price |
| Three-phase | IBD | self-leveling base; without smell; hardens quickly; adheres well to the surface of the nails | intended for professional use only |
Manufacturers of these materials guarantee coating durability of at least 3 weeks.
When choosing a specific brand, you need to focus on the quality of the polymer, your taste and the material component.
After coating
In order for the polymer to lay down more evenly, a few days before the procedure, you will need to stop lubricating your hands with greasy creams, applying masks, and making hand baths.
Following some rules will help preserve the beauty of your nails:
- Do not wet your hands for 24 hours after the procedure. During this time, the polymerization process will be completed and the gel coating will become durable.
- Carry out all housework with rubber gloves. This will help avoid chipping and maintain the original shine of the coating.
- If varnish is applied to the gel coating, do not use acetone to remove it, as the polymer may peel off.
- The varnishes should not contain acetone, only acrylic or gel.
- Soak your hands daily with a cream containing lanolin. This is especially useful for the cuticle.
You also need to monitor your diet, including foods containing calcium, silicon, and biotin. In combination with vitamins, this will help strengthen the horny surface. Regular nail correction will also be required.
Gel nail care
Nails extended with gel on forms are quite strong and durable, unlike tips. With proper care, they retain a neat appearance for up to a month, do not chip, do not peel off, and lengthen as their own nail plate grows.
Extended nails must be protected in everyday life:
- from exposure to detergents,
- long work in water,
- careless handling of kitchen utensils,
- from open fire.
You should be more careful when fastening tight clothing, closing doors, and when playing sports. When doing home care, it is better to use non-metallic tools; do not cut off the free length, but file it off. Use professional gentle varnishes and acetone-free removers.
Make timely corrections not only for aesthetic purposes, but also to preserve your nails: the longer the nail, the more the stress zone shifts, where damage to the plate most often occurs.
Acrylic gel and polygel: what is the difference?
With the advent of each new product for decorating and modeling natural nails, the question immediately arises for the “newbie”: “In what ways is it better than its predecessor?” A representative of the manicure classics, a liquid polymer material, has many properties in common with acrylic. However, there are several points in which there is a significant difference between gel and polygel:
- Unlike gel, acrygel is well suited for use with top molds. This type of accessory is loved by novice and experienced professionals for the ability to quickly perform the most painstaking types of extensions and designs (gradient, cuticle manicure, aquarium designs, etc.). Since acrylic gel does not spread when laid out, it is more convenient for a manicurist to stretch it to the desired thickness over an artificial substrate than over a natural nail;
- Simplicity and ease of finishing the design is the next point in which the gel differs from polygel for extensions and is inferior to the new product. Polygel can be easily and quickly leveled. It is easier to remove excess from the nail plate before baking in the lamp. When the client places his hand in the device, the acrylic does not spread into the sinuses, unlike the gel. And therefore does not require cutting out excess and streaks. If the need for sawdust does arise, then the excess acrylic gel is cut off easier and faster than with hard gels;
- The combined coating does not have a strong odor during laying out or polymerization. Many gels, especially budget ones, can in this regard unpleasantly affect clients of a beauty artist;
- Polygel is better suited for extension (especially without forms, on weight) and strengthening severely injured nails. Copes well with correcting aesthetic defects of the nail plate after unsuccessful removal of shellac;
- Classic modeling gels are also inferior to gel acrylics because the latter have a softer sawdust. This property is especially important if you have to work with a client with allergies (or the craftswoman herself suffers from manifestations of respiratory allergies);
- You can clearly see how acrygel differs from regular acrylic at the demanicure stage. If with a powder product, detachment on the free edge of the extended nail is a common phenomenon, then polygel almost never suffers from this. It has better adhesive properties and therefore eliminates the risk of air pockets.
Which material the nail artist ultimately chooses for his work will depend on the characteristics of the nails of the visitor to his beauty salon or manicure salon. If you are getting acquainted with a new type of material for the first time, choosing between polygel and acrylic gel and do not know what the difference is between them, then do not be afraid to make a mistake with your choice. It's the same material, just called differently by different brands.
How is gel nail correction done?
On average, after 3-4 weeks, natural nails grow back, and in the hole area a noticeable border appears between the gel and its own plate. Many people remove this difference in heights with a buff at home, but manicure professionals do not recommend this technique: there is a risk of thinning your own nail and causing the gel to peel off.
It makes more sense to make a full correction every time the distance from the cuticle to the beginning of the gel is 3 mm or more. Indications include damage to nails from impacts, cracks, chips. The correction procedure consists of the same steps as the actual extension, but is much more labor-intensive. Therefore, professionals in salons often do not undertake to correct the work of other masters.
After disinfecting hands and tools, the nails are prepared, the glossy layer is removed and the excess thickness is filed away with a buff. After applying the base layer, the nails are modeled with gel. In this case, the forms are previously extended nails, and the process itself resembles nail extensions.
The polymerized material is filed and given shape and length. The final step is to apply a finishing coat and cuticle care cream.
Don't miss the most popular article in the section: How to draw monograms on nails step by step for beginners. Instructions with photos.
Brands of modeling gels
Before starting nail extensions, it is recommended to pay attention to the choice of composition, since the result of the technique and the duration of its preservation in the same state depend on its quality.
In addition, the consistency varies among many manufacturers, which is why beginners in the manicure industry often encounter difficulties. There are two common brands of modeling gels that are often used by professionals in salons.
Pro tech
Single-phase gel is often used due to its ease and speed of application. In addition to modeling, it replaces the three stages of the procedure - applying the base, pigment, and then the finishing layer. Instead, the composition is evenly distributed over the surface, creating a spectacular manicure in 1-2 applications.
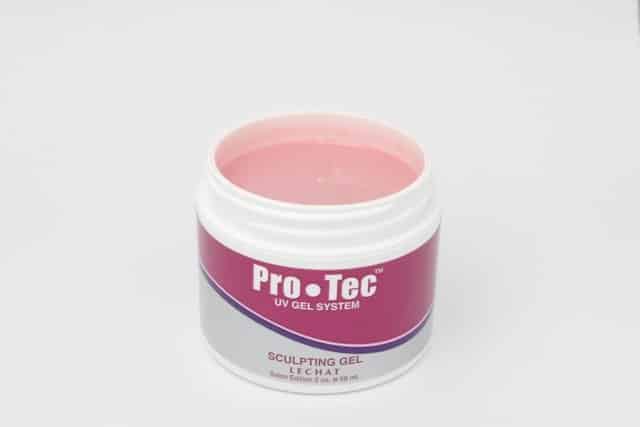
However, keep in mind that the manufacturer only has camouflage shades - beige, pink, coffee, therefore they are often used to create a French manicure. Despite the fact that the gel is single-phase, manufacturers still recommend fixing it with a layer of topcoat to prevent premature deterioration. The consistency of the solution is quite thick, so when applied it does not flow to the side rollers, hardening unevenly.
Giorgio capachini
The brand belongs to the LUX class, which is why it is used mainly only in salons. But the gel can be single-phase or three-phase, which depends on the type of manicure that you want to achieve as a result.
The composition is quite convenient to work with, since it does not spread, but also spontaneously levels out on the surface, creating a uniform coating.
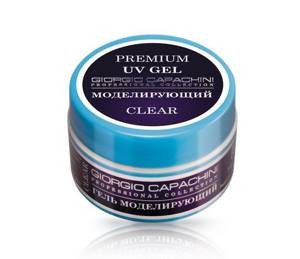
The shades are both camouflage and blue or regular transparent for basic extensions. After applying the top coat included in the kit, the shade of the manicure becomes deep and rich.
The consumption of the composition is quite small, because it can be applied only in 1 layer, which is enough to create a dense substrate.
Advice from professionals
Scroll:
- Use materials purchased from professional stores.
- Work carefully with the natural nail, without scratching or thinning it.
- Accurately follow the extension technology for specific materials.
- Study the recommendations of the cosmetics manufacturer regarding application thickness, polymerization time and wearing characteristics.
- Remember that too thick a layer of gel can lead to detachment of the artificial nail and damage to the natural one.
- Do not bite, cut or pry artificial nails with sharp objects.
- Give the nail plate a rest once every 3-4 months.
It is possible to extend nails with gel on forms using step-by-step instructions at home, however, if you doubt the quality of the materials used or the accuracy of the technology used, it is better to visit a professional and “peep” the secrets of his work. It is wiser to do the initial extensions in a salon, and deal with regular corrections yourself.
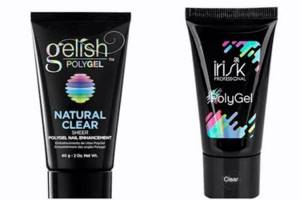
What is acrylic gel (Acryl Gel) and its advantages over classic gels and acrylics
Gel acrylic, or combigel as it is also called, has opened up a lot of advantages for nail specialists in comparison with previous generations of materials. First of all, the masters appreciated its most important advantages, such as hypoallergenicity, health safety, time saving and maximum ease of work, so desirable for beginners to master all the intricacies of their profession. In addition to the technological features, acrygels allowed the craftsmen to increase the number of clients by reaching girls suffering from sensitivity to smells, as well as ladies in an interesting position and fashionistas who are sensitive to smells and sawdust.
All this became possible thanks to such textural and component features of acryl gels as:
- Sawdust density.
During the filing process of this material, the resulting dust is 30% heavier than dust from classic gels and acrylic. It immediately settles on the table and skin and does not scatter in the air. This, of course, does not eliminate the need for craftsmen to use such protective equipment as a mask, screen, glasses and a vacuum cleaner to collect dust, but it significantly reduces the risk of developing occupational diseases (respiratory and contact allergies). In addition, the dense sawdust and the absence of harmful vapors during the polymerization of the drug in the lamp do not harm the health of clients, including those suffering from asthma and allergies. - Reduces the risk of accidental contact of material with skin.
Since combigels do not spread, do not self-level, and do not stain the cuticle and side ridges during the process of molding and spreading them over the nail with a brush, even masters who are just beginning to fill their hands will be able to work at a pace that is convenient for them and without rushing. You just have to carefully choose clinsers in which you need to wet the brush when stretching the gel acrylic over the nail. Preference should be given to liquids from professional brands that have proven themselves to be safe for clients with sensitivity to ingredients and those suffering from allergies. - Comfort of working with the drug.
Thanks to the new product, the artist will be able to devote all his attention and energy directly to modeling and creating the image, without being distracted by measuring the time during drying or carefully combining the proportions of powder and monomer (as when working with acrylic). There is no need to worry about accidental polymerization of the material if the sun's rays fall on an open jar or tube. Acryl Gel hardens only in a lamp, does not dry in air or under the sun. The only thing that the master should remember when drying the material is the need to dry the white shades of acrylic gels (polygels) longer and more thoroughly.
- The most lightweight application technique.
When working with gel acrylic, you don’t have to worry about excessive consumption of materials and auxiliary liquids. The process of preliminary preparation of the nail, extension itself, correction and design is identical to the technology of working with gels and gel polishes. Once you have experience working with these products, you will quickly become familiar with the use of polygels! - Comfort for the client.
A new type of preparation for modeling and design, even when creating dense and very long nails, does not cause a strong burning sensation when polymerized in a lamp. Acrygel materials are dried without the formation of a dispersion, or with a very slight sticky layer. This minimizes the risk of contact allergies to the sticky layer, and creating the image itself takes a little less time and is not as expensive (since the artist does not use lint-free wipes and liquid to remove stickiness). - Comfortable material to wear.
Thanks to its unique formula, acrylic is stronger and lighter than acrylic, and also more elastic than hard gels of all professional brands. The design with them is pleasant and comfortable to wear, since gel acrylic does not weigh down the manicure and is practically not felt on the nail plate, despite the thickness and density of the material. This feature allows you to perform polygel extensions even on thin and brittle nails, with increased sensitivity to weight in the stress zone of the nail. Polygels relieve pressure on the natural nail to an optimal level while maintaining the necessary plasticity and strength.

Of no small importance for both the master and the client are such pleasant little details and features of acrylic gels, such as:
- Almost complete absence of material peeling
- thanks to excellent adhesion with the base and primer, as well as a colored decorative coating applied on top (gel polish, weekly gel polish or classic nail polishes); - Naturalness of the final result.
Both the extension and strengthening, as well as the design with polygels, looks very natural and elegant. The master will not need additional preparations to visually eliminate aesthetic defects of the nails, as well as decorative elements to make the manicure more expressive. Lay-out French, baby boomer, colored and millennium French will look equally gentle and stylish, being made only with shades of acrylic from one palette of a particular brand. Nail art using gel acrylics turns out beautiful and effective, like a salon manicure of the highest level; - Removing restrictions on the use of material for nail modeling.
Due to the fact that acrylic does not have a strong odor, the manicurist (if he works in a salon) no longer needs a separate office to comply with sanitary and hygienic standards. Which will undoubtedly affect the final cost of the work; - Savings and more savings.
The material does not require purchasing a separate set of brushes; you can use the same tools that you purchased for working on gel or acrylic. Acrygels are not picky about the bristles of brushes: those made entirely from artificial bristles or those made from a combination of natural bristles and synthetics are suitable. Polygel is a “single-layer” preparation; it gives a uniform and dense color with high-quality elongation with minimal material consumption. To give the shape the master needs, you can use any convenient accessories (both regular tips and reusable forms, as well as “liquid” tips), or even apply the material directly to the nail, without “safety net” (with the proper level of skill).
For the sake of objectivity, we will also mention the possible shortcomings of the innovative product
. These include the following points:
- Gel acrylic is not inherently a soak-off material, and not every type of it can be removed by soaking. To safely remove a design, you will need either a high-quality milling machine or a set of files for working with artificial materials;
- In order for the acrylic gel to harden efficiently, firmly and quickly, you will need a reliable lamp (or LED) both at the stage of drying the base and top, used respectively before and after laying out the material, and when baking the layers of the polygel itself;
- Depending on the manufacturer and the essence of the preparation, the master may require a special liquid in which it is necessary to periodically wet the brush for a smooth, even and uniform distribution of the acrylic gel over the surface of the nail.
However, all these nuances are more than offset by the multifunctionality of gel acrylics and the mass of techniques and procedures that a master can perform with just one preparation. Let's take a closer look at them...
Varieties
Today, two types of upper forms are known. Depending on the cost, they can be either with or without markings to facilitate the work process. The first option is especially convenient for beginners who are getting acquainted with nail extensions using such templates.
The markings on the forms may differ; in some places they are arched stripes, in others they are a grid.
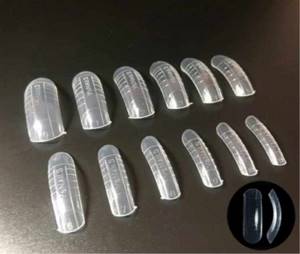
The set has the same arch and length, as well as markings with the indicated dimensions. Based on the marking lines, it is easier to align the length and adjust the edge. There is no need to tediously adjust an identical shape, since it already exists.
The upper forms are classified as reusable types of extension templates. They differ from arched counterparts and liquid tips.
Home recovery after extensions
Sooner or later the moment will come when you do not correct the gel coating, but completely remove it. I don't think you'll be happy with the look of your natural nails. The plate will be thin, brittle, and lacking natural shine. And it will be necessary to urgently begin restoration.
Masks, baths for hands and nails, which can always be made at home, have proven themselves well. The necessary products are available in any supermarket at an affordable price. Herbs are sold at your nearest pharmacy. And if you regularly use these procedures, your nails will soon become dense and healthy again.
Salt scrub
A salt scrub that is easy to prepare yourself will perfectly restore your nails and the skin around them. You need to take sea salt and mix it with shower gel. You should get a mass of mushy consistency. Apply to fingertips and massage lightly for several minutes. We especially carefully work on the area near the cuticle.
Nourishing, vitamin mask
You will need 100 grams of honey (if you are not allergic to it), 100 ml of lemon juice, which will whiten the plate, 50 ml of olive oil, which will soften the effect of lemon. Mix all the ingredients, dip your fingers into the mixture and, without wiping, put on cellophane gloves. We wait about ten minutes, rinse our hands with warm water.
Gel nail extension technology
Wax mask-bath
Heated natural wax facilitates the penetration of all the beneficial substances contained in the mask into the skin and nail plate. We melt it in a water bath. We crush the aloe leaves in a mortar and squeeze out the juice through cheesecloth; we need to get 100 ml. You will also need 3 dessert spoons of honey, which we combine with aloe juice, and then add a tablespoon of peach oil. Dip your fingers into the resulting mass and hold for a while. We take our hands out of the bath and, without wiping the skin, dip them into warm wax. Wrap your hands in cling film for 15 minutes. Then remove the wax and apply nourishing hand cream.
Possibilities of polygel in manicure and nail design
Acrigel combined varnish and acrylic polymers, oligomers and made the manicure service area more diverse. When using acrygel, the master not only lengthens and strengthens the nail plate, but can also eliminate defects and surface injuries.
Polygel nail extensions are carried out if:
- the client suffers from increased brittleness of nails, which also have a trapezoid shape,
- if correction of the nail surface is required.
More detailed instructions for extensions
First stage
- After disinfecting the palms and fingers with an antiseptic, we treat the nail plates.
- Use a wooden stick to push back the cuticle. It is advisable to trim off the excess using special nippers or sharpened nail scissors.
- Carefully file the nails, leaving approximately 1-5 mm. Use an orange stick to remove dirt under your nails.
- The top glossy layer is removed with a buff and unevenness is removed. Use a brush or brush to shake off the dust.
- We degrease the nail plate using a special product. At home, you can use alcohol to soak a napkin.
- A primer is applied, it ensures adhesion of the material to the nail plate and protects against microbes.
Second phase
After the nails are processed, we select the upper forms of a suitable size, one by one applying them to the nail plate.
The blank should be slightly smaller than the nail plate. The free space will be filled with excess gel.
- The nail is covered with a thin base layer of gel. It should not be dried out.
- The inside of the workpiece is carefully filled with a denser layer of material in the area of the free edge, which should be dried after application (20 seconds). The gel is then applied to the area intended to adhere to the nail plate.
- The procedure can be simplified. A thin layer of gel covers the part of the plate that comes into contact with the nails. The free edge of the workpiece is compacted more tightly (0.5-1mm). At this stage of modeling, you can also determine the approximate desired length of the nail.
- The gel-filled blank is carefully pressed against the nail. There is no need to put pressure on the plate. Turning your palm over, you need to see how the gel lays down; its excess is removed with a pusher.
- Fingers with applied tips are placed under a UV lamp for about five minutes and wait for the material to polymerize. Manufacturers indicate on the packaging how long it takes for the material to harden.
- Once the gel has hardened, the top molds are carefully removed. We wipe the tip and put it back in the box. The nail is degreased. The free edge is processed with a file, which is given a neat appearance.
- To consolidate the result, this extension technology provides the possibility of applying a finishing coating. It is advisable to do this, but there is no particular need. This layer is polymerized for about two minutes.
- Degrease the nail plate. Lubricate the cuticle with special oil.
How the top forms came to be
We all remember that happy, carefree time when, as small children, we played in the sandbox, filled various molds with wet sand, tipped them over and made Easter cakes. A simple game that is loved by all children.
Even in childhood, it was clear to each of us that sculpting a beautiful and even figure ourselves is much more difficult than simply pouring sand into a ready-made mold and turning it over.
Now imagine how great it would be to transfer this method (with certain changes, of course) to the nail service, using something similar for nail extensions!
Imagine how much easier the process of nail extensions would be if we had a mold prepared in advance for each nail, into which all we had to do was put the construction material (acrylic or gel) and turn it over, as if gluing the material onto a natural nail!
And then, after waiting for the material to dry, remove the mold and get a finished nail, shiny and smooth!
In 2007, the Formula Profi company introduced a new, unique nail extension technology that used the above-mentioned principle. The new technology is called upper forms. It is based on special plastic forms into which the material is laid out.
In order to evaluate the pros and cons of the upper forms technology, we will try to understand how it differs from earlier, preceding technologies.