Gel polish correction without removal is a manicure update without removing the old coating. It is performed after 2-4 weeks, when the nails have grown sufficiently. Cover only the natural part of the plates, first filing the border of the flower bed. Then proceed in the same way as with a complete manicure update, using sequentially a cuticle remover, degreaser, primer, base, the same or a different gel polish and top coat.
You can make a correction by partially removing the coating. Use a file to grind it down to the base and cover it with a new color. Or they decorate the overgrown part of the nails with rhinestones, foil, and sparkles. The broken plate is replenished with gel, and in case of small cracks, the entire coating on it is simply renewed.
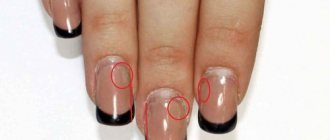
Correction of gel polish without removing color
Correcting gel polish without removing the color saves time, as it is faster than a complete design update:
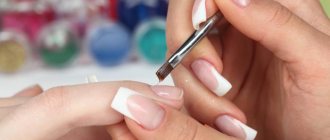
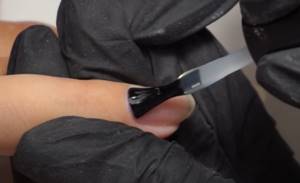
- First the cuticle is treated. You can remove the excess with a hardware cutter, then with nippers, and if you don’t have a device, with a remover and an orange stick. If the stratum corneum is small, it is simply moved using a softening agent and a pusher.

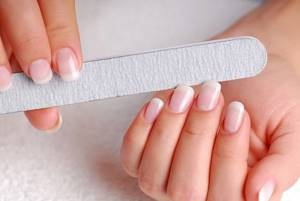
- The gel polish at the border with the regrown area of the nail needs to be filed down. This way, the convex transition line is removed - a step that will interfere with making the updated coating smooth and natural.
- The buff is passed over the entire surface of the plates. This is necessary to remove the glossy sheen, that is, better adhesion to the fresh layer of coating.
- After filing, the surfaces of the nail plates are wiped with a degreaser. All debris is thoroughly cleaned from the sinuses and removed from the skin.
- Apply primer to the regrown parts of the nails. This is done with a semi-dry brush. And you need to wait a few seconds for the liquid to dry in the air.
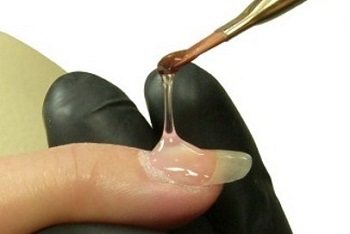
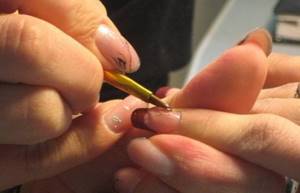
- The next product is the base. It is taken in a small amount and applied to the middle of the nail or to the entire nail, directly over the remaining layer of gel polish. The base is polymerized.
- Paint your nails with gel polish of the same color over the entire surface or to the middle, free edge. The choice depends on the design and thickness of the previous coating. But the renewed surface should be smooth.

- The layer is dried. And you can cover your nails with gel polish again for color density and polymerize again.
- Apply the finish to each plate entirely. Dry the last layer in a lamp.

With this method, you can reduce the length of your nails using a file or a hardware router. This is done at the very beginning, even before working with the cuticle. But there is a danger of compromising the integrity of the coating on the tips. Therefore, it will be necessary to apply a fresh layer of gel polish to the entire surface of the nails, including the free edge.
Important facts about the correction procedure
Formation of a stress zone of the nail
- It consists of several stages and always involves hand treatment.
- Nails must be shortened.
- The free edge of the nail decreases in thickness.
- And only then can you begin to form a stress zone in the central part of the nail plate, evenly distributing the material.
- The final stage of correction is drying and polishing.
How to correct gel polish with color change
It is also possible to correct gel polish by updating the main shade of the coating:
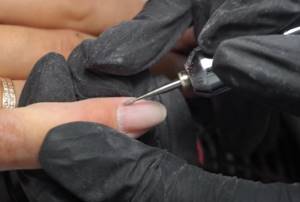
- First, reduce the length of the nails using a file or milling cutter. You can change the shape if you wish. At the same stage, rough skin around the corners of the nails and side ridges are treated.
- Then remove the color coating to the base. It is permissible to preserve its layer and, if possible, leave it even. Use a file with an abrasiveness of 100-180 grit or a hardware router.

- They work with the cuticle. It is lifted using a pusher, softened with a remover and cut with scissors. If the stratum corneum has not grown enough, it is moved away with an orange stick.
- Apply primer to the regrown part of the nails. You need to let it air dry.
- Use another thin layer of base. It is needed to level the surface. The product is polymerized.
- Apply 2 layers of gel polish. Each one needs to be dried in a lamp.
- Use a finishing coat. It is also polymerized.

This method is possible if there are no peeling marks on the old base coat. They can be seen by swollen places or material raised above the surface of the nail, under which there are voids.
If a problem is detected, you will have to remove the entire coating completely. To do this, after removing the top with a rough file, use a special liquid. It is applied to pieces of cotton pads, placed on the nails and wrapped with foil on the fingertips. Silicone caps can be used for the same purpose.
After 10-15 minutes of exposure, the remaining coating is removed with an orange stick and the manicure is performed as usual:
- Correct the length and shape of nails.
- Treat the cuticle.
- Grind the surfaces of the plates with a buff.
- Wipe them and the skin with a degreaser.
- Primer is applied.
- Use a base with leveling, dry under UV or LED radiation.
- Apply gel polish in 2 layers, both are polymerized.
- Cover with finish and dry.
Another interesting option for manicure correction with gel polish
Manicure correction with gel polish can be done by changing the design, but without removing the previous coating. In all cases, the cuticle is first processed, that is, it is cut or moved. Then you can use the following tools:
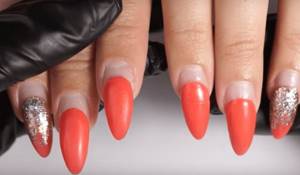
- Gel polish of a different color for the regrown part of the nail. You need to file down the “step” between it and the old coating, degrease it, and coat the open area with primer. After it dries, a base is applied to this area and polymerized. And then they paint it with gel polish. After drying it and covering the entire surface of the nail with top coat, you get a reverse French manicure. It is necessary that the border with the shade is even, otherwise it will have to be covered with some kind of decor.
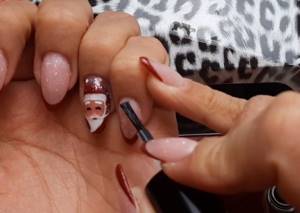
- Rhinestones. Here, too, the transition between the natural plate and the coating is smoothed using a file, and the surface is degreased. Glue or a thick base is used as a fixative. In the second case, rhinestones are placed on a coated surface and polymerized in a lamp. Apply a topcoat around the stones and dry it.
- Glitter. You can tightly cover the entire strip of the regrown nail with them or stretch it with glitter. Prepare the surface as in previous cases.
- Strips of flexible foil or display material. Here, too, you should cover the entire natural part of the nails. The color of the foil is matched to the shade of the gel polish.
- Acrylic powder with decorative properties. You can take a colored or neon one with glitter, pour it onto a damp base layer and dry it. And then use a brush to get rid of excess grains and cover everything with top coat.

How to correct nails after gel polish
Correction of nails after gel polish may be necessary if one or more are cracked on the free edge, but you want to maintain the length. It's done like this:
- The entire coating is removed by first cutting off the top, then soaking it and removing its remains with an orange stick.
- Treat the cuticle and skin around the nails.
- If possible, carefully file them down, but so as not to enlarge the cracks on the free edge.
- Degrease and clean the work area with a special product.
- Apply ultrabond and allow it to air dry.
- Apply the base with leveling and polymerize.
- Make 2 layers of color coating, each one is dried in a lamp.
- A finishing agent is used and polymerized.
A coating consisting of 4 layers can maintain the integrity of the nails if there are small cracks on the free edge. For greater reliability, at the 6th stage, you can use acrylic powder on the wet base. Sprinkle it with a spatula, or dip your finger into the powder several times. And only after this should the coating be dried. And the flower garden is applied after shaking off excess powder with a brush.
Larger cracks or broken corners are corrected with polygel or extension gel. One of the products is applied to the defect after drying a thin layer of base, kneaded with a brush slightly moistened with a cleanser. Then it is smoothed so that the surface acquires a natural texture. After drying in the lamp, the shape is adjusted with a file. Then continue coating application as usual.
Watch the video on how to correct nails after gel polish:
The cyclical nature of “restoration”
Many girls want to know exactly how many days after extensions they need to make corrections. No one can give a definite answer to this question. It all depends on the following factors:
- brittle nails;
- proper manicure care;
- extension technology;
- materials used (quality or not).
On average, girls wear artificial nails for 3 weeks. With careful wear and slow growth of the nail plate, you can enjoy perfect nails for up to 5 weeks. After this time, in any case, it will be necessary to carry out correction in order to avoid very unpleasant consequences (for example, breakdown or infection).
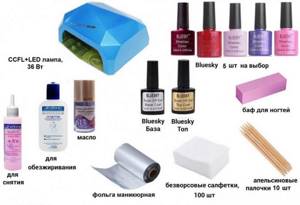
Gel polish correction at home: what tools are needed
Correction of gel polish at home is performed using:
- manicure files with abrasiveness 100-180 and 240 grit;
- pusher and orange stick;
- scissors or cuticle nippers;
- remover;
- buff and brushes;
- degreaser and primer;
- base, gel polish of the desired shade and top;
- lamps for coating polymerization;
- lint-free wipes.
To paint the overgrown part of the nails, some people require a thin brush, but you can get by with the one that comes in the bottle. If your manicure is refreshed with the help of decorative elements (glitter, rhinestones, foil, etc.), you need to stock up on them too. After completing the procedure, it is useful to apply a little oil to the cuticle and rub.
Classification
Depending on the condition of the coating, two types of correction can be distinguished:
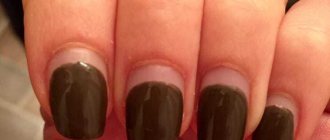
- No nail polish remover. This option is suitable for girls whose nails grow very quickly. Those. The coating is still intact, without chips or damage, but there is already noticeably grown space that is not covered with varnish, and the manicure looks untidy. The coating remains on the nail plate, and the essence of the correction work is to fill the resulting “void” with an additional layer of varnish;
- Full correction with changing the color of the coating. This option is chosen by ladies who do not want to wear the same shade and pattern on their nails for a long time. The gel polish is removed and the coating is reapplied.
Preparing for nail correction
Which nail correction option to choose is up to you to decide. But before you make a final decision, it’s worth knowing the pros and cons of both options:
- The main advantage of correction without removing nail polish is considered to be time saving. This factor is most important for young mothers and busy women, for whom every minute counts. The cost of such work is not high. The disadvantages include the fact that the design and color of the coating remains unchanged;
- A complete change will ensure that you don't get tired of your manicure because you'll be updating it periodically. You can change not only the color of the polish, but also the shape of the nail, as well as the design. The disadvantages include the high price tag and duration.
Correction at home is available if you have the necessary tools and skills.
Nail correction without removing polish
Advantages and disadvantages of correcting grown-out gel polish without removing it
Correcting overgrown gel polish without removing it has many advantages:
- makes a 2-3 week old design fresh, making your nails look neater;
- saves time and money, as well as materials;
- allows you to “get your hands on” in applying a flower bed near the cuticle;
- protects nails from additional exposure to liquid for dissolving gel polish or cutters, which can injure them;
- makes it possible to grow the desired length;
- coating defects are quickly corrected;
- there are conditions for the manifestation of imagination in the search for a new design.
Some girls still prefer to completely renew their manicure, since the method of correction without removal is not without its drawbacks:
- it may turn out that there is too much material on the free edge, which increases the risk of breakage;
- It’s not always possible to do everything neatly and beautifully; surfaces may look “pot-bellied” or uneven, with flower bed overhangs;
- the old coating still wears out, that is, there is a greater risk of peeling and chipping;
- under the peeled layer, if the defect is not immediately noticed, an infection may develop;
- The color of gel polish gets boring when worn for a long time.
What to remember
Let's summarize:
- If you wear extended nails, it is necessary to correct them from time to time. There are three types: minimal - for example, to eliminate an accidental scratch; medium or planned - necessary in any case, simply because our nails grow; complex - carried out in case of serious damage to the nail or peeling of the coating. In the latter case, you need to find the cause - this can be very important for the health of your real nails.
- You can “repair” the coating yourself at home. To do this, you will need to acquire the necessary tools and materials and follow all the recommendations outlined above. If you have doubts and don’t know exactly how to correct extended nails in your particular case, then it’s better not to take risks and contact a top nail technician. It will give your hands a flawless look again.
- In order for artificial turf to please you for a long time and cause less trouble, you need to properly care for it. Follow the general care recommendations and do not neglect the advice of nail technicians - then everything will be fine with your nails!
Girls, almost every one of you has done nail extensions at least once in your life. Tell us, how often did you have to make corrections? How long do artificial nails last? What troubles did you encounter? I look forward to your stories in the comments and see you again in the next articles!
Is it possible to refinish the coating with regular varnish?
You can also renew the coating with regular varnish; you can choose the exact color or, conversely, use a different shade to create an original design. It will be easier, cheaper and faster.
To ensure that the thickness of the layer at the base of the nails matches the rest of the space, apply a base for regular polish, then a flower bed and a top coat. It is necessary to strive to ensure that these products are applied only to the regrown part of the plates. Otherwise, regular varnish will quickly chip.
But when updating your manicure this way, you need to consider two points:
- a product that dries in air will still differ in texture and appearance from gel polish, sometimes this is very noticeable;
- it does not last as long as a polymerizing coating, a maximum of a week.
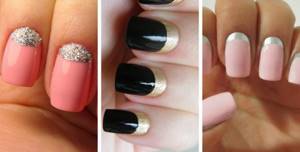
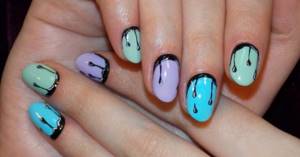
Design options
Each girl's nails grow at different rates, and the need for correction arises with different frequencies. But the darker the shade of the varnish, the more noticeable the regrown part of the plate will be. Therefore, there are many different design options to disguise it:
- When coated with decorative varnish, a hole of the natural nail is left at the base, and such a manicure will less often need correction.
- Decoration with decorative elements (rhinestones, sparkles, beads), as well as design with monograms or other lines.

- French manicure is one of the most successful and long-lasting options, since the regrown part is absolutely invisible to the people around you.

How often to correct gel polish
Correction should be done so often that the nails look neat, that is, every 2-4 weeks. It depends on the speed of their growth, it is different for everyone. If the hole is visible by 2-2.5 mm or completely, the overall appearance of the hands looks sloppy. And with strong growth of the free edge on which there is material, the architecture of the nails is disrupted. This area is overloaded, and there is a high risk of a crack or part of the plate breaking off.
If correction is needed precisely because of the formation of recent defects, it should be eliminated as soon as possible. Otherwise the problem may get worse. For example, a crack will extend beyond the free edge, and this is not only unsightly, but also painful.
Correction also includes caring for the cuticle and side ridges. If burrs, irregularities, or defects appear on them, you should get rid of them using scissors or a special file that grinds the skin. These problems can be avoided by regular use of emollient oil. When the cuticle grows, it is not necessary to cut off every millimeter. It is enough to regularly push it away with an orange stick.
If your nails grow quickly, so that you don’t have to correct them too often, you can cover them with shades of gel polish that are close to the natural color. Or use a camouflage base. You can put off the need for a design update if you do a manicure with negative space in the hole area.
What is correction
The most important procedure after nail extensions is timely correction. It is usually carried out 2-3 weeks after applying the artificial turf.
The point here, of course, is that real nails continue to grow. And with some coatings, for example, biogel, they grow back even faster than usual. As a result, an unpainted hole appears and enlarges below the level of the extended nail.
Agree that such a manicure looks, to put it mildly, unpresentable! And if there is a design on the surface, it looks even more untidy and attracts sidelong glances from others. Is not it?
This is interesting. Did you know that every 7 days your fingernails grow by about 1 mm?