Rating: No rating

Female representatives who strive to look well-groomed and beautiful in everyday life, as on any holiday, simply cannot ignore their hands . They often resort to the services of nail service specialists for such procedures as hygienic manicures, paraffin therapy and hand spa treatments, gel polish coating and nail extensions. Extension, in turn, implies timely correction. I would like to dwell in more detail on what correction of extended nails is and what needs to be taken into account if you use or plan to use such a service.
The specifics of such a procedure as correction of extended nails
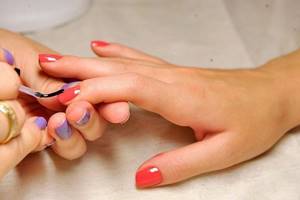
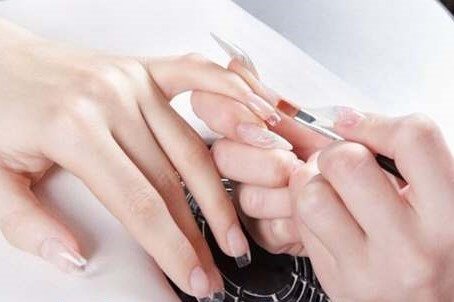
Correction of extended nails usually involves a visit to a manicure salon. This is a rather lengthy procedure in which the missing material is added to the regrown part of the nail to give the manicure a neat, original look again. During correction, you can partially or completely change the design of your nails, as well as their shape and length.
There are two types of extensions: gel and acrylic. The specifics of working with these two materials have significant differences:
- to carry out gel extensions and corrections, a gel is used, which polymerizes in a UV lamp, and when working with acrylic, the master mixes two components - acrylic powder and monomer, which harden without additional equipment;
- the gel does not smell of anything , while the monomer, without which acrylic extensions are impossible, has a pungent odor, due to which it is contraindicated for people prone to allergies, asthma sufferers, and pregnant women;
- gel is a lightweight material , and when filing nails, gel dust flies into the air, acrylic is heavier than gel, and dust from it falls to the surface of the table;
- With the help of gel it is convenient to make aquarium designs and various color extensions, acrylic is not so transparent, similar options for nail art with acrylic extensions are also possible, but they do not look so impressive.
If for some reason you cannot make a correction in the salon, and the time to correct your nails has already come, you can carry out this procedure yourself at home if you have all the necessary materials for this.
Complex correction
Complex nail correction with gel is carried out in cases where the time from extension to correction is more than 4 weeks. As a rule, at this time there are definitely breakages, and the material has already moved to the middle of the natural nail. This correction almost corresponds to full nail extensions. In the process of complex correction, the master cuts all the material down to the substrate. Then the gel completely creates a new nail, taking into account all proportions.
During complex corrections, an aquarium design or French manicure is often performed or restored. It is important to correct the reverse side of the nail as well. Be sure to cut out any irregularities or detachments using a router, and create a new arch.
What is needed to correct extended nails with gel?
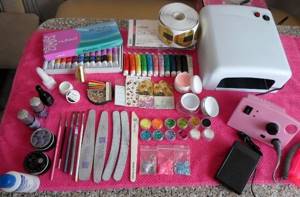
To correct extended nails with gel, you need the following materials :
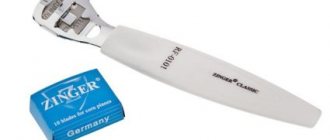
- milling machine (at home you can replace it with a nail file);
- soft brush for removing nail dust;
- brush for gel extensions;
- degreaser;
- file and buff;
- Ultraviolet lamp;
- Siller;
- colored or transparent gel (depending on what the extension was originally);
- a paper napkin to wipe the brush;
- lint-free wipes;
- cuticle oil;
- primer;
- clinser.
When correcting nails, use a file for extended nails with a coarse abrasiveness of 80-100 grit. It is suitable for both gel nails and acrylic nails.
Materials and equipment
For gel correction, the following consumables and equipment are required:
1. Gel. The wizard selects a 3- or 1-phase system. You will need a base gel, a transparent gel to create a base, a camouflage gel, and a white gel for a jacket.
2. Degreaser.
3. Primer. Acid or acid-free. Designed to create good adhesion of the gel to the natural nail plate.
4. Gel topcoat. Designed to create a protective layer and add shine to finished nails.
5. Liquid for removing dispersed (sticky) layer on the surface of the gel coating.
6. Paper forms.
7. Brush for gel nail extensions.
8. UV lamp with a power of at least 36 W.
9. A router or a set of files of different abrasiveness (from 100 to 240 grit).
Each correction differs in the complexity of execution, the amount of consumables spent and time. Simple nail correction with gel is the most common. Technically it is basic.
A simple correction is always planned in advance and carried out after 3-4 weeks. In its process, the material is laid out only in the area of the regrown nail and the side ridges. The instructions below will tell you how to correct your nails with gel in 1 hour. The procedure is simple, but requires patience.
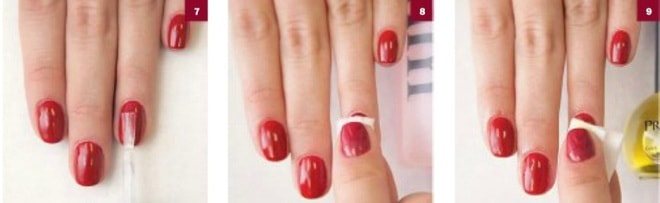
Step-by-step instructions for correcting extended nails with gel at home with photos
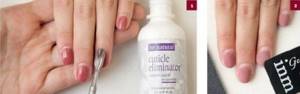
By following these instructions, you will learn how to correct extended nails with gel step by step at home and will be able to carry out the procedure yourself. Before you begin, treat your hands with an antiseptic, soften and remove the cuticle in a way convenient for you . Further actions require accuracy and lack of haste.
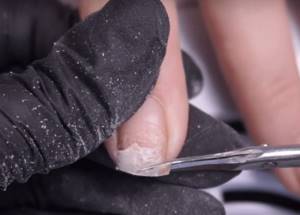
- Using a nail file or a router remove the shiny layer of sealer from the previous coating from the nails, file the nails, adjust their shape and length so that there are no peelings left. Buff each nail with a buff. Remove nail dust with a brush.
- Degrease the overgrown part of the natural nail, then apply primer to the entire length of your nails.
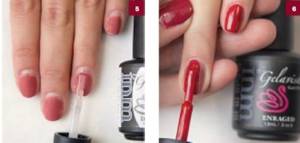
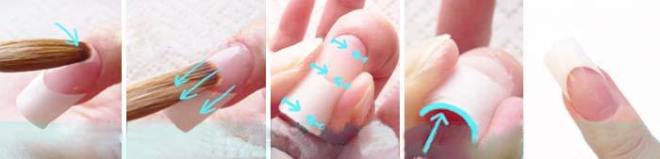
- Brush apply gel to your nails from the cuticle area to the free edge in a very thin layer. Dry in the lamp for 2 minutes. Repeat this step and remove the sticky layer with a lint-free cloth and cleanser.
Do not forget to wipe the brush on a napkin while working with the gel. Make sure that it is not exposed to ultraviolet light.
- Adjust the surface of your nails file and buff, taking care not to damage the shape.
- Cover your nails with finishing sealer and dry in a lamp for 2 minutes.
- Use oil for the cuticle.
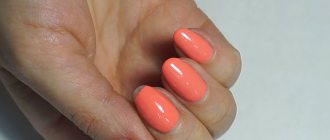
At this stage, the correction of gel nails is completed . If desired, you can complement the result with a beautiful design.
Advantages and disadvantages
Despite all the recommendations of nail service professionals, not all girls take into account the optimal frequency of corrections, considering this to be uneconomical.
In fact, there are two options for correction performed in the salon:
- Full. It involves completely removing the previous work and applying a new pigment. The new effect can be made in any shape or choose a unique design. Most often, girls prefer to use this update method.
- Partial. Instead of removing the previous gel polish, the master applies an additional small amount of pigment to the regrown part in the cuticle area. This is done carefully using a thin brush, if there are no chips, cracks or other defects on the previous coating. The dye, applied locally, can be the same color, or a different shade to create a gradient.
The second method of technology is not performed by all masters, but it saves the client’s time, since instead of 2.5-3 hours spent on removing the work and re-doing it, the partial method is completed in 30-40 minutes.
The correction itself, regardless of the method performed, has positive aspects:
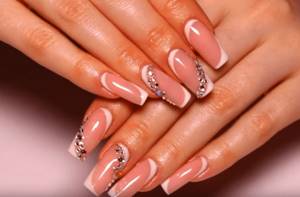
- Possibility of changing the design of the decorative coating, completely transforming the natural manicure;
- Preventing spontaneous breakage of the natural nail bed when the load on the free edge increases. It also prevents the occurrence of local problems - thinning of nails, chipping, cracking;
- A girl's manicure always looks impressive, neat, which makes her hands well-groomed;
- Possibility of changing the style and design of the nail when performing a full correction. Then the master, at the girl’s request, can adjust the shape of the free edge;
- When performing partial technology, the client significantly saves his time, spending about an hour on nail care every 3-4 weeks.
If you follow the master's recommendations regarding methods of correcting the work, your nails will always look well-groomed and neat, and they will not appear chipped or other defects.
However, keep in mind some of the disadvantages of the procedure:
- Performing corrections too frequently can lead to damage to the stratum corneum of the nail plate;
- Performing a partial correction often looks sloppy, since the transition between the old and new gel polish can be noticeable, especially when performing the technique by a beginner.
Despite the fact that one session in the salon takes about three hours on average, it needs to be performed on average once a month, so as a result, the girl does not spend much time caring for the condition of her natural manicure.
How to correct extended nails with acrylic
Correction of acrylic nails is carried out according to the same principle as gel nails. The main difference is the application of the material itself and a special brush for working with acrylic. The brush is moistened in monomer, previously poured into a small glass container, then acrylic powder is collected. This mixture is distributed over the nail plate.
This material does not require additional drying devices; it hardens in air without any manipulation. Taking this fact into account, you need to work quickly with acrylic powder and monomer , and the brush must be regularly cleaned of material residues while working, otherwise it will become unusable after the first correction.
You will still need a UV lamp to dry the topcoat with sealer. This step should not be skipped, since the sealer, in addition to shine, also serves as a fixative that can increase the wear time of the manicure.
Caring for artificial nails
Do you want your new nails to last as long as possible? Then you need to follow the recommendations of experts:
- Try not to visit baths and saunas for 24 hours after correction or extension. The artificial turf has not yet matured, so you should not expose it to temperature changes.
- Get rid of the habit of tapping your nails on the table, opening objects with them, picking your teeth, etc.
- Do household chores (such as washing floors and dishes) wearing rubber gloves. Household chemicals have a detrimental effect on artificial surfaces (and on the skin of your hands, of course, too).
- Choose the right lotions and creams to care for your nails and hands. It is best to give preference to natural oils (ylang-ylang, peach, rose).
- If you wear extended nails, forget about paraffin masks, salt or soda baths. Artificial turf doesn't like this.
- Don't forget about caring for your cuticles. Special products (they can be found in any cosmetic store) will slow down its growth, and your nails will look beautiful longer.
Caring for extended nails is not so difficult, is it? It is enough to follow these tips, and then the artificial turf will serve you for a long time.
Correction of extended nails using tips
Typically, flexible forms with a sticky base are used for nail extensions, but tips are also sometimes used. They are glued to the natural nail with special glue and serve as a more stable substrate for the further extension procedure.
When working with tips, use only special glue for tips! Using any other glue can seriously damage your nail!
Masters use tips in cases where the client’s nails are too short or their natural shape does not allow the use of conventional flexible forms. Before starting the procedure, each tip needs to be adapted to your nail , since initially they all have a standard length and shape. When gluing tips, you need to press them tightly against the surface of a previously degreased natural nail so that during further use there are no peelings or chips.
Also an obligatory step is filing the finished substrate with a hard buffer - without this, the material will not stick due to the glossy surface of the tips. After the base is ready, gel or acrylic is applied on top of the tips, giving the nails the most natural look possible and applying the finishing coat . It is worth considering that a French jacket made on tips cannot be adjusted; it will need to be redone.
Types of "repair"
There are three main types of correction of nail extensions:
- "Mini". Often it is performed within a few days after lengthening. The reason is usually various kinds of chips, cracks, scratches, etc. They need to be eliminated and gel polish applied again. The duration of the procedure is no more than 15 minutes.
- Average. This is a standard elective procedure that is usually performed at 3-4 weeks. The nails are filed and the regrown area is covered with varnish.
- Complex. May be required at any time due to serious damage (e.g. peeling coating, broken nail, etc.). In this case, it is necessary to do the extension again.
Attention! Nails coated with gel, acrylic or polygel take a little longer to correct than those treated with shellac. Some girls repair their nails at home themselves. However, in order for everything to go smoothly, it is important to know how to make the correction correctly and be sure to follow the step-by-step instructions.
How long does it take to correct extended nails?
The question about the frequency of the procedure for adjusting extended nails suggests itself, but no one can give a definite answer. It all depends on how quickly your nails grow , how brittle they are, and whether you use gloves when doing housework. Also, your profession and place of work, as well as the household chemicals you use, play an important role in wearing extended nails.
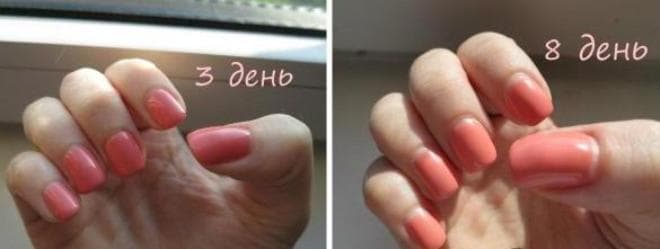
On average, it takes three weeks from extension to correction. If your nails do not grow too quickly, if you wear them carefully, you can wear extended manicure for a little longer. If your nails are naturally weak and brittle, or the conditions of the work you perform do not have the best effect on their condition, you may have to resort to correction more often . Everything is very individual, by doing extensions for a certain amount of time, you will determine the optimal period for wearing nails until the next correction and will focus on it during subsequent appointments at the manicure salon.
The extension procedure is popular and in demand. When growing your nails, you should immediately think about the fact that after some time they will grow and will need to be adjusted. To do this, you don’t have to go to the salon, now you know that correction of gel and acrylic nails is possible at home, you just need to be patient, and everything will work out!
Causes of detachment
Have you ever had artificial turf peel off? For me, yes. A very unpleasant phenomenon, I tell you! If this defect is not corrected in time, you can cause significant damage to your natural nails. The causes of detachment are as follows:
- carelessness during “operation”;
- incorrect selection of nail length - such a nuisance as detachment most often occurs with excessively long nails;
- allergic reactions to the applied component (they say that in case of type 2 diabetes, the coating immediately flies off);
- taking antibiotics;
- hormonal imbalance;
- severe sweating of hands;
- incorrect technique for applying acrylic, gel or polygel.
In my case, the correct extension technology was not followed. In general, it is advisable to go to the same “trusted” nail specialist, then the likelihood of various unpleasant moments arising will be minimal. And if you come to a person for the first time, you can ask him to show a photo with examples of his work.
FAQ
Are there any contraindications for the nail correction procedure? Yes, and they are not much different from contraindications for nail extensions. This is a fungus and some other nail diseases.
How much does a nail correction procedure cost? The price is determined taking into account many factors. For example, do you do it in a salon or at home, what material is used, how much work is required. Usually it varies around 1500 rubles.
How often do you need to have your nails done? This is also an individual question. You can see for yourself when a natural nail grows, and if it becomes very ugly and the difference is too noticeable, then you need to go to a nail technician. On average this time is 3 weeks.
Nail care after nail correction
Caring for nails after correction is the same as for extended nails. Do not knock or scratch them, do not open anything using your fingernails, or do cleaning and washing dishes with gloves (this is also good for the skin of your hands). You don’t have to be afraid to use any hand creams – they are in no way harmful to artificial nails.
Basic shapes of the nail plate
Any master knows that the procedure for correcting extended nails has a number of specific features depending on the type of nail plate of their clients. According to the growth trend, nails are conventionally divided into three types:
- straight growing;
- growing upward or springboard-shaped;
- growing downwards or pecking;
There is another type - a nail plate that is twisted or growing to the side. Such deformation exists both on its own and in combination with the three types described above.
- As practice shows, there are not so many owners of the first type. If you are lucky enough to be on this list, then you can rest easy. Correction, regardless of the type of coating, will not be difficult for the master, even if he did not carry out the extension procedure initially. There will be no problems at all with restoring the nail architecture.
- If your nail plate, as it grows, curls downwards like a griffin’s claws, then you are the owner of the pecking type. There may be several reasons for this anomaly. Congenital characteristics, injuries sustained, bruises and other mechanical damage, lack of vitamins, water imbalance, viral fungal diseases. In some cases, such curvature is almost invisible. You may not even be aware of this feature, especially if you prefer square or oval nail shapes and don't tend to grow them too long. For those whose choice falls on the fashionable “stiletto” or “almond”, the downward growth of the nail plate becomes more noticeable.
- Another physiological feature that has become a real challenge for manicurists is the springboard type. This nail plate, as it grows, rises to the top. Most often, they also have a trapezoidal shape, expanding towards the edge, which does not make the work of the master any easier. If your nails have a similar shape, then you know firsthand how difficult it is to find a competent nail technician who can cope with such a task. What are the ways to correct such a situation and what are the features of correcting such a nail plate? Let's start with the reasons. Among them are genetic predisposition, possible trauma (in this case, the nail plate may return to its original form over time) or viral skin diseases, which can also lead to such deformation. There is an opinion that children who like to bite their nails can also achieve a similar result. There is no scientific basis for this fact. If a similar story happened to you, share it in the comments.
- And finally, the last type of nail deformity is curled or growing to the side. The first subspecies is perhaps more common. Curling of the nail plate is a problem that manifests itself as it grows. There are many reasons for its occurrence. Most often, the nail file is used incorrectly when, when filing the side parts, it is placed too deep. The second reason is thin and soft nails - something you probably encounter every day. In this case, you should not get carried away with grinding and polishing. This will only lead to further thinning of the plate. The third reason is aggressive manicure products. These can be regular varnishes, bases, nuclear acetone for nail polish remover, etc. If, after using any products, the nail plate begins to curl into a tube, stop using them without hesitation. It is unknown how to deal with this problem, other than trying to eliminate its causes. However, if you succeeded, share your experience in the comments.
Features of extended nails
Artificial turf requires special care:
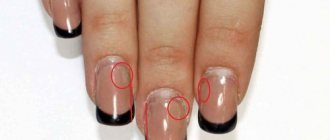
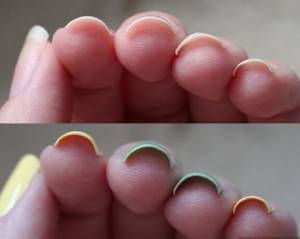
- Over time, air penetrates between the nail and the coating, so detachment occurs, and the beauty of the manicure is lost.
- An indentation appears between the cuticle and the extension material, which spoils the overall appearance.
- Without proper care, not only the aesthetic appearance is lost, but also the natural nail cover is damaged. To do this, you need to know how to properly adjust your manicure.
Acrylic nails
It is not necessary to take expensive paid lessons, the main thing is to follow simple instructions.