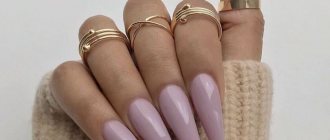
Rating: 5/5 (2)
Nail aesthetics is a very entertaining process. Many girls want to learn this business for commercial practice or to save money on constant visits to salons. But before you master gel nail extensions, you should definitely watch videos of experienced nail technicians who are happy to provide training for beginners. It's not only entertaining, but also completely free.
If you have a talent for drawing, rest assured that you can learn how to do a manicure without special courses. The only thing you need to consider is advanced training. Master classes and conferences will help you with this, where you can learn trends, popular variations of manicure and, of course, the secrets of masters that they will never show on video.
Variety of gels for nail extensions
There is a wide range of gels for nail extensions at home. They exist in transparent or camouflage form, with shades of pink or beige, stained glass and color.
All gels differ in a specific extension scheme:
- Single-phase: contain base, modeling and protective compounds. Easy to apply to the nail. The consistency is liquid. Best used by beginners.
- Two-phase: the consistency is the densest. When applying them, 2 products are used separately - the first main layer and the second sculptural one.
- Three-phase: when using them, layers are applied in 3 stages - initial, sculptural and protective. The third of them ensures the preservation of the nail for a longer time. Widely used by experienced craftsmen.
There are a lot of manufacturers of nail extension gels that can be used independently.
The most popular of them:
- Gel IBD. Made in USA. Does not provoke the development of allergies, acid-free, no pain during drying, neutral odor. It consists of natural ingredients, which protects the nail and also nourishes it. There are no problems with application. This manufacturer produces various types of gels. One of them is IBD Bonder Gel: not thick, self-leveling, hardens under a lamp in 60 seconds. The structure of the nail does not deteriorate, it is able to adhere firmly to the surface, and the nails do not turn yellow. Price 800 rub. Volume 14 ml.
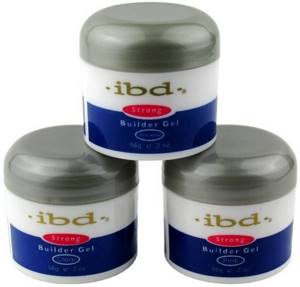
For gel nail extensions at home, it is recommended to use only high-quality materials, for example, IBD - Gel Formula Profi. Russian manufacturer. Among the range produced by the manufacturer is the Formula Profi gel base. Cost 590 rub. Liquid, adheres well to the nail surface. Under a UV lamp it hardens in about 2 minutes.
- Gel All Season. Made in USA. Among its products it is worth highlighting: Shimmer Gel from All Season. Cost 1210 rub. Volume 28 g. Contains silver glitter. Used as layers applied in the second or third stage. Dries in 2 minutes.
- Gel Runail. Made in Russia. Among the products we can note a transparent gel with an orange tint. Cost 205 rub. Volume 7.5 g. Increased viscosity, dries in 1 minute.
- Gel Global. Made in USA. Our products include single-phase and three-phase gels. Global gel sets (12 pcs.) are also offered. Cost 1,500 rub. There are several different colors in the jars.
Types of gels
You can get beautiful nails if you choose a high-quality coating material and use it correctly. Nails are extended according to the same pattern both in beauty salons and at home. The main thing is not to skip any of the stages.
Among artificial coatings, you can choose those that injure the nail plate and those that restore. They also differ in the duration of the extension.
Single phase
A beautiful manicure without additional bottles and jars is possible if you extend your nails with single-phase gel. It has the properties of both a base and modeling layer, and a finishing (top) layer. Single-phase products allow beginners not to worry about the sequence of applying layers, but to fully engage in nail modeling and design.

In order for artificial nails to have a decent appearance when using single-phase gel, you need to know some tricks and not neglect them. To form an attractive “hump” on the nail (apex), at the formation stage you need to turn your finger over with the nail down. This is necessary so that a certain amount of liquid gel accumulates in one place, and the apex area has a convex shape. The result can be recorded by exposing the gel to an ultraviolet lamp.
Two-phase
The procedure and technique for extensions with this gel does not change at all. Only the number of required bottles is added: now you need two of them. One product serves as a base, and the second as a sculptor and top layer.
Two-phase gels are more reliable and durable to wear, but have the disadvantage that the protective function must be performed by the sculpting gel. It is applied in a very thin layer for the third layer - the “finish”. He often fails to cope with his duties, and a beautiful long nail simply bursts lengthwise.
Since the consistency of the two products is different, for two-phase extensions you need to have two brushes.
Three-phase
This type of extension is considered professional and the most durable. Three special tools are used here that have a specific purpose.

- The first product, the base, is applied to the nail surface prepared in advance. It is this that will firmly “adhere” the natural surface of the nail plate with the artificial coating.
- After drying, the sculptor is applied. This layer can be either transparent or colored gel. It is thick enough to slowly create the intended shape of the nail.
- Having gone through a complex procedure of nail formation and design, everything is eventually covered with a special product, which preserves an excellent manicure. It protects against everyday “provocateurs”: detergents, hard objects, impacts on a hard surface, etc.
Natural nails are coated with three different products, which is why the gel is called three-phase. The advantage of such gel nails is durability, but there is also a drawback - during the removal procedure and subsequent extension, the nail plate becomes thinner.
It is difficult to remove such nails on your own without special tools at hand. It is difficult to file extended nails with three-phase gel due to their high strength, and “tearing” them off the nail is completely prohibited.
Extension techniques
Gel nail extensions at home will come to the rescue when it is impossible to grow your own nails.
There are several methods:
1. With tips . It is based on fixing the tips with special glue. They are produced in a wide variety of sizes and shapes. They can be white, transparent or colored. After the gluing stage, the tips are filed to create the required length and shape. Then begins the stage of distributing the gel or acrylic, which is polished after application. If necessary, you can apply a drawing on top.
The advantages of this extension include:
- less painstaking work than on forms;
- extension takes less time;
- more suitable for people with large fingertips;
- good for brittle nails.
Among the disadvantages of this method it is worth noting:
- nails look less neat;
- tips do not allow you to create some forms;
- cannot be pressed, which makes them very thick;
- will make the wide nail plate wider.
2. On forms. There are 2 types: disposable paper and durable metal. First, the form is attached to the edge of the nail, which is free, and then covered with material. When the applied composition has dried, the mold is removed and the length is formed with a file. Then the nail is polished and secured with a product.
Advantages of using forms:
- nails look more natural in appearance;
- It is possible to give the nail plates a variety of shapes.
Flaws:
- duration of the process;
- the price is much higher.
Also, nail extension methods are divided depending on the material:
1. With acrylic. This material dries quickly, so it is necessary to develop a certain skill in working with it.
The advantages of extensions using acrylic are:
- strength, can last up to a month;
- look natural.
The disadvantages of acrylic coating are:
- pungent and unpleasant odor;
- worsens the condition of the nail.
2. Gel extensions. More than half of the gel consists of pine tree resin. Dry only under a UV lamp.
The advantages of this extension include:
- environmental friendliness of the material;
- air and moisture permeability, so your own nails do not deteriorate;
- it is possible to create a variety of beautiful drawings;
- the lamp prevents the spread of fungal diseases.
Among the disadvantages are:
- fragility;
- a damaged nail cannot be corrected.
How realistic is it to learn this using videos?
It's no secret that in order to learn how to skillfully do such a manicure, you need not only drawing skills, but also a great desire and enough time. You can’t learn how to grow nail plates in one day, so be prepared that all your free time will be spent on learning. But if you still have some basic skills, then you can easily master this wonderful type of manicure art.
If we evaluate it realistically, then, in principle, watching video lessons may well replace professional courses. But do not forget that if you attend courses, at the end you will receive a diploma that will confirm your qualifications and real skills. In this case, with this diploma, you will be able to take a position in some salon, when self-taught via video does not give you such an opportunity, and you do not have confirmation that you know how to do nail extensions. If you still decide to train yourself, then search the Internet for step-by-step videos in which the actions of the master are clearly visible. This way you can practice alongside it.
The second way to learn is to attend special master classes, which are periodically held in almost any city. You can find out their time and location from local newspapers, as well as search on the Internet with a specific request for the location of the courses. In this case, you will learn more information and secrets of the masters, but you will also have to pay for it.
You can also find a lot of videos that show not only the technique itself or the extension process, but also all kinds of designs. With their help, you will be able to expand your skills and ultimately become a true master of this difficult but fascinating task.
Rules for choosing a nail extension method
Gel nail extensions at home can be done using several methods.
There are many reasons that influence the choice of the appropriate method, for example, the shape of the natural nail:
- Normal - almond-shaped. Any method can be applied to them.
- Springboard-shaped are characterized by a small nail plate. Here it is worth choosing tips. They need to be taken with a more formed arch, with a bend and not a wide area for contact.
- Flat nails . Both methods can be used.
- Nails growing down. The most suitable method is using forms.
- Bitten nails. For this type, the most suitable are tips that have a small area for connection.
Extension methods
Beautiful, well-groomed nails bring joy to their owner and are a source of pride to others. But among the people who admire aesthetic manicure, no one even realizes the efforts of a good master to achieve it. It happens that the nail is not suitable for applying any gels on top of it. Then tips come to the rescue, which are glued to the nail with special glue.
On tips
Although this method of extension is no longer considered a popular technology, it is used for self-extension. This is convenient, since there is no need to use sticker forms, and the shape of the nail is almost ready and will only need a slight correction. Tips are also used in the following cases:
- the nail plate is wide and short;
- the surface of the nail is severely depleted and cannot be re-extended;
- there is an allergic reaction to the gel (then tips are selected that completely cover the nail from the nail bed itself).
In order for the nail to end up looking attractive, you need to choose the right material for extensions: the tips should best suit the width of the nail and the shape features (flat, convex). It is also better to choose a color that is close to natural.
The procedure for applying the gel has its own characteristics if you use tips as a base instead of your own nail, but many stages are the same. Any type of gel can be used.
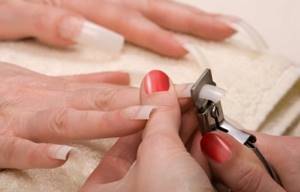
- Trim your nails, do a hardware manicure, after removing the cuticle - degrease, glue the tip to a certain notch on it.
- Form it as intended using a cutter (type cutter). To create a durable manicure, clean the surface of the tip with a nail file or cutter until it is rough. Treat the nail with a buff.
- Further, the extension technology does not differ from that inherent in one or another type of gel.
- After growing your nails, use cuticle oil and hand cream.
Any colored varnish can be applied over these nails. And it will last much longer than on your natural ones.
Using natural plates
This method of extension is one of the most successful in terms of manicure quality. The principle of this extension is to take your own nail as a basis and give it greater strength. In such cases, it is popular to use biogel. It ensures the health of natural nails, with its help you can create a fashionable manicure, and it also gives your nails a shine that is close to natural.
Biogel is recommended for use by those with fragile and depleted nails, as well as those who are afraid of spoiling their loved ones. Strengthening nails with biogel is a popular procedure among those who want to minimize trauma to the nail plate and at the same time have the goal of getting a wonderful manicure. The only downside of this gel is that it does not extend nails longer than 5 mm.
In very rare cases, two-phase and three-phase gel coatings are used, but they are not relevant for preserving the natural nail, as they destroy its structure. If biogel is used, it acts on the nail like a single-phase gel: it acts as a base. So is the top (finish).
Nails on forms: what you need
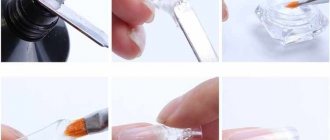
Performing a manicure requires the presence of certain items:
- extension forms;
- Ultraviolet lamp;
- brushes for distributing gel;
- modeling gel;
- primer;
- degreaser;
- nail files and buffer to shape and smooth the surface of the nails;
- fixative;
- scraper (pusher);
- disinfectant solution;
- a product that removes sticky layers;
- lint-free wipes;
- cuticle softening oil.
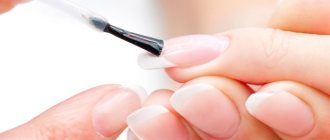
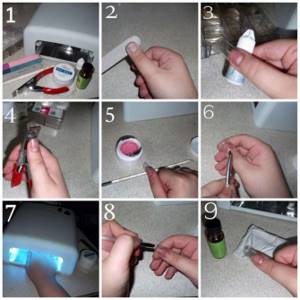
How to use three-phase gel - step-by-step instructions
Extension step by step with three-phase gel on forms requires the master to have certain experience and qualifications.
Sequencing:
- Preliminary preparation of nails:
- antiseptic treatment;
- hygienic manicure;
- filing the edge of the nail and the nail surface;
- cleaning nail dust.

- Installation and adjustment of the form.
- Applying dehydrator and primer.
- Application of the first composition - basic, transparent, ensuring adhesion of the artificial nail to the nail plate. It has a liquid consistency, is applied and evenly distributed with a flat brush. The layer is polymerized under a UV lamp for 2 minutes, under an LED lamp for 1 minute.
- Application of the second composition - a gel modeling structure. This is a thick, viscous composition suitable for giving the nail the required shape. The layer is polymerized under a UV lamp for 3 minutes, under an LED lamp for 2 minutes.
- Removing the sticky layer with a lint-free cloth.
- Correction of the resulting nail.
- Applying the third layer is a top coat. This is a protective layer that secures the two previous layers and gives the extended nail shine and strength.
Using tips
Gel nail extensions at home using tips requires the following to be available:
- a product that softens the cuticle;
- scraper;
- file and polisher (buff) for nails;
- tips;
- type cutter;
- glue for gluing tips;
- gel;
- Ultraviolet lamp;
- brushes for applying gel;
- a product that removes the adhering layer;
- lint-free wipes;
- disinfectant;
- primer (promotes better attachment of natural nails and gel);
- nail-trap (a product that prepares the nail for applying gel);
- a product for removing excess oil from nails;
- cuticle oil.
Features of extension technology
Tips are plastic tips that imitate natural nails. They differ in shape, size, and colors. The tip is glued to the nail itself and becomes part of it. Covered with a special gel. The good thing about this method is that it suits girls with short nails.
Forms (plates) are attached to the base. They are easier to build up with gel and can be removed. The result is amazingly natural.
A three-phase expansion system requires components, each of which performs its own function. The first ensures safe contact between artificial turf and natural turf. The second one models the body of the nail. The last layer protects against external influences and provides gloss.
Two-phase consists of a gel responsible for reliable adhesion, and a second one for strength. Single-phase - universal material. It contains all the necessary characteristics: it connects, models, makes it durable.
Classification of nail forms
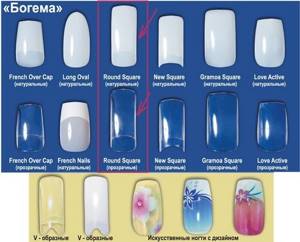
Nails can be given different shapes:
- square - look good on long fingers. Their corners are not rounded. They are considered the simplest to implement;
- oval - the edge of the nail reflects the cuticle. They are oval in shape and have no corners. More suitable for narrow and wide plates;
- squawval – oval-square shape. There are formed corners and a slightly rounded edge that does not show the cuticle area;
- almond-shaped – there are no corners, the edges are rounded at the ends more than the cuticle line;
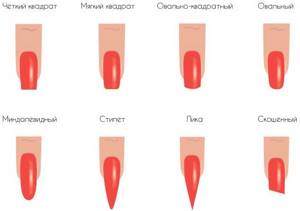
- stiletto - an acute angle without rounding is formed in the center of the edge.
Don't miss the most popular article in the section: How to extend nails with gel polish. Nail extension instructions for beginners. Photo.
Proper care of artificial nails
It would seem that, well, it has grown, the problems with constant nail care have been solved. But that was not the case. A careless attitude towards your gel nails can not only ruin the overall impression of a manicure, but also doom the owner to constant additional procedures.
- On the day when you decide to extend your nails, it is not recommended to use nourishing fatty creams. They can ruin the effect and create a large furrow between the cuticle area and the artificial turf.
- If the nail was already affected by a fungal infection before extensions, you should not expect long-term results. The nail will simply reject the artificial coating and aggravate the situation with the disease
- It is not recommended to extend nails if the period coincides with menstrual periods, lactation or pregnancy.
- You should not expect long-lasting manicure if daily chores include cleaning, hand washing, frequent ironing, washing, etc. daily.
If one of the nails is damaged (chips, cracks), full extensions are required. Correction in such cases is impossible.
Preparatory process
Gel nail extensions at home involve preparatory measures. Such preparation will allow for better quality extensions, avoiding nail fragility, detachment and infection.
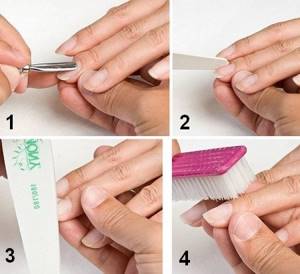
This preparation includes several stages:
- Hands are washed and treated with the product.
- The cuticle is softened with a softening agent. It is rubbed into all fingers. Next, the cuticle is pushed back with a scraper.
- Give the required shape to the nail plates.
- Nail plates are polished with files with an abrasiveness of at least 240 units. Polishing is done in the direction of nail growth. Dust is removed with a brush. Then disinfection is carried out with special means. They come in the form of a spray, liquid solution or wipes. Such preparation is sufficient for high-quality extensions.
How to make designs on nails with gel polish?
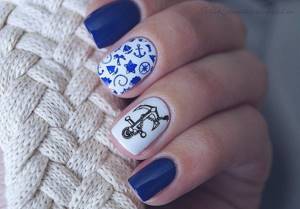
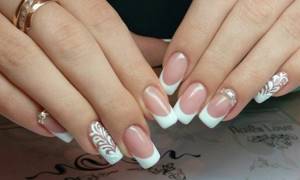
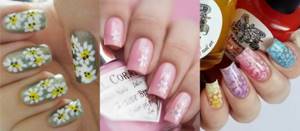
Nail art is a type of manicure in which, in addition to the standard classical treatment of nails, various designs are also reproduced on them according to the technique. Shellac quickly gives freedom to decor, which is why there are entire trends in nail design where images are applied to a ready-made coating. You can make absolutely unimaginable pictures on your nails, it all depends on the artist’s imagination, but you need to understand that individual bright patterns will look more impressive on long nails, and their use on short nails is unacceptable. Examples are shown below.

Nail painting techniques.
There are many techniques for painting with gel polish professionally, but only a few of them can be used at home:
- painting technique with a thin brush;
- dotting technique (a special tool with a small ball at the end);
- dot manicure technique (somewhat reminiscent of children's drawing using dots with the described order);
- “wet” technique: the varnish moves freely on the nail plate using a toothpick or needle;
- liner manicure technique.
Before starting to use any of the techniques, you should observe the master and his manicure sequence. If you can’t go to a salon, you can get the necessary tips from videos on manicure lessons on the Internet. But to gain experience, you still need to work and improve yourself.

Rose gel polish: step-by-step instructions
Rose gel polish is one of the simplest designs, so it can be reproduced even by beginners. The entire procedure from scratch can be divided into several stages.
First you need to choose the right colors. Most often they choose white for the background and red and green for the flower, but this is not necessary. You can play with the colors and choose something unusual. For example, on a matte natural beige tone, a glossy rose is slightly visible. Or paint your nail with black polish and make the rose itself from rhinestones. It all depends on personal preferences and clothing range. And a colored matte manicure with a large abundance of small roses looks very beautiful. Then the nails are coated with the main color, and all at once, and not one by one, are dried in a UV lamp, this gives additional durability. The dryer allows you to seal the color for a long time.
When the varnish has dried, use the tip of a needle to make several dots on the nail with the colors you like and connect them to create the image of a rose.
Butterfly gel polish
Butterfly is a universal design, as it is suitable for both short and long nails. It looks most impressive on a classic French manicure or just white nails, when insect wings contrast with the background.
You can draw a butterfly yourself using a liner or a brush, or you can simply buy a sticker and attach it to your nail. This won't work with a rose. And this is an undeniable advantage of the butterfly.
If you still want to make a drawing yourself, then it should be applied to a good ready-made base. First, the outline of the insect is drawn, and then the wings and body of the butterfly are filled with color. If desired, the drawing can be left as a contour. But learning how to apply color inside the outline is a must.
Skull shellac
Sometimes you want to step away from something cute and decorate your nails with something like a skull. The application technology will differ little from the same butterfly; this is also an easy manicure, but the inside of the skull can be painted with shiny varnish or rhinestones. Looks impressive! But the manicure ideas don't end there.
Hieroglyph shellac
Hieroglyphs are the easiest to draw because they only use two colors. Usually choose black and white varnishes, but you can try a combination of black and red, blue and white, or yellow and green. But the most important thing here is not to miss the meaning of the symbol. Hieroglyphs are in fashion, but you shouldn’t wear meaningless lines or descriptions of public toilets on your hands, this is one of the mistakes beginners make when designing nails.
Pirate theme
Using gel polish, you can cover your nails with the profile of Jack Sparrow, the outline of his Black Pearl and the pirate's helm. Of course, such a design will take a lot of time, but the end result will be a stylish, unique design, and not a typical nail painting!
Shellac letters
You can also write your name on the manicure. Conveniently, if your name is Alexandra or Constance, you get one letter per finger. Others will have to come up with the arrangement of letters from the first and last names of relatives and children, but these are the subtleties of nail coating. In general, gel polish at home gives a huge flight of fancy if you remember the rules of application! The main mistakes in application: it is better to use the alphabet that has the most letters in the name. The Latin or Cyrillic alphabet is chosen according to your own preferences, otherwise you will want to quickly wash everything off later.
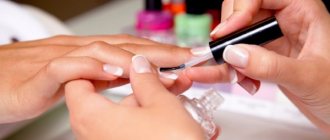
Stages of self-building
During gel extensions, the following actions are performed:
- Hands are treated with antiseptic.
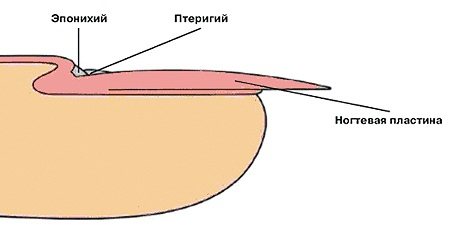
- The cuticle and pterygium (film on the nail surface) are removed.
- Use a file to form the outer edge of the nail and remove the gloss from its surface using a buff (a file in the form of a bar). The length of the nails should be at least half a centimeter to fix the shape.
- Brush off the dust.
- Remove traces of fat with a dehydrator.
- Distribute the primer - adhesive agent.
- Distribute the initial layer of gel, the thickness of which should be no more than 3 mm. Then dry for 3 minutes. under the lamp.
- Fix the form. To attach a paper form you must:
- remove the middle and glue it from the inside to the area where the material will be applied;
- make an oval shape;
- a more twisted shape will make it easier to fix;
- attach the form so that it is a continuation of the nail;
- wrap your ears around your finger;
- the edge of the nail should be cylindrical, corresponding in diameter and size of the nail.
For a high-quality result, it is necessary to secure the form so that there is no space between them. Otherwise, leakage of materials will occur, which will make the thickness greater.
The gel should be applied in a certain sequence: first 4 fingers on one hand, then 4 fingers on the other hand and finally the thumbs.
Creating a gel nail. The shape and nail are divided into zones:
- cuticle area - a third of your own nail;
- the contact zone between the nail and the form is 2/3 of the nail plate, a third of the form is the stress zone. It bears the heaviest load;
- the rest of the form area.
A thin layer of gel must be applied to the cuticle area. The thickness of the gel application becomes greater as you approach the stress zone. The contact area must be covered with the most generous amount of gel. The outer edge is not created by a thick layer of gel. After gel application, drying is carried out under a lamp with UV rays.
- The sticky layer is removed with a special product, and then the nail is filed to level its surface. The file also creates a shape.
- Then the camouflage gel is distributed in 2-3 layers. The layers are dried under a UV lamp.
- Distribution over the surface of the final coating. Hold for 5 minutes. under the lamp.
- The sticky layer is removed.
- The cuticle is moisturized with oil.
Gel extensions are not an easy procedure
To learn how to do a beautiful manicure on short nails, you need to take a gel extension course. If you have no experience working with molds, then peeling and unevenness on the surface of the plate are inevitable.
This manipulation consists of stages.
- We disinfect our hands.
- We lift the cuticle using a pusher and clean the pterygium.
- Carefully remove the natural gloss, wash off the dust, and dry.
- We adjust the length and shape of the base.
- Apply primer, then base.
- We decide on the shape and size of the tips so that they become an extension of our own nails.
- We attach the tips. We make sure that there are no gaps. This is to ensure quality.
- We take the gel with a special brush and decorate the nails. Dry in an ultraviolet lamp (30 seconds). Then, while the mold is hot, press it to the natural one.
- Place a drop of gel closer to the base, distribute it over the surface, not reaching 1 mm from the side rollers.
- Let's dry it.
If desired, you can use design elements for decoration. On the day of the procedure, you should not take on dirty work. In the future, use gloves.
Stages of extension using tips
Gel nail extensions using tips at home are as follows:
- Hands are treated with an antiseptic spray.
- Soften the cuticle and push it back with a pusher.
- Use a degreaser to remove excess fat.
- The outer edge of the nail plate is filed to obtain the shape.
- Use a buff to remove the top layer of the nail. Movements are made in one direction and are carried out until a milky-matte shade is achieved.
- Remove dust with a brush.
- Remove excess fat.
- Select tips that suit the shape of the nail. A number of principles should be followed:
- the width of the tip should be the same as that of your own nail;
- the shape on the outside of the tip should match the inner groove of the nail;
- The plastic nail should completely cover the natural nail.
- Glue the tips to your nails. The glue is distributed with a brush onto the inside of the tip over the entire surface. The tip leans at an angle of 45 degrees. First, it is leaned against the edge of the nail, and then against the surface. Keep pressed for 10 seconds.
- Remove unnecessary length with a tip cutter, leaving a reserve.
- The nail is filed and the border between the nail and the tip is gradually smoothed out so that the line is invisible. The natural nail is not affected. The file should be 100/80 grit. The surface of the nail should be smooth without steps.
- Remove dust with a brush and spread nail prep onto your own nail (a product that will prepare the nail for the distribution of the gel).
- The primer is applied before evaporation.
- Apply a thin layer of gel and dry in a UV lamp for 2-3 minutes.
- The next layer of gel is applied to the contacting part and dried under a lamp. To distribute the gel evenly, keep your hands upside down.
- The sticky layer is removed.
- Use a file to form a shape and polish with a buff. Remove dust with a brush.
- Cover your nails with top coat.
- If you need to make a design.
- The cuticle is lubricated with oil.
Extensions with tips
Tips are plastic false nails that are glued onto natural nails. They can be transparent, white or colored and are selected individually for each nail.
Tips are ideal for short, narrow or irregularly shaped nails. Tip extensions can also be performed in one, two or three phases.
To make your manicure look truly natural and aesthetically pleasing, you need to choose the right tips.
How to choose suitable tips?
Here are some recommendations for wisely choosing tips:
• The plastic from which the tips are made must be elastic and thin. • The size should correspond as much as possible to the size of natural nails. • For convex and flat nails you need to choose special tips. • For uneven, wavy nails, it is recommended to use a gel adhesive that fills in the unevenness.
You can buy tips using our website with delivery throughout Russia.
Materials for extensions onto tips.
For extensions using this technique you will need the following materials:
- cuticle softener;
- orange stick or pusher;
- nail file or buff;
- the tips themselves;
- type cutter;
- glue for tips;
- lint-free wipes;
- UF lamp;
- modeling gel;
- brush for treating nails after filing;
- tassels;
- liquid to remove sticky layer;
- primer;
- degreaser;
- cuticle oil.
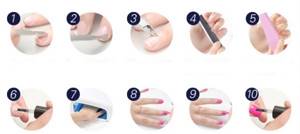
Extension with tips. Step-by-step instruction
Stage 1
We prepare the workplace, disinfect hands, tools, materials and surfaces. To make it more convenient to work, you can select tips and immediately arrange them in the order of gluing on each nail. Tips should not exceed 2/3 of the natural nail. The excess must be carefully cut off. You cannot glue tips that are narrower than the nail. It is better to choose the one that is wider and carefully file it to the size of the nail.
Stage 2
We perform a manicure, trim the cuticle and carefully remove the pterygium. If pieces of skin remain, this may cause the gel to peel off. We cut off the free part of the nail to 0.5 millimeters and process it with a file. Use a buff or file to remove the glossy surface from the nail plate. Clean it with a brush.
Stage 3
Apply glue to the tip up to the step line, which is applied to the edge of the nail. To improve adhesion, you can apply glue to the area where it joins the tip. Apply the tip to the middle of the nail at a slight angle and press the rest of the nail. The line of the step should coincide with the edge of the nail. For gluing, hold for 15 seconds. If you find bubbles between the tip and the nail, try to squeeze them out or re-glue the tips.
Stage 4
Using a tip cutter, we remove the excess length, giving the nail the desired shape. Using files with large cells, we file the tips for leveling. Using a buff or the same file, we treat the surface of the tips for better adhesion to the gel. We pay special attention to the junction of the tip and your nail. Using a file, we clean this place as thinly as possible so that the transition is invisible. Remove dust from nails and finger skin with a brush. We treat the nails with a degreasing solution, apply a primer and polymerize.
Stage 5
Let's start working with the gel. Apply the first thin layer. Be sure to retreat about a millimeter from the cuticle and side ridges. Dry in a UF lamp for 2-3 minutes. Apply a thicker layer to the middle of the nail, gradually reducing it towards the sides. Dry at this stage for at least 3 minutes! If you experience discomfort from heating your nail, you can take a break and then continue drying. When interrupting drying, turn the nail down so that the unformed layer of gel does not spread. After drying, remove the sticky layer.
Stage 6
Now we give our nails the final shape. Using a file or buff, we process the surface of the nail, removing any unevenness in the arch. We clean the sides and the area of the nail near the cuticle, reducing the coating to nothing as much as possible. We file the tips of the nails so that they are as thin as natural nails. We process irregularities on the free edge. We wipe off the dust with a brush.
Stage 7
We're almost done! Apply the final coat so that it lays on the nail in a thin, even layer. This time we also cover the places left earlier along the side ridges and cuticle. Dry in a UF lamp. Some manufacturers produce a topcoat that does not have a sticky layer. If there is such a layer, then it must be removed.
Nails are ready! We treat the cuticle with special oil.
Tip extensions are also used to create a beautiful French manicure. A tip is attached to the base of the nail with glue, then gel is applied to the artificial material. The gel nail is dried in a UF lamp. Depending on your wishes, a smile is painted on top of the gel, or between layers. Beauty!
Possible mistakes
Incorrect actions when applying nail extensions lead to the material coming off and pockets appearing. These phenomena are associated with incorrect modeling technology or poor nail preparation.
The most frequently made mistakes include:
- the pterygium is poorly removed, which leads to the appearance of pockets. Even the smallest particle of it that gets on the material leads to peeling;
- the nail is excessively filed. This usually happens with a highly abrasive file in the transverse direction. Consequences: soreness of the nail, its thinning and splitting;
- antiseptics and degreasers were not used;
- excessive use of primer, which leads to stratification;
- nails are overdried in the lamp. Nails will peel if kept under the lamp for too long. The material will come off if it gets on the cuticle;
- All c-curves and arches are incorrectly aligned and the apex (the highest point of the nail) is determined. Even a slight thickening will cause detachment. It will change the correct lines of arches and C-curves. Thickening will cause irrational distribution of nail tension forces.
Extended nails require correction at least once every 4 weeks.
Advantages and disadvantages of gel nail extensions
Although extended nails look very attractive and provide an opportunity to elevate your manicure, they also have many disadvantages. The first of them is the restoration of nails after extensions. A fairly thin nail plate is reluctant to accept the effects of special extension gels. This makes the recovery course last longer than wearing artificial nails.
- Toxicity . Many ladies do not realize that they absorb many toxic substances along with the nail coating material. Although modern products try to enrich with a minimum of toxins, they still exist and are absorbed into the body through thin nail plates.
- Permanence of correction . Nature always takes its toll, even after extensions. Your nails will still grow. That is, constant corrective procedures will be needed, since proper care of artificial turf will not ensure a presentable appearance all the time.
- Burning sensation when building up . This uncomfortable moment during extensions is quite possible if low-quality material is used or the first layer of gel is applied in a very thick layer.
- Removing extended gel nails is not easy . This requires long-term cutting of material and a reserve of patience. Simply tearing off the coating is a dangerous action, which entails an unpresentable appearance of the nail and its unsuitability for future extensions.
- If you apply colored varnishes over a gel nail , they will look very unnatural.
In any case, when creating artificial nails it is very difficult to replicate the structure of natural ones. But even many negative facts about extensions do not make this procedure less popular.
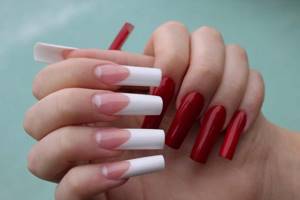
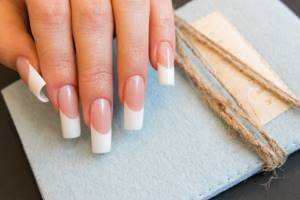
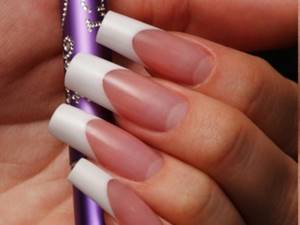
French
Gel nail extensions at home can be done using different techniques.
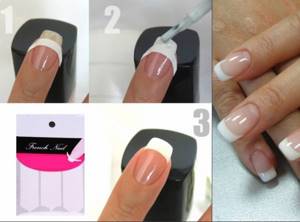
To create a French manicure you will need to follow these steps:
- Determine the future length of the nail. Perform the extension procedure on tips or forms.
- Use a nail file to form the shape of your nail. This determines what the smile line will be like.
- Apply pink gel to the nail and dry under a UV lamp.
- Polish with a file.
- Draw a white stripe with modeling white gel on the free edge of the nail. It is necessary that the antennae be symmetrical, and the transition line be equally curved on all nails. File the edge of the nail.
- Sand the color transition.
- Apply a finishing layer of gel.
Technology
As the video above shows, acrylic nail extensions are a fairly lengthy and labor-intensive procedure. Especially if it is performed using technology on forms. Below we will try to divide the whole process into stages:
- Prepare your nails as usual. Do a manicure, remove the length and polish the plate;
- Apply degreaser. This must be done very carefully, you can even dip your fingertips in it. Let your nails dry;
- Apply primer. As soon as the nail turns white and the scales open, it moves on to the next stage;
- Set the forms;
- Wet the brush in the monomer and distribute the resulting ball over the nail, forming a plate. This must be done quickly enough, before the mixture dries;
- Wait for the acrylic to dry and remove the mold;
- File the nail to the desired shape and length and apply a top coat of acrylic. Dry it too.
After this, you can create a design on your nails. This procedure involves applying nail extensions under varnish. If you want to do, for example, a French manicure, then you will need acrylic powder in two shades. The process of how professionals apply acrylic nails can be seen in the video.
https://youtu.be/-kvBtt_yLcc
[yandex3] [google3]
Plain nails: technique
To beautifully cover your nails with the same color, you need to fill your hand. Step-by-step instructions will help with this.
Stages:
- Disinfect your hands with a special means.
- Degrease your nails with a degreaser.
- Apply primer for better adhesion of the nail to the gel.
- Apply clear gel evenly to the nail.
- Dry your nails in a UV lamp for two minutes.
- Carefully paint the nail plates with colored gel polish.
- Dry your nails under ultraviolet light for 2 minutes.
- Apply another coat if a deeper color is required.
- Dry the second layer for 3 minutes.
- Protect your nails with a fixative.
- Remove the sticky layer using a special product.
A beginner will need about half an hour to do this manicure.
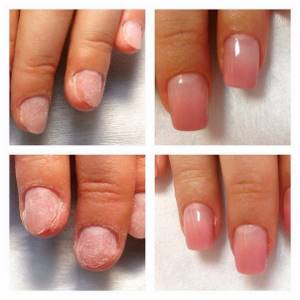
Photo results
Different extension methods used give a priori different effects. But there are general aspects: the higher quality the material, the better the extension result. The experience of the master, the use of special brushes and good drying under ultraviolet rays will definitely give the expected result.
Photos of different nail shapes after extensions:
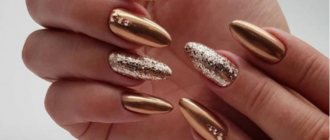
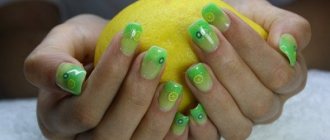
Nail designs after extensions using various techniques: rubbing, painting, foil, stone inlay, French, sculpting:
Fashionable design options for extended nails:
Interesting on the topic:
- How to make liquid stones on nails?
- What is needed for acrylic extensions?
- Step-by-step instructions for correcting gel nails with video
Implementation of a combined design
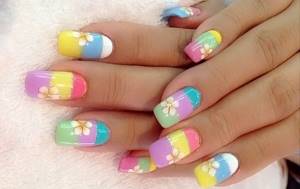
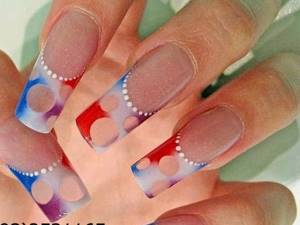
Combined nail designs include various colors and textures:
- the use of two or more shades;
- use of painting, prints and stickers;
- a combination of different textures: matte and glossy, three-dimensional pattern, enamel.
Combined manicure ideas:
- Select 2 nails with lilac polish and paint the rest burgundy.
- Paint 2 nail plates soft pink, paint an ornament on them with black varnish and add rhinestones. Paint the rest burgundy.
- On 2 nails draw a floral print in white and pink tones. On the other nails, paint a pink and white ombre.
- On 2 nails, draw a graphic design in the same color scheme, but with a different structure. Paint the rest of your nails pink.
- Paint your nails with 3 colors of pastel shades: little finger – yellow, ring finger – pink, middle finger – green, index finger – yellow, big finger – pink. At the same time, use a thin white strip to highlight the hole and the outer edge of the nail plate.
How to adjust the shape to the nail
The form is a template with markings made of metal, Teflon and other materials. Durable reusable forms require careful disinfection after use, so disposable forms made of paper, thin plastic, and foil are often used. The form can be fixed at the top or bottom of the nail.
Installation and adjustment of the form is a very important stage on which the quality of the extended nail depends.
When using solid forms, you need to choose the size of the template so that it fits perfectly on the nail plate. The form is bent with light pressure and put on the nail through the provided hole. Once the shape matches the “smile line,” it is securely attached to the finger.
Disposable soft forms require additional adjustments. They make it possible to adjust the stencil to the contours of a specific nail plate. This is especially convenient when processing nails with non-standard shapes. If the forms are too soft, then experienced craftsmen advise gluing two pieces together.
The disposable template is removed from the backing, the perforated oval is extruded and glued to the back of the form, providing additional rigidity. The bottom edges are torn along a perforated line, the shape is slightly bent and placed on the finger. For orientation, there is a center line on the form.
Before final fixation on the finger, the form is given the desired slope - it should continue the line of the nail, without deviating up or down. If this creates gaps between the surface of the nail and the form, the cutout of the form is corrected with nail scissors. The shape must match perfectly with the root arch, otherwise the gel will leak into the resulting gaps.
After adjustment, the “ears” are carefully glued together to fix the shape on the nail. The bottom edges of the form are glued to the finger. The shape is adjusted individually for each nail.
Artistic painting
The drawing is applied using varnishes. To do this, use brushes, needles, and toothpicks. It is possible to use rhinestones, sand, and foil.
To create an abstract image on your nails you will need:
- Follow the steps for nail extensions discussed above.
- At the nail design stage: apply the silhouette of a butterfly with white gel, put down a series of dots and draw several curved lines.
- Draw similar components on other nails. They should not repeat the pattern on the ring finger. On the little finger and thumb, draw only dots and wavy lines.
- Take a shade of gel that is close to the main background and draw the leaves of the flower.
- Cover your nails with a sealer.
Designing flowers in an aquarium can be done by following these steps:
- Follow the nail extension steps to design.
- Cover the nail plate to the free edge with red gel.
- Apply the first tier of flowers with pink gel to the outer edge of the nail.
- Apply clear gel to your nails and place under a UV lamp.
- Draw the upper tier of petals with white gel, placing them between the petals of the lower tier. They need to be drawn in more relief.
- Apply transparent gel to nails and dry under a UV lamp.
- Remove the sticky layer and paint the stamens with white paint.
- Decorate the middle of the color with stones.
- Apply a finishing coat to your nails.
Pros and cons of acrylic
The technology of acrylic nail extensions appeared a very long time ago, and therefore, most masters have honed it literally to a shine. Although, sometimes you can hear the opinion that gel extensions are easier, and therefore many novice hairdressers only do it. In many ways, this is a matter of the taste and skills of the master and the wishes of the client. Acrylic extensions, like any other procedure, have a number of pros and cons.
So, the undoubted positive features of acrylic include the fact that it is much stronger than gel. That is why, only when choosing it, it is possible to create a natural thin plate, which is often absent with gel extensions due to the fragility of the material. Most often, acrylic nails with extensions look much more natural.
In addition, gel is much more difficult to remove from nails. Often it only lends itself to mechanical filing, which risks damaging the natural nail. Acrylic successfully dissolves in a special liquid liquid (monomer), which does not have a significant negative effect on natural nails.
Acrylic nail coating can also be applied to long natural nails for the purpose of mechanical strengthening. This procedure is similar to gel strengthening, but is less harmful to nails. In addition, acrylic is more durable, and therefore, when performing corrections, you can go through quite a long time with the same extension or reinforcing layer.
Acrylic nails can be painted with a simple varnish; they do not absorb pigment; however, you should not neglect the protective base. This coating can only be washed using liquid without acetone. If acetone gets on such plates, they will immediately lose their shine.
Among the disadvantages, one can highlight a rather sharp and persistent smell that remains on the nails for quite a long time. As with gel, acrylic nails do not breathe and do not develop a protective layer, and therefore, if you wear the coating for a long time, your own nails can deteriorate. Unlike gel, acrylic cannot be repaired; if a nail is cracked, it has to be removed and rebuilt.
[yandex2] [google2]
Manicure options
In 2022, the following nail design ideas will be fashionable:
- deep dark shades are in fashion: marsala, wine, cherry, dark blue, brown, purple;
- fashionable combinations will be bright red, orange, pink and yellow;
- pastel colors are also popular: pink, blue, beige and others;
- Graphic manicure and abstract designs remain trendy;
- The combination of ombre technique and graphic design looks stylish;
- mini-landscapes on nails are popular: greenery, floral motifs, etc.;
- for additional decoration you can use rhinestones, small shells, lace;
- the delicate shade looks harmonious with the correctly chosen tone of powder and rhinestones;
- a stylish manicure can be done using tape and various shades of varnish;
- French and moon manicure do not lose their popularity.
Don't miss the most popular article in the section: How to draw monograms on nails step by step for beginners. Instructions with photos.
Video course by Alena Kutnyakova
On the Internet you can find enough information about various video courses from professional nail design artists. However, the search can take a lot of time, so we want to recommend you one of them that will be relevant in 2015.
- Master Alena Kutnyakova has been working in the field of gel nail design for more than 8 years. She runs the Lady Perfection beauty salon and has several certificates, so there is no doubt about her professionalism. The information you find on the discs will be completely reliable .
- I am pleased with the good quality of the video, the availability of the information provided, and excellent step-by-step lessons. In the course you will find all the most fashionable and popular techniques: modeling nails in the shape of pipe, oval, arched square and much more.
- The course consists of 15 sections, which cover all important topics: workplace, necessary materials, basic rules, contraindications for extensions. A huge number of techniques and types of design that are still relevant in 2015 are also described. That is, this is a full-fledged training manual from scratch to professional level. You can find more information about the course by going to. Alena Kutnyakova's course will be a wonderful investment for you in your future skills, don't miss this opportunity!
From our article, you learned how to learn how to grow nails using different methods and, probably, have already chosen an option to your liking and capabilities. As a nice bonus, we invite you to watch a video with a step-by-step technique for creating a very beautiful “Blooming Garden” manicure in the style of an aquarium design.
Without using UV lamp
There are two types of gels: light-sensitive and non-light-sensitive. Sensitive ones are dried only under a UV lamp. Insensitive ones dry out under the influence of a special activating substance, which is applied in a thin layer over the surface of the entire nail plate. There are gels that harden in water. To do this, immerse your hands in cool water for 5-7 minutes.
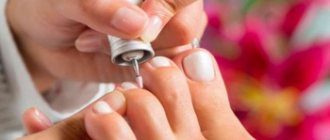
Professional cosmetics stores will allow you to purchase all the necessary materials to perform gel nail extensions at home. Over time, your hand will become fuller and extensions will become easier.
Article design: Vladimir the Great
Specifics of the procedure
If you want to learn something, then everything is in your hands. In the age of technology and the Internet, you can become a professional without leaving your home. And it is important to remember that all manicurists began their work with training. But when you finally decide that you want to do nail extensions, then first of all make sure that you have all the necessary materials and devices to carry out this procedure in full. In this case, you need to take care of everything, right down to special brushes for applying gel and acrylic.
Next, pay attention to the quality of the materials. Under no circumstances should you save money or choose materials that are cheaper and larger in volume. This is the main sign that their quality is worse than professional materials. Be sure to read a separate article about professional gels, powders, acrylics and others accompanying this process. You must immediately decide whether you are ready to invest money in this business.
The ultraviolet lamp may not be professional, but it is desirable that it be large. This way it will be more convenient for you to work.
All manicure accessories (scissors, tweezers and others) must be made exclusively of special metal and must be sterilized before the procedure. This does not apply to nail files, since nail files that are not made of metal are used for extensions.
Next, be sure to read about the existence of such extension technologies, and watch the video to find out how gel and acrylic differ, so that you can ultimately give preference to any technology and continue training mainly on it. This is done so that you initially learn one technology, and in the future the rest.
Correction of French nail extensions
Nail correction is a fairly important procedure that many girls require after extensions. Over time, the nail plate gradually grows, making the French extensions not very neat and aesthetically beautiful. When else might correction be needed? Detachment of the material, some kind of mechanical damage, or even a broken nail - incidents can be very different. In such cases, nail correction will bring the French manicure to its ideal original state .
The restoration process is similar in technology to gel French extensions. But you don’t have to start everything from scratch; you just need to correct all the shortcomings and flaws in each specific situation. The whole process essentially comes down to proper filing of the nails and careful correction of the necessary areas with gel. If you are interested in more detailed information on this issue, you can find it on the pages of our website.