Features of using upper forms for extensions.
Top forms have appeared in the nail industry for quite some time. They have been used since the advent of gel, but few masters can boast of such skills. The fact is that they were originally developed as a way to extend nails using acrylic or gel. But just a year ago, with the advent of polygel, top forms became popular again. In this article we will tell you how to extend nails using top forms.
Acrylic nail extensions: advantages of the material
Acrylic is very easy to use, it has many advantages:
- No pungent or unpleasant odor.
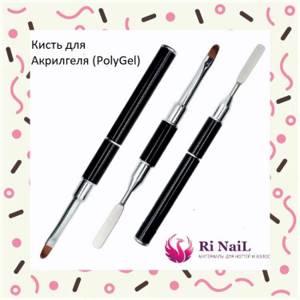
- No additional tools are needed for the job; acrygel can be applied with regular gel or acrylic brushes.
- There is no dust from the polygel, particles do not hover in the air throughout the procedure.
- Does not create streaks.
- Does not cause allergies.
- Saves time - you work faster with gel.
- Durability and long wear.
- The most natural looking nails.
- There is no burning sensation when drying your hands in the lamp.
Now, knowing the benefits of acrylic, you can take a closer look at acrylic nail extensions step by step.
Important: when applying polygel extensions from some manufacturers, you need to use a special liquid. But if it is not there, the problem can be easily solved with regular alcohol.
Gel-jelly extensions
Gel jelly is one of the latest developments in the field of nail design. The dense jelly-like consistency makes it a very convenient material to work with. Working with jelly gel takes noticeably less time than with conventional gels. It is easy to shape, convenient for correcting mistakes made during extensions, and convenient for repairing nails.
Setting time is only 5 seconds, polymerization takes 2 minutes. Manufacturers offer natural shades of gel-jelly: flesh-colored, beige, pink.
Tools and materials for polygel nail extensions
To make perfect extensions, craftsmen often use modern and innovative polygel. Almost all manufacturers call it differently. If you hear such product names as acrylic, acrygel, combigel, you can rest assured that we are talking about polygel.
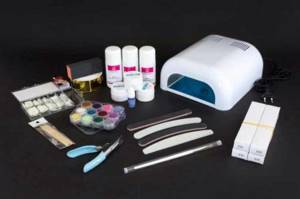
To work, you will need a professional set of tools and consumables.
What you need for polygel nail extensions, list:
- Polygel.
- Base coat and topcoat.
- Manicure tools – brushes, napkins, scissors, etc.
- Antiseptic.
- Degreaser.
- Primer.
- Files of different sizes and purposes, buffs.
- Decorative elements for design.
- Led or UV lamp.
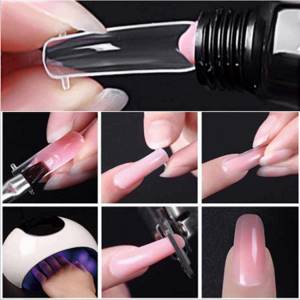
Acrylic nail extensions step by step
The procedure is quite simple, even beginners can quickly master this technique without much difficulty.
Once all the tools and consumables have been prepared, you can begin to work.
Step-by-step instructions for polygel nail extensions:
Sterilization of instruments.
- Preparing the nail plate. The length is adjusted and the cuticle is removed. For such a manicure, you can use any method: edged, unedged, hardware or combined.
- Then the nails are polished, degreased and moisture is thoroughly removed using a primer. It also provides better adhesion of the gel to the nail plate.
- A base layer is applied. It must be very thin. The base is used to securely fix the acrygel. Apply it with rubbing movements.
- After the base has dried under the lamp, you can carefully apply a layer of polygel using a special manicure spatula. Due to the ductility of the material, acrylic can easily stretch over the entire surface of the nail, right down to the side ridges and cuticle. Therefore, you need to apply the material to the middle of the nail plate.
- Be sure to dry thoroughly under a lamp.
- Apply finish and dry thoroughly again.
- Finally, remove the sticky layer and apply a buff to make the nails shine, as well as a nail file to carefully remove all imperfections.
- A design is created at the client's request.
If you want to master polygel nail extensions, the instructions are quite detailed and understandable not only for experienced nail artists, but also for beginners.
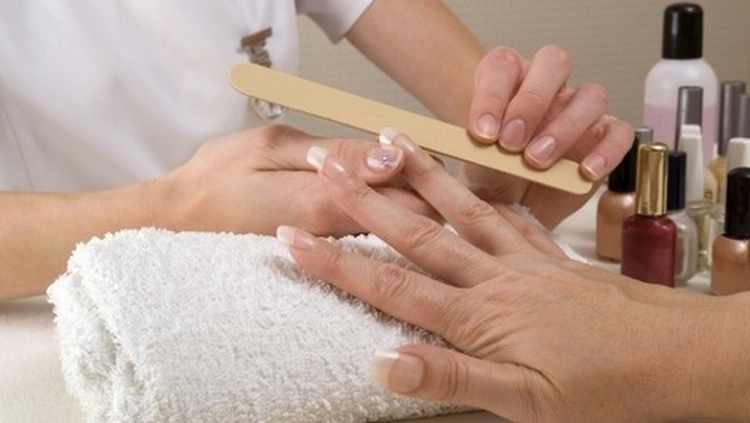
What is included in a basic manicure course?
The basis of the manicure course “from scratch” is theoretical knowledge and practical skills in creating a classic manicure.
Issues covered during training:
- preparing the workplace in accordance with sanitary standards;
- prevention of infectious diseases;
- sterilization of equipment;
- correct selection of tools and materials;
- study of anatomy, structure of the nail cornea, skin;
- consideration of common diseases of nails and skin;
- demonstration of classic manicure;
- leveling the nail plates with a base, bio-gel or manicure gel;
- massage techniques, SPA treatments;
- applying varnish, gel polish to the nail, under the cuticle;
- simple design with gel paste, gel paint, gel polish;
- price list of manicure services;
- formation of the image of a master;
- studying ethics and psychology of customer service;
- practical lessons on models.
Upon completion of courses and passing exams, students receive a certificate (diploma) from the educational institution. It is also possible to issue an international certificate from KSSC and assign qualifications.
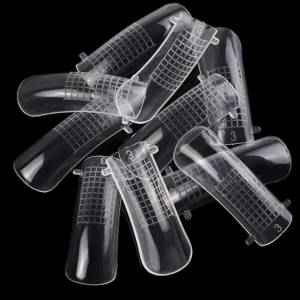
Varieties
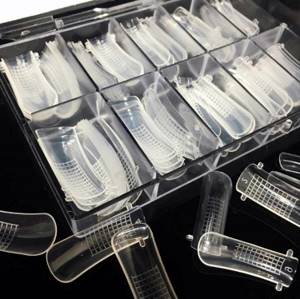
Today, two types of upper forms are known. Depending on the cost, they can be either with or without markings to facilitate the work process. The first option is especially convenient for beginners who are getting acquainted with nail extensions using such templates.
The markings on the forms may differ; in some places they are arched stripes, in others they are a grid.
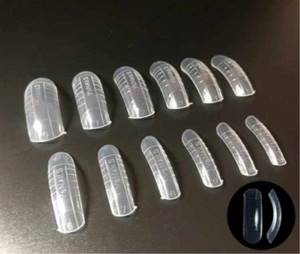
The set has the same arch and length, as well as markings with the indicated dimensions. Based on the marking lines, it is easier to align the length and adjust the edge. There is no need to tediously adjust an identical shape, since it already exists.
The upper forms are classified as reusable types of extension templates. They differ from arched counterparts and liquid tips.
How to choose?
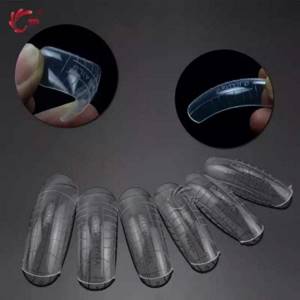
When buying top forms for nail extensions, you should pay attention to a number of nuances. For example, the inside of templates is very important. It should not have visible defects; a quality product will leave the desired gloss on new nails.
Typically, such frames are enough for 40-50 extensions. It is better to buy a frame with markings, especially for novice craftsmen.
When choosing the required option, you should take a closer look at the shape of the templates, which may differ. Sometimes it is more curved, sometimes the difference may be in the height of the arch. It is better to take the option in which the manicure hatchet can fit in the space between the form itself and the nail plate.
It is recommended to purchase sets with a large number of elements - this will allow you to select the required sizes as accurately as possible.
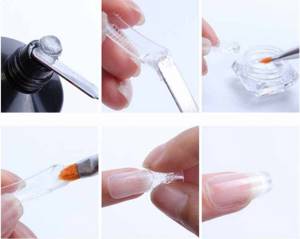
Depending on the type of sculpting product, when applying extensions to silicone top molds, you may need gel products, as well as base, top and acrylic. In addition to them, you need to prepare the templates themselves, primer material for coupling (primer), cuticle oil, glossy coating, dispersion layer remover, brushes, files, orange stick and dehydrator.
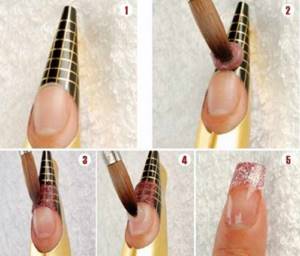
French lay-out
In order not to draw the smile line and not suffer with a clear joint, use the lay-out technique. In this case, everyone can get a French manicure.
- Carry out standard preparation - manicure, polishing, degreasing and primer coating;
- Place camouflage polygel into the mold and form a curved smile line. This part will be pink, so leave an imaginary margin for the white tip;
- Stamp a camouflage shape onto your nail. Look at the structure from above - if the gel shows through, pull the workpiece off and start over. The layer should not be too thick, but it should not be visible either.
- After installing the form with polygel on the nail, send it to the lamp for 10-13 seconds;
- Reach out with your hand, pinch the free edge, remove the workpiece and put on the clothespin;
- Dry the polygel in a lamp;
- Take the mold again and put white polygel there. Stretch it as much as the length of the future nail should increase. Don’t pay attention to the smile line - the joint with the camouflage will be smooth in any case;
- Secure the blank on the nail, moving it from the free edge to the junction with the camouflage;
- Check the antennae. The lines going to the lateral sinuses should be smooth and filled. If you find any gaps, fill them with white polygel;
- Place your hands in the lamp for 15-20 seconds;
- Pinch the nail, but only where the white color is completed. Attach a clothespin and send your nails to dry;
- File the form, check for empty cavities and polish the nail plate to remove excess streaks of white polygel onto the camouflage;
- Cover your nails with top coat.
What's better?
It is impossible to say unequivocally which of the two materials is better, since each option has its own advantages. For example, acrylic dries faster, which affects the time of the entire work process. In addition, it is easier to lay it out in a thin layer, making it look more natural.
It should be noted that acrylic has an attractive price, it is economical to work with and is characterized by high strength.
When applying gel nail extensions, you can afford various fantasy solutions. For example, even a French coat can be made with colored materials of this type. However, if you don’t have a special lamp at home, you should try acrylic modeling.
The difference between the upper forms and the usual ones
The usual forms mean tips, liquid tips and disposable templates for extensions.
- The upper ones are reusable. After polymerization, the material separates effortlessly and leaves no marks on the workpiece, so it can be used until it loses its bending. Approximate service life – 2 years,
- The top forms do not polymerize along with the coating, but are removed immediately after the material has hardened,
- The technique of working with forms allows you to save material and create nails that are close in thickness to natural ones,
- The extension procedure is halved and ranges from 1 to 1.5 hours including decoration,
- The end result requires almost no modification. After polymerization, you only need to remove excess and polish the resulting nail,
- Unlike liquid tips, where the material is applied only to 2/3 of the natural nail, top forms involve laying gel over the entire nail plate,
- There is no need to add material after removal.
Collection of photos of nails extended using tips
Neat and durable tips, modeled with tips and strengthened with gel, look great if decorated with a beautiful design. An experienced specialist, having done the extensions, will intuitively select for you the appropriate nail art that will give you elegance. The laconicism of a lunar manicure or the classic severity of a French manicure are not inferior in beauty to an aquarium nail design coated with transparent gel. Volumetric compositions, abstract drawings or a simple monochromatic coating on tips - the choice is yours. Our photo gallery will give you creative inspiration and help you decide on a design.
Continuing your training, watch another video lesson on how to extend nails using liquid tips. This unique innovative technology opens up more possibilities, allowing you to save time on the nail modeling procedure. Enjoy watching, dear girls. Don't forget that a beautiful manicure is the highlight of your look!
Common problems with hair extensions
- The natural nail plate is completely flat or its edge tends upward. In such cases, the stress zone is difficult to form and most often remains the weakest in the extended nail.
- What to do: Before printing the material, drop a little polygel in the center of the stress zone. The ball should be no more than 1.5 mm in height and no more than 1 mm in width. Dry the ball in the lamp and start printing.
This technique will help keep your shape at the desired level and prevent it from falling below the required level.
- A very arched nail. When looking at the end of the free edge of a natural nail, a strongly rounded arch is visible. In this case, it will not be possible to press the workpiece tightly, since the transverse arch of the workpiece will not be so rounded.
- What to do: before imprinting the form, add a little polygel to the natural nail in the cuticle area. This technique will help smooth out a steep arch.
- Nails grow downwards. If the nail plate tends downwards, the edge of the workpiece at the cuticle will constantly move away.
- What to do: Place a small layer of polygel near the cuticle, as well as drops in the center of the stress zone. Only after the layering has polymerized, start printing.
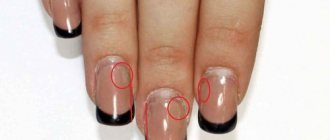
- Large gap between cuticle and mold. There is no need to install the workpiece tightly to the cuticle, but there should not be a large gap. The maximum indentation is 1 mm.
- What to do: File the plastic blank on the sides so that the edges do not interfere with moving it closer to the cuticle. You only need to cut down a little bit so that there are no gaps in the side sinuses.
- There is no free edge. To work with top forms, it is best that the natural nail has at least minimal regrowth. The distal edge will help avoid material leakage and also increase the strength of the structure.
- What to do: Before modeling, complete the free edge with polygel. You can do this on disposable paper blanks.
Three non-standard options
Tanya Strelova tests online lifehacks by conducting experiments on herself. In this video, she will try to do her nails in three atypical ways, armed with available materials. Viewers will find out how the experiments ended while watching. You will use cotton wool (the workpiece turns out to be sloppy, you will have to spend a lot of effort on filing), the bristles of a toothbrush (a long, painstaking task - impractical, but it looks decent), a tube of cream. The last method has the most right to life - a stencil is cut out of an old soft tube in the manner of a paper one. The device is convenient, easy to remove, and can be used repeatedly.
More detailed instructions for extensions
First stage
- After disinfecting the palms and fingers with an antiseptic, we treat the nail plates.
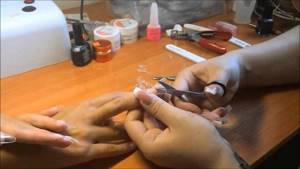
- Use a wooden stick to push back the cuticle. It is advisable to trim off the excess using special nippers or sharpened nail scissors.
- Carefully file the nails, leaving approximately 1-5 mm. Use an orange stick to remove dirt under your nails.
- The top glossy layer is removed with a buff and unevenness is removed. Use a brush or brush to shake off the dust.
- We degrease the nail plate using a special product. At home, you can use alcohol to soak a napkin.
- A primer is applied, it ensures adhesion of the material to the nail plate and protects against microbes.
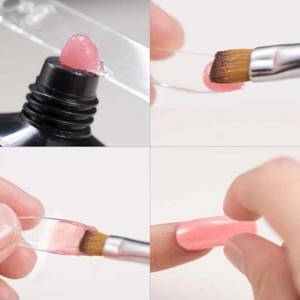
Second phase
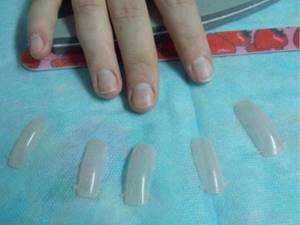
After the nails are processed, we select the upper forms of a suitable size, one by one applying them to the nail plate.
The blank should be slightly smaller than the nail plate. The free space will be filled with excess gel.
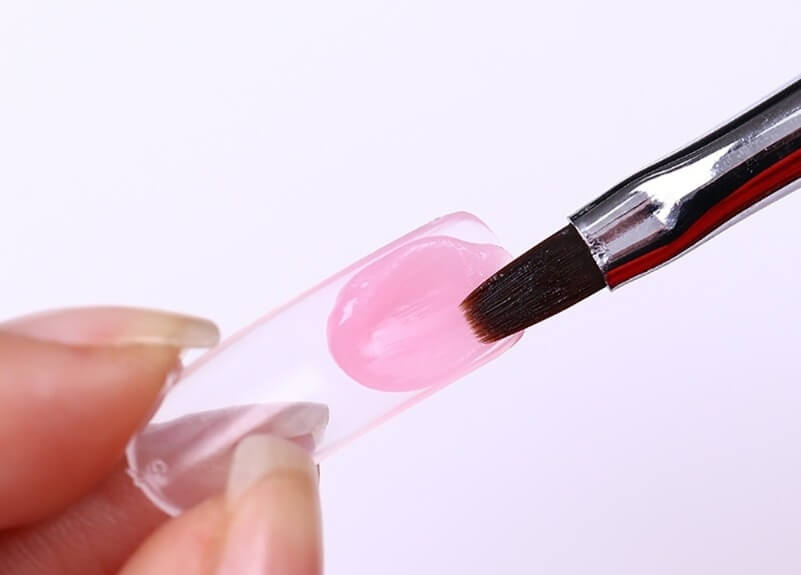
- The nail is covered with a thin base layer of gel. It should not be dried out.
- The inside of the workpiece is carefully filled with a denser layer of material in the area of the free edge, which should be dried after application (20 seconds). The gel is then applied to the area intended to adhere to the nail plate.
- The procedure can be simplified. A thin layer of gel covers the part of the plate that comes into contact with the nails. The free edge of the workpiece is compacted more tightly (0.5-1mm). At this stage of modeling, you can also determine the approximate desired length of the nail.
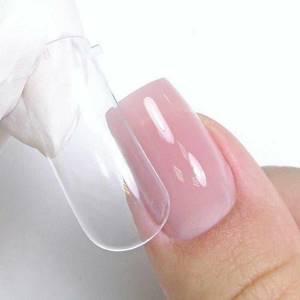
- The gel-filled blank is carefully pressed against the nail. There is no need to put pressure on the plate. Turning your palm over, you need to see how the gel lays down; its excess is removed with a pusher.
- Fingers with applied tips are placed under a UV lamp for about five minutes and wait for the material to polymerize. Manufacturers indicate on the packaging how long it takes for the material to harden.
- Once the gel has hardened, the top molds are carefully removed. We wipe the tip and put it back in the box. The nail is degreased. The free edge is processed with a file, which is given a neat appearance.
- To consolidate the result, this extension technology provides the possibility of applying a finishing coating. It is advisable to do this, but there is no particular need. This layer is polymerized for about two minutes.
- Degrease the nail plate. Lubricate the cuticle with special oil.
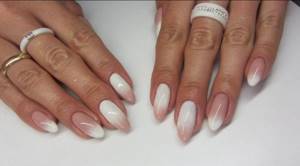
Extension lesson: French on forms - step by step with photos
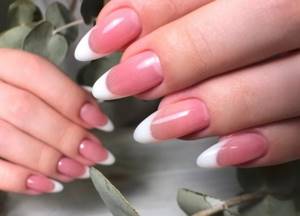
Classic French manicure (French) is a plain, discreet background (flesh or pinkish tint) and a clearly drawn white “smile line” along the edge of the nail. The appearance of extended nails has led to a new round of popularity for the French style, which looks especially impressive on nails of a regular geometric shape.
When creating a jacket using molds, it is lined with gel of the selected color.

Step-by-step extensions with gel on forms are performed for any nail shape.
Stages of performing French on forms:
- Preliminary preparation of nails.
- Installation and adjustment of the form. The edge of the form is placed under the nail, the other edge is fixed on the finger.
- Applying a layer of base gel. To give it a matte finish, you can blot it with a napkin.
- The nail is formed with gel of the selected shade (pinkish, flesh-colored) - up to the border of the future “smile”. “The Smile Line” is laid out very carefully. The surface must be perfectly flat.
- Using a brush, a white gel is used to form a smile contour; the gel is applied close to the main color. The layer is polymerized under a UV lamp for 2 minutes, under an LED lamp for 1 minute.
- Removing the form.
- Grinding the surface and adjusting the edge of the created nail, removing sawed off particles.
- Apply a clear coat for protection and shine.
You can create a French manicure without using white gel. Then a “smile” is drawn on the formed nail with white acrylic paint, and the nail is covered with a protective layer of transparent gel, which polymerizes according to technology.
What base should I use for acrylic?
Which base to use - this issue must already be decided based on the brand of polygel that you are using, however, it should be noted that the material is well compatible with base coats of different brands.
Working with acrylic does not require applying a base; it adheres perfectly to the natural nail plate; preliminary application of a primer will be enough. Using a database is acceptable, but not a required step.
What else is needed for acrylic extensions?
There will be no additional costs for instruments (for example, brushes or preparations). Polygel can be applied with a gel or acrylic brush. For some manufacturing companies, together with the polygel, you will have to purchase a special liquid - a clinser, which will be as compatible as possible with the modeling material.
These nuances pale in comparison to the mountain of benefits that we will receive by choosing acrylic extensions.
How to choose acrylic? What do polygel manufacturers offer us?
The nail industry market is developing dynamically and constantly pleases with new products for both design and modeling. Therefore, the variety of polygels will be constantly updated with new types and brands. At the moment, there are two main directions in the range of polygels:
Acrylics, which in their texture are very similar to the acrylic mass, which was obtained by mixing powder and monomer.
There are even small particles of acrylic visible in them, the structure of the material is paste-like, very thick, the material is distributed by pressing movements. As a rule, these are polygels made in the USA or Germany, since acrylic technology is more popular in Europe and America, and craftsmen are more accustomed to working with acrylic textures. An example of this format is polygel TM GGA Professional.
Polygels, which in texture resemble a very thick gel soufflé or gel jelly.
They are also very thick, but the structure is more like a gel, there are no visible acrylic particles in them, the texture is more like a soufflé than a paste. Most of these materials even have surface self-leveling properties (that is, the material does not spread over the edges, but surface irregularities are smoothed out during modeling).
Such materials are produced mainly in China or Korea, since in these regions the gel extension technique predominates and the gel texture is more common in use.
Also, it was from China and Korea that the technology of polygel nail extensions on top forms came to us. An example of this type of acrygel is Canni polygel, which can be purchased in our online store.
We recommend the most flexible material with excellent performance qualities and a varied palette of shades.
The choice of a subtype of polygel and its brand is a matter of preference of the master: which texture is more familiar and comfortable to work with is up to you to decide. The most important thing is the end result and the pleasure of wearing it: durable and most natural nails, durability of the manicure before correction, safety and environmental friendliness of the material.
Polygel has these properties 100%, you just have to choose your “favorite”!
Tips for using acrygel
We recommend using the products as follows:
- Acrigel is applied only to the prepared nail. It is necessary to pre-treat the surface with a buff, degrease, cover with primer and base for gel polish.
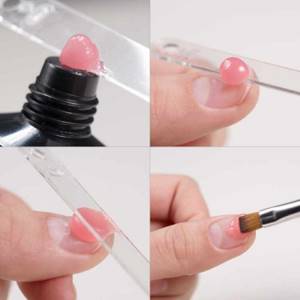
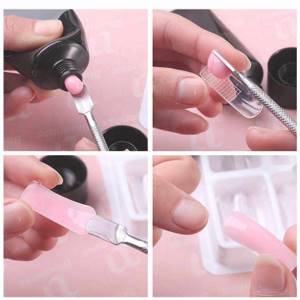
- Acrigel does not level out on its own like a gel; it must be applied to the nail with a special brush.
- A ball of small diameter is placed on the nail, then using a flat brush it is given the required shape. The brush must be dipped in a degreaser, a means to remove the sticky layer.
- Acrylic gel can be used as on conventional standard forms
- and on the upper forms
The material is polymerized in an LED or UV lamp with a power of 36 W or more. This takes up to 2 minutes.
! An important point: in lamps up to 36 W, acrygel does not polymerize.
The final stage of applying the polygel is smoothing the surface using a file. We finish forming the nail with it.
Modeling using the Ombre technique
Thanks to the unique technology and simplicity, extensions can be done immediately with the design. One of the common varieties is ombre modeling.
To work you will need:
- Polygel: white and camouflage;
- Orange stick and brush;
- File and buff;
- Top.
- Prepare for extensions: do a manicure, apply primer;
- Place a small amount of camouflage in the center of the workpiece with an orange stick and spread it with a brush in a thin layer. When distributing the polygel, “smooth” it to a thin, almost imperceptible layer;
- Place the form in the lamp for 7 seconds so that the camouflage “sets” slightly;
- Using an orange stick, place white polygel in the place where the white color is planned for ombre;
- Distribute the polygel, carefully blending it onto the camouflage where the color transitions;
- Dry for 7 seconds in a lamp;
- Lay out a little more camouflage - this layer will become the main thickness of the future nail;
- Distribute the gel, forming a thickened stress zone, a free edge with its future shape, a cuticle zone and side ridges;
- Print the form with the material onto the nail, remove the excess, complete the missing pieces with camouflage;
- Place your hand in the lamp for 10 seconds;
- Using a clamp, pinch the distal edge and growing points, remove the workpiece and install a clothespin;
- Dry the material in a lamp;
- File down the free edge, remove any imperfections and polish the surface of the nail with a buff. When polishing, avoid the color transition area so as not to simply file it off;
- Wipe your nails with degreaser and apply top coat.
What types of acrylic gels are there?
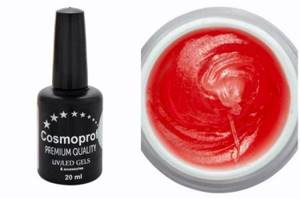
- In banks
- In tubes
The material in the cans is a little softer than in the tubes. Each manufacturer mixes acrylic and gel in different proportions, which is why the density and consistency may vary slightly.
How to remove acrylic
A 160-200 grit file or router is suitable for removing material. Soaking polygel is useless and harmful to nails.
How the top forms came to be
We all remember that happy, carefree time when, as small children, we played in the sandbox, filled various molds with wet sand, tipped them over and made Easter cakes. A simple game that is loved by all children.
Even in childhood, it was clear to each of us that sculpting a beautiful and even figure ourselves is much more difficult than simply pouring sand into a ready-made mold and turning it over.
Now imagine how great it would be to transfer this method (with certain changes, of course) to the nail service, using something similar for nail extensions!
Imagine how much easier the process of nail extensions would be if we had a mold prepared in advance for each nail, into which all we had to do was put the construction material (acrylic or gel) and turn it over, as if gluing the material onto a natural nail!
And then, after waiting for the material to dry, remove the mold and get a finished nail, shiny and smooth!
In 2007, the Formula Profi company introduced a new, unique nail extension technology that used the above-mentioned principle. The new technology is called upper forms. It is based on special plastic forms into which the material is laid out.
In order to evaluate the pros and cons of the upper forms technology, we will try to understand how it differs from earlier, preceding technologies.
Advantages and disadvantages of upper forms
Advantages
- The most unpleasant and dangerous extension procedure, filing, is eliminated
- The extension procedure time is reduced to 30-40 minutes
- Saving material reduces the cost of extensions
- The design possibilities are unlimited and execution is very simple.
- Possibility to demonstrate the design to the client before extension
- Perfect gloss
- Same shape for all nails
- Correctly formed stress zone
- Same arch on all nails
Of course, any technology has its pros and cons. Compared to classical technologies, top mold technology is not as versatile.
In particular, there are restrictions on the length and width of the nail (it cannot be greater than the length and width of the upper form).
So, the disadvantages of the upper forms:
- Limitation on the length and width of the nail
- The need for training and purchasing a rotating lamp for gel technology
However, the length of the upper forms is designed in such a way that it is enough even for the most demanding customers. As for the width and shape of the nail, the Formula Profi company is currently working to expand the range of sizes of the upper forms in order to eliminate this drawback.
But at the moment, there are few clients with non-standard nails, and the existing top forms are suitable for work in 90% of cases.
Possibilities of polygel in manicure and nail design
Acrigel combined varnish and acrylic polymers, oligomers and made the manicure service area more diverse. When using acrygel, the master not only lengthens and strengthens the nail plate, but can also eliminate defects and surface injuries.
Polygel nail extensions are carried out if:
- the client suffers from increased brittleness of nails, which also have a trapezoid shape,
- if correction of the nail surface is required.
Technology advantage
- The procedure for nail extensions in this way is very ergonomic. No need to waste time filing off excess gel.
- Saving consumables.
- Nail extensions on top forms allow you to make the end result much more similar in appearance to natural nails.
- Quickly and less traumaticly giving nails the required length.
- Suitable for short and bitten nails and small nail plates.
- Do-it-yourself nail extensions at home without resorting to the services of a professional.